2013 MERCEDES-BENZ CLA-CLASS dimensions
[x] Cancel search: dimensionsPage 8 of 352

BootEmergency release ..........................86
Important safety notes ....................84
Opening/closing (manually from
outside) ............................................ 85
Opening (automatically from out-
side) ................................................. 85
Opening automatically from inside ..85
Boot lid
Display message ............................ 252
Opening dimensions ......................343
Boot load (maximum) ........................ 343
Brake Assist see BAS (Brake Assist System)
Brake fluid
Display message ............................ 233
Notes ............................................. 341
Brake lamps
Adaptive ........................................... 68
Changing bulbs .............................. 118
Display message ............................ 237
Brakes
ABS .................................................. 64
Adaptive Brake Assist ......................66
BAS .................................................. 64
Brake fluid (notes) .........................341
Display message ............................ 227
Driving tips .................................... 166
Important safety notes ..................166
Parking brake ................................ 163
Warning lamp ................................. 256
Breakdown
see Flat tyre
see Towing away/tow-starting
Bulbs
see Changing bulbs
C
Calling up a fault see Display messages
Car
see Vehicle
Care
Automatic car wash .......................288
Carpets .......................................... 294
Display ........................................... 292
Exhaust pipe .................................. 292
Exterior lighting ............................. 291
Gear or selector lever ....................293
High-pressure cleaner .................... 289
Interior ........................................... 292
Matt paintwork .............................. 290
Notes ............................................. 288
Paint .............................................. 289
Plastic trim .................................... 293
Reversing camera ..........................291
Roof lining ...................................... 294
Seat belt ........................................ 294
Seat cover ..................................... 293
Sensors ......................................... 291
Steering wheel ............................... 293
Trim pieces .................................... 293
Washing by hand ........................... 289
Wheels ........................................... 289
Windows ........................................ 290
Wiper blades .................................. 291
Wooden trim .................................. 293
Car wash (care) ................................. 288
Central locking Automatic locking (on-board com-
puter) ............................................. 223
Locking/unlocking (key) ..................77
Centre console
Lower section .................................. 35
Upper section .................................. 34
Changing bulbs
Brake lamps ................................... 118
Cornering light function .................117
Dipped-beam headlamps ...............116
Important safety notes ..................114
Main-beam headlamps ................... 116
Overview of bulb types ..................115
Rear foglamp ................................. 118
Removing/replacing the cover
(front wheel arch) .......................... 116
Reversing lamps ............................ 118
Turn signals (front) ......................... 117
Turn signals (rear) ..........................118
Child-proof locks
Important safety notes ....................62
Rear doors ....................................... 63
Children
In the vehicle ................................... 50
Restraint systems ............................ 506IndexProCarManuals.com
Page 20 of 352
Trailer towing7-pin connector ............................. 206
Blind Spot Assist ............................ 199
Cleaning the trailer tow hitch ......... 292
Coupling up a trailer ......................204
Decoupling a trailer .......................204
Driving tips .................................... 201
Folding in the ball coupling ............205
Folding out the ball coupling ..........203
Important safety notes ..................201
Lights display message ..................237
Mounting dimensions ....................344
Parktronic ...................................... 185
Power supply ................................. 206
Shift range ..................................... 155
Trailer loads ................................... 345
Transmission
see Automatic transmission
see Manual transmission
Transmission position display
(DIRECT SELECT lever) ...................... 153
Transporting the vehicle .................. 311
Trim pieces (cleaning instructions) . 293
Trip computer (on-board computer) 211
Trip meter Calling up ....................................... 211
Resetting (on-board computer) ......212
see Trip meter
Turn signals
Changing bulbs (front) ...................117
Changing bulbs (rear) ....................118
Switching on/off ........................... 109
Two-way radio
Frequencies ................................... 334
Installation ..................................... 334
Transmission output (maximum) .... 334
Type identification plate
see Vehicle identification plate
Tyre pressure
Calling up (on-board computer) .....322
Display message ............................ 248
Not reached (TIREFIT) ....................301
Reached (TIREFIT) ..........................301
Recommended ............................... 319
Tyre pressure loss warning
Important safety notes ..................321
Restarting ...................................... 321Tyre pressure monitor
Checking the tyre pressure elec-
tronically ........................................ 323
Function/notes ............................. 322
Restarting ...................................... 324
Warning lamp ................................. 265
Warning message .......................... 323
Tyres
Changing a wheel .......................... 324
Checking ........................................ 317
Direction of rotation ......................325
Display message ............................ 248
Important safety notes ..................316
M+S tyres ...................................... 318
MOExtended tyres .........................318
Replacing ....................................... 324
Service life ..................................... 317
Storing ........................................... 325
Summer tyres ........................ 168, 318
Tyre size (data) .............................. 329
Tyre tread ...................................... 317
see Flat tyre
U
Unlocking Emergency unlocking .......................83
From inside the vehicle (central
unlocking button) ............................. 82
V
Vanity mirror (in sun visor) .............. 275
Variable SPEEDTRONIC see SPEEDTRONIC
Vehicle
Correct use ...................................... 24
Data acquisition ............................... 25
Electronics ..................................... 334
Equipment ....................................... 22
Implied warranty .............................. 24
Individual settings ..........................219
Leaving parked up .........................164
Locking (in an emergency) ...............84
Locking (key) ................................... 77
Lowering ........................................ 328
Pulling away ................................... 146
Raising ........................................... 326
Registration ..................................... 24
18IndexProCarManuals.com
Page 21 of 352
Securing from rolling away ............326
Towing away .................................. 308
Tow-starting ................................... 308
Transporting .................................. 311
Unlocking (in an emergency) ...........83
Unlocking (key) ................................ 77
Vehicle data ................................... 343
Vehicle data ....................................... 343
Vehicle dimensions ........................... 343
Vehicle emergency locking ................ 84
Vehicle identification number see VIN
Vehicle identification plate .............. 336
Vehicle maintenance see ASSYST PLUS
Vehicle tool kit .................................. 297
Vehicle weights ................................. 343
Video (DVD) ........................................ 215
Video DVD (on-board computer) ...... 215
VIN ...................................................... 336
W
Warning and indicator lamps ABS ................................................ 256
Brakes ........................................... 256
Distance warning signal .................264
ESP ®
.............................................. 258
ESP ®
OFF ....................................... 259
Fuel tank ........................................ 262
LIM (cruise control) ........................ 169
LIM (DISTRONIC PLUS) ..................174
LIM (variable SPEEDTRONIC) .........171
Overview .......................................... 32
PASSENGER AIRBAG OFF ................53
Reserve fuel ................................... 262
Seat belt ........................................ 255
SRS ................................................ 261
Tyre pressure monitor ...................265
Warning triangle ................................ 296
Washer fluid Display message ............................ 254
Wheel bolt tightening torque ........... 328
Wheel chock ...................................... 326
Wheels Changing/replacing .......................324
Changing a wheel .......................... 324
Checking ........................................ 317
Cleaning ......................................... 289
Cleaning (warning) .........................325
Emergency spare wheel .................331
Fitting a new wheel ........................328
Fitting a wheel ............................... 325
Important safety notes ..................316
Removing a wheel ..........................328
Storing ........................................... 325
Tightening torque ........................... 328
Wheel size/tyre size ......................329
Windowbag
Display message ............................ 236
Operation ......................................... 45
Windows
Cleaning ......................................... 290
see Side windows
Windscreen
Demisting ...................................... 132
see Windscreen
Windscreen washer fluid
see Windscreen washer system
Windscreen washer system
Notes ............................................. 342
Topping up ..................................... 286
Windscreen wipers
Display message ............................ 254
Problem (malfunction) ...................121
Replacing the wiper blades ............119
Switching on/off ........................... 118
Winter driving
General notes ................................ 318
Winter operation
Slippery road surfaces ...................168
Snow chains .................................. 319
Winter tyres
Limiting the speed (on-board com-
puter) ............................................. 223
M+S tyres ...................................... 318
Wiper blades
Cleaning ......................................... 291
Important safety notes ..................119
Replacing (windscreen) ..................119
Wooden trim (cleaning instructions) 293
Workshop see Qualified specialist workshop Index19ProCarManuals.com
Page 87 of 352
leave persons (particularly children) unatten-
ded in the vehicle.
! The boot lid swings upwards when
opened. Therefore, make sure that there is
sufficient clearance above the boot lid.
i The opening dimensions of the boot lid
can be found in the "Vehicle data" section
( Y page 343).
Stow luggage or loads preferably in the boot.
Observe the loading guidelines
( Y page 268).
Do not leave the key in the boot. You could
otherwise lock yourself out.
The boot lid can be:
R opened and closed manually from outside
R unlocked from the inside with the emer-
gency key element
Opening and closing manually from
outside
Opening
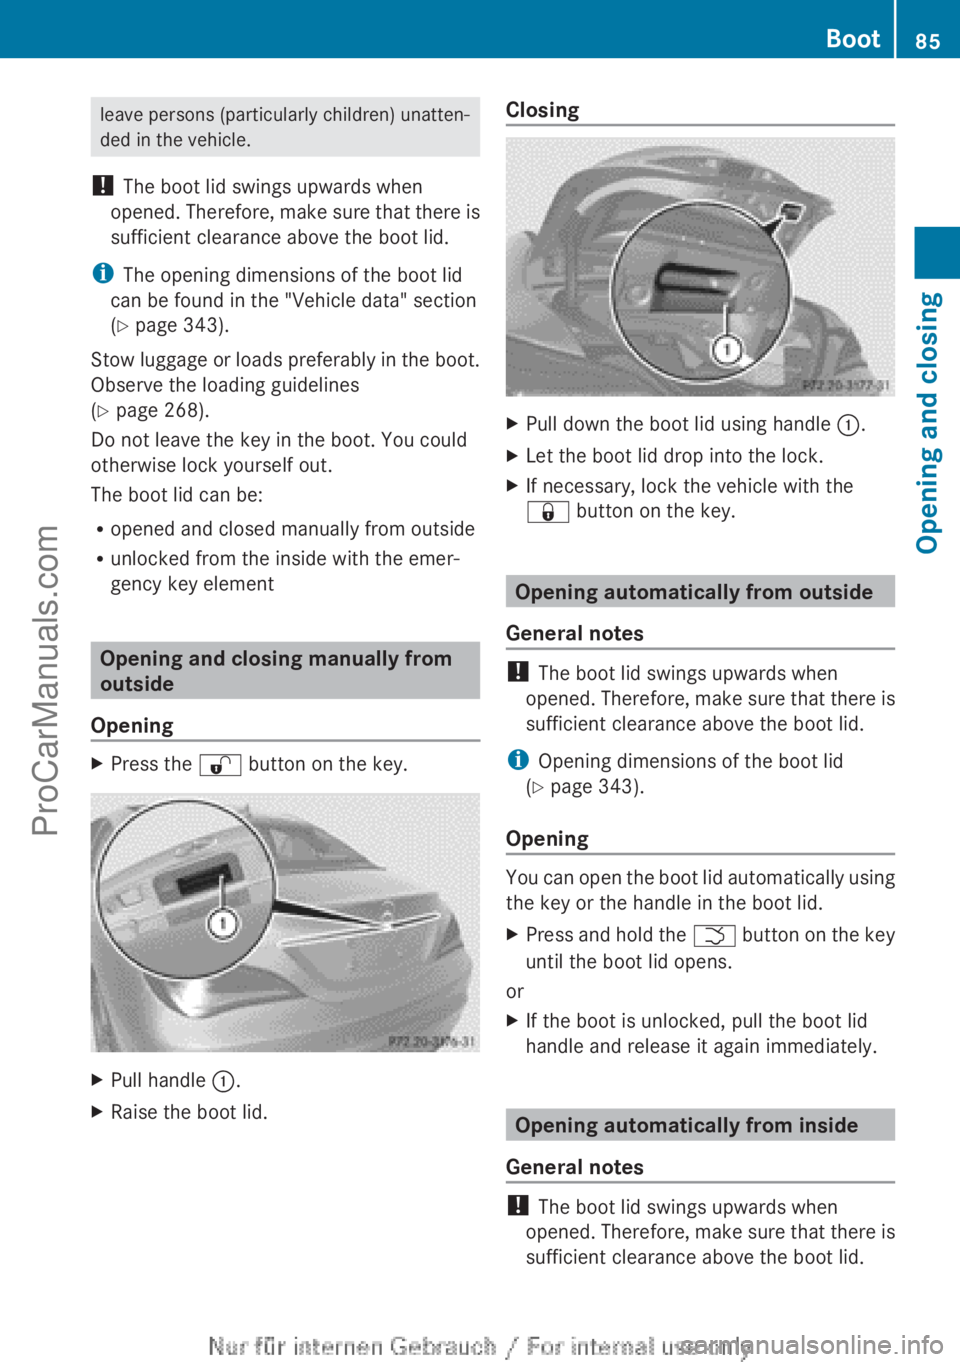
XPress the % button on the key.XPull handle :.XRaise the boot lid.ClosingXPull down the boot lid using handle :.XLet the boot lid drop into the lock.XIf necessary, lock the vehicle with the
& button on the key.
Opening automatically from outside
General notes
! The boot lid swings upwards when
opened. Therefore, make sure that there is
sufficient clearance above the boot lid.
i Opening dimensions of the boot lid
( Y page 343).
Opening
You can open the boot lid automatically using
the key or the handle in the boot lid.
XPress and hold the F button on the key
until the boot lid opens.
or
XIf the boot is unlocked, pull the boot lid
handle and release it again immediately.
Opening automatically from inside
General notes
! The boot lid swings upwards when
opened. Therefore, make sure that there is
sufficient clearance above the boot lid.
Boot85Opening and closingZProCarManuals.com
Page 88 of 352
iOpening dimensions of the boot lid
( Y page 343).
Opening
You can open the boot lid from the driver's
seat when the vehicle is stationary and
unlocked.
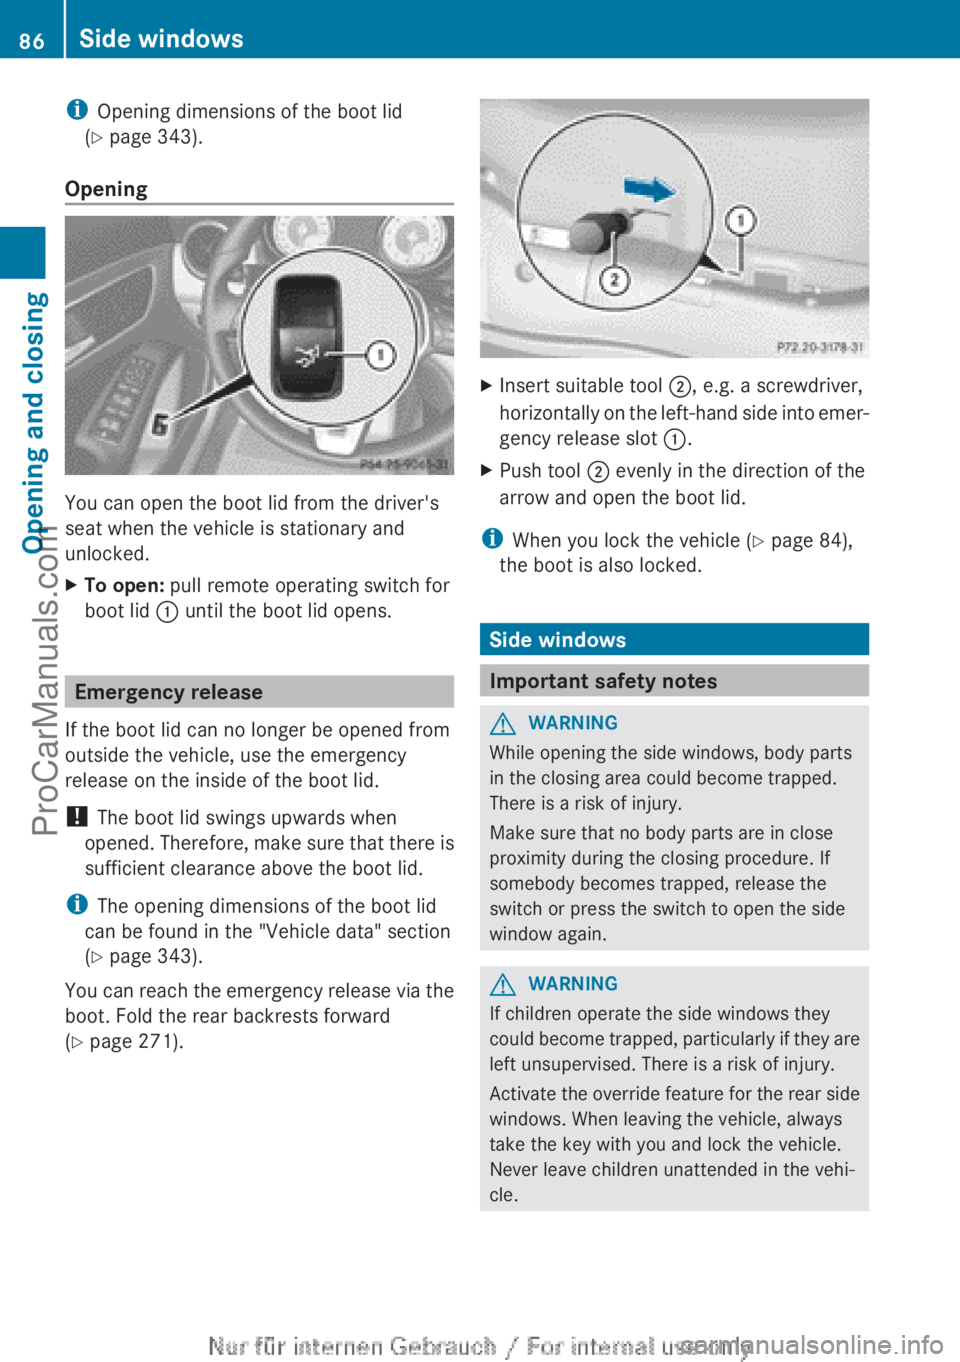
XTo open: pull remote operating switch for
boot lid : until the boot lid opens.
Emergency release
If the boot lid can no longer be opened from
outside the vehicle, use the emergency
release on the inside of the boot lid.
! The boot lid swings upwards when
opened. Therefore, make sure that there is
sufficient clearance above the boot lid.
i The opening dimensions of the boot lid
can be found in the "Vehicle data" section
( Y page 343).
You can reach the emergency release via the
boot. Fold the rear backrests forward
( Y page 271).
XInsert suitable tool ;, e.g. a screwdriver,
horizontally on the left-hand side into emer-
gency release slot :.XPush tool ; evenly in the direction of the
arrow and open the boot lid.
i When you lock the vehicle ( Y page 84),
the boot is also locked.
Side windows
Important safety notes
GWARNING
While opening the side windows, body parts
in the closing area could become trapped.
There is a risk of injury.
Make sure that no body parts are in close
proximity during the closing procedure. If
somebody becomes trapped, release the
switch or press the switch to open the side
window again.
GWARNING
If children operate the side windows they
could become trapped, particularly if they are
left unsupervised. There is a risk of injury.
Activate the override feature for the rear side
windows. When leaving the vehicle, always
take the key with you and lock the vehicle.
Never leave children unattended in the vehi-
cle.
86Side windowsOpening and closing
ProCarManuals.com
Page 204 of 352

To avoid hazardous situations:
R make sure to check the noseweight before
each journey.
R use a drawbar noseweight as close as pos-
sible to the maximum noseweight.
R do not exceed the maximum permissible
noseweight.
R do not use a noseweight lower than the
minimum permissible trailer drawbar nose-
weight.
You can use carrier systems, e.g. bicycle
racks or load-bearing implements, on the ball
coupling. The maximum noseweight of
75 kg applies when using carrier systems on
the ball coupling.
When reversing the vehicle towards the
trailer, make sure there is nobody between
the trailer and the vehicle.
Couple and uncouple the trailer carefully. If
you do not couple the trailer to the towing
vehicle correctly, the trailer could become
detached.
Make sure that the following values are not
exceeded:
R the permissible trailer drawbar noseweight
R the permissible trailer load
R the permissible rear axle load of the towing
vehicle
R the maximum permissible gross vehicle
weight of both the towing vehicle and the
trailer
The applicable permissible values, which
must not be exceeded, can be found:
R in your vehicle documents
R on the identification plates of the trailer tow
hitch and the trailer
R on the vehicle identification plate
If the values differ, the lowest value applies.
You will find the values approved by the man-
ufacturer on the vehicle identification plates
and those for the towing vehicle in the "Tech-
nical data" section.When towing a trailer, your vehicle's handling
characteristics will be different in comparison
to when driving without a trailer.
The vehicle/trailer combination:
R is heavier
R is restricted in its acceleration and gradi-
ent-climbing capability
R has an increased braking distance
R is affected more by strong crosswinds
R demands more sensitive steering
R has a larger turning circle
This can impair the vehicle's handling char-
acteristics. Adapt your style of driving accord-
ingly. Maintain a safe distance. Drive care-
fully.
When towing a trailer, always adjust your
speed to the current road and weather con-
ditions. Do not exceed the maximum permis-
sible speed for your vehicle/trailer combina-
tion.
General notes
! Use a drawbar noseweight as close as
possible to the maximum permissible nose-
weight. Do not use a noseweight of less
than 50 kg, otherwise the trailer may come
loose.
Note that the payload and the rear axle load
are reduced by the actual payload.
XWhen towing a trailer, set the tyre pressure
on the rear axle of the towing vehicle for a
maximum load; see the tyre pressure table
in the fuel filler flap ( Y page 319).
You will find fitting dimensions and loads in
the "Technical data" section ( Y page 344).
The actual noseweight may not though be
higher than the value which is given:
R on the type plate of the trailer tow hitch and
R on the type plate of the trailer
The lowest weight applies.
Please note that when towing a trailer, PARK-
TRONIC ( Y page 182) and Blind Spot Assist
202Towing a trailerDriving and parking
ProCarManuals.com
Page 318 of 352
Useful information
i This Owner's Manual describes all mod-
els, series and optional equipment for your
vehicle that were available at the time of
going to press. National variations are pos-
sible. Note that your vehicle may not be
equipped with all of the functions descri-
bed. This is also the case for systems and
functions relevant to safety.
i Read the information on qualified special-
ist workshops: ( Y page 24).
Important safety notes
GWARNING
If wheels and tyres of the wrong size are used,
the wheel brakes or suspension components
may be damaged. There is a risk of an acci-
dent.
Always replace wheels and tyres with those
that fulfil the specifications of the original
part.
When replacing wheels, make sure to fit the
correct:
R designation
R type
When replacing tyres, make sure to fit the
correct:
R designation
R manufacturer
R type
GWARNING
A flat tyre severely impairs the driving, steer-
ing and braking characteristics of the vehicle.
There is a risk of accident.
Tyres without run-flat characteristics:
R do not drive with a flat tyre.
R immediately replace the flat tyre with your
emergency spare wheel or spare wheel, or
consult a qualified specialist workshop.
Tyres with run-flat characteristics:
R pay attention to the information and warn-
ing notices on MOExtended tyres (tyres
with run-flat characteristics).
Accessories that are not approved for your
vehicle by Mercedes-Benz or that are not
being used correctly can impair operating
safety.
Before purchasing and using non-approved
accessories, visit a qualified specialist work-
shop and enquire about:
R suitability
R legal stipulations
R factory recommendations
Information on dimensions and types of
wheels and tyres for your vehicle can be
found ( Y page 329).
Information on air pressure for the tyres on
your vehicle can be found:
R on the tyre pressure label on the fuel filler
flap
R under "Tyre pressure"
Modification work on the brake system and
wheels is not permitted. The use of wheel
spacers or brake dust shields is not permit-
ted. This invalidates the general operating
permit for the vehicle.
i Further information on wheels and tyres
can be obtained at any qualified specialist
workshop.
Operation
Information on driving
R Check the tyre pressures when the vehicle
is heavily laden and, if necessary, adjust.
R While driving, pay attention to vibrations,
noises and unusual handling characteris-
tics, e.g. pulling to one side. This may indi-
cate that the wheels or tyres are damaged.
If you suspect that a tyre is defective,
reduce your speed immediately. Stop the
vehicle as soon as possible to check the
316OperationWheels and tyres
ProCarManuals.com
Page 326 of 352
Restarting the tyre pressure monitor
When you restart the tyre pressure monitor,
all existing warning messages are deleted and
the warning lamps go out. The monitor uses
the currently set tyre pressures as the refer-
ence values for monitoring. In most cases, the
tyre pressure monitor will automatically
detect the new reference values after you
have changed the tyre pressure. However,
you can also define reference values man-
ually as described here. The tyre pressure
monitor then monitors the new tyre pressure
values.
XUse the table on the inside of the fuel filler
flap to ensure that the tyre pressure is set
correctly in all four tyres for the current
operating conditions.
Also observe the notes in the section on
tyre pressures ( Y page 319).XMake sure that the key is in position 2 in
the ignition lock.XPress the = or ; button on the steer-
ing wheel to select the Service menu.XPress the 9 or : button to select
Tyre pressure .XPress the a button.
The multifunction display shows the cur-
rent tyre pressure for the individual tyres or
the Tyre pressures will be dis‐
played after a few minutes of driv‐
ing message.XPress the : button.
The Use current pressures as new
reference values message appears in
the multifunction display.
If you wish to confirm the restart:
XPress the a button.
The Tyre press. monitor restarted
message appears in the multifunction dis-
play.
After you have driven for a few minutes, the
system checks whether the current tyre
pressures are within the specified range.The new tyre pressures are then accepted
as reference values and monitored.
If you wish to cancel the restart:
XPress the % button.
The tyre pressure values stored at the last
restart will continue to be monitored.
Changing a wheel
Flat tyre
You can find information on what to do in the
event of flat tyre in the "Flat tyre" section
( Y page 298). Information on driving with
MOExtended tyres in the event of a flat tyre
can be found under "Breakdown assistance"
( Y page 298).
Vehicles with an emergency spare
wheel: in the event of a flat tyre, the emer-
gency spare wheel is fitted according to the
description under "Fitting a wheel"
( Y page 325).
Interchanging the wheels
GWARNING
Interchanging the front and rear wheels may
severely impair the driving characteristics if
the wheels or tyres have different dimensions.
The wheel brakes or suspension components
may also be damaged. There is a risk of acci-
dent.
Interchange front and rear wheels only if the
wheels and tyres are of the same dimensions.
! On vehicles fitted with a tyre pressure
monitor, electronic components are loca-
ted in the wheel.
Tyre-fitting tools should not be applied in
the area of the valve, as this could damage
the electronic components.
Only have tyres changed at a qualified spe-
cialist workshop.
324Changing a wheelWheels and tyres
ProCarManuals.com