Page 108 of 336
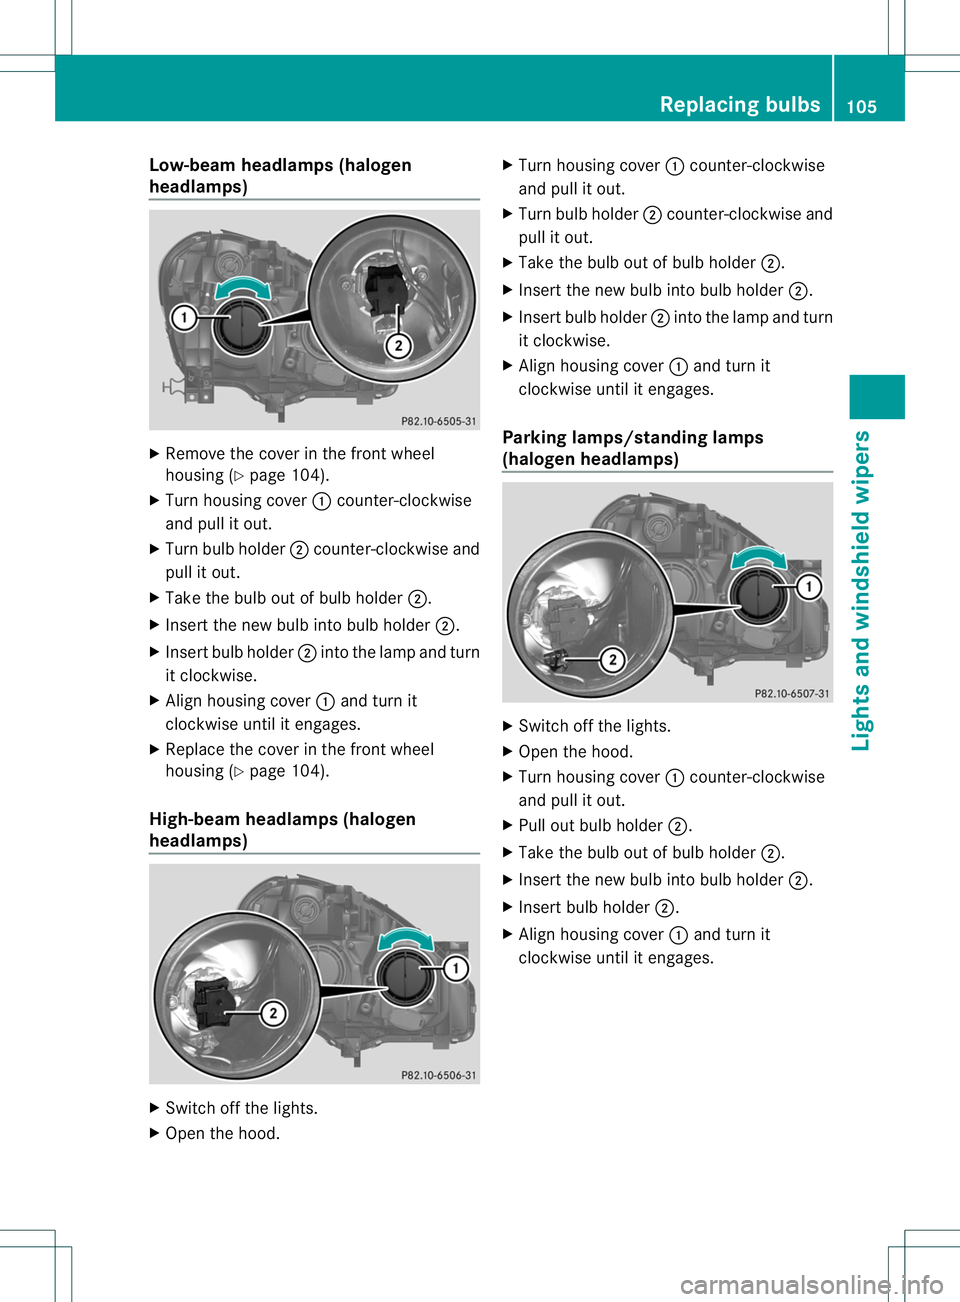
Low-bea
mheadlamps (halogen
headlamps) X
Remove the cover in the front wheel
housing (Y page 104).
X Turn housing cover :counter-clockwise
and pull it out.
X Turn bulb holder ;counter-clockwise and
pull it out.
X Take the bulb out of bulb holder ;.
X Inser tthe new bulb into bulb holder ;.
X Insert bulb holder ;into the lamp and turn
it clockwise.
X Align housing cover :and turn it
clockwise until it engages.
X Replace the cover in the front wheel
housing (Y page 104).
High-beam headlamps (halogen
headlamps) X
Switch off the lights.
X Open the hood. X
Turn housing cover :counter-clockwise
and pull it out.
X Turn bulb holder ;counter-clockwise and
pull it out.
X Take the bulb out of bulb holder ;.
X Insert the new bulb into bulb holder ;.
X Insert bulb holder ;into the lamp and turn
it clockwise.
X Align housing cover :and turn it
clockwise until it engages.
Parking lamps/standing lamps
(halogen headlamps) X
Switch off the lights.
X Open the hood.
X Turn housing cover :counter-clockwise
and pull it out.
X Pull out bulb holder ;.
X Take the bulb out of bulb holder ;.
X Insert the new bulb into bulb holder ;.
X Insert bulb holder ;.
X Align housing cover :and turn it
clockwise until it engages. Replacing bulbs
105Lights and windshield wipers Z
Page 109 of 336
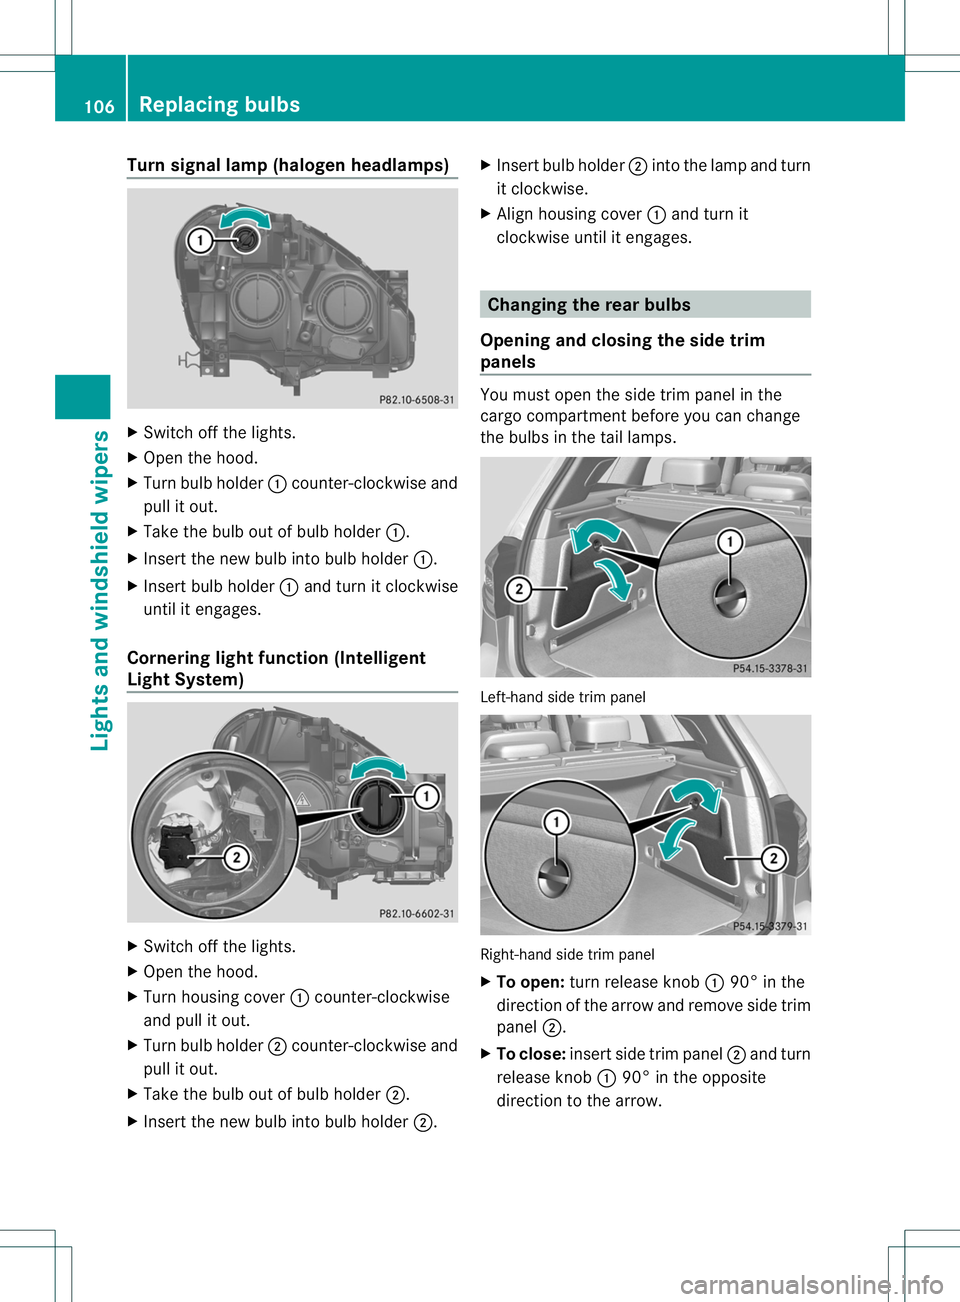
Turn signal lamp (halogen headlamps)
X
Switch off the lights.
X Open the hood.
X Turn bulb holder :counter-clockwise and
pull it out.
X Take the bulb ou tofbulb holder :.
X Inser tthe new bulb into bulb holder :.
X Insert bulb holder :and turn it clockwise
until it engages.
Cornering light function (Intelligent
Light System) X
Switch off the lights.
X Open the hood.
X Turn housing cover :counter-clockwise
and pull it out.
X Turn bulb holder ;counter-clockwise and
pull it out.
X Take the bulb out of bulb holder ;.
X Insert the new bulb into bulb holder ;.X
Insert bulb holder ;into the lamp and turn
it clockwise.
X Align housing cover :and turn it
clockwise until it engages. Changing the rear bulbs
Opening and closing the side trim
panels You must open the side trim panel in the
cargo compartment before you can change
the bulbs in the tail lamps.
Left-hand side trim panel
Right-hand side trim panel
X
To open: turn release knob :90° in the
direction of the arrow and remove side trim
panel ;.
X To close: insert side trim panel ;and turn
release knob :90° in the opposite
direction to the arrow. 106
Replacing bulbsLights and windshield wipers
Page 110 of 336
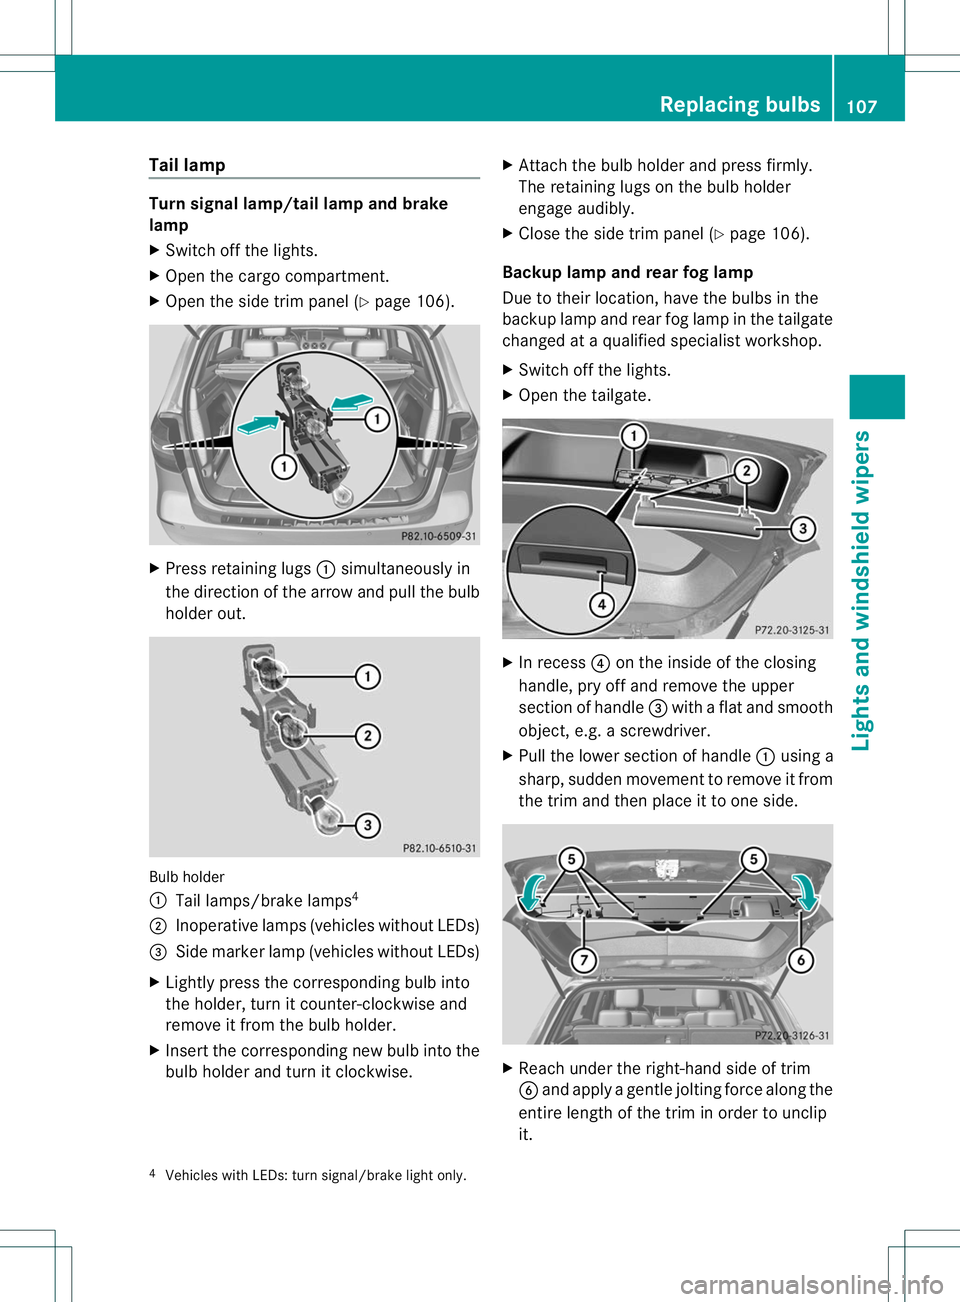
Tail lamp
Turn signal lamp/tail lamp and brake
lamp
X
Switch off the lights.
X Open the cargo compartment.
X Open the side trim panel (Y page 106).X
Press retaining lugs :simultaneously in
the direction of the arrow and pull the bulb
holde rout. Bulb holder
:
Tail lamps/brake lamps 4
; Inoperative lamps (vehicles without LEDs)
= Side marke rlamp (vehicle swithout LEDs)
X Lightly press the corresponding bulb into
the holder, tur nitcounter-clockwise and
remove it from the bulb holder.
X Insert the corresponding new bulb into the
bulb holder and turn it clockwise. X
Attach the bulb holder and press firmly.
The retaining lugs on the bulb holder
engage audibly.
X Close the side trim panel (Y page 106).
Backup lamp and rear fog lamp
Due to their location, have the bulbs in the
backup lamp and rear fog lamp in the tailgate
changed at a qualified specialist workshop.
X Switch off the lights.
X Open the tailgate. X
In recess ?on the inside of the closing
handle, pry off and remove the upper
section of handle =with a flat and smooth
object, e.g. a screwdriver.
X Pull the lower section of handle :using a
sharp, sudden movementtor emove it from
the trim and then place it to one side. X
Reach under the right-hand side of trim
B and apply a gentle jolting force along the
entire length of the trim in order to unclip
it.
4 Vehicles with LEDs: turn signal/brake light only. Replacing bulbs
107Lights and windshield wipers Z
Page 111 of 336
X
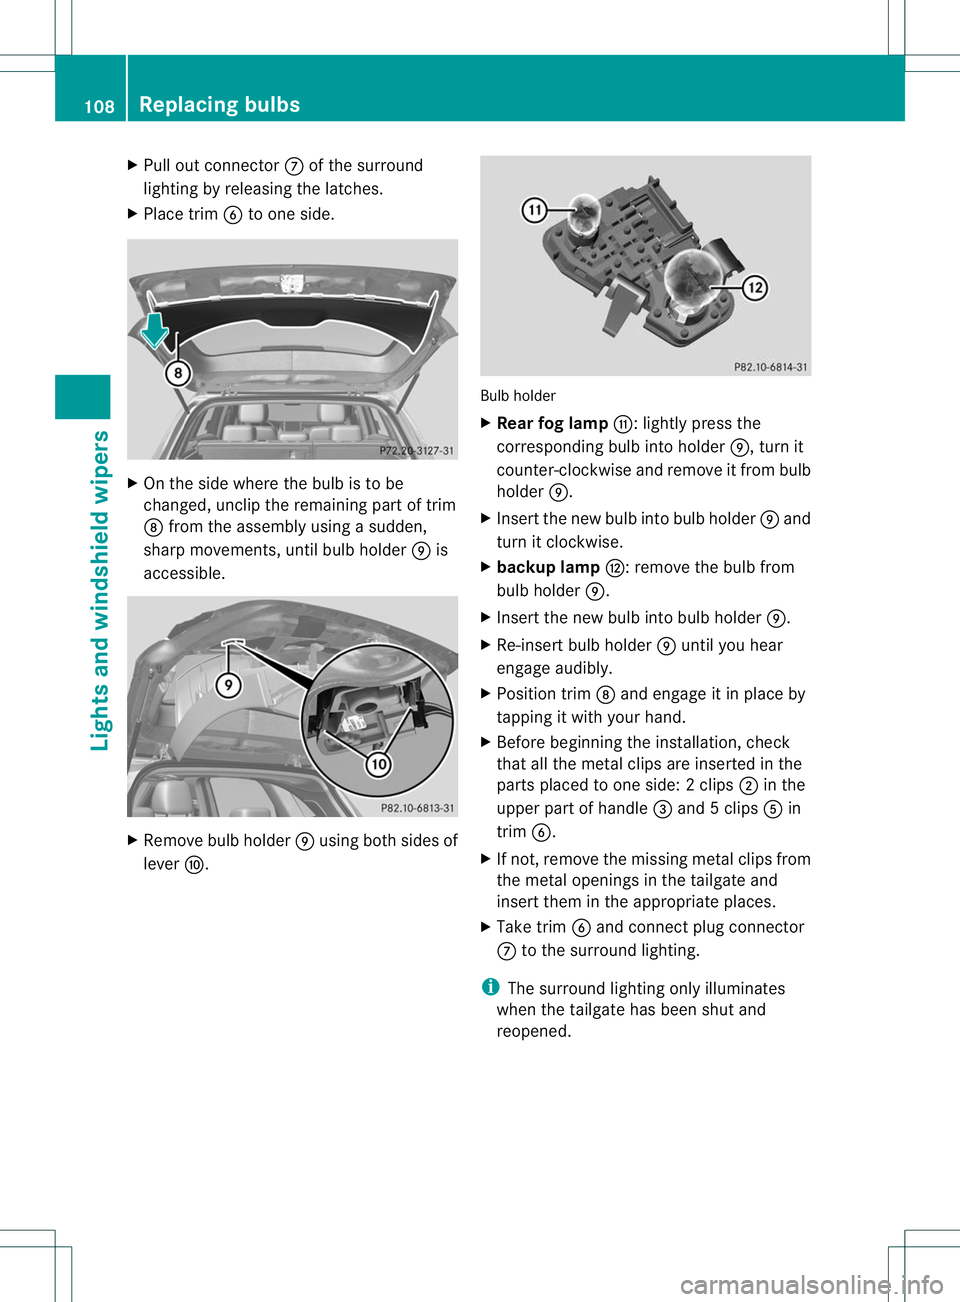
Pull out connector Cof the surround
lighting by releasing the latches.
X Place trim Bto one side. X
On the side where the bulb is to be
changed, unclip the remaining part of trim
D from the assembly using a sudden,
sharp movements, until bulb holder Eis
accessible. X
Remove bulb holder Eusing both sides of
lever F. Bulb holder
X
Rear fog lamp G:lightly press the
corresponding bulb into holder E, turn it
counter-clockwise and remove it fromb ulb
holder E.
X Inser tthe new bulb into bulb holder Eand
turn it clockwise.
X backup lamp H: remove the bulb from
bulb holder E.
X Insert the new bulb into bulb holder E.
X Re-insert bulb holder Euntil you hear
engage audibly.
X Position trim Dand engage it in place by
tapping it with your hand.
X Before beginning the installation, check
that all the metal clips are inserted in the
parts placed to one side: 2clips ;in the
upper part of handle =and 5clips Ain
trim B.
X If not, remove the missing metal clips from
the metal openings in the tailgate and
insert the minthe appropriate places.
X Take trim Band connect plug connector
C to the surround lighting.
i The surround lighting only illuminates
when the tailgate has been shut and
reopened. 108
Replacing bulbsLights and windshield wipers
Page 112 of 336
X
Position trim Band engage it in place by
tapping it with your hand, starting from the
outside.
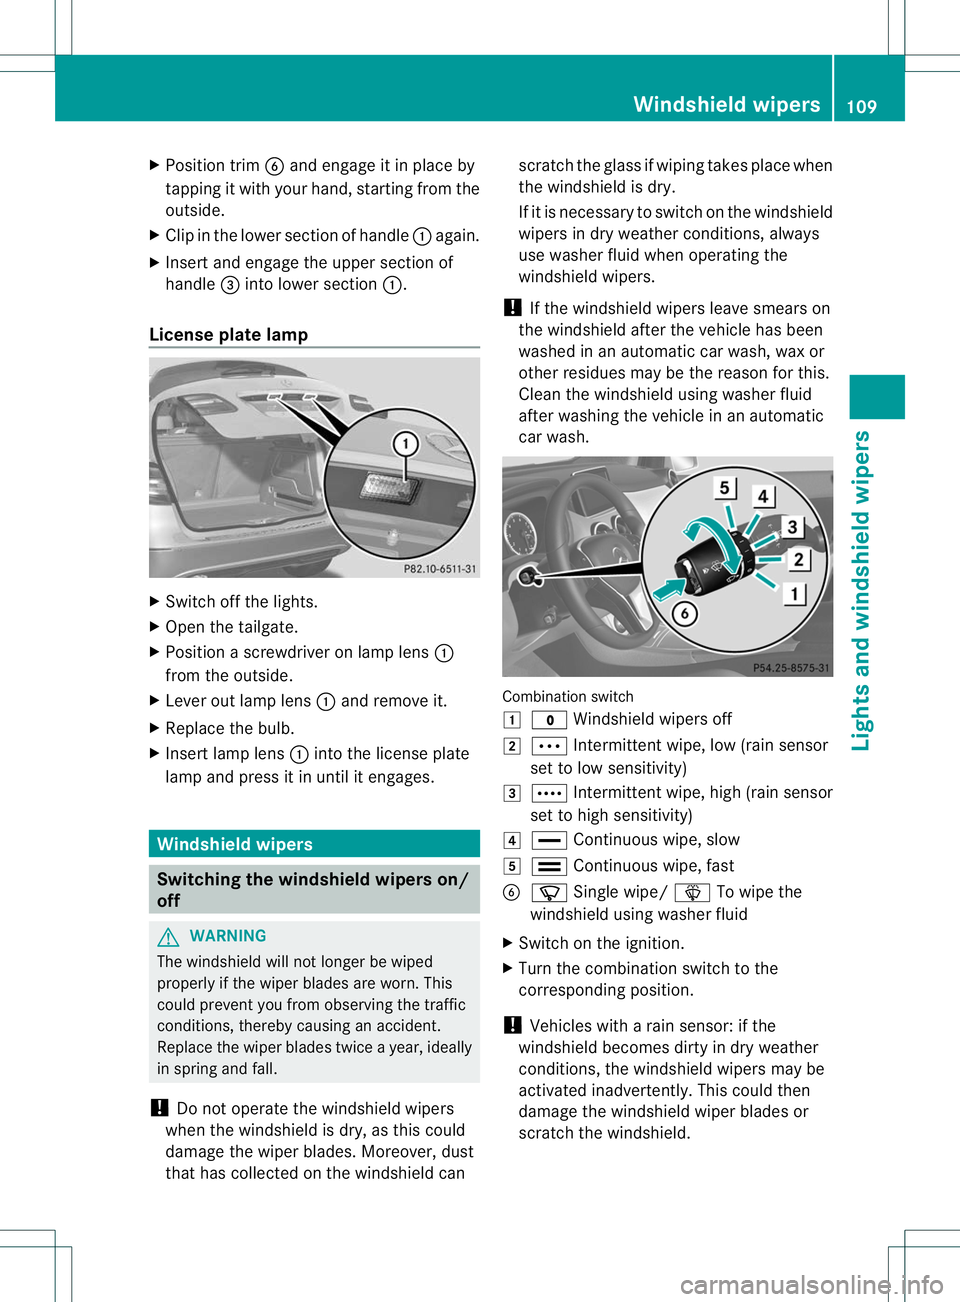
X Clip in the lower section of handle :again.
X Inser tand engage the uppe rsection of
handle =into lower section :.
License plate lamp X
Switch off the lights.
X Open the tailgate.
X Position a screwdriver on lamp lens :
from the outside.
X Lever out lamp lens :and remove it.
X Replace the bulb.
X Inser tlamp lens :into the license plate
lamp and press it in until it engages. Windshield wipers
Switching the windshield wipers on/
off
G
WARNING
The windshield will notl onger be wiped
properly if the wiper blades are worn. This
could prevent you from observing the traffic
conditions, thereby causing an accident.
Replace the wiper blades twice a year, ideally
in spring and fall.
! Do not operate the windshield wipers
when the windshield is dry, as this could
damage the wiper blades. Moreover, dust
that has collected on the windshield can scratch the glass if wiping takes place when
the windshield is dry.
If it is necessary to switch on the windshield
wipers in dry weather conditions, always
use washer fluid when operating the
windshield wipers.
! If the windshield wipers leave smears on
the windshield after the vehicle has been
washed in an automatic car wash, wax or
other residues may be the reason for this.
Clean the windshield using washer fluid
after washing the vehicle in an automatic
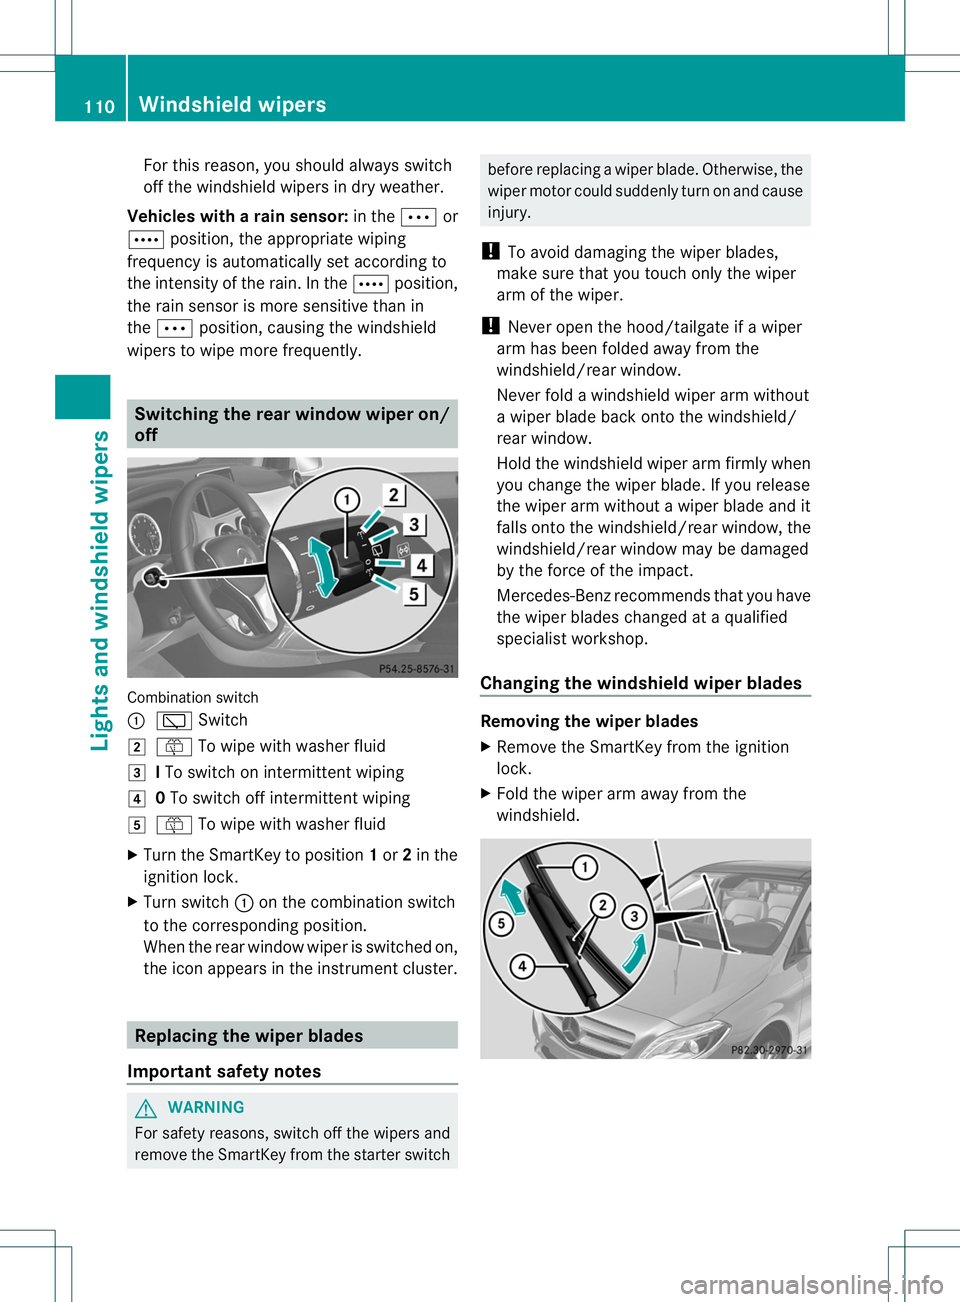
car wash. Combination switch
1
$ Windshield wipers off
2 Ä Intermittent wipe, low (rain sensor
set to low sensitivity)
3 Å Intermittent wipe, high (rain sensor
set to high sensitivity)
4 ° Continuous wipe, slow
5 ¯ Continuous wipe, fast
B í Single wipe/ îTo wipe the
windshield using washer fluid
X Switch on the ignition.
X Turn the combination switch to the
corresponding position.
! Vehicles with a rain sensor: if the
windshield becomes dirty in dry weather
conditions, the windshield wipers may be
activated inadvertently. This could then
damage the windshield wiper blades or
scratch the windshield. Windshield wipers
109Lights and windshiel dwipers Z
Page 113 of 336
For this reason, you shoul
dalways switch
off the windshield wipers in dry weather.
Vehicles with arain sensor: in theÄor
Å position, the appropriate wiping
frequency is automatically set according to
the intensity of the rain. In the Åposition,
the rains ensor is more sensitive than in
the Ä position, causing the windshield
wipers to wipe more frequently. Switching the rear window wiper on/
off
Combination switch
:
è Switch
2 ô To wipe with washer fluid
3 ITo switch on intermittent wiping
4 0To switch off intermittent wiping
5 ô To wipe with washer fluid
X Turn the SmartKey to position 1or 2in the
ignition lock.
X Turn switch :on the combination switch
to the corresponding position.
When the rear window wiper is switched on,
the icon appears in the instrument cluster. Replacing the wiper blades
Important safety notes G
WARNING
For safety reasons, switch off the wipers and
remove the SmartKey from the starter switch before replacing a wiper blade. Otherwise, the
wiper motor could suddenly turn on and cause
injury.
! To avoid damaging the wiper blades,
make sure that you touch only the wiper
arm of the wiper.
! Never open the hood/tailgate if a wiper
arm has been folded away from the
windshield/rear window.
Never fold a windshield wiper arm without
a wiper blade back onto the windshield/
rear window.
Hold the windshield wiper arm firmly when
you change the wiper blade. If you release
the wiper arm without a wiper blade and it
falls onto the windshield/rear window, the
windshield/rear window may be damaged
by the force of the impact.
Mercedes-Benzr ecommends that you have
the wiper blades changed at aqualified
specialist workshop.
Changing the windshield wiper blades Removing the wiper blades
X
Remove the SmartKey from the ignition
lock.
X Fold the wiper arm away from the
windshield. 110
Windshiel
dwipersLights and windshield wipers
Page 114 of 336
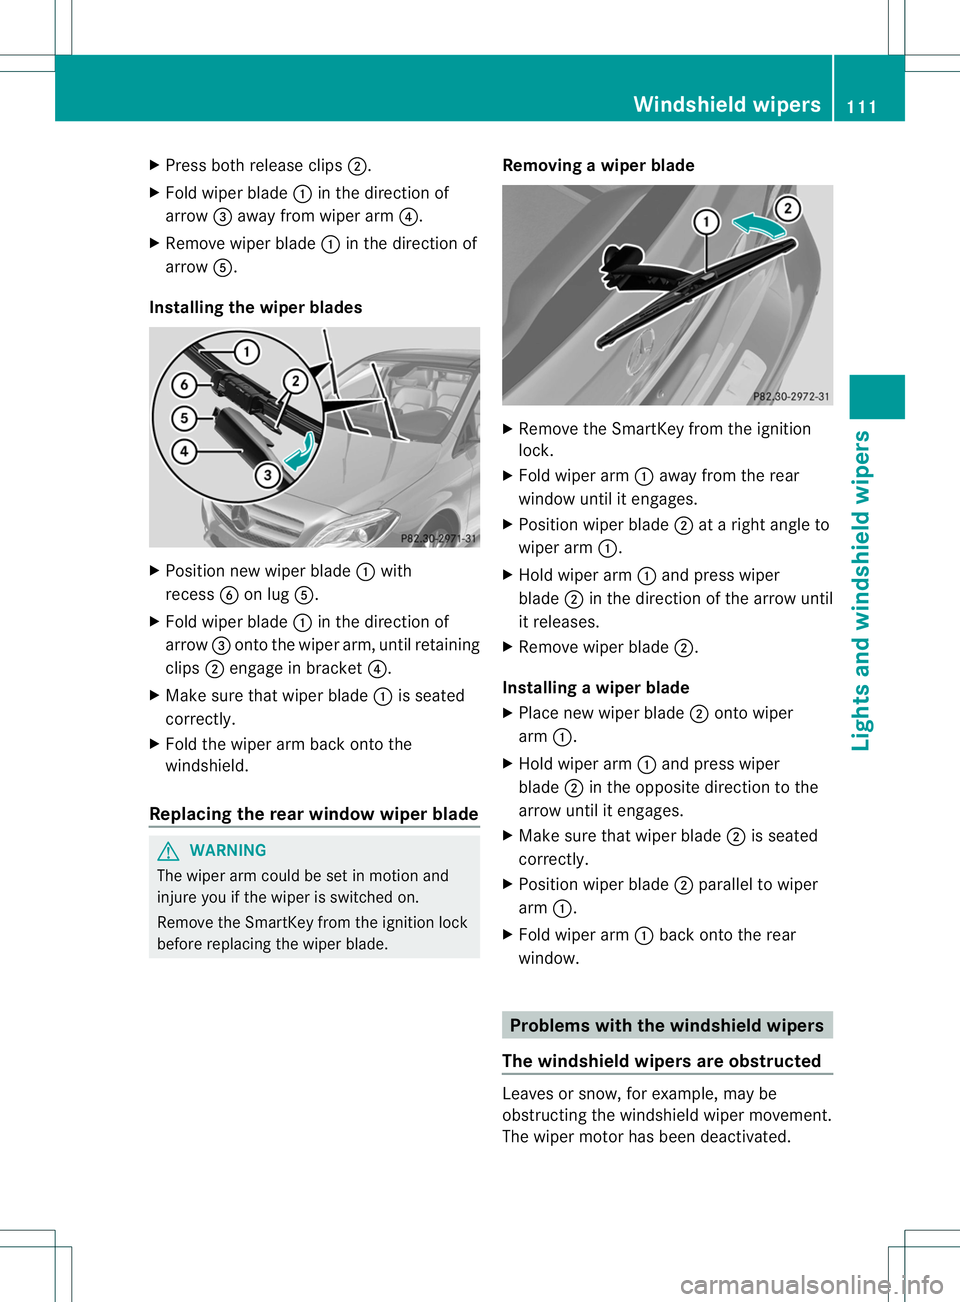
X
Press both release clips ;.
X Fold wiper blade :in the direction of
arrow =away from wiper arm ?.
X Remove wiper blade :in the direction of
arrow A.
Installing the wiper blades X
Position new wiper blade :with
recess Bon lug A.
X Fold wiper blade :in the direction of
arrow =onto the wiper arm, until retaining
clips ;engage in bracket ?.
X Make sure that wiper blade :is seated
correctly.
X Fold the wiper arm back onto the
windshield.
Replacing the rear window wiper blade G
WARNING
The wiper arm could be set in motion and
injure you if the wiper is switched on.
Remove the SmartKey from the ignition lock
before replacing the wiper blade. Removing
awiper blade X
Remove the SmartKey from the ignition
lock.
X Fold wiper arm :away from the rear
window until it engages.
X Position wiper blade ;at a right angle to
wiper arm :.
X Hold wiper arm :and press wiper
blade ;in the direction of the arrow until
it releases.
X Remove wiper blade ;.
Installing awiper blade
X Place new wiper blade ;onto wiper
arm :.
X Hold wiper arm :and press wiper
blade ;in the opposite direction to the
arrow until it engages.
X Make sure that wiper blade ;is seated
correctly.
X Position wiper blade ;parallel to wiper
arm :.
X Fold wiper arm :back onto the rear
window. Problems with the windshield wipers
The windshield wipers are obstructed Leaves or snow, for example, may be
obstructing the windshield wiper movement.
The wiper motor has been deactivated. Windshield wipers
111Lights and windshield wipers Z
Page 115 of 336
X
For safety reasons, yous hould remove the
SmartKey from the ignition lock.
X Remove the cause of the obstruction.
X Switch the windshield wipers back on.
The windshield wipers are inoperative The windshield wiper drive is malfunctioning.
X
Select another wiper speed on the
combination switch.
X Have the windshield wipers checked at a
qualified specialist workshop.
The spray nozzles are misaligned The windshield washer fluid from the spray
nozzles no longer hits the center of the
windshield. The spray nozzles are misaligned.
X
Have the spray nozzles adjusted at a
qualified specialist workshop. 112
Windshield wipersLights and windshield wipers