2013 MERCEDES-BENZ B-CLASS SPORTS height
[x] Cancel search: heightPage 89 of 336
!
To avoid damage to the seats and the seat
heating, observe the following information:
R keep liquids from spilling on the seats. If
liquid is spilled on the seats, dry them as
soon as possible.
R if the seat covers are damp or wet, do not
switch on the seat heating. The seat
heating should also not be used to dry
the seats.
R clean the seat covers as recommended;
see the "Interior care" section.
R do not transport heavy loads on the
seats. Do not place sharp objects on the
seat cushions, e.g. knives, nails or tools.
The seats should only be occupied by
passengers, if possible.
R when the seat heating is in operation, do
not cover the seats with insulating
materials, e.g. blankets, coats, bags,
seat covers, child seats or booster seats.
! Make sure that there are no objects in the
footwell or behind the seats when resetting
the seats. There is a risk that the seats
and/or the objects could be damaged.
i The head restraints in the front and rear
seats can be removed.
For more information, contact a qualified
specialist workshop.
i Further related subjects:
R cargo compartment enlargement
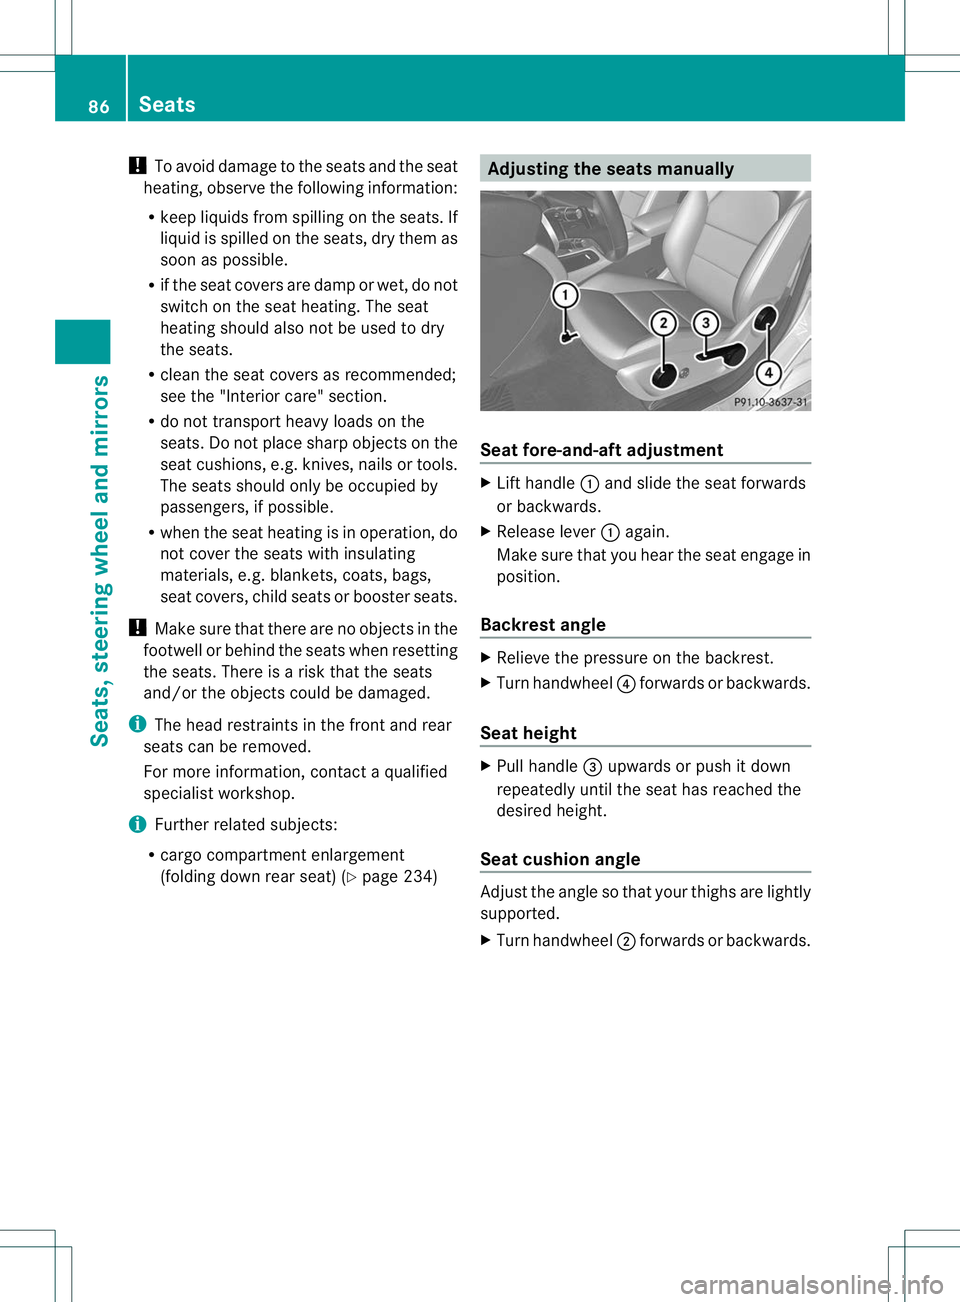
(folding down rear seat) (Y page 234) Adjusting the seats manually
Seat fore-and-aft adjustment
X
Lift handle :and slide the seat forwards
or backwards.
X Release lever :again.
Make sure that you hear the seat engage in
position.
Backrest angle X
Relieve the pressure on the backrest.
X Turn handwheel ?forwards or backwards.
Seat height X
Pull handle =upwards or push it down
repeatedly until the seat has reached the
desired height.
Seat cushion angle Adjust the angle so that your thighs are lightly
supported.
X
Turn handwheel ;forwards or backwards. 86
SeatsSeats, steering wheel and mirrors
Page 90 of 336
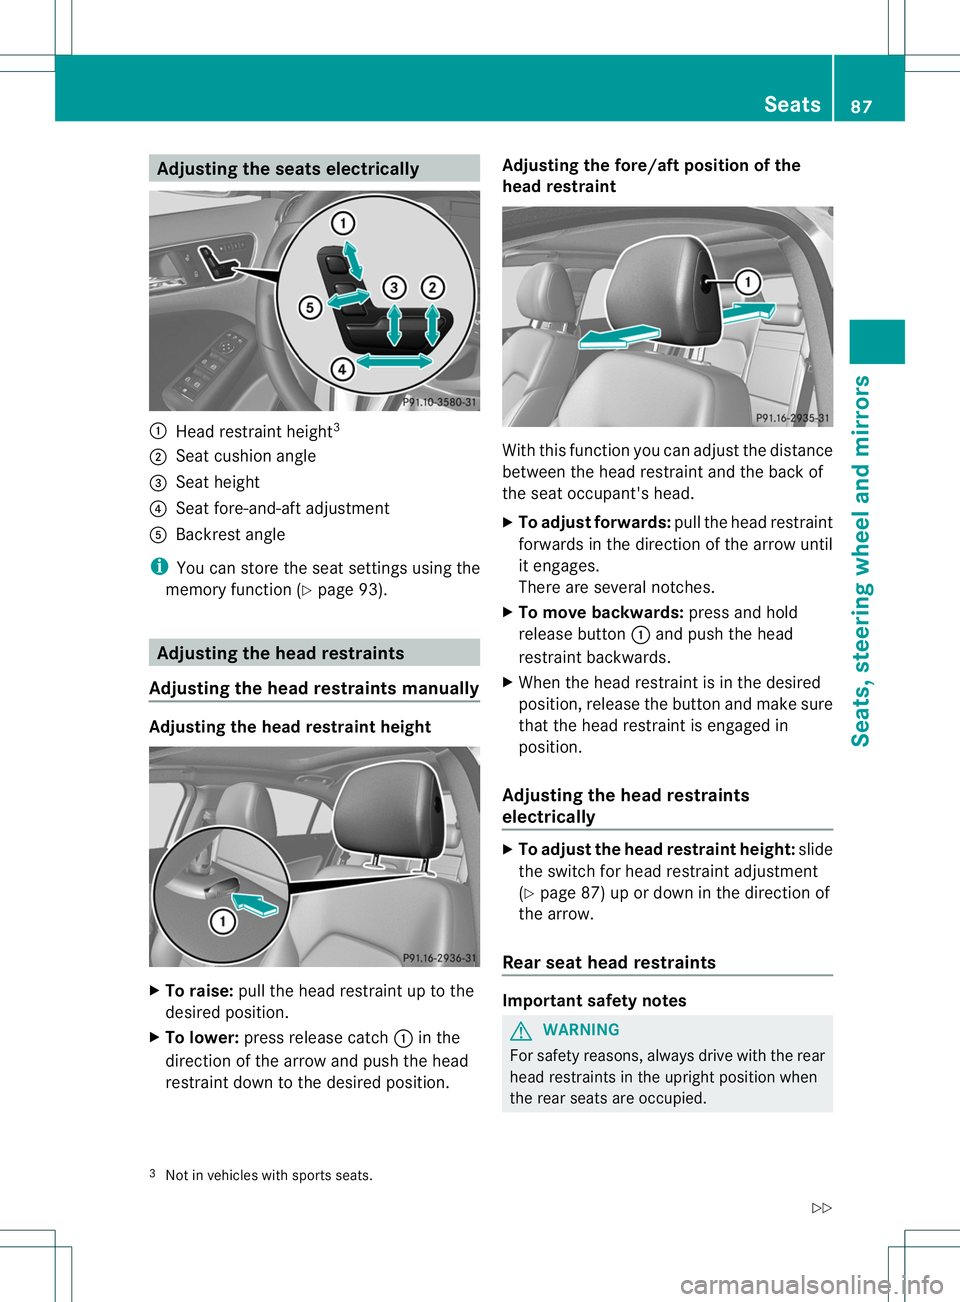
Adjusting the seats electrically
:
Head restrain theight 3
; Seat cushion angle
= Seat height
? Seat fore-and-aft adjustment
A Backrest angle
i You can store the seat settings using the
memory function (Y page 93). Adjusting the head restraints
Adjusting the head restraints manually Adjusting the head restraint height
X
To raise: pull the head restraint up to the
desired position.
X To lower: press release catch :in the
direction of the arrow and push the head
restraint down to the desired position. Adjusting the fore/aft position of the
head restraint
With this function you can adjust the distance
between the head restraint and the back of
the seat occupant's head.
X
To adjust forwards: pull the head restraint
forwards in the direction of the arrow until
it engages.
There are several notches.
X To move backwards: press and hold
release button :and push the head
restraint backwards.
X When the head restraint is in the desired
position, release the button and make sure
that the head restraint is engaged in
position.
Adjusting the head restraints
electrically X
To adjust the head restraint height: slide
the switch for head restraint adjustment
(Y page 87) up or down in the direction of
the arrow.
Rear seat head restraints Important safety notes
G
WARNING
For safety reasons, always drive with the rear
head restraints in the upright position when
the rear seats are occupied.
3 Not in vehicles with sportss eats. Seats
87Seats, steering wheel and mirrors
Z
Page 91 of 336
Keep the area around head restraints clear of
articles (e.g. clothing) to not obstruct the
folding operation of the head restraints.
G
WARNING
For yourp rotection, drive only with properly
positioned head restraints.
Adjust the head restraint in such a way that it
is as close to the head as possible and the
center of the head restraint supports the back
of the head at eye level .This will reduce the
potential for injury to the head and neck in the
event of an accident or similar situation.
With a rear seat occupied, make sure to move
the respective head restraint up from the
lowest non-use position and have the
occupant adjust the head restraint properly.
Do not drive the vehicle without the seat head
restraints installed when the rear seats are
occupied. Head restraints are intended to
help reduce injuries during an accident.
Adjusting the rear seat head restraint
height X
To raise: pull the head restraint up to the
desired position.
X To lower: press release catch :and push
the head restraint down until it is in the
desired position.
Removing and installing the rear seat
head restraints G
WARNING
Occupants should only travel sitting on seats
which have the head restraints installed. This reduces the risk of injury to occupants in the
event of an accident.
X
Fold the seat backrest slightly forwards in
order to remove the head restraint
(Y page 234).
X To remove: pull the head restraint up to
the stop.
X Press release catch :and pull the head
restraint out of the guides.
X To re-install: insert the head restraint so
that the notches on the bar are on the left
when viewed in the direction of travel.
X Push the head restraint down until you hear
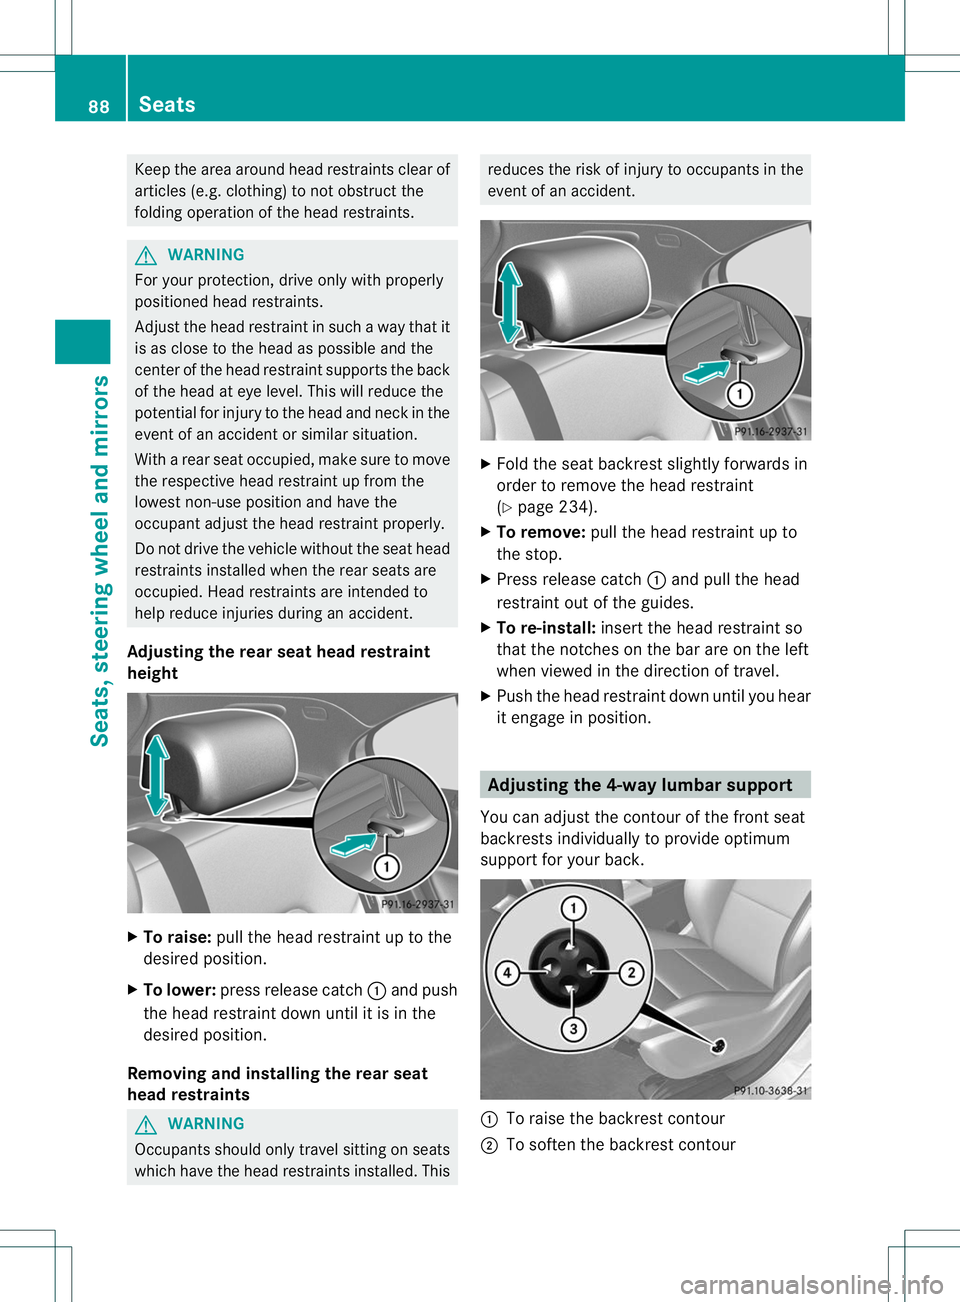
it engage in position. Adjusting the 4-way lumbar support
You can adjust the contour of the front seat
backrests individually to provide optimum
support for your back. :
To raise the backrest contour
; To soften the backrest contour 88
SeatsSeats, steering wheel and mirrors
Page 92 of 336
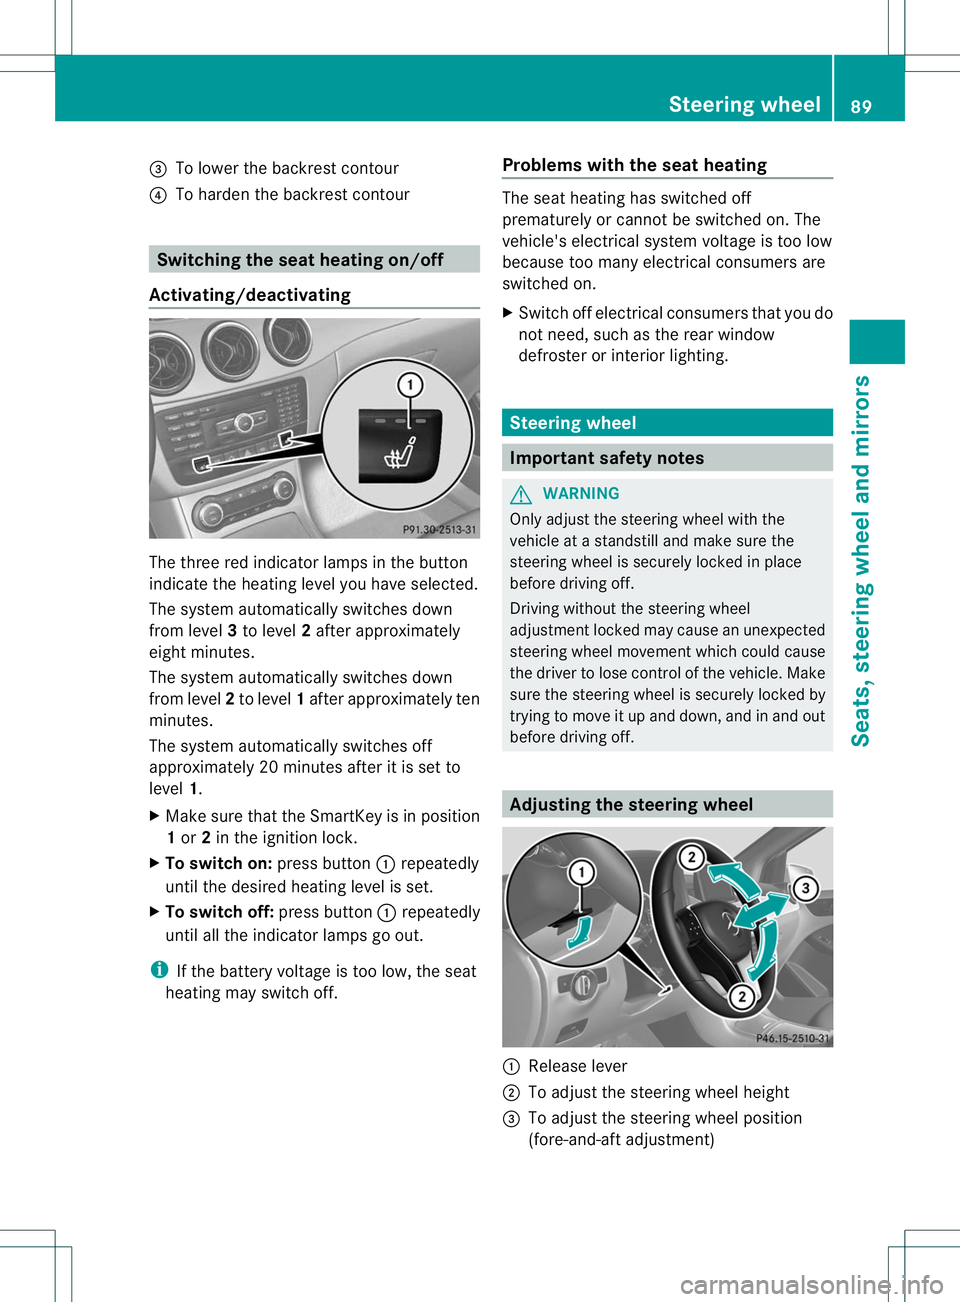
=
To lower the backrest contour
? To harden the backrest contour Switching the seat heating on/off
Activating/deactivating The three red indicator lamps in the button
indicate the heating level you have selected.
The system automatically switches down
from level
3to level 2after approximately
eight minutes.
The system automatically switches down
from level 2to level 1after approximately ten
minutes.
The system automatically switches off
approximately 20 minutes after it is set to
level 1.
X Make sure that the SmartKey is in position
1or 2in the ignition lock.
X To switch on: press button:repeatedly
until the desired heating level is set.
X To switch off: press button:repeatedly
until all the indicator lamps go out.
i If the battery voltage is too low, the seat
heating may switch off. Problems with the seat heating The seat heating has switched off
prematurely or cannot be switched on. The
vehicle's electrical system voltage is too low
because too many electrical consumers are
switched on.
X
Switch off electrical consumers that you do
not need, such as the rear window
defroster or interior lighting. Steering wheel
Important safety notes
G
WARNING
Only adjust the steering wheel with the
vehicle at a standstill and make sure the
steering wheel is securely locked in place
before driving off.
Driving without the steering wheel
adjustmen tlocked may cause an unexpected
steering wheel movement which could cause
the driver to lose control of the vehicle. Make
sure the steering wheel is securely locked by
trying to move it up and down, and in and out
before driving off. Adjusting the steering wheel
:
Release lever
; To adjust the steering wheel height
= To adjust the steering wheel position
(fore-and-aft adjustment) Steering wheel
89Seats, steering wheel and mirrors Z
Page 168 of 336
Parking tips:
R
on narrow roads, drive past the parking
space as close as possible.
R parking spaces that are littered, overgrown
or partially occupied by trailer drawbars
might be identified incorrectly or not at all.
R snowfall or heavy rain may lead to a parking
space being measured inaccurately.
R pay attention to the PARKTRONIC
(Y page 162) warning messages during the
parking procedure.
R you can intervene in the steering procedure
to correct it at any time. Active Parking
Assist will then be canceled.
R when transporting a load which protrudes
from your vehicle, you should not use
Active Parking Assist.
R never use Active Parking Assist when snow
chains are installed.
R make sure that the tire pressures are
always correct. This has adirec tinfluence
on the parking characteristics of the
vehicle.
R the way your vehicle is positioned in the
parking space after parking is dependent
on various factors .These include the
position and shape of the vehicles parked
in front and behind it and the conditions of
the location. In some cases, Active Parking
Assist may guide you too far into a parking
space, or not far enough into it. In some
cases, it may also lead you across or onto
the curb. If necessary, you should abort the
parking procedure with Active Parking
Assist.
R you can also engage forward gear
prematurely. The vehicle redirects and
does not drive as far into the parking space.
Should the gear change occur too soon to
achieve a sensible parking position, the
parking procedure will be aborted. General notes Active Parking Assist is an electronic parking
aid with ultrasound. Ultrasound is used to
measure the road on both sides of the vehicle.
As
uitable parking space is indicated by the
parking symbol. Active steering intervention
can assis tyou during parking.
You may also use PARKTRONIC
(Y page 161). When PARKTRONIC is switched
off, Active Parking Assist is also unavailable.
Use Active Parking Assist for parking spaces:
R that are parallel to the direction of travel
R that are on straight roads, not bends
R that are on the same level as the road, e.g.
not on the pavement
Detecting aparking space Objects located above the height range of
Active Parking Assist will not be detected
whe
nthe parking space is measured. These
are not taken into account when the parking
procedure is calculated, e.g. overhanging
loads, tail sections or loading ramps of goods
vehicles. In some circumstances, Active
Parking Assist may therefore guide you into
the parking space too early. G
WARNING
If there are objects above the detection range,
Active Parking Assist may turn prematurely.
You may cause a collision as a result. There is
a risk of an accident.
If there are objects above the detection range,
stop and deactivate Active Parking Assist.
Active Parking Assist is automatically
activated when driving forwards. The system
is operational at speeds of up to
approximately 22 mph (35 km/h). While in
operation, the system independently locates
and measures parking spaces on both sides
of the vehicle. When driving at speeds below
19 mph (30 km/h), you will see the parking
symbol as a status indicator in the instrument
cluster. By default, Active Parking Assist only
displays parking spaces on the front- Driving systems
165Driving and parking Z
Page 239 of 336
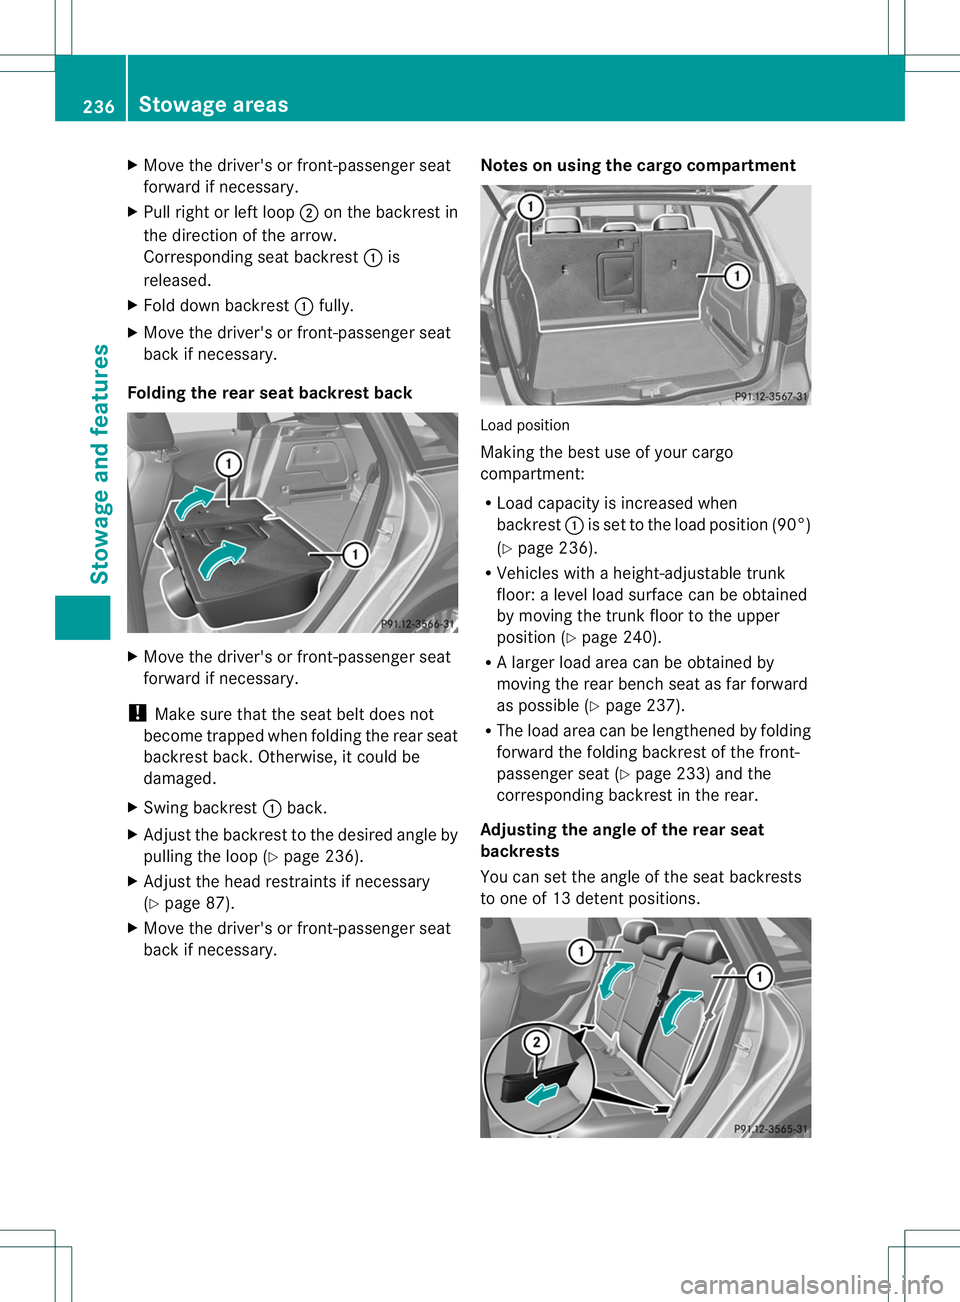
X
Move the driver's or front-passenger seat
forward if necessary.
X Pull right or left loop ;on the backrest in
the direction of the arrow.
Corresponding seat backrest :is
released.
X Fold down backrest :fully.
X Move the driver's or front-passenger seat
back if necessary.
Folding the rear seat backrest back X
Move the driver's or front-passenger seat
forward if necessary.
! Make sure that the seat belt does not
become trapped when folding the rear seat
backrest back. Otherwise, it could be
damaged.
X Swing backrest :back.
X Adjust the backrest to the desired angle by
pulling the loop (Y page 236).
X Adjust the head restraints if necessary
(Y page 87).
X Move the driver's or front-passenger seat
back if necessary. Notes on using the cargo compartment Load position
Making the best use of your cargo
compartment:
R
Load capacity is increased when
backrest :is set to the load position (90°)
(Y page 236).
R Vehicles with a height-adjustable trunk
floor: a level load surface can be obtained
by moving the trunk floor to the upper
position (Y page 240).
R Al arge rload area can be obtained by
moving the rear bench seat as far forward
as possible (Y page 237).
R The load area can be lengthened by folding
forward the folding backrest of the front-
passenger seat (Y page 233) and the
corresponding backrest in the rear.
Adjusting the angle of the rear seat
backrests
You can set the angle of the seat backrests
to one of 13 detent positions. 236
Stowage areasStowage and features
Page 243 of 336
X
Attach hook =to the cargo
compartment's uppers eal?.
X To close: detach hook =from seal ?.
X Fasten hook =to the bracket on the
underside of the cargo compartment floor.
X Fold the trunk floor down.
X Press the trun kfloor down until it engages.
Setting the height of the trunk floor The stowage well under the trunk floor can be
increased or decreased in size as necessary.
To do this, you can lock the floor at two
differen
theights. The upper catch gives a flat
load surface when the rear bench seat is
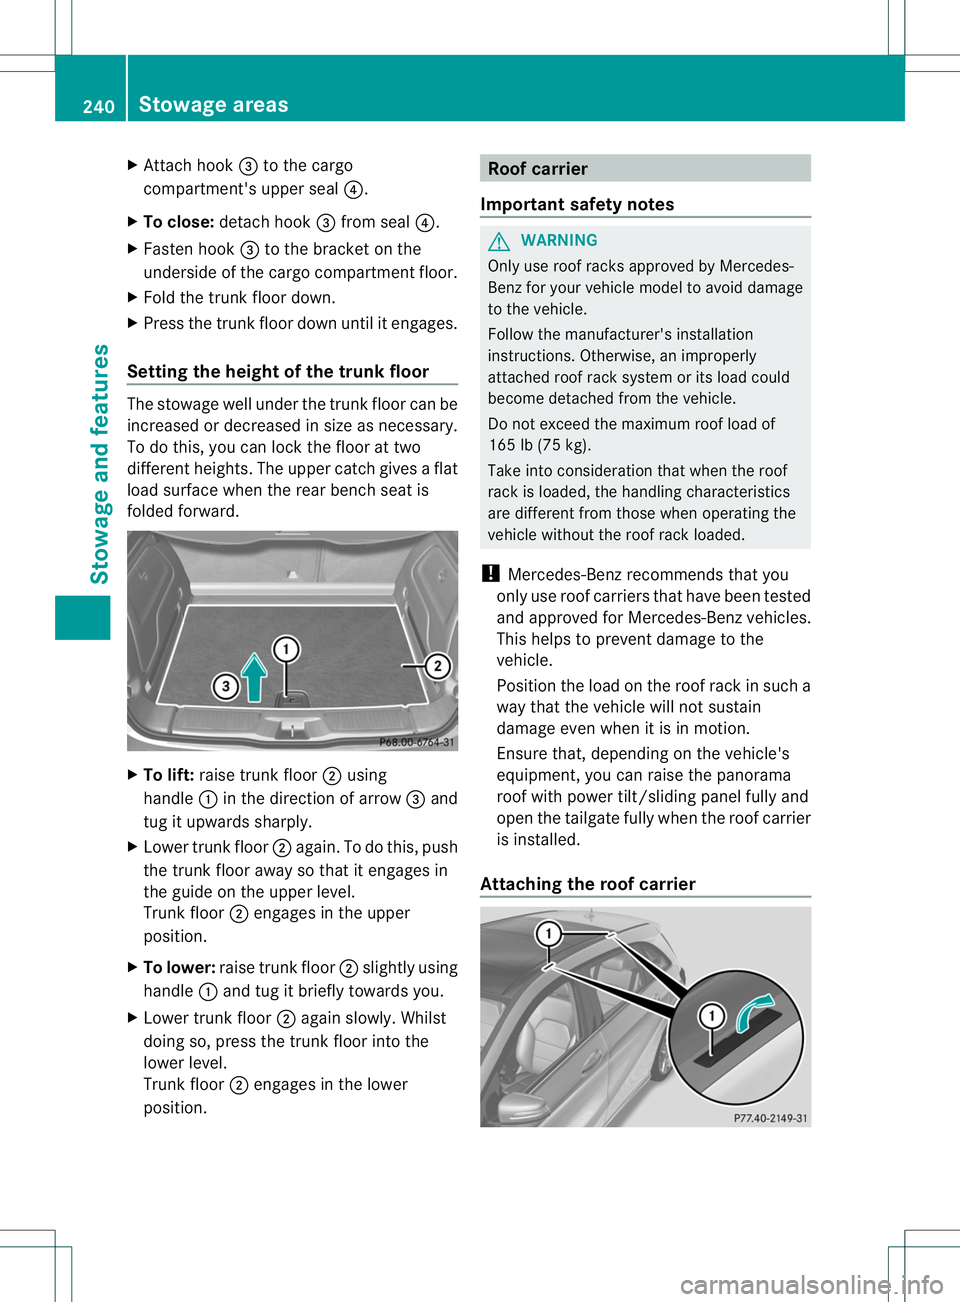
folded forward. X
To lift: raise trunk floor ;using
handle :in the direction of arrow =and
tug it upwards sharply.
X Lower trunk floor ;again. To do this, push
the trun kfloor away so that it engages in
the guide on the upper level.
Trunk floor ;engages in the upper
position.
X To lower: raise trunk floor ;slightly using
handle :and tug it briefly towards you.
X Lower trunk floor ;again slowly. Whilst
doing so, press the trunk floor into the
lower level.
Trunk floor ;engages in the lower
position. Roof carrier
Important safety notes G
WARNING
Only use roof racks approved by Mercedes-
Ben zfor your vehicle model to avoid damage
to the vehicle.
Follow the manufacturer' sinstallation
instructions. Otherwise, an improperly
attached roo frack system or its load could
become detached from the vehicle.
Do not exceed the maximum roof load of
165 lb (75 kg).
Take into consideratio nthat when the roof
rack is loaded, the handling characteristics
are different from those when operating the
vehicle without the roof rack loaded.
! Mercedes-Benzr ecommends that you
only use roof carriers that have been tested
and approved for Mercedes-Benzv ehicles.
This helps to preven tdamage to the
vehicle.
Positio nthe load on the roof rack in such a
way that the vehicle will not sustain
damage even when it is in motion.
Ensure that, depending on the vehicle's
equipment, you can raise the panorama
roof with power tilt/sliding panel fully and
open the tailgate fully when the roof carrier
is installed.
Attaching the roof carrier 240
Stowage areasStowage and features
Page 244 of 336
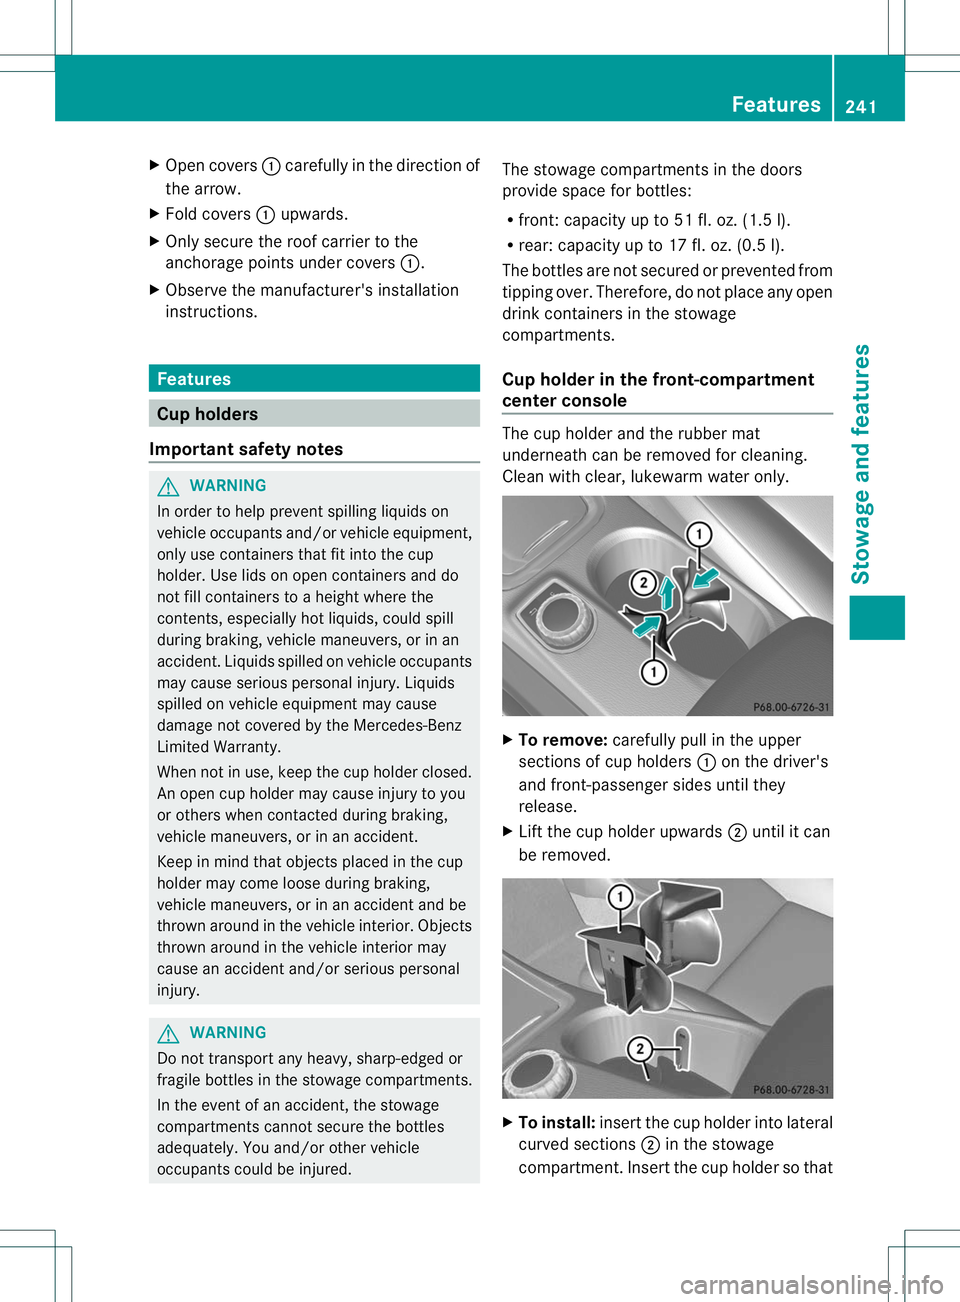
X
Open covers :carefully in the direction of
the arrow.
X Fold covers :upwards.
X Only secure the roof carrier to the
anchorage points under covers :.
X Observe the manufacturer's installation
instructions. Features
Cup holders
Important safety notes G
WARNING
In order to help prevent spilling liquids on
vehicle occupants and/or vehicle equipment,
only use containers that fit into the cup
holder. Use lids on open containers and do
not fill containers to aheight where the
contents, especially hot liquids, could spill
during braking, vehicle maneuvers, or in an
accident. Liquids spilled on vehicle occupants
may cause serious personal injury. Liquids
spilled on vehicle equipment may cause
damage not covered by the Mercedes-Benz
Limited Warranty.
When not in use, keep the cup holder closed.
An open cup holder may cause injury to you
or others when contacted during braking,
vehicle maneuvers, or in an accident.
Keep in mind that objects placed in the cup
holder may come loose during braking,
vehicle maneuvers, or in an accident and be
thrown around in the vehicle interior. Objects
thrown around in the vehicle interior may
cause an acciden tand/o rserious personal
injury. G
WARNING
Do not transport any heavy, sharp-edged or
fragile bottles in the stowage compartments.
In the event of an accident, the stowage
compartments cannot secure the bottles
adequately. You and/or other vehicle
occupants could be injured. The stowage compartments in the doors
provide space for bottles:
R
front: capacity up to 51 fl. oz. (1.5 l).
R rear: capacity up to 17 fl. oz. (0.5 l).
The bottles are not secured or prevented from
tipping over. Therefore, do not place any open
drink containers in the stowage
compartments.
Cup holder in the front-compartment
center console The cup holder and the rubber mat
underneath can be removed for cleaning.
Clean with clear, lukewarm water only.
X
To remove: carefully pull in the upper
sections of cup holders :on the driver's
and front-passenger sides until they
release.
X Lift the cup holder upwards ;until it can
be removed. X
To install: insert the cup holder into lateral
curved sections ;in the stowage
compartment .Inser tthe cup holder so that Features
241Stowage and features Z