Page 9 of 16
 1516
nOte : If the rear AUTO button is pushed while the front A /C button is off, the
rear air conditioning operates only to circulate air. Setting the temperature to the
maximum high or low will n")
1516
nOte : If the rear AUTO button is pushed while the front A /C button is off, the
rear air conditioning operates only to circulate air. Setting the temperature to the
maximum high or low will not provide the desired temperature at a faster rate.
Automatic Climate Control
F
RO nt Se At W ARM eRS
The driver and front passenger seats can be warmed by pushing the
applicable seat warmer button while the ignition is ON.
• Seat temperature increases as the number of indicator lights
increases. Two lights equal high, one light equals low.
• When the seat warmers are not needed, push button until indicator
lights are off.
n Ote : The automatic temperature control always works, even if the AUTO ON
indicator light comes off after rotating the Fan Control Dial or changing vent mode.
n Ote : Automatic climate control will allow you to maintain individual preset cabin
temperatures for the driver and passenger when DUAL mode is selected.
in FORMA tiOn Di SPLAY
Passenger
temperature
Control Dial
• Push to turn DUAL
m ode on or off.
• With DUAL mode
On (indicator on),
rotate the dial to
set passenger
side temperature
separate from the
driver’s side (shown
in the Information
Display above).
• With DUAL mode
OFF (indicator off),
driver controls the
temperature setting
on both sides.
Push to allow
control from the
rear controls
(indicator on).
Push to
display outside
temperature.
Fan Control Dial
•
Push OFF to turn climate
control system off.
• Rotate the dial to select
the desired fan speed.
Push to defrost
windshield.
Push to defrost
rear window.
Push to recirculate
cabin air to reduce
outside odors and
improve cooling
(indicator on) or
receive fresh air
(indicator off).
P u s h t o
manually turn
air conditioning
ON or OFF.
Driver t
emperature
Control Dial
AU tO O n: Push dial
to turn Automatic
Air Conditioning
system on. Rotate
dial to select
your desired set
temperature (shown
in information
Display above). The
airflow mode and
amount of airflow
will be automatically
controlled in
accordance with
the set temperature.
Push to select
airflow mode.
OUtSiDe teMPReAR
ReAR
FROnt
R
eAR CL iMA te CO ntROL
Operation from Front Seats
1 Turn the front air conditioning on.
2 Push the REAR control button
on the front control panel
(indicator on).
3 Selection of the airflow mode,
airflow amount and temperature
will be automatically controlled
to the same setting as the front
air conditioner.
Operation from Rear Seats
AU tO O n:
1 Turn the front air conditioning on.
2 Push AUTO ON button on the rear control panel to turn Rear
Automatic Air Conditioning system on. Push Temperature setting
button on the rear control panel to select your desired set
temperature. The air flow mode and amount of air flow will be
automatically controlled in accordance with the set temperature.Rear Control Panel
www.MazdaUSA.com
1284179_13a_Mazda_CX-9_SSG_101512.indd 16-1710/15/12 3:04 PM
Page 10 of 16
 1718
POWeR On
Push the Power/ Volume dial to
turn the audio system on.
Me DiA Se Le Cti On
Push the AUDIO button to select the
appropriate on-screen button:
Radio: Select FM/AM button for FM1,")
1718
POWeR On
Push the Power/ Volume dial to
turn the audio system on.
Me DiA Se Le Cti On
Push the AUDIO button to select the
appropriate on-screen button:
Radio: Select FM/AM button for FM1,
FM2, or AM band.
CD: Select for CD player.
Bluetooth
®: Select for BT Audio.
Pandora: Select to play Pandora from
Bluetooth device (with Pandora app).
USB: Select to play iPod/iPhone
®
through USB port.
AUX: Select to switch to AUX input.
S iR iUS: Select for SiriusXM Satellite
Radio
®. If your vehicle is equipped
with SiriusXM Satellite Radio® (satellite
radio antenna on roof), your new
Mazda includes a free introductory
subscription with a limited term trial
offer. Call 888-539-7474 to activate!
See the Owner’s Manual and/or dealer
for details, or contact your dealer about
adding SiriusXM Satellite Radio
®.
See your Owner’s Manual for further
information on:
• Pandora audio application
•
Audio menu voice-command tUning
M
anual: Turn the TUNE/FILE dial to
manually change the frequency.
S eek: Push the SEEK
button or
touch and hold the
on-screen button, to automatically seek
a higher or lower frequency or track,
depending on media selected.
n O te :
If you continue to push and
hold the button, the frequency will
continue changing without stopping.
S can: Touch the SCAN on-screen
button to automatically sample strong
stations for seconds each. Touch again
to cancel.
Auto Memory t uning:
1 Touch the
Auto Memory on-screen
button. The auto memory preset list
is displayed and the previously tuned
frequency is received.
2 Touch the
Update List on-screen
button to display the frequencies of
up to ten radio stations on the auto
memory preset list.
3 Touch the desired frequency.
Refer to the Owner’s Manual for
complete details.
Preset Channel: Can be used to store
6 AM or 12 FM stations.
hD RADi O
When the HD radio button is
ON (illuminated), there could
be a noticeable difference in
sound quality and volume
when a change from digital
to analog signals occurs.
If the sound quality and
volume becomes noticeably
diminished or cuts off, touch
the HD button to turn OFF
HD radio (not illuminated).
1 To set a channel, first select
AM, FM1 or FM2.
2 Tune to the desired station.
3 Long-press any of the
preset on-screen buttons.
The reception frequency is
programmed and displayed
on the preset button.
4 Repeat this operation for the
other stations and bands you
want to store. When receiving
a programmed frequency,
select AM, FM1, or FM2 and
touch the preset on-screen
button. The station frequency
will be displayed.
BLU etOOth® AUDi O
Bluetooth® enabled devices provide an
opportunity to play music through the
audio system with no wires attached,
however, there are some limitations:
• Depending on BT version, the song
title may not display.
•
Not all controls on the device may be
active when paired.
•
Audio streaming may be affected by
signal strength.
•
Sound quality of streaming
audio may vary.
AUD iO OP eRA tiOn US ing VOiC e
Audio operation and media selection can be
done using voice. Press the “Talk” button
and say a command. (A list of available
commands will be displayed on the screen).
Some available commands are:
*Change mode *Mute/Mute off
Radio: *Seek up/down *Preset #
CD: *Play track #
B t: Next/Previous folder
CD, USB, B t: *Play *Repeat
*Next/Previous track *Shuffle
CD, USB, B t, Pandora: *Pause *Resume
Pandora: *Skip song *Thumbs up/down
PLAYing BLU etOOth® (Bt) AUD iO
1 Make sure BT audio device is paired to
your vehicle.
2
Turn on BT audio device.
3
Touch the Bluetooth
® on-screen tab.
4
Select the BT-Audio option.
e ject CD
Audio Controls (with Navigation)
g RAC enOte
Gracenote has the largest database of music
and video metadata for entertainment
products, apps and services. To update:
1 Load the Gracenote update on a memory
stick from www.MazdaUSA.com/bluetooth.
Insert memory stick into the USB port.
2
Press the PHONE button.
3 Select Setup and scroll down to
Gracenote Update.Di SPLAY / SOUnD S etUP
1
Push the Setup button.
2
Touch the desired on-screen tab.
3 Change the desired setup item by
touching it.
LOAD ing A CD
Insert CD, label-side up.
www.MazdaUSA.com
1284179_13a_Mazda_CX-9_SSG_101512.indd 18-1910/15/12 3:04 PM
Page 11 of 16
 Bluetooth
®
1920
PAiR ing YOUR BLUet OOth® PhOne OR AUD iO De ViC e
n Ote :
• For safety reasons, you cannot pair a phone while driving.
• Before pairing your cell phone or audio device, it")
Bluetooth
®
1920
PAiR ing YOUR BLUet OOth® PhOne OR AUD iO De ViC e
n Ote :
• For safety reasons, you cannot pair a phone while driving.
• Before pairing your cell phone or audio device, it is recommended that you
refer to its manual for steps to turn on Bluetooth
® and perform pairing.
• For customer service and device compatibility:
toll-free call: 800-430-0153
Website: www.MazdaUSA.com/bluetooth
• iMPOR tA nt : Set the volume level on your cell phone or audio device to the
highest level before distortion starts, then adjust the volume on the audio system.
• When in range of another Wi-Fi device, the Bluetooth connection between your
phone and the system may disconnect for a short time if you have Wi-Fi enabled.
Turn off Wi-Fi on your phone if needed.
t ouch Screen Pairing
1
Push Phone button.
2
Touch the
Setup on-screen button.
3
Touch the
Bluetooth Setup on-screen
button. The list of all paired devices
is displayed.
4
Touch the
Add New Device on-screen
button to display the message and
switch to the device operation.
5 Using the device, perform a search for
the Bluetooth
® device (Peripheral device).
6
Select “Mazda” from the device list searched
by the device.
7
(Device with Bluetooth
® version 2.0)
Input the displayed 4-digit pairing code
into the device.
(Device with Bluetooth
® v e r s i o n 2 .1
or higher)
• Just Works is detected
The pairing is performed automatically.
• numeric Comparison is detected
Verify the displayed 6-digit code on the audio unit, which is also
displayed on the device, and touch the
Yes on-screen button.
8
(Device with PBAP profile)
Call history (incoming/outgoing history) for the device is
downloaded automatically.
n Ote : On engine start, the
last connected device will
automatically be re-connected
after several seconds.
tO MAK e OR ReC ei Ve A h An DS -FR ee CALL
Basic Operation:
button: To make/receive/swap a call.
button: To end/reject a call.
button: To skip voice guidance
(for speeding up operation).
nO te : For connection issues, please confirm the Bluetooth
connection status by pressing the PHONE button and looking in
the top left corner for the Bluetooth icon and your phone’s name.
Some phones will turn off the Bluetooth signal after connecting the USB cable to
the vehicle or after downloading an update
• If not displayed, check your phone and make sure Bluetooth is turned on
(or discoverable) in the Settings menu. Detailed instructions for some phones
are available online.
• If there is still no connection, delete the pairing data on on the system and
your phone and try again after confirming your cell phone is compatible at
www.MazdaUSA.com/bluetooth.
BLU etOO th® FeAtUR eS
The Bluetooth system has some new features.
Press the PHONE button, then select the
“Setup” tab. SMS TEXT AUDIO DELIVERY/
VOICE REPL AY: Play (read) text or email from
a Bluetooth connected phone (with MAP
profil e) and respond back.
nOt e: if “Message” is grayed out, your phone does not have MAP profile.
See your Owner’s Manual for more information.
n O te : For a list of phones with MAP profile, visit www.MazdaUSA.com/bluetooth.
See your Owner’s Manual for more information.
AU tOMA tiC 911 CALL
AUTOMATIC 911 CALL: Calls 911 if the air bags deploy. This can be turned
ON or OFF.
n Ote :
• Phone must be paired and connected.
• 911 operator can verify vehicle position information using phone GPS
(if equipped).
See your Owner’s Manu al for more information.
talk
Pick-uphang up
www.MazdaUSA.com
1284179_13a_Mazda_CX-9_SSG_101512.indd 20-2110/15/12 3:04 PM
Page 12 of 16
 2122
PeRSOnALize YOUR MAzDA CX-9 With genUine
MAzDA ACCeSSORieS:
• All-Weather Floor Mats
• Auto-Dimming Rearview
Mirror with Compass
• Cargo Mat, Carpet
• Cargo Net
• Cargo Tray
• Fo")
2122
PeRSOnALize YOUR MAzDA CX-9 With genUine
MAzDA ACCeSSORieS:
• All-Weather Floor Mats
• Auto-Dimming Rearview
Mirror with Compass
• Cargo Mat, Carpet
• Cargo Net
• Cargo Tray
• Fog Lights
• Front Mask
• Hood Bug Deflector
• Moonroof Wind Deflector
• Navigation System
• Paint Protection
Door Edge
Front Kit • Rear Bumper Guard
•
Rearview Camera
with Auto-Dimming
Mirror Display
• Remote Engine Start
• Retractable Cargo Cover
• Roof Rack
Bike Carrier
Cargo Box, Short
Cargo Box, Medium
Luggage Basket
Kayak Carrier
Ski/Snowboard Carrier
Surfboard Carrier • SiriusXM
® Satellite Radio
• Splash Guards
• Touch-Up Paint
• Trailer Hitch (Class II)
Bike Carrier,
Hitch Mounted
• Wheel Locks
• Windshield Sunscreen www.MazdaUSA.com
Feature Highlights
USB Port
Refer to the Owner’s Manual for additional information.
1
Connect the cable into the portable audio player and the USB port.
2 •
Audio Controls (without navigation): Push the AUX button on
the audio unit to switch to the USB mode and start playback.
•
Audio Controls (with navigation): Push AUDIO button on audio
system, then touch the USB on-screen button.
n Ote :
When the iPod® is connected to the USB port, the USB on-screen tab
changes to the iPod on-screen tab. Do not remove the iPod while in the iPod
mode. Otherwise, the data could be damaged.
3
Use the vehicle’s audio system or steering wheel controls to control
the USB device connected.
n Ote :
The iPod functions on the iPod cannot be operated while it is connected
to the vehicle’s audio system because it controls the iPod functions.
2 •
Audio Controls (without navigation): Push the AUX button on
the audio unit to switch to the AUX mode.
•
Audio Controls (with navigation): Push AUDIO button on audio
system, then touch AUX on-screen button.
3 Use the portable audio player controls to play music.
Auxiliary Jack
n Ote :
You will need an audio cable with an 1/8 inch
(3.5 mm) mini stereo plug (available as a Genuine Mazda
accessory) to connect your portable audio player into the
aux jack.
n Ote : AUX jack is not available on vehicles equipped with Rear Seat Entertainment
System (RSES).
Refer to the Owner’s Manual for additional information.
1 Plug 1/8 inch mini stereo cable into the portable audio player and the
AUX jack.
POR tABL e AUD iO PLAY eR integ RAtiOn US ing the
USB POR t OR AUX JACK
Your vehicle is equipped with a USB port (some models) and auxiliary AUX
jack located in the center console. This will allow you to play your iPod, USB
device, or portable audio player through the vehicle’s audio system. Learn
the system when parked and do not let it distract you while driving.
iM P O R tA n t:
•
Set the volume level on your portable audio player to the highest level
before distortion starts, then use the vehicle’s audio system to adjust
the volume.
•
Unplug any device from the USB port and accessory socket before
turning off the vehicle. Leaving devices plugged in can drain the battery
and cause issues during the Bluetooth pairing process at startup. Wait
about 15 seconds after starting the vehicle before plugging anything into
the USB port.
1284179_13a_Mazda_CX-9_SSG_101512.indd 22-2310/15/12 3:04 PM
Page 13 of 16
 Navigation System
2324
5 Enter the town or city name.
6 Enter the street name.
7 Enter the house number, then touch Done .
8
The location is shown on the map. Touch Select to continue or")
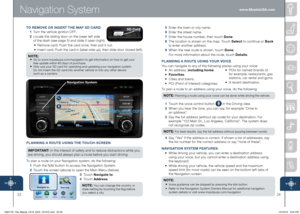
Navigation System
2324
5 Enter the town or city name.
6 Enter the street name.
7 Enter the house number, then touch Done .
8
The location is shown on the map. Touch Select to continue or Back
to enter another address.
9 When the new route is shown, touch Done .
For more information about the route, touch Details .
P LA nning A ROU te USing YOUR VO iC e
You can navigate to any of the following places using your voice:
• An address, including home .
• Favorites .
• Cities and towns.
• POI (Point of Interest) categories. •
POIs for named brands of,
for example, restaurants, gas
stations, car rental and gyms.
• A recent destination.
To plan a route to an address using your voice, do the following: n Ote :
Planning a route using your voice can be done while driving the vehicle.
1 Touch the voice control button in the Driving view.
2
When you hear the tone, you can say, for example “Drive to
a n a d d r e s s ”.
3 Say the full address (without zip code) for your destination. For
example “123 Main St., Los Angeles, California”. The system does
not recognize zip codes.
n Ote :
For best results, say the full address without pausing between words.
4 Say “Yes” if the address is correct. If shown a list of addresses, say
the list number for the correct address or say “none of these”.
nAV igAti On S YSte M Fe AtURe S:
• While driving your vehicle, you can enter a destination address
using your voice, but you cannot enter a destination address using
the keyboard.
•
While driving your vehicle, the vehicle speed and the maximum
speed limit (for most roads) can be seen on the bottom left tabs of
the Navigation screen.
n Ote :
•
Voice guidance can be skipped by pressing the talk button.
•
Refer to the Navigation System Owners Manual for additional navigation
system details or visit www.mazdausa.com/navigation
PLA nning A ROU te USing the t OUCh-SCR een
i M P O R tAn t : In the interest of safety and to reduce distractions while you
are driving, you should always plan a route before you start driving.
To plan a route on your Navigation system, do the following:
1 Push the NAV button to access the Navigation System.
2 Touch the screen (above) to open the Main Menu (below).
3 To u c h n avigate to .
4 To u c h Address .
n Ote :
You can change the country or
state setting by touching the flag before
you select a city.
n avigation System
tO R eMOV e OR in SeR t the MAP SD CARD:
1 Turn the vehicle ignition OFF.
2 Locate the sliding door on the lower left side
of the dash (see page 5) and slide it open (right).
• Remove card: Push the card once, then pull it out.
• Insert card: Push the card in (label-side up), then slide door closed (left).
n Ote :
•
Go to www.mazdausa.com/navigation to get information on how to get your
free update within 60 days of purchase.
• Only use your SD card for operating and updating your navigation system.
Do not insert the SD card into another vehicle or into any other device
such as a camera.
SD Card
www.MazdaUSA.com
1284179_13a_Mazda_CX-9_SSG_101512.indd 24-2510/15/12 3:04 PM
Page 14 of 16
 25
Feature Highlights
POWeR MiRRORS With ReVe RS e tiL t DOWn FUnCti On *
When the ignition is switched ON and the selector
lever is shifted to the R position, the outside
mirrors tilt downward t")
25
Feature Highlights
POWeR MiRRORS With ReVe RS e tiL t DOWn FUnCti On *
When the ignition is switched ON and the selector
lever is shifted to the R position, the outside
mirrors tilt downward to facilitate the view of the
lower area on each side of the vehicle.
1 Switch the left/right power door mirror
selector switch to the left or right side.
2 Shift the selector lever to the R position
while pressing the brake pedal. The outside
mirrors tilt downward automatically.
n Ote :
If the left/right power outside mirror selector
switch is in the center position, or the selector lever
is shifted to a position other than the R position,
the outside mirrors return to their on-road position
automatically. The door mirrors return to their
on-road position automatically even when the ignition
is switched from ON to OFF.
Power
Door Mirror Selector Switch
www.MyMazda.com—The Official Site
for M{zd{ Owners
Register today on www.MyMazda.com—the ultimate destination for Mazda
Owners. Once registered, you’ll be able to take advantage of benefits
exclusively for Mazda Owners:
• Insider access to exclusive events and promotions
• Personalized maintenance schedules
• Zoom-Zoom Owner Magazine
• Warranty information and on-line Owner’s Manuals
• Wallpaper, videos and other fun stuff
• Accessories specifically designed for your vehicle
• Car Care Discount Coupons available from your Authorized Mazda Dealer
Visit and register at www.MyMazda.com today!
MA zDA MOB iLe
The following apps are available for iPhone® and Android smartphones:
• Mazda Assist app - Provides roadside assistance 24 hours a day,
365 days a year. Toll free number 1-800-866-1998 can also be used
for roadside assistance.
•
MyMazda app - Keep track of your Mazda from the palm of your hand
with these features:
The apps can be downloaded, free of charge, from the App store for the iPhone
®
and Google Play (Android Market) for Android powered devices. After downloading
app, customer name, email, smartphone number and VIN are required.
Maintenance schedule Service coupons Promotional alerts Service history Recall information Parked car locator
Scan VIN barcode capability
when registering a vehicle
Mazda Dealer locator Update owner profile Link to Mazda Assist
Free MyMazda app
iPhone and AndroidFree Mazda Assist app
iPhone and Android
Driver Side i nterior
Set t emperature
Climate Control
inFORMA tiOn DiSPLAY
Outside t emperature/
Passenger Side
Set t emperature
Clock www.MazdaUSA.com
1284179_13a_Mazda_CX-9_SSG_101512.indd 26-2710/15/12 3:04 PM
Page 15 of 16
 Keyless e
ntry ...............................1-2 • Keyless Transmitter
• Advanced Key*
• Door Request Switches*
• Liftgate Request Switch*
• Power Door Locks
Starting the e")
Keyless e
ntry ...............................1-2 • Keyless Transmitter
• Advanced Key*
• Door Request Switches*
• Liftgate Request Switch*
• Power Door Locks
Starting the e
ngine .......................2 • Start Knob Ignition
(Advanced Key*)
Seats
............................................3-4 • Adjustment
• Memory Seat Function*
Rear Seat Access
...........................4 • 2nd and 3rd row seating access
Driver’s View
...............................5-6 • Location of Switches and Controls
Set Clock
........................................6
instrument Cluster
.....................7- 8 • Review indicator light function
and location
Lighting Control
.............................9
Wiper/Washer
................................10
Sport A / t Manual Shift Mode .....11
Fuel Door
......................................11 • Fuel-Filler Door Release
Customer Delivery ChecklistCustomer Delivery Checklist
*if equipped
DeALe RShiP DAt e
SAL eS CO nSUL tA nt CUStOMeR’S n AMe
V in e-MA iLVehi CLe PR eS ent Ati On:
Refer to the Smart Start Guide during presentation
Auto-Dimming Mirror* .................12
homeLink®* ..................................12
Blind Spot Monitoring*
................13
Rear View Monitor* ......................14
Backup Sensor System*.
.............14
Liftgate
..........................................14
• Manual Operation
• Power Liftgate (PLG) Operation*
Climate Control
........................15 -16
• Front Controls • Rear Controls
Audio Controls
..........................17-18 • Sirius® Satellite Radio Operation
• Trip Computer (INFO Button)
• Back-Up Camera (Navigation only)
Bluetooth® h
ands-Free ...........19 -20 • Tutorial • To l l - F r e e
• Pair Phone Customer Service
• Make a Call 800-430-0153
USB/AUX i
nput .........................21-2 2
naviga
tion System* .................23-24
• Planning a route
• SD Card
Power Mirr
ors with Reverse
t ilt Down Function* .....................25
SAL eS CO nSUL tA nt DAt e CUStOMeR DAt e
All items in the Customer Deliver y Checklist have been reviewed with the customer and
the first maintenance appointment has been scheduled:
Signed copy must be placed in dealer jacket
Smart Start guide
•
Remove this checklist from
Smart Start Guide
• Personalization Features
(including all Auto Lock /Unlock
function settings, refer to your
Owner’s Manual)
Warranty information
Warranty Start Date:
Customer i nitial:
• Basic Vehicle –
36 months/36,000 miles
• Roadside assistance program
www.MyMazda.com
•
Offer to register customer on
www.MyMazda.com
Owner’s Manual
Maintenance Passport
Floor Mats
•
Ensure floor mats are properly
hooked after cleaning
• Do not install two floor mats, one on
top of the other, on the driver side
• Accessory rubber floor mats should
be cleaned with mild soap and
water only
P R eS ent Ati On OF OWne R’S M Ate RiALS :
Review the following items with the customer
SeRV iC e De PARtM ent
Introduce Service Manager;
provide business cards
Review Service and Parts
Department hours of operation
Explain free Full Circle
Service Inspection
Schedule first maintenance service
1284179_13a_Mazda_CX-9_SSG_101512.indd 28-2910/15/12 3:05 PM
Page 16 of 16
 © Mazda North American Operations
Printed in U.S.A. 10/12 Print 1
9999 95 011C 13SS
FR ee FULL C iRCLe
S eRV iC e in SPeC ti On
We’re committed to providing
expert Mazda service.
You love to")
© Mazda North American Operations
Printed in U.S.A. 10/12 Print 1
9999 95 011C 13SS
FR ee FULL C iRCLe
S eRV iC e in SPeC ti On
We’re committed to providing
expert Mazda service.
You love to drive your Mazda, and we love to service your Mazda. With our Full Circle
Service, we’ll give your vehicle a COMPLIMENTARY MULTI-POINT INSPECTION.
Your Mazda will receive a thorough review of its most crucial components.
This easy-to-use Smart Start Guide is intended to help you more fully appreciate some
of the unique features and functions of your new vehicle. However, it is not intended to
replace your Owner’s Manual. The Owner’s Manual contains more detailed information
to help you better understand the important safety warnings, features, operation, and
maintenance of your vehicle. All information, specifications, photographs and illustrations
in this publication are those in effect at the time of printing. Mazda reserves the right to
change specifications or design without obligation.
g en Uine MA zDA S eRV iC e
Because you and your Mazda deserve the best
Your new Mazda deserves nothing less than the very best. To keep it running
like new for years to come, trust the experts at your local Authorized Mazda
Dealer. Simply bring your vehicle in for your scheduled maintenance and any
needed repairs.*
At participating Mazda Full Circle Service Centers,** our technicians will
automatically perform a complimentary Full Circle inspection on your vehicle
and issue a detailed report card at every visit. This is designed to help you
keep track of your Mazda’s critical operating condition. Our factory-trained
technicians know your vehicle inside out and use Genuine Mazda Parts,
giving your vehicle the optimum care and maintenance it requires to run
with flawless precision.
Remember, to further enhance your driving experience, visit your local
Mazda Service Center for your scheduled maintenance. It’s also the place
where you can find a wide variety of tires, parts, and accessories that are
just right for your vehicle.
* See vehicle’s scheduled-maintenance program for details.
** Visit the Mazda Owners website at www.MyMazda.com/fullcircle to find a
participating Mazda Full Circle Service Dealer.
Customer Assistance Center:
1-800-222-5500
Roadside Assistance Contact: 1-800-866-1998
www.MazdaUSA.com
1284179_13a_Mazda_CX-9_SSG_101512.indd 3010/15/12 3:05 PM