2013 LINCOLN MKZ HYBRID ECO mode
[x] Cancel search: ECO modePage 114 of 475
Fuel Economy
Help —
—
Help
Fuel Economy Displays
• Fuel History: This view from left to right starts with the instantaneous fuel
economy gauge and adds historical fuel economy data. The data is
represented as an average for time intervals of either 1, 2 or 6 minutes, with
the left most interval being the most recent. Total time for the 5 intervals is
shown at the bottom of the view. Intervals shown in grey color are from the
previous drive.
• Average Fuel Economy:
Average fuel economy is continuously averaged
since the last reset. You can reset your average fuel economy by pressing
and holding the OK button on the left hand steering wheel controls. For
Energi vehicles both Hybrid and Plug-in Power mode operation will be
included in the calculation.
• Instantaneous Fuel Economy:
If your instantaneous fuel economy is
greater than the maximum value displayed, a + sign will be shown next to
the maximum scale number. When the vehicle is operating on battery power
only, EV is displayed and the gauge fill is shown in blue.
Note that fuel economy is not always a measure of appropriate driving behavior.
For example, when driving uphill and maintaining an appropriate speed, your
instant fuel economy may not be good (losing leaves) but the Coach may show
a blue bar for Acceleration or Cruising.
Info In this mode, you can view
different vehicle system
information and perform a
system check.
112
MKZ (CC9) Information DisplaysE144642
Page 116 of 475
Settings
On (default on
key cycle) / Off
Warn
—
Adaptive / Normal
Cruise Control
—
On (default on key
cycle) / Off
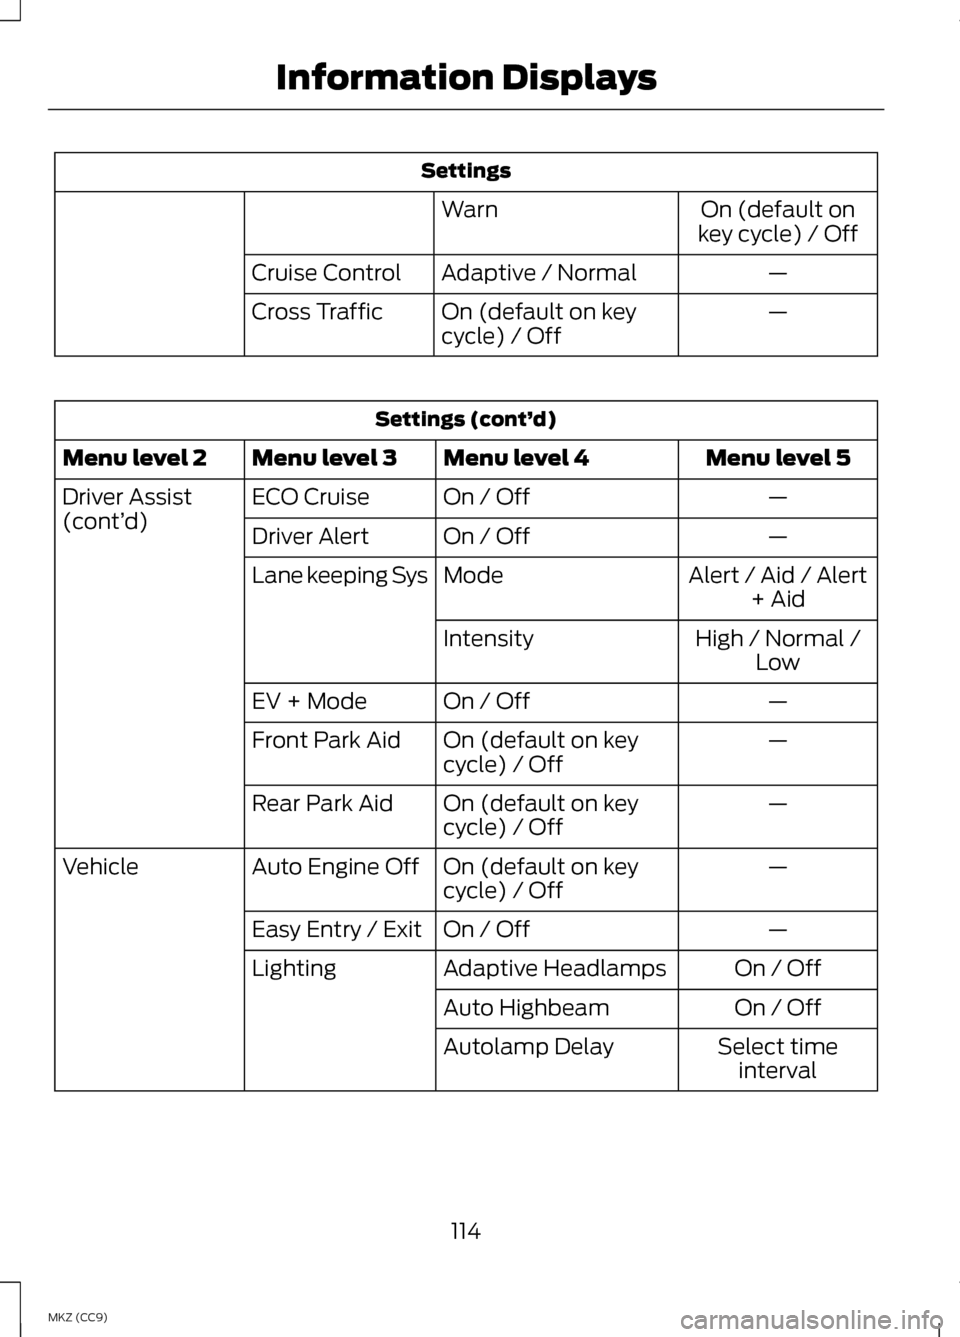
Cross Traffic Settings (cont’
d)
Menu level 5
Menu level 4
Menu level 3
Menu level 2
—
On / Off
ECO Cruise
Driver Assist
(cont’ d)
—
On / Off
Driver Alert
Alert / Aid / Alert+ Aid
Mode
Lane keeping Sys
High / Normal /Low
Intensity
—
On / Off
EV + Mode
—
On (default on key
cycle) / Off
Front Park Aid
—
On (default on key
cycle) / Off
Rear Park Aid
—
On (default on key
cycle) / Off
Auto Engine Off
Vehicle
—
On / Off
Easy Entry / Exit
On / Off
Adaptive Headlamps
Lighting
On / Off
Auto Highbeam
Select timeinterval
Autolamp Delay
114
MKZ (CC9) Information Displays
Page 122 of 475

Battery and Charging System (12 volt)
Action
Message
Stop your vehicle as soon as it is safe to do so and
switch off the ignition. Contact your authorized dealer.
Electrical System
Overvoltage Stop Safely
Displays to warn of a low battery condition. Turn offall unneeded electrical accessories. Contact your authorized dealer.
Battery Low See
Manual
Displayed when the charging system needs servicing.If the warning stays on or continues to come on,
contact your authorized dealer as soon as possible.
Check Charging
System
Displayed when the battery management system
detects an extended low-voltage condition. Various
vehicle features will be disabled to help preserve the
battery. Turn off as many of the electrical loads as soon as possible to improve system voltage. If the system voltage has recovered, the disabled features will operate again as normal
Low Battery Features
Temporarily Turned Off
Displayed when the battery management system
determines that the battery is at a low state of charge.
Turn the ignition off as soon as possible to protect the battery. This message will clear once the vehicle has been started and the battery state of charge has
recovered. Turning off unnecessary electrical loads will allow faster battery state-of-charge recovery.
Turn Power Off to
Save Battery
Battery and Charging System (High Voltage) Action
Message
Displays when the stop safety hazard warning lamp isilluminated. This indicates an electrical component
fault/failure that will cause the vehicle to shut down or enter into limited operating mode.
Stop Safely Now
Displays when the vehicle is ready to drive.
Ready to Drive
120
MKZ (CC9) Information Displays
Page 137 of 475

Do not expose discs to direct sunlight
or heat sources for extended periods.
MP3 Track and Folder
Structure
Audio systems capable of recognizing
and playing MP3 individual tracks and
folder structures work as follows:
•
There are two different modes for
MP3 disc playback: MP3 track
mode (system default) and MP3
folder mode.
• MP3 track mode ignores any folder
structure on the MP3 disc. The
player numbers each MP3 track on
the disc (noted by the .mp3 file
extension) from T001 to a
maximum of T255. The maximum
number of playable MP3 files may
be less depending on the structure
of the CD and exact model of radio
present.
• MP3 folder mode represents a
folder structure consisting of one
level of folders. The CD player
numbers all MP3 tracks on the disc
(noted by the .mp3 file extension)
and all folders containing MP3
files, from F001 (folder) T001
(track) to F253 T255.
• Creating discs with only one level
of folders helps with navigation
through the disc files.
If you are burning your own MP3 discs,
it is important to understand how the
system reads the structures you
create. While various files may be
present, (files with extensions other
than mp3), only files with the .mp3 extension are played; other files are
ignored by the system. This enables
you to use the same MP3 disc for a
variety of tasks on your work
computer, home computer and your
in-vehicle system.
In track mode, the system displays
and plays the structure as if it were
only one level deep (all .mp3 files
play, regardless of being in a specific
folder). In folder mode, the system
only plays the .mp3 files in the current
folder.
AUDIO UNIT - VEHICLES
WITH: PREMIUM
AM/FM/CD
WARNING
Driving while distracted can
result in loss of vehicle control,
crash and injury. We strongly
recommend that you use extreme
caution when using any device that
may take your focus off the road. Your
primary responsibility is the safe
operation of your vehicle. We
recommend against the use of any
hand-held device while driving and
encourage the use of voice-operated
systems when possible. Make sure you
are aware of all applicable local laws
that may affect the use of electronic
devices while driving. Note:
The MyLincoln Touch system
controls most of the audio features.
See Entertainment (page 367).
135
MKZ (CC9) Audio System
Page 142 of 475
Note:
When the system is in AUTO
mode, and the interior and exterior
temperatures are high, the system
automatically selects recirculated air
to maximize cooling of the interior.
When the system reaches the selected
air temperature, it automatically
switches to outside air.
Note: When you select windshield
defrosting and defogging, the
instrument panel and footwell level
functions automatically switch off and
air conditioning switches on. Outside
air flows into your vehicle.
Heating the Interior Quickly
1. Press the AUTO button.
2. Adjust the temperature control to the desired setting.
Recommended Settings for
Heating
1. Press the AUTO button.
2. Adjust the temperature control to a comfortable setting.
Cooling the Interior Quickly
1. Press the MAX A/C button.
2. Adjust the temperature control to the desired setting.
Recommended Settings for
Cooling
1. Press the AUTO button.
2. Adjust the temperature to a comfortable setting. Side Window Defogging in Cold
Weather
1. Press the defrost button.
2. Adjust the temperature control to
the desired setting.
HEATED WINDOWS AND
MIRRORS
Heated Rear Window
Note: You must switch the ignition on
to use this feature.
Press the button to clear the rear
window of thin ice and fog. Press the
button again within 10 minutes to
switch it off. It switches off
automatically after 10 minutes, or
when you switch the ignition off.
Do not use razor blades or other
sharp objects to clean the inside
of the rear window or to remove
decals from the inside of the rear
window. This may cause damage
to the heated grid lines, which your
warranty does not cover.
Heated Exterior Mirror
Note: Do not remove ice from the
mirrors with a scraper or attempt to
readjust the mirror glass if it has frozen
in place. These actions could cause
damage to the glass and mirrors.
Note: Do not clean the housing or
glass of any mirror with harsh
abrasives, fuel or other
petroleum-based cleaning products.
140
MKZ (CC9) Climate Control
Page 148 of 475

Power Lumbar
Multi-Contour Front Seats With
Active Motion (If Equipped)
Note:
The massage system will turn
off after 20 minutes. Note:
The engine must be running or
the vehicle must be in accessory mode
to activate the seats.
Note: Allow a few seconds for any
selection to activate. The seatback and
cushion massage cannot function at
the same time. 146
MKZ (CC9) SeatsE144632 E165608 E156301
Page 149 of 475

Lumbar and bolster mode
Massage mode
Upper lumbar
Back massage intensity
adjustment
A
Lumbar decrease
Massage intensity
decrease and off 1
B
Lower lumbar2
Cushion massage
intensity adjustment
C
Lumbar increase
Massage intensity
increase
D
-
On and off
E
1 The massage feature will default to
an alternating massage mode with
back massage intensity adjustment.
The lumbar and bolster feature will
default to the middle lumbar mode.
2 Press C a second time to adjust the
back bolster. Press C a third time to
adjust the cushion bolster.
You can also adjust this feature
through the touch screen. When
switched on, the system displays
directions for you to adjust the lumbar
settings in your seat or to set the
massage function. To access and
make adjustments to the lumbar
setting:
1. Press the Menu Settings icon > Vehicle > Multi-contour Seat.
2. Choose the desired seat to adjust.
3. Press the + or - to adjust the lumbar intensity.
To access and make adjustments to
the massage setting: 1. Press the Menu Settings icon >
Vehicle >Multi-contour Seat.
2. Choose the desired seat to adjust.
3. Press Off, Lo or Hi.
MEMORY FUNCTION WARNINGS
Before activating the seat
memory, make sure that the area
immediately surrounding the seat is
clear of obstructions and that all
occupants are clear of moving parts. Do not use the memory function
when your vehicle is moving.
This feature will automatically recall
the position of the driver's seat, power
mirrors and optional power steering
column. The memory control is
located on the driver
’s door.
147
MKZ (CC9) Seats
Page 157 of 475
Programming your garage door
opener motor
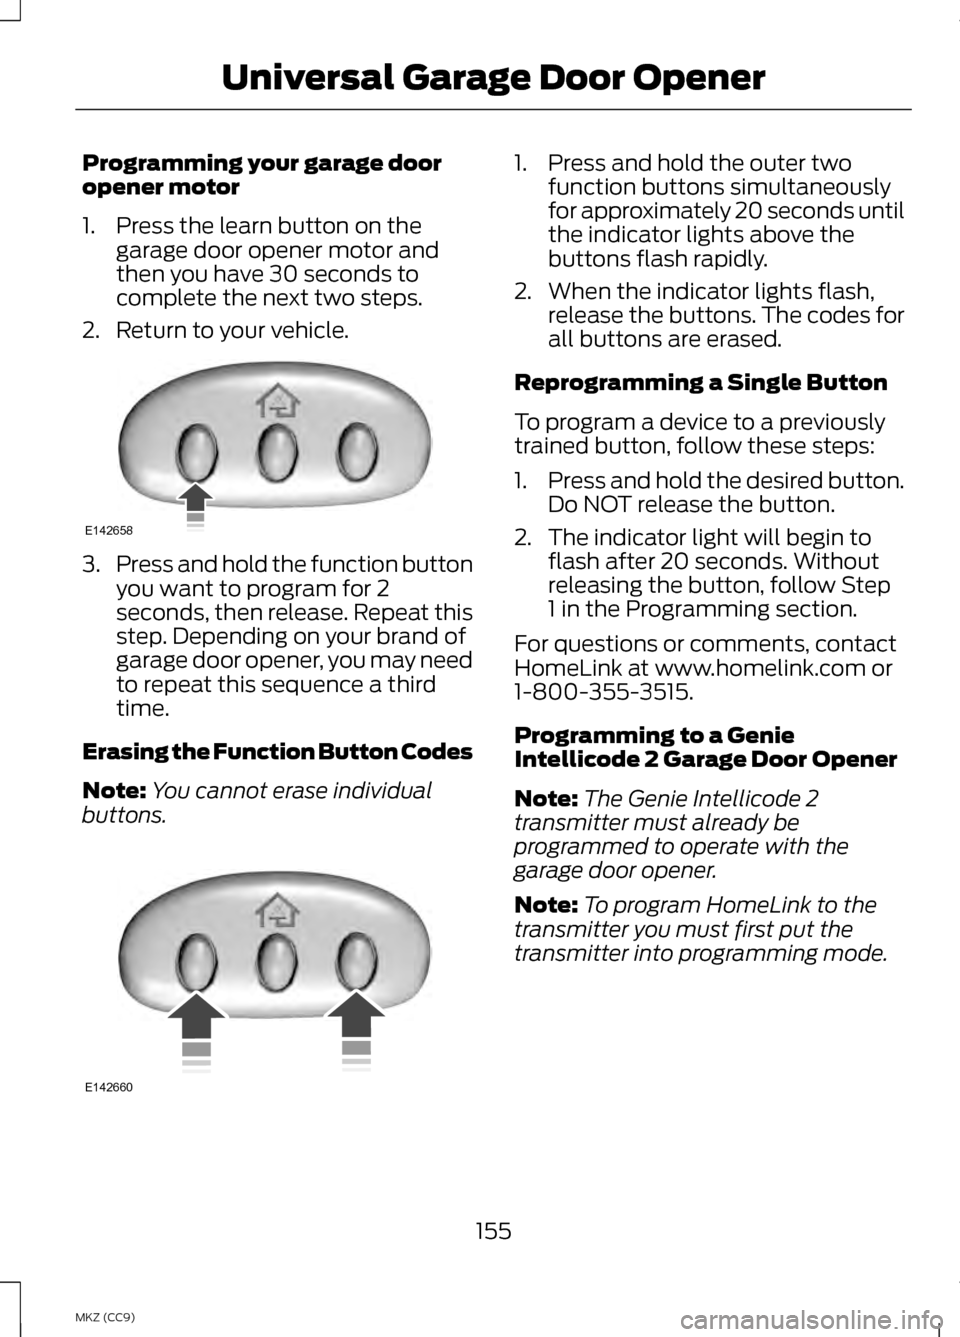
1. Press the learn button on the
garage door opener motor and
then you have 30 seconds to
complete the next two steps.
2. Return to your vehicle. 3.
Press and hold the function button
you want to program for 2
seconds, then release. Repeat this
step. Depending on your brand of
garage door opener, you may need
to repeat this sequence a third
time.
Erasing the Function Button Codes
Note: You cannot erase individual
buttons. 1. Press and hold the outer two
function buttons simultaneously
for approximately 20 seconds until
the indicator lights above the
buttons flash rapidly.
2. When the indicator lights flash, release the buttons. The codes for
all buttons are erased.
Reprogramming a Single Button
To program a device to a previously
trained button, follow these steps:
1. Press and hold the desired button.
Do NOT release the button.
2. The indicator light will begin to flash after 20 seconds. Without
releasing the button, follow Step
1 in the Programming section.
For questions or comments, contact
HomeLink at www.homelink.com or
1-800-355-3515.
Programming to a Genie
Intellicode 2 Garage Door Opener
Note: The Genie Intellicode 2
transmitter must already be
programmed to operate with the
garage door opener.
Note: To program HomeLink to the
transmitter you must first put the
transmitter into programming mode.
155
MKZ (CC9) Universal Garage Door OpenerE142658 E142660