Page 25 of 110
25
ES350_QG_OM33A11U_(U)
Automatic Transmission
■Shifting the shift lever
While the “START STOP ENGINE” switch is in IGNITION ON mode, move the shift
lever with the brake pedal depressed.
When shifting the shift lever between P and D, make sure that the vehicle is com-
pletely stopped.
■Shift position purpose
*1: Shifting the shift lever to D allows the system to select a gear suitable for the driving con-
ditions.
Setting the shift lever to D is recommended for normal driving.
*2: Selecting shift ranges using S mode restricts the upper limit of the possible gear ranges, controls engine braking force, and prevents unnecessary upshifting.
Shift positionObjective or function
PParking the vehicle/starting the engine
RReversing
NNeutral
DNormal driving*1
SS mode driving*2
Page 26 of 110
26
ES350_QG_OM33A11U_(U)
■Selecting gears in the S position
When the shift lever is in S, the sh ift lever can be operated as follows:
Upshifting
Downshifting
The selected shift range, from S1 to S6,
will be displayed in the meter.
The initial shift range in S mode is set
automatically to S5 or S4 according to
vehicle speed. However, the initial shift
range may be set to S3 if AI-SHIFT has
operated while the shift lever was in D.
1
2
■Shift ranges and their functions
Automatically selecting gears between S1 and S6 according to vehicle speed and driv-
ing conditions. But the gear is limited according to selected shift range.
You can choose from 6 levels of engine braking force.
A lower shift range will provide greater engi ne braking force than a higher shift range,
and the engine speed will also increase.
Page 27 of 110
27
ES350_QG_OM33A11U_(U)
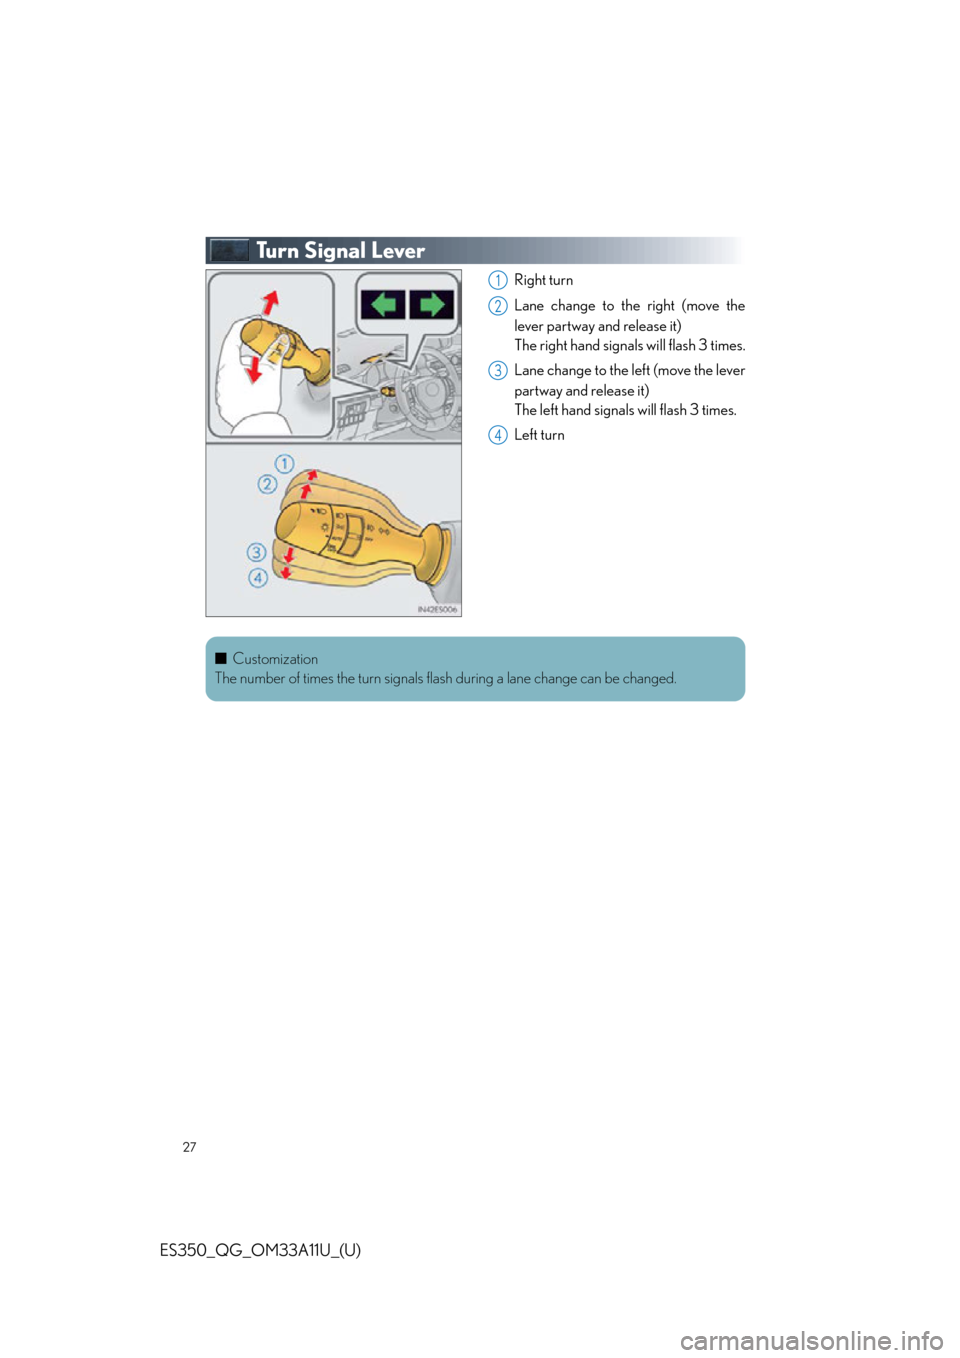
Tu r n S i g n a l L e v e r
Right turn
Lane change to the right (move the
lever partway and release it)
The right hand signals will flash 3 times.
Lane change to the left (move the lever
partway and release it)
The left hand signals will flash 3 times.
Left turn1
2
3
4
■ Customization
The number of times the turn signals flas h during a lane change can be changed.
Page 28 of 110
28
ES350_QG_OM33A11U_(U)
Multi-information Display
■Display contents
● Trip information
• Eco Driving Indicator Zone Display
• Outside temperature
• Current fuel consumption
• Average fuel consumption after refuel-
ing
• Average fuel consumption
• Average vehicle speed
• Driving range
•Elapsed time
• Tire inflation pressure ( P. 4 7 )
● Drive monitor
• Outside temperature
• Average fuel consumption after refuel-
ing
• Driving range
● Intuitive parking assist display
* (if
equipped)
● Dynamic radar cruise control display
* (if
equipped)
● LDA (Lane Departure Alert) display
* (if
equipped)
● Wa r n i n g m e s s a g e s
*: Automatically displayed when the sys-
tem is used. Display can be switched by
pressing the “DISP” button.
The multi-information display presents the dr iver with a variety of driving-related data
including the current outside air temperature.
Page 29 of 110
29
ES350_QG_OM33A11U_(U)
■Switching the display of trip information
Items displayed can be switched by press-
ing the “DISP” button.
If a problem is detected in any of the vehicl e’s systems, a warning message is shown on the
multi-information display.
Page 30 of 110
30
ES350_QG_OM33A11U_(U)
Eco Driving Indicator
Eco Driving Indicator Light
Eco Driving Indicator Light availability
can be customized. The default setting
is off.
During Eco-friendly acceleration (Eco
driving), Eco Driving Indicator Light
will turn on.
When the acceleration exceeds Zone
of Eco driving, or when the vehicle is
stopped, the light turns off.
Eco Driving Indicator Zone Display
Zone of Eco driving
Eco driving ratio based on accelera-
tion
If the acceleration exceeds Zone of
Eco driving, the right side of Eco Driv-
ing Indicator Zone Display blinks.
Eco Driving Indicator will not operate in the
following conditions:
● The shift lever is anything other than D.
● Neither normal mode nor Eco drive
mode is selected.
● The vehicle speed is approximately 80
mph (130 km/h) or higher.1
2
3
4
Page 31 of 110
31
ES350_QG_OM33A11U_(U)
Headlights
The side marker, daytime run-
ning, tail, license plate and
instrument panel lights turn on.
The headlights, parking and all
lights listed above (except day-
time running lights) turn on.
The headlights, daytime
running lights and all the lights
listed above turn on and off
automatically. (When the
“START STOP ENGINE”
switch is in IGNITION ON
mode.)
Off
The daytime running lights turn
on.
■Turning on the high beam headlights
With the headlights on, push the lever
away from you to turn on the high
beams.
Pull the lever toward you to the center
position to turn the high beams off.
Pull the lever toward you and release it
to flash the high beams once.
You can flash the high beams with the
headlights on or off.
(Canada)
(U.S.A.)
1
2
3
4
(U.S.A.)
(Canada)
1
2
Page 32 of 110
32
ES350_QG_OM33A11U_(U)
Automatic High Beam (if equipped)
■Activating the Automatic High Beam system
Push the lever away from you with the
headlight switch in or posi-
tion.
Press the Automatic High Beam
switch.
The Automatic High Beam indicator
will come on when the headlights are
turned on automatically to indicate
that the system is active.
The Automatic High Beam uses an in-vehicle camera sensor to assess the brightness of
streetlights, the lights of oncoming and prec eding vehicles, etc., and automatically turns
high beam on or off as necessary.
1
2