2013 Lancia Thema transmission
[x] Cancel search: transmissionPage 215 of 336

To disengage AutoStick® mode, press
and hold the (+) shift paddle until
“D” or “S” is once again displayed in
the instrument cluster. You can shift
in or out of the AutoStick® mode at
any time without taking your foot off
the accelerator pedal.WARNING!Do not downshift for additional en-
gine braking on a slippery surface.
The drive wheels could lose their grip
and the vehicle could skid, causing a
collision or personal injury.OPERATION – 3.0L DIESEL
ENGINEWhen the shift lever is in the DRIVE
position, the transmission will operate
automatically, shifting between the five
available gears. To engage AutoStick®
(for versions/markets, where pro-
vided), simply tap the shift lever to the
right or left (+/-) while in the DRIVE
position, or tap one of the steering
wheel-mounted shift paddles (+/-), for
versions/markets, where provided.Tapping (-) to enter AutoStick® mode
will downshift the transmission to the
next lower gear, while using (+) to en-
ter AutoStick® mode will retain the
current gear. When AutoStick® is ac-
tive, the current transmission gear is
displayed in the instrument cluster. In
AutoStick® mode, the transmission
will shift up or down when (+/-) is
manually selected by the driver (using
the shift lever, or the shift paddles, for
versions/markets, where provided),
unless an engine lugging or overspeed
condition would result. It will remain
in the selected gear until another up-
shift or downshift is chosen, except as
described below.
The transmission will automati-
cally upshift when necessary to pre-
vent engine over-speed.
If the accelerator is fully pressed, the transmission will downshift
when possible (based on vehicle
speed and gear).
The transmission will automati- cally downshift as the vehicle slows
down (to prevent engine lugging)
and will display the current gear. The transmission will automati-
cally downshift to first gear when
coming to a stop. After a stop, the
driver should manually upshift (+)
the transmission as the vehicle is
accelerated.
You can start out from a stop, in first or second gear. Tapping (+) (at
a stop) will allow starting in second
gear. Starting out in second gear is
helpful in snowy or icy conditions.
The system will ignore attempts to upshift at too low of a vehicle speed.
Avoid using speed control when AutoStick® is engaged.
Transmission shifting will be more noticeable when AutoStick® is en-
gaged.
To disengage AutoStick® mode, hold
the shift lever to the right or press and
hold the (+) shift paddle (for versions/
markets, where provided) until “D” is
once again displayed in the instrument
cluster. You can shift in or out of the
AutoStick® mode at any time without
taking your foot off the accelerator
pedal.
209
Page 218 of 336

CAUTION!(Continued)
Driving through standing water
may cause damage to your vehicle’s
drivetrain components. Always in-
spect your vehicle’s fluids (i.e., en-
gine oil, transmission, axle, etc.) for
signs of contamination (i.e., fluid
that is milky or foamy in appear-
ance) after driving through stand-
ing water. Do not continue to oper-
ate the vehicle if any fluid appears
contaminated, as this may result in
further damage. Such damage is
not covered by the New Vehicle
Limited Warranty.
Getting water inside your vehicle’s
engine can cause it to lock up and
stall out, and cause serious internal
damage to the engine. Such dam-
age is not covered by the New Ve-
hicle Limited Warranty.
WARNING!
Driving through standing water limits your vehicle’s traction ca-
pabilities. Do not exceed 8 km/h
when driving through standing
water.
Driving through standing water
limits your vehicle’s braking ca-
pabilities, which increases stop-
ping distances. Therefore, after
driving through standing water,
drive slowly and lightly press on
the brake pedal several times to
dry the brakes.
Getting water inside your vehi-
cle’s engine can cause it to lock up
and stall out, and leave you
stranded.
Failure to follow these warnings may result in injuries that are se-
rious or fatal to you, your passen-
gers, and others around you. POWER STEERING
Your vehicle is equipped with an
electro-hydraulic power steering sys-
tem that will give you good vehicle
response and increased ease of ma-
neuverability in tight spaces. The sys-
tem will vary its assist to provide light
efforts while parking and good feel
while driving. If the electro-hydraulic
power steering system experiences a
fault that prevents it from providing
power steering assist, then the system
will provide mechanical steering ca-
pability.
CAUTION!
Extreme steering maneuvers may
cause the electrically driven pump
to reduce or stop power steering
assistance in order to prevent dam-
age to the system. Normal opera-
tion will resume once the system is
allowed to cool.
212
Page 219 of 336

If the “SERVICE POWER
STEERING SYSTEM”
message and a flashing icon
are displayed on the EVIC
screen, it indicates that the vehicle
needs to be taken to the dealer for
service. It is likely the vehicle has lost
power steering assistance. Refer to
“Electronic Vehicle Information
Center (EVIC)” in “Understanding
Your Instrument Panel” for further
information.
If the “POWER STEERING SYSTEM
OVER TEMP” message and an icon
are displayed on the EVIC screen, it
indicates that extreme steering ma-
neuvers may have occurred, which
caused an over temperature condition
in the power steering system. You will
lose power steering assistance mo-
mentarily until the over temperature
condition no longer exists. Once driv-
ing conditions are safe, then pull over
and let vehicle idle for a few moments
until the light turns off. Refer to
“Electronic Vehicle Information Cen-
ter (EVIC)” in “Understanding Your
Instrument Panel” for further infor-
mation. NOTE:
Even if power steering assistance
is no longer operational, it is still
possible to steer the vehicle. Un-
der these conditions there will be
a substantial increase in steering
effort, especially at very low ve-
hicle speeds and during parking
maneuvers.If the condition persists, see your
authorized dealer for service.PARKING BRAKE
Before leaving the vehicle, make sure
that the parking brake is fully applied
and place the shift lever in the PARK
position.
The foot operated parking brake is
located below the lower left corner of
the instrument panel. To apply the
park brake, firmly push the park
brake pedal fully. To release the park-
ing brake, press the park brake pedal
a second time and let your foot up as
you feel the brake disengage.
When the parking brake is applied
with the ignition switch in the ON po-
sition, the “Brake Warning Light” in
the instrument cluster will illuminate.NOTE:
When the parking brake is ap-
plied and the transmission is
placed in gear, the “Brake Warn-
ing Light” will flash. If vehicle
speed is detected, a chime will
sound to alert the driver. Fully
release the parking brake before
attempting to move the vehicle.
This light only shows that the parking brake is applied. It does
not show the degree of brake
application.
Parking Brake
213
Page 220 of 336

When parking on a hill, it is important
to turn the front wheels toward the
curb on a downhill grade and away
from the curb on an uphill grade.
Apply the parking brake before plac-
ing the shift lever in PARK, otherwise
the load on the transmission locking
mechanism may make it difficult to
move the shift lever out of PARK. The
parking brake should always be ap-
plied whenever the driver is not in the
vehicle.WARNING!
Never use the PARK position as asubstitute for the parking brake.
Always apply the parking brake
fully when parked to guard
against vehicle movement and
possible injury or damage.
When leaving the vehicle, always
remove the key fob from the igni-
tion and lock your vehicle.
(Continued)
WARNING!(Continued)
Never leave children alone in a vehicle, or with access to an un-
locked vehicle. Allowing children
to be in a vehicle unattended is
dangerous for a number of rea-
sons. A child or others could be
seriously or fatally injured. Chil-
dren should be warned not to
touch the parking brake, brake
pedal or the shift lever.
Do not leave the key fob in or near the vehicle, and do not leave a
vehicle equipped with Keyless
EnterNGo™ in the ACC or ON/
RUN mode. A child could operate
power windows, other controls, or
move the vehicle.
Be sure the parking brake is fully disengaged before driving; failure
to do so can lead to brake failure
and a collision.
WARNING! (Continued)
Always fully apply the parking
brake when leaving your vehicle,
or it may roll and cause damage or
injury. Also be certain to leave the
transmission in PARK. Failure to
do so may allow the vehicle to roll
and cause damage or injury.CAUTION!
If the “Brake Warning Light” re-
mains on with the parking brake
released, a brake system malfunc-
tion is indicated. Have the brake
system serviced by an authorized
dealer immediately.
ANTI-LOCK BRAKE
SYSTEM
The Anti-Lock Brake System (ABS)
provides increased vehicle stability
and brake performance under most
braking conditions. The system auto-
matically “pumps” the brakes during
severe braking conditions to prevent
wheel lock-up.
214
Page 251 of 336

TRAILER TOWING WEIGHTS (MAXIMUM TRAILER WEIGHT RATINGS)
The following chart provides the maximum trailer weight ratings towable for your given drivetrain.
Engine/TransmissionFrontal AreaMax. GTW
(Gross Trailer Wt.) Max. Tongue Wt.
(See Note)
3.6L Automatic 2.04 sq m 1 725 kg86 kg
3.0L Diesel Automatic 2.97 sq m 1 996 kg100 kg
Refer to local laws for maximum trailer towing speeds
NOTE: The trailer tongue weight must be considered as part of the combined weight of occupants and cargo,
and it should never exceed the weight referenced on the “Tire and Loading Information” placard. Refer to
“Tire Safety Information” in “Starting and Operating” for further information.
TRAILER AND TONGUE
WEIGHT
Always load a trailer with 60% to
65% of the weight in the front of the
trailer. This places 5% of the Gross
Trailer Weight (GTW) on the tow
hitch of your vehicle. Loads balanced
over the wheels or heavier in the rear
can cause the trailer to sway severely
side to side which will cause loss of
control of the vehicle and trailer. Fail-
ure to load trailers heavier in front is
the cause of many trailer collisions.
Never exceed the maximum tongue
weight stamped on your bumper or
trailer hitch. Consider the following items when
computing the weight on the rear axle
of the vehicle:
The tongue weight of the trailer.
The weight of any other type of
cargo or equipment put in or on
your vehicle. The weight of the driver and all
passengers.
NOTE: Remember that every-
thing put into or on the trailer adds
to the load on your vehicle. Also,
additional factory-installed op-
tions or dealer-installed options
must be considered as part of the
total load on your vehicle. Refer to
the “Tire and Loading Informa-
tion” placard for the maximum
combined weight of occupants and
cargo for your vehicle.
245
Page 252 of 336

TOWING REQUIREMENTS
To promote proper break-in of your
new vehicle drivetrain components
the following guidelines are recom-
mended:CAUTION!
Do not tow a trailer at all duringthe first 805 km the new vehicle is
driven. The engine, axle or other
parts could be damaged.
Then, during the first 805 km
that a trailer is towed, do not
drive over 80 km/h and do not
make starts at full throttle. This
helps the engine and other parts
of the vehicle wear in at the
heavier loads.WARNING!
Improper towing can lead to an in-
jury collision. Follow these guide-
lines to make your trailer towing as
safe as possible:
(Continued)
WARNING!(Continued)
Make certain that the load is se- cured in the trailer and it will not
shift during travel. When traile-
ring cargo that is not fully se-
cured, dynamic load shifts can
occur that may be difficult for the
driver to control. You could lose
control of your vehicle and have a
collision.
When hauling cargo or towing a trailer, do not overload your ve-
hicle or trailer. Overloading can
cause a loss of control, poor per-
formance, or damage to brakes,
axle, engine, transmission, steer-
ing, suspension, chassis structure,
or tires.
Safety chains must always be used
between your vehicle and trailer.
Always connect the chains to the
frame or hook retainers of the ve-
hicle hitch. Cross the chains under
the trailer tongue and allow
enough slack for turning corners.
(Continued)
WARNING! (Continued)
Vehicles with trailers should not be parked on a grade. When
parking, apply the parking brake
on the tow vehicle. Put the tow
vehicle automatic transmission in
PARK. Always, block or "chock"
the trailer wheels.
GCWR must not be exceeded.
Total weight must be distrib-
uted between the tow vehicle
and the trailer such that the
following four ratings are not
exceeded:
1. Max loading as defined on the
“Tire and Loading Information”
placard.
2. GTW
3. GAWR
4.
Tongue weight rating for the
trailer hitch utilized. (This re-
quirement may limit the ability to
always achieve the 10% to 15%
range of tongue weight as a per-
centage of total trailer weight.)
246
Page 255 of 336
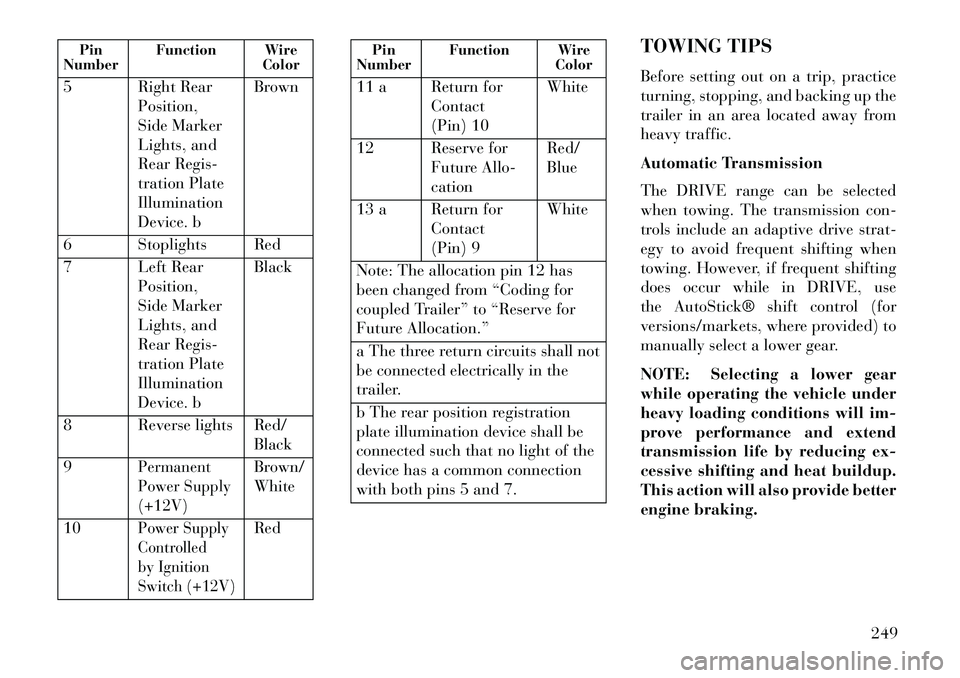
Pin
Number Function Wire
Color
5 Right Rear Position,
Side Marker
Lights, and
Rear Regis-
tration Plate
Illumination
Device. b Brown
6 Stoplights Red
7 Left Rear Position,
Side Marker
Lights, and
Rear Regis-
tration Plate
Illumination
Device. b Black
8 Reverse lights Red/ Black
9
Permanent
Power Supply
(+12V)
Brown/
White
10
Power Supply
Controlled
by Ignition
Switch (+12V)
Red
Pin
Number Function Wire
Color
11 a Return for Contact
(Pin) 10 White
12 Reserve for Future Allo-
cation Red/
Blue
13 a Return for Contact
(Pin) 9 White
Note: The allocation pin 12 has
been changed from “Coding for
coupled Trailer” to “Reserve for
Future Allocation.”
a The three return circuits shall not
be connected electrically in the
trailer.
b The rear position registration
plate illumination device shall be
connected such that no light of the
device has a common connection
with both pins 5 and 7. TOWING TIPS
Before setting out on a trip, practice
turning, stopping, and backing up the
trailer in an area located away from
heavy traffic.
Automatic Transmission
The DRIVE range can be selected
when towing. The transmission con-
trols include an adaptive drive strat-
egy to avoid frequent shifting when
towing. However, if frequent shifting
does occur while in DRIVE, use
the AutoStick® shift control (for
versions/markets, where provided) to
manually select a lower gear.
NOTE: Selecting a lower gear
while operating the vehicle under
heavy loading conditions will im-
prove performance and extend
transmission life by reducing ex-
cessive shifting and heat buildup.
This action will also provide better
engine braking.
249
Page 256 of 336

If you REGULARLY tow a trailer for
more than 45 minutes of continuous
operation, then change the automatic
transmission fluid and filter as speci-
fied for “police, taxi, fleet, or frequent
trailer towing.” Refer to the “Mainte-
nance Schedule” for the proper main-
tenance intervals.
Electronic Speed Control
Do not use in hilly terrain or withheavy loads.
When using the speed control, if you experience speed drops greater
than 16 km/h, disengage until you
can get back to cruising speed.
Use speed control in flat terrain and with light loads to maximize fuel
efficiency.
AutoStick® (for versions/markets,
where provided)
– When using the AutoStick® shift control, select the highest gear that
allows for adequate performance
and avoids frequent downshifts. For example, choose “4” if the de-
sired speed can be maintained.
Choose “3” or “2” if needed to
maintain the desired speed.
– To prevent excess heat generation, avoid continuous driving at high
RPM. Reduce vehicle speed as nec-
essary to avoid extended driving at
high RPM. Return to a higher gear
or vehicle speed when grade and
road conditions allow.
Cooling System
To reduce potential for engine and
transmission overheating, take the
following actions:
City Driving
When stopped for short periods of
time, shift the transmission into NEU-
TRAL and increase engine idle speed.
Highway Driving
Reduce speed.
Air Conditioning
Turn off temporarily. TRAILER HITCH
ATTACHING POINTS
Your vehicle will require extra equip-
ment to tow a trailer safely and effi-
ciently. The trailer tow hitch must be
attached to your vehicle using the
provided attaching points on the ve-
hicle's frame. Refer to the following
chart to determine the accurate at-
taching points. Other equipment,
such as trailer sway controls and
braking equipment, trailer equalizing
(leveling) equipment and low profile
mirrors, may also be required or
strongly recommended.
250