2013 Lancia Thema headlights
[x] Cancel search: headlightsPage 120 of 336

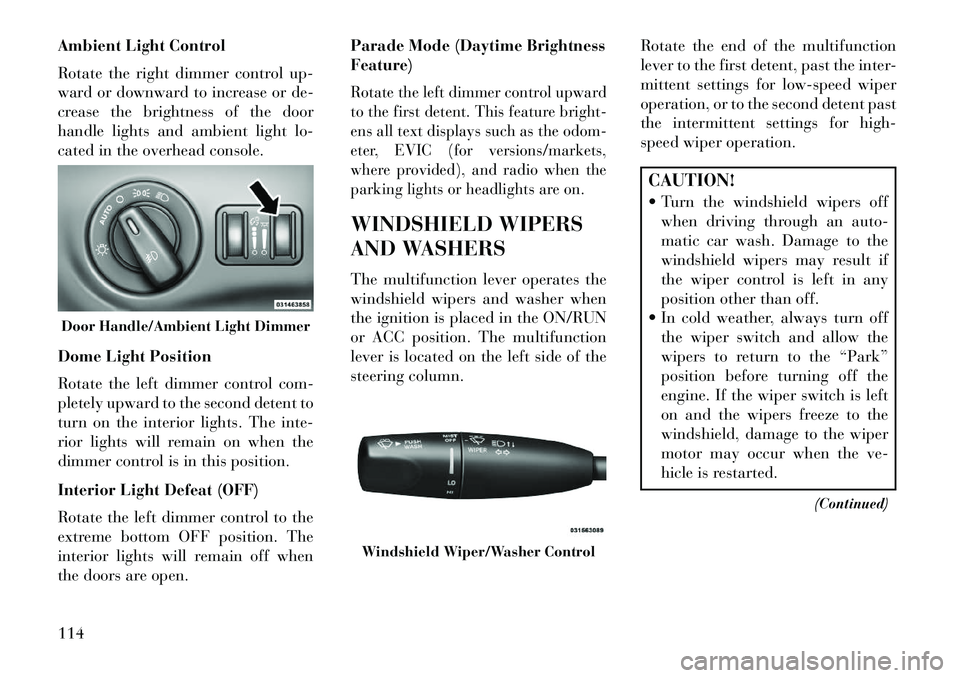
Ambient Light Control
Rotate the right dimmer control up-
ward or downward to increase or de-
crease the brightness of the door
handle lights and ambient light lo-
cated in the overhead console.
Dome Light Position
Rotate the left dimmer control com-
pletely upward to the second detent to
turn on the interior lights. The inte-
rior lights will remain on when the
dimmer control is in this position.
Interior Light Defeat (OFF)
Rotate the left dimmer control to the
extreme bottom OFF position. The
interior lights will remain off when
the doors are open.Parade Mode (Daytime Brightness
Feature)
Rotate the left dimmer control upward
to the first detent. This feature bright-
ens all text displays such as the odom-
eter, EVIC (for versions/markets,
where provided), and radio when the
parking lights or headlights are on.WINDSHIELD WIPERS
AND WASHERS
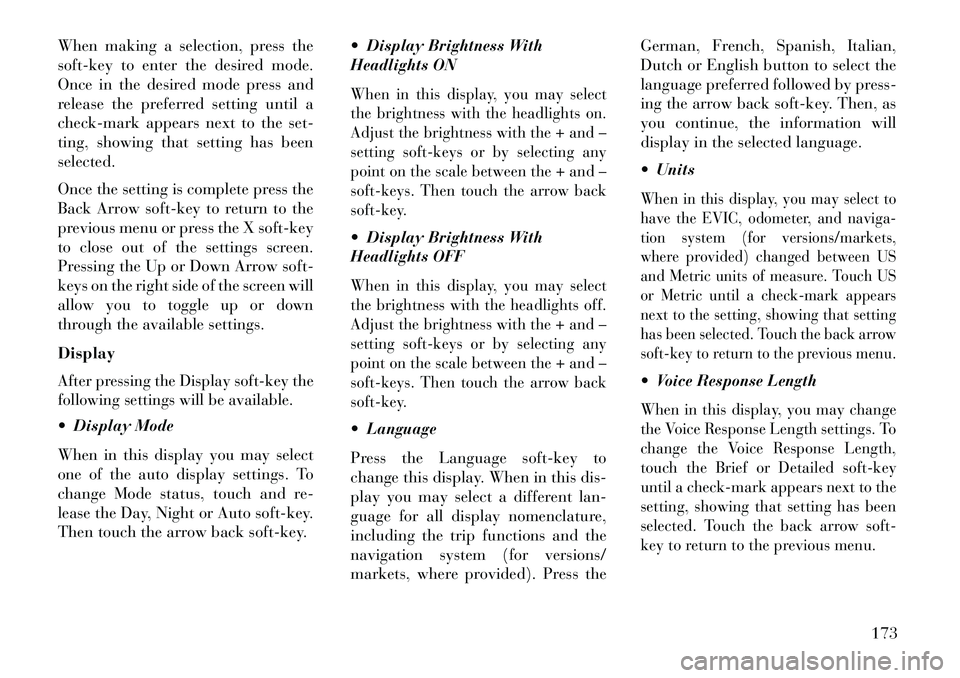
The multifunction lever operates the
windshield wipers and washer when
the ignition is placed in the ON/RUN
or ACC position. The multifunction
lever is located on the left side of the
steering column.
Rotate the end of the multifunction
lever to the first detent, past the inter-
mittent settings for low-speed wiper
operation, or to the second detent past
the intermittent settings for high-
speed wiper operation.
CAUTION!
Turn the windshield wipers off
when driving through an auto-
matic car wash. Damage to the
windshield wipers may result if
the wiper control is left in any
position other than off.
In cold weather, always turn off the wiper switch and allow the
wipers to return to the “Park”
position before turning off the
engine. If the wiper switch is left
on and the wipers freeze to the
windshield, damage to the wiper
motor may occur when the ve-
hicle is restarted.
(Continued)
Door Handle/Ambient Light Dimmer
Windshield Wiper/Washer Control
114
Page 122 of 336

The sensitivity of the system can be
adjusted with the multifunction lever.
Wiper delay position 1 is the least sen-
sitive, and wiper delay position 4 is the
most sensitive. Setting 3 should be used
for normal rain conditions. Settings 1
and 2 can be used if the driver desires
less wiper sensitivity. Settings 4 can be
used if the driver desires more sensitiv-
ity. The rain sense wipers will auto-
matically change between an intermit-
tent wipe, slow wipe and a fast wipe
depending on the amount of moisture
that is sensed on the windshield. Place
the wiper switch in the OFF position
when not using the system.The Rain Sensing feature can be
turned on and off using the Uconnect
Touch™ System, refer to “Uconnect
Touch™ Settings” in “Understanding
Your Instrument Panel” for further
information.
NOTE:
The Rain Sensing feature will not
operate when the wiper speed is
in the low or high position.
The Rain Sensing feature maynot function properly when ice
or dried salt water is present on
the windshield.
The use of products containing wax or silicone may reduce rain
sensor performance.
The Rain Sensing system has protec-
tive features for the wiper blades and
arms. It will not operate under the
following conditions:
Low Temperature Wipe Inhibit
— The Rain Sensing feature will
not operate when the ignition is
placed in the RUN position, the ve-
hicle is stationary and the outside
temperature is below 0°C, unless
the wiper control on the multifunc-
tion lever is moved, the vehicle
speed becomes greater than 0 km/h
or the outside temperature rises
above freezing.
Neutral Wipe Inhibit — The Rain
Sensing feature will not operate
when the ignition is placed in the
RUN position, the transmission
shift lever is in the NEUTRAL po-
sition and the vehicle speed is less than 8 km/h, unless the wiper con-
trol on the multifunction lever is
moved or the shift lever is moved
out of the NEUTRAL position.
HEADLIGHT WASHERS
The multifunction lever operates the
headlight washers when the ignition
switch is in the ON position and the
headlights are turned on. The multi-
function lever is located on the left
side of the steering column.
To use the headlight washers, push
the multifunction lever inward (to-
ward the steering column) to the sec-
ond detent and release it. The head-
light washers will spray a timed high-
pressure spray of washer fluid onto
each headlight lens. In addition, the
windshield washers will spray the
windshield and the windshield wipers
will cycle.
NOTE: After turning the ignition
switch and headlights ON, the
headlight washers will operate on
the first spray of the windshield
washer and then every eleventh
spray after that.
116
Page 164 of 336

INSTRUMENT CLUSTER
DESCRIPTIONS
1. TachometerThis gauge measures engine revo-
lutions-per-minute (RPM x 1000).2. Park/Headlight ON IndicatorThis indicator will illumi-
nate when the park lights or
headlights are turned on.
3. Turn Signal Indicators
The arrow will flash with the
exterior turn signal when the
turn signal lever is operated.
If the vehicle electronics sense that the
vehicle is driven more than 1.6 km
with either turn signal on, a continu-
ous chime will sound to alert you to
turn the signals off. If either indicator
flashes at a rapid rate, check for a
defective outside light bulb.
4. Front Fog Light Indicator
This indicator will illuminate
when the front fog lights are on.
5. Rear Fog Light Indicator
This indicator will illuminate
when the rear fog lights are on.
6. High Beam Indicator This indicator shows that the
high beam headlights are on.
Push the multifunction lever forward
to switch the headlights to high beam,
and pull toward yourself (normal po-
sition) to return to low beam.
7. Odometer Display / Electronic
Vehicle Information Center (EVIC)
Display
Odometer Display
The odometer display shows the total
distance the vehicle has been driven.
Electronic Vehicle Information
Center (EVIC) Display
The Electronic Vehicle Information
Center (EVIC) features a driver-
interactive display that is located in
the instrument cluster. For further in-
formation, refer to “Electronic Ve-
hicle Information Center (EVIC)”. The Shift Lever Indicator is self-
contained within the EVIC display. It
displays the gear position of the auto-
matic transmission.
NOTE:
You must apply the brakes be-
fore shifting from PARK.
The highest available transmis-
sion gear is displayed in the lower
right corner of the Electronic Ve-
hicle Information Center (EVIC)
whenever the Electronic Range
Select (ERS) feature is active. Use
the +/- selector on the shift lever
to activate ERS (for versions/
markets, where provided). Refer
to “Automatic Transmission” in
“Starting And Operating” for fur-
ther information.8. Tire Pressure Monitoring
Telltale Light
Each tire, including the
spare (if provided), should
be checked monthly when
cold and inflated to the in-
flation pressure recommended by the
158
Page 179 of 336

When making a selection, press the
soft-key to enter the desired mode.
Once in the desired mode press and
release the preferred setting until a
check-mark appears next to the set-
ting, showing that setting has been
selected.
Once the setting is complete press the
Back Arrow soft-key to return to the
previous menu or press the X soft-key
to close out of the settings screen.
Pressing the Up or Down Arrow soft-
keys on the right side of the screen will
allow you to toggle up or down
through the available settings.
DisplayAfter pressing the Display soft-key the
following settings will be available. Display Mode
When in this display you may select
one of the auto display settings. To
change Mode status, touch and re-
lease the Day, Night or Auto soft-key.
Then touch the arrow back soft-key. Display Brightness With
Headlights ON
When in this display, you may select
the brightness with the headlights on.
Adjust the brightness with the + and –
setting soft-keys or by selecting any
point on the scale between the + and –
soft-keys. Then touch the arrow back
soft-key. Display Brightness With
Headlights OFFWhen in this display, you may select
the brightness with the headlights off.
Adjust the brightness with the + and –
setting soft-keys or by selecting any
point on the scale between the + and –
soft-keys. Then touch the arrow back
soft-key. Language
Press the Language soft-key to
change this display. When in this dis-
play you may select a different lan-
guage for all display nomenclature,
including the trip functions and the
navigation system (for versions/
markets, where provided). Press theGerman, French, Spanish, Italian,
Dutch or English button to select the
language preferred followed by press-
ing the arrow back soft-key. Then, as
you continue, the information will
display in the selected language.
Units
When in this display, you may select to
have the EVIC, odometer, and naviga-
tion system (for versions/markets,
where provided) changed between US
and Metric units of measure. Touch US
or Metric until a check-mark appears
next to the setting, showing that setting
has been selected. Touch the back arrow
soft-key to return to the previous menu. Voice Response LengthWhen in this display, you may change
the Voice Response Length settings. To
change the Voice Response Length,
touch the Brief or Detailed soft-key
until a check-mark appears next to the
setting, showing that setting has been
selected. Touch the back arrow soft-
key to return to the previous menu.
173
Page 183 of 336

Lights
After pressing the Lights soft-key the
following settings will be available.
Headlight Off DelayWhen this feature is selected, the driver
can choose to have the headlights re-
main on for 0, 30, 60, or 90 seconds
when exiting the vehicle. To change the
Headlight Off Delay status touch the 0,
30, 60 or 90 soft-key. Then touch the
arrow back soft-key. Headlight Illumination On
Approach
When this feature is selected, the
headlights will activate and remain on
for 0, 30, 60, or 90 seconds when the
doors are unlocked with the Remote
Keyless Entry (RKE) transmitter. To
change the Illuminated Approach sta-
tus, touch the + or - soft-key to select
your desired time interval. Touch the
back arrow soft-key to return to the
previous menu. Headlights With Wipers (for
versions/markets, where provided)
When this feature is selected, and the
headlight switch is in the AUTO posi-
tion, the headlights will turn on
approximately 10 seconds after the
wipers are turned on. The headlights
will also turn off when the wipers are
turned off if they were turned on by
this feature. To make your selection,
touch the Headlights With Wipers
soft-key, until a check-mark appears
next to setting, showing that setting
has been selected. Touch the back
arrow soft-key to return to the previ-
ous menu.
Auto Dim High Beams
“SmartBeam™” (for versions/
markets, where provided)
When this feature is selected, the high
beam headlights will deactivate auto-
matically under certain conditions. To
make your selection, touch the Auto
High Beams soft-key, until a check-
mark appears next to setting, showing
that setting has been selected. Touch
the back arrow soft-key to return to the previous menu. Refer to “Lights/
SmartBeam™ (for versions/markets,
where provided)” in “Understanding
The Features Of Your Vehicle” for fur-
ther information.
Daytime Running Lights (for
versions/markets, where provided)
When this feature is selected, the
headlights will turn on whenever the
engine is running. To make your se-
lection, touch the Daytime Running
Lights soft-key, until a check-mark
appears next to setting, showing that
setting has been selected. Touch the
back arrow soft-key to return to the
previous menu.
Steering Directed Lights (for
versions/markets, where provided)When this feature is selected, the head-
lights turn relative to a change in direc-
tion of the steering wheel. To make
your selection, touch the Steering Di-
rected Lights soft-key, until a check-
mark appears next to setting, showing
that setting has been selected. Touch
the back arrow soft-key to return to the
previous menu.
177
Page 184 of 336

Headlight Dipped Beam (Traffic
Changeover) (for versions/markets,
where provided)Low beam headlights have more con-
trol of upward light and direct most of
their light downward and either to the
left for right hand drive countries or to
the right for left hand drive countries to
provide safe forward visibility without
excessive glare.Doors & Locks
After pressing the Doors & Locks soft-
key the following settings will be
available.
Auto Unlock On ExitWhen this feature is selected, all doors
will unlock when the vehicle is stopped
and the transmission is in the PARK or
NEUTRAL position and the driver's
door is opened. To make your selection,
touch the Auto Unlock On Exit soft-
key, until a check-mark appears next
to setting, showing that setting has
been selected. Touch the back arrow
soft-key to return to the previous
menu.
1st Press Of Key Fob Unlocks
When 1st Press Of Key Fob Unlocks is
selected, only the driver's door will
unlock on the first press of the Remote
Keyless Entry (RKE) transmitter UN-
LOCK button. When 1st Press Of Key
Fob Unlocks is selected, you must
press the RKE transmitter UNLOCK
button twice to unlock the passenger's
doors. When Unlock All Doors On 1st
Press is selected, all of the doors will
unlock on the first press of the RKE
transmitter UNLOCK button.
NOTE: If the vehicle is pro-
grammed 1st Press Of Key Fob Un-
locks, all doors will unlock no
matter which Passive Entry
equipped door handle is grasped.
If 1st Press Of Key Fob Unlocks is
programmed, only the driver’s
door will unlock when the driver’s
door is grasped. With Passive En-
try, if 1st Press Of Key Fob Unlocks
is programmed touching the
handle more than once will only
result in the driver’s door opening.
If driver door first is selected, oncethe driver door is opened, the inte-
rior door lock/unlock switch can
be used to unlock all doors (or use
RKE transmitter).
Passive Entry
This feature allows you to lock and
unlock the vehicle’s door(s) without
having to press the Remote Keyless
Entry (RKE) transmitter lock or un-
lock buttons. To make your selection,
touch the Passive Entry soft-key, until
a check-mark appears next to setting,
showing that setting has been selected.
Touch the back arrow soft-key to re-
turn to the previous menu. Refer to
“Keyless Enter-N-Go” in “Things To
Know Before Starting Your Vehicle”. Personal Settings Linked To
FOB (for versions/markets,
where provided)This feature provides automatic driver
seat positioning to enhance driver mo-
bility when entering and exiting the
vehicle. To make your selection, touch
the Personal Settings Linked To FOB
soft-key, until a check-mark appears
next to setting, showing that setting
178
Page 296 of 336

Cleaning Headlights
Your vehicle has plastic headlights
that are lighter and less susceptible to
stone breakage than glass headlights.Plastic is not as scratch resistant as
glass and therefore different lens clean-
ing procedures must be followed.To minimize the possibility of scratch-
ing the lenses and reducing light out-
put, avoid wiping with a dry cloth. To
remove road dirt, wash with a mild
soap solution followed by rinsing.Do not use abrasive cleaning compo-
nents, solvents, steel wool or other ag-
gressive material to clean the lenses.Glass Surfaces
All glass surfaces should be cleaned
on a regular basis with any commer-
cial household-type glass cleaner.
Never use an abrasive type cleaner.
Use caution when cleaning the inside
rear window equipped with an elec-
tric defroster. Do not use scrapers or
other sharp instruments that may
scratch the elements.When cleaning the rear view mirror,
spray cleaner on the towel or rag that
you are using. Do not spray cleaner
directly on the mirror.
Cleaning Plastic Instrument
Cluster Lenses
The lenses in front of the instruments
in this vehicle are molded in clear
plastic. When cleaning the lenses,
care must be taken to avoid scratch-
ing the plastic.
1. Clean with a wet soft rag. A mild
soap solution may be used, but do not
use high alcohol content or abrasive
cleaners. If soap is used, wipe clean
with a clean damp rag.
2. Dry with a soft cloth.
Seat Belt Maintenance
Do not bleach, dye, or clean the belts
with chemical solvents or abrasive
cleaners. This will weaken the fabric.
Sun damage can also weaken the fabric.If the belts need cleaning, use a mild
soap solution, or lukewarm water. Do
not remove the belts from the vehicle
to wash them.Replace the belts if they appear frayed
or worn or if the buckles do not work
properly.
Cleaning The Center Console
Cupholders
Clean with a damp cloth or towel using
a mild detergent with the cupholder in
the center console.NOTE: The cupholder cannot be
removed.
FUSES
Integrated Power ModuleThe Integrated Power Module is lo-
cated in the engine compartment. This
module contains fuses and relays.
Integrated Power Module
290
Page 326 of 336

About Your Brakes. . . . . . . . . . .213
ABS (Anti-Lock Brake System) . . .214
Adaptive Cruise Control (ACC) (Cruise Control) . . . . . . . . . . .121
Adding Engine Coolant (Antifreeze) . . . . . . . . . . . . . .282
Adding Fuel . . . . . . . . . . . . . . .241
Adding Washer Fluid . . . . . . . . .279
Additives, Fuel . . . . . . . . . . . . . .239
Adjustable Pedals . . . . . . . . . . . .119
Airbag . . . . . . . . . . . . . . . . .36, 43
Airbag Deployment . . . . . . . . . . .43
Airbag Light . . . . . . .41, 45, 57, 160
Airbag Maintenance . . . . . . . . . . .44
Airbag, Side . . . . . . . .38, 41, 42, 43
Airbag, Window (Side Curtain) . . . . . . . .38, 41, 43
Air Cleaner, Engine (Engine Air Cleaner Filter) . . . . . . . . . .275
Air Conditioner Maintenance . . . .277
Air Conditioning Filter . . . . .189, 277
Air Conditioning Refrigerant . . . .277
Air Conditioning System . . .188, 277
Air Pressure, Tires . . . . . . . . . . .228
Alarm Light . . . . . . . . . . . . . . .162
Alarm System (Security Alarm) . . . . . . . . . . . . . . .15, 16
All Wheel Drive (AWD) . . . .210, 287Alterations/Modifications, Vehicle
. . .7
Antifreeze (Engine Coolant) . . . . . . . . . . . .282, 302
Disposal . . . . . . . . . . . . . . .283
Anti-Lock Brake System (ABS) . . . . . . . . .214, 216
Anti-Lock Warning Light . . . . . .161
Assist, Hill Start . . . . . . . . . . . . .218
Auto Down Power Windows . . . . . .25
Automatic Dimming Mirror . . . . . .67
Automatic Door Locks . . . . . . . . .21
Automatic Headlights . . . . . . . . .109
Automatic Oil Change Indicator . .168
Automatic Temperature Control (ATC) . . . . . . . . . . . .188
Automatic Transmission . . .200, 204,
286, 287
Adding Fluid . . . . . . . . .287, 304
Autostick . . . . . . . . . . . . . . .208
Fluid and Filter Changes . . . .287
Fluid Change . . . . . . . . . . . .287
Fluid Level Check . . . . . . . . .286
Fluid Type . . . . . . . . . .286, 304
Gear Ranges . . . . . . . . . . . . .201
Special Additives . . . . . . . . . .286
Automatic Transmission Limp Home Mode . . . . . . . . . . . . . .203
Autostick . . . . . . . . . . . . . . . . .208 Auto Unlock, Doors
. . . . . . . . . . .21
Auto Up Power Windows . . . . . . . .25
Axle Fluid . . . . . . . . . . . . . . . . .304
Axle Lubrication (Axle Fluid) . . . .304
Battery . . . . . . . . . . . . . . . . . . .276
Keyless Transmitter
Replacement (RKE) . . . . . . . . .19
Location . . . . . . . . . . . . . . .276
Belts, Seat . . . . . . . . . . . . . . .29, 57
Body Mechanism Lubrication . . . .278
B-Pillar Location . . . . . . . . . . . .225
Brake Assist System . . . . . . . . . .216
Brake Control System, Electronic . . . . . . . . . . . . . . .216
Brake Fluid . . . . . . . . . . . . . . . .304
Brake, Parking . . . . . . . . . . . . . .213
Brakes . . . . . . . . . . . . . . . . . . .284
Brake System . . . . . . . . . . . . . . .284
Anti-Lock (ABS) . . . . . . . . . .214
Fluid Check . . . . . . . . .285, 304
Master Cylinder . . . . . . . . . .285
Parking . . . . . . . . . . . . . . . .213
Warning Light . . . . . . . . . . .160
Brake/Transmission Interlock . . . .200
Break-In Recommendations, New Vehicle . . . . . . . . . . . . . . .55
Brightness, Interior Lights . . . . . .113
320