2013 KIA VENGA ECU
[x] Cancel search: ECUPage 203 of 751
4 131
Features of your vehicle
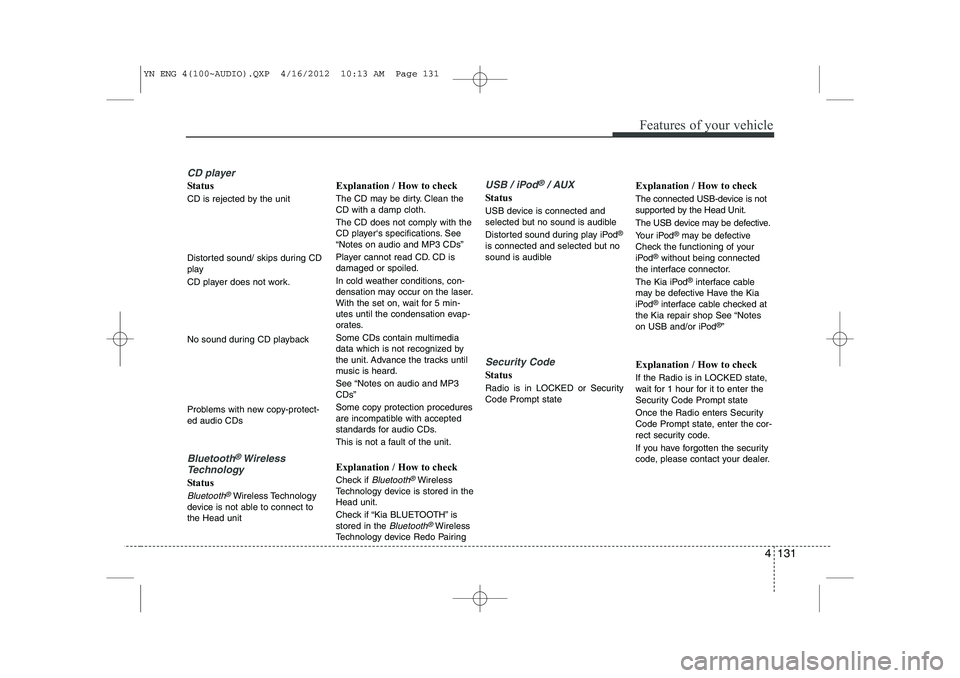
CD player
Status
CD is rejected by the unit
Distorted sound/ skips during CD
play
CD player does not work.
No sound during CD playback
Problems with new copy-protect- ed audio CDs
Bluetooth®Wireless
Technology
Status
Bluetooth®Wireless Technology
device is not able to connect to the Head unit Explanation / How to check
The CD may be dirty. Clean the CD with a damp cloth. The CD does not comply with the
CD player‘s specifications. See“Notes on audio and MP3 CDs”
Player cannot read CD. CD is damaged or spoiled.
In cold weather conditions, con-
densation may occur on the laser.
With the set on, wait for 5 min-
utes until the condensation evap-
orates.
Some CDs contain multimedia
data which is not recognized by
the unit. Advance the tracks until
music is heard.
See “Notes on audio and MP3 CDs”
Some copy protection procedures
are incompatible with accepted
standards for audio CDs.
This is not a fault of the unit. Explanation / How to check
Check if
Bluetooth®Wireless
Technology device is stored in the Head unit.
Check if “Kia BLUETOOTH” is stored in the
Bluetooth®Wireless
Technology device Redo Pairing
USB / iPod®/ AUX
Status
USB device is connected and
selected but no sound is audible
Distorted sound during play iPod ®
is connected and selected but no
sound is audible
Security Code
Status
Radio is in LOCKED or Security Code Prompt state Explanation / How to check
The connected USB-device is not
supported by the Head Unit.
The USB device may be defective.
Your iPod
®
may be defective
Check the functioning of your
iPod ®
without being connected
the interface connector.
The Kia iPod ®
interface cable
may be defective Have the Kia
iPod ®
interface cable checked at
the Kia repair shop See “Notes
on USB and/or iPod ®
”
Explanation / How to check
If the Radio is in LOCKED state,
wait for 1 hour for it to enter the
Security Code Prompt state
Once the Radio enters Security
Code Prompt state, enter the cor-
rect security code.
If you have forgotten the security
code, please contact your dealer.
YN ENG 4(100~AUDIO).QXP 4/16/2012 10:13 AM Page 131
Page 230 of 751

Driving your vehicle
26
5
Releasing the parking brake
To release the parking brake, first apply
the foot brake and pull up the parking
brake lever slightly. Secondly press the
release button (1) and lower the parking
brake lever (2) while holding the button. Check the brake warning light by turning
the ignition switch ON (do not start the
engine). This light will illuminate when the
parking brake is applied with the ignition
switch in the START or ON position.
Before driving, be sure the parking brake
is fully released and the brake warning
light is off.
If the brake warning light remains on
after the parking brake is released while
the engine is running, there may be a
malfunction in the brake system.
Immediate attention is necessary.
If at all possible, cease driving the vehi-
cle immediately. If that is not possible,
use extreme caution while operating the
vehicle and only continue to drive the
vehicle until you can reach a safe loca-
tion or repair shop.
WARNING
To prevent unintentional move- ment when stopped and leaving
the vehicle, do not use the shift
lever instead of the parking
brake. Set the parking brake AND
make sure the shift lever is
securely positioned in 1st (First)
gear or R (Reverse) for manual
transaxle equipped vehicles and
in P (Park) for automatic
transaxle equipped vehicles.
Never allow anyone who is unfa- miliar with the vehicle to touch
the parking brake. If the parking
brake is released unintentionally,
serious injury may occur.
All vehicles should always have the parking brake fully engaged
when parking to avoid inadver-
tent movement of the vehicle
which can injure occupants orpedestrians.
W-75OYN052021
YN ENG 5.QXP 4/16/2012 10:02 AM Page 26
Page 258 of 751
Driving your vehicle
54
5
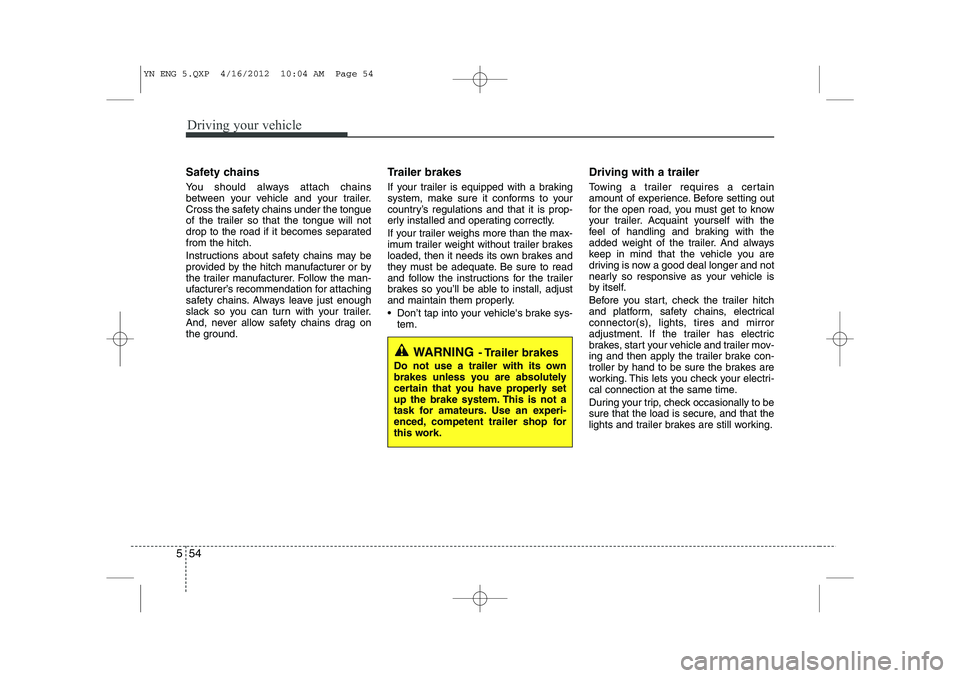
Safety chains
You should always attach chains
between your vehicle and your trailer.
Cross the safety chains under the tongue
of the trailer so that the tongue will not
drop to the road if it becomes separatedfrom the hitch.
Instructions about safety chains may be
provided by the hitch manufacturer or by
the trailer manufacturer. Follow the man-
ufacturer’s recommendation for attaching
safety chains. Always leave just enough
slack so you can turn with your trailer.
And, never allow safety chains drag on
the ground. Trailer brakes
If your trailer is equipped with a braking
system, make sure it conforms to your
country’s regulations and that it is prop-
erly installed and operating correctly.
If your trailer weighs more than the max-
imum trailer weight without trailer brakes
loaded, then it needs its own brakes and
they must be adequate. Be sure to read
and follow the instructions for the trailer
brakes so you’ll be able to install, adjust
and maintain them properly.
Don’t tap into your vehicle's brake sys-
tem. Driving with a trailer
Towing a trailer requires a certain
amount of experience. Before setting out
for the open road, you must get to know
your trailer. Acquaint yourself with the
feel of handling and braking with the
added weight of the trailer. And always
keep in mind that the vehicle you are
driving is now a good deal longer and not
nearly so responsive as your vehicle is
by itself.
Before you start, check the trailer hitch
and platform, safety chains, electrical
connector(s), lights, tires and mirror
adjustment. If the trailer has electric
brakes, start your vehicle and trailer mov-
ing and then apply the trailer brake con-
troller by hand to be sure the brakes are
working. This lets you check your electri-
cal connection at the same time.
During your trip, check occasionally to be
sure that the load is secure, and that the
lights and trailer brakes are still working.
WARNING
- Trailer brakes
Do not use a trailer with its own
brakes unless you are absolutely
certain that you have properly set
up the brake system. This is not a
task for amateurs. Use an experi-
enced, competent trailer shop for
this work.
YN ENG 5.QXP 4/16/2012 10:04 AM Page 54
Page 267 of 751

63
What to do in an emergency
2. When the vehicle is stopped, turn onyour emergency hazard flashers, set
the parking brake and put the transaxle
in P (automatic transaxle) or reverse
(manual transaxle).
3. Have all passengers get out of the vehicle. Be sure they all get out on the
side of the vehicle that is away from
traffic.
4. When changing a flat tire, follow the instruction provided later in this sec-tion.
If engine stalls while driving
1. Reduce your speed gradually, keeping a straight line. Move cautiously off the
road to a safe place.
2. Turn on your emergency flashers.
3. Try to start the engine again. If your vehicle will not start, we recommend
that you contact an authorized Kia
dealer. If engine doesn't turn over or
turns over slowly
1. If your vehicle has an automatic
transaxle, be sure the shift lever is in N
(Neutral) or P (Park) and the emer-
gency brake is set.
2. Check the battery connections to be sure they are clean and tight.
3. Turn on the interior light. If the light dims or goes out when you operate the
starter, the battery is discharged.
4. Check the starter connections to be sure they are securely tightened.
5. Do not push or pull the vehicle to start it. See instructions for "Jump starting". If engine turns over normally but
does not start
1. Check the fuel level.
2. With the ignition switch in the LOCK
position, check all connectors at the
ignition coils and spark plugs.
Reconnect any that may be discon-
nected or loose.
3. Check the fuel line in the engine com- partment.
4. If the engine still does not start, we recommend that you call an author-
ized Kia dealer.
IF THE ENGINE WILL NOT START
WARNING
If the engine will not start, do not
push or pull the vehicle to start it.This could result in a collision or
cause other damage. In addition,
push or pull starting may cause the
catalytic converter to be over-
loaded and create a fire hazard.
YN ENG 6.QXP 4/16/2012 10:05 AM Page 3
Page 272 of 751
What to do in an emergency
8
6
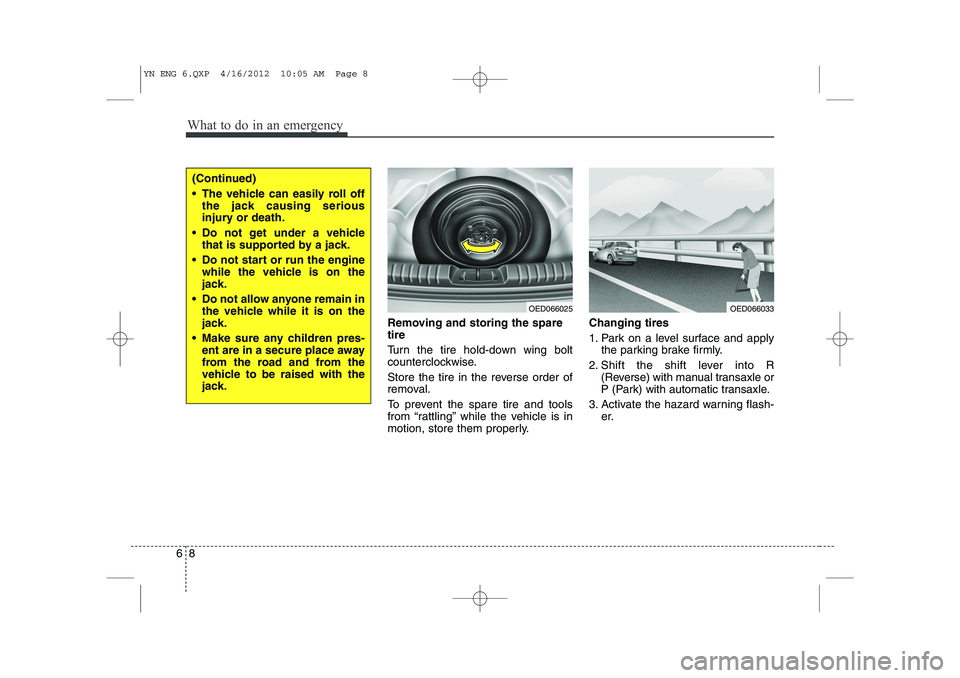
Removing and storing the spare tire
Turn the tire hold-down wing bolt
counterclockwise.
Store the tire in the reverse order of
removal.
To prevent the spare tire and tools
from “rattling” while the vehicle is in
motion, store them properly. Changing tires
1. Park on a level surface and apply
the parking brake firmly.
2. Shift the shift lever into R (Reverse) with manual transaxle or
P (Park) with automatic transaxle.
3. Activate the hazard warning flash- er.
(Continued)
The vehicle can easily roll offthe jack causing serious
injury or death.
Do not get under a vehicle that is supported by a jack.
Do not start or run the engine while the vehicle is on the
jack.
Do not allow anyone remain in the vehicle while it is on the
jack.
Make sure any children pres- ent are in a secure place away
from the road and from the
vehicle to be raised with the
jack.
OED066025OED066033
YN ENG 6.QXP 4/16/2012 10:05 AM Page 8
Page 276 of 751
What to do in an emergency
12
6
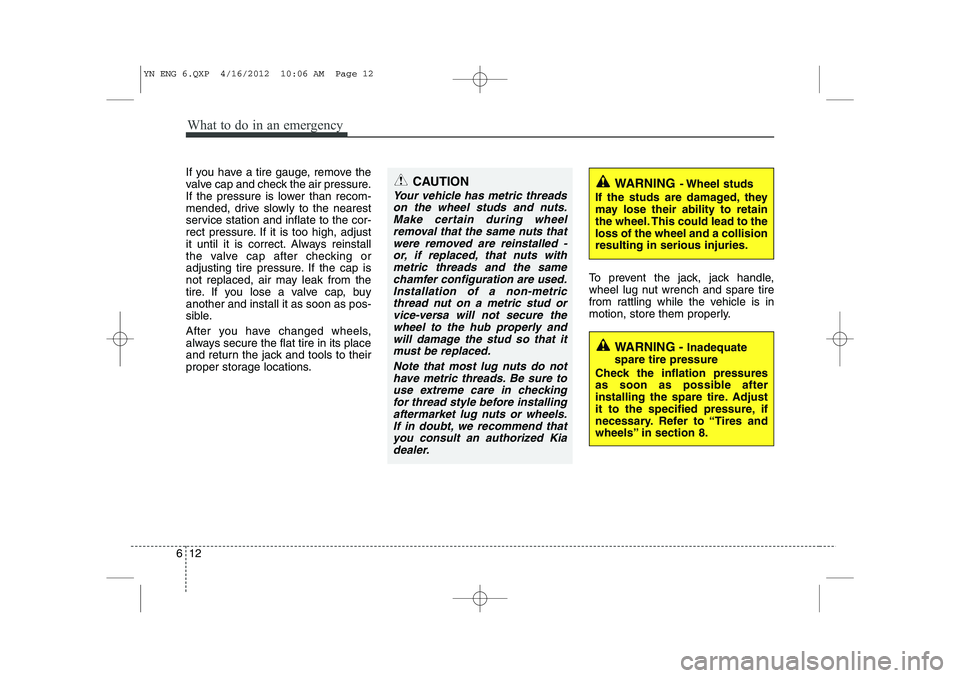
If you have a tire gauge, remove the
valve cap and check the air pressure.
If the pressure is lower than recom-
mended, drive slowly to the nearest
service station and inflate to the cor-
rect pressure. If it is too high, adjust
it until it is correct. Always reinstall
the valve cap after checking or
adjusting tire pressure. If the cap is
not replaced, air may leak from the
tire. If you lose a valve cap, buyanother and install it as soon as pos-
sible.
After you have changed wheels,
always secure the flat tire in its place
and return the jack and tools to their
proper storage locations. To prevent the jack, jack handle,
wheel lug nut wrench and spare tire
from rattling while the vehicle is in
motion, store them properly.CAUTION
Your vehicle has metric threads
on the wheel studs and nuts.Make certain during wheel removal that the same nuts thatwere removed are reinstalled -or, if replaced, that nuts with metric threads and the samechamfer configuration are used.Installation of a non-metric thread nut on a metric stud orvice-versa will not secure thewheel to the hub properly andwill damage the stud so that it must be replaced.
Note that most lug nuts do nothave metric threads. Be sure touse extreme care in checking for thread style before installingaftermarket lug nuts or wheels.If in doubt, we recommend thatyou consult an authorized Kia dealer.
WARNING - Wheel studs
If the studs are damaged, they
may lose their ability to retain
the wheel. This could lead to theloss of the wheel and a collisionresulting in serious injuries.
WARNING - Inadequate
spare tire pressure
Check the inflation pressures
as soon as possible after
installing the spare tire. Adjust
it to the specified pressure, if
necessary. Refer to “Tires and
wheels” in section 8.
YN ENG 6.QXP 4/16/2012 10:06 AM Page 12
Page 290 of 751
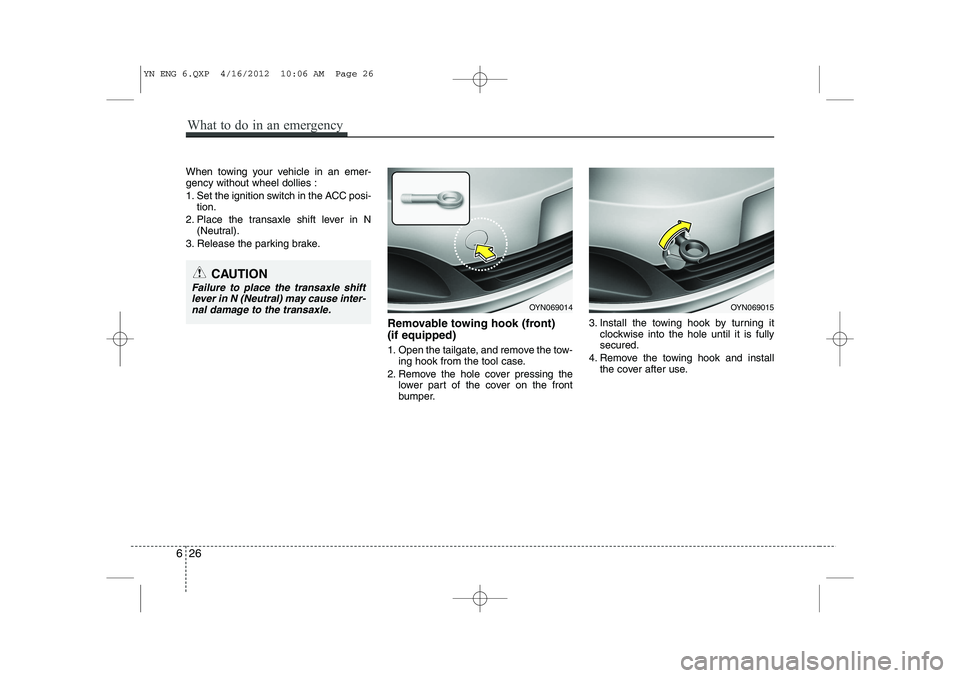
When towing your vehicle in an emer- gency without wheel dollies :
1. Set the ignition switch in the ACC posi-tion.
2. Place the transaxle shift lever in N (Neutral).
3. Release the parking brake.
Removable towing hook (front) (if equipped)
1. Open the tailgate, and remove the tow-ing hook from the tool case.
2. Remove the hole cover pressing the lower part of the cover on the front
bumper. 3. Install the towing hook by turning it
clockwise into the hole until it is fullysecured.
4. Remove the towing hook and install the cover after use.
CAUTION
Failure to place the transaxle shift
lever in N (Neutral) may cause inter-nal damage to the transaxle.
OYN069014OYN069015
626
What to do in an emergency
YN ENG 6.QXP 4/16/2012 10:06 AM Page 26
Page 291 of 751
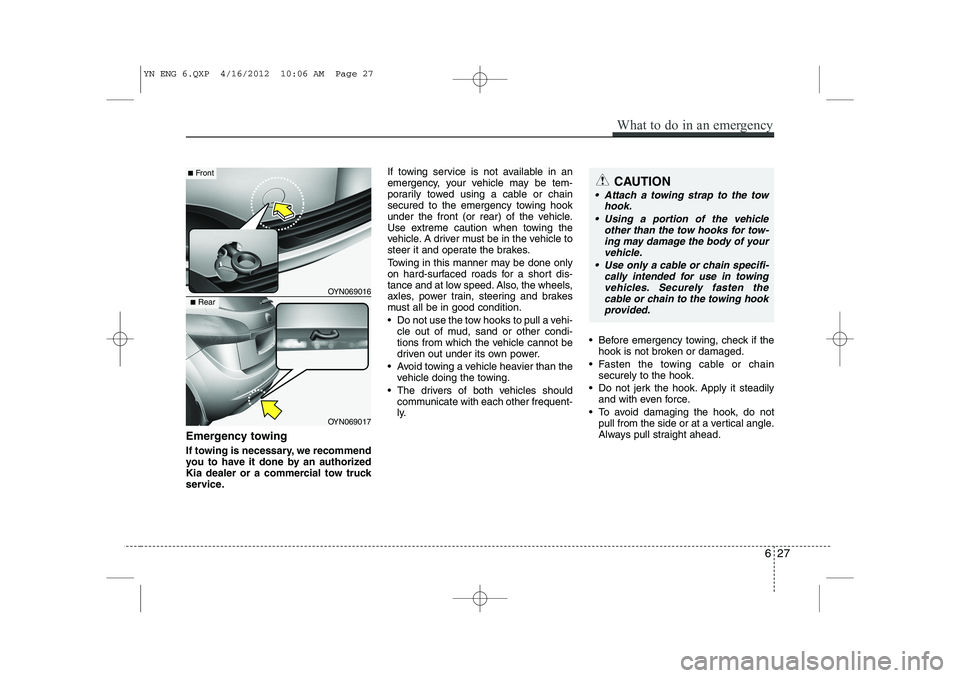
Emergency towing
If towing is necessary, we recommend
you to have it done by an authorized
Kia dealer or a commercial tow truck
service.If towing service is not available in an
emergency, your vehicle may be tem-
porarily towed using a cable or chain
secured to the emergency towing hook
under the front (or rear) of the vehicle.
Use extreme caution when towing the
vehicle. A driver must be in the vehicle to
steer it and operate the brakes.
Towing in this manner may be done only
on hard-surfaced roads for a short dis-
tance and at low speed. Also, the wheels,
axles, power train, steering and brakes
must all be in good condition.
Do not use the tow hooks to pull a vehi-
cle out of mud, sand or other condi-
tions from which the vehicle cannot be
driven out under its own power.
Avoid towing a vehicle heavier than the vehicle doing the towing.
The drivers of both vehicles should communicate with each other frequent-
ly. Before emergency towing, check if the
hook is not broken or damaged.
Fasten the towing cable or chain securely to the hook.
Do not jerk the hook. Apply it steadily and with even force.
To avoid damaging the hook, do not pull from the side or at a vertical angle.
Always pull straight ahead.
CAUTION
Attach a towing strap to the tow
hook.
Using a portion of the vehicle other than the tow hooks for tow-ing may damage the body of yourvehicle.
Use only a cable or chain specifi- cally intended for use in towingvehicles. Securely fasten thecable or chain to the towing hookprovided.
What to do in an emergency
27
6
OYN069016
■ Front
OYN069017
■Rear
YN ENG 6.QXP 4/16/2012 10:06 AM Page 27