2013 KIA Sportage key battery
[x] Cancel search: key batteryPage 5 of 387
Index
2I
Air bags ··················\
··················\
··················\
··················\
···3-42Air bag warning label................................................3-68
Air bag warning light ................................................3-45
Curtain air bag ..........................................................3-60
Driver's and passenger's front air bag ......................3-54
Side impact air bag....................................................3-58
Air cleaner··················\
··················\
··················\
·················7-23\
Alarm system ··················\
··················\
··················\
············4-13
All wheel drive (AWD), see four wheel drive (4WD) ··················\
··················\
··················\
···········5-21
Antenna ··················\
··················\
··················\
··················\
·4-108
Anti-lock brake system (ABS)··················\
··················\
····5-30
Appearance care··················\
··················\
··················\
········7-53 Exterior care ··················\
··················\
··················\
········7-53
Interior care ··················\
··················\
··················\
·········7-58
Armrest ··················\
··················\
··················\
··················\
···3-16
Audio system ··················\
··················\
··················\
··········4-108 Antenna ··················\
··················\
··················\
·············4-108
Aux, USB and iPod ··················\
··················\
·············4-110
Steering wheel audio control ··················\
················4-109
Automatic climate control system ··················\
················4-88 Air conditioning ··················\
··················\
··················\
··4-94
Automatic heating and air conditioning··················\
··4-89
Manual heating and air conditioning ··················\
······4-90 Automatic transaxle ··················\
··················\
··················\
··5-15
Ignition key interlock system ··················\
··················\
5-19
Shift lock system ··················\
··················\
··················\
·5-18
Sports mode··················\
··················\
··················\
·········5-17
Battery ··················\
··················\
··················\
··················\
·····7-28
Battery saver function ··················\
··················\
·················4-67\
Before driving ··················\
··················\
··················\
·············5-3
Bottle holders, see cup holders ··················\
··················\
·4-101
Brake fluid ··················\
··················\
··················\
················7-21
Brake system ··················\
··················\
··················\
·············5-27 Anti-lock brake system (ABS) ··················\
················5-30
Downhill brake control (DBC)··············\
··················\
··5-36
Electronic stability control (ESC) ··················\
···········5-32
Parking brake··················\
··················\
··················\
·······5-28
Power brakes ··················\
··················\
··················\
·······5-27
Bulb wattage ··················\
··················\
··················\
···············8-2
Button start/stop, see engine start/stop button ··················\
5-7
Capacities (Lubricants) ··················\
··················\
·················8-4
Care Exterior care ··················\
··················\
··················\
········7-53
Interior care ··················\
··················\
··················\
·········7-58
Tire care··················\
··················\
··················\
···············7-31
A
B
C
Page 9 of 387
Index
6I
Jack and tools ··················\
··················\
··················\
·············6-7
Jump starting ··················\
··················\
··················\
··············6-4
Key positions ··················\
··················\
··················\
·············5-4
Keys ··················\
··················\
··················\
··················\
·········4-2
LabelAir bag warning label ··················\
··················\
···········3-68
Tire sidewall labeling ··················\
··················\
···········7-36
Tire specification and pressure label ··················\
········8-7
Vehicle certification label ··················\
··················\
·······8-6
Latch system, see lower anchor system ··················\
·······3-39
Lighting ················\
··················\
··················\
··················\
····4-67 Battery saver function ··················\
··················\
··········4-67
Daytime running light ··················\
··················\
···········4-71
Headlight escort function ··················\
··················\
······4-67
Headlight welcome function ··················\
··················\
·4-67
Lubricants and capacities ··················\
··················\
·············8-4
Luggage net holder ··················\
··················\
··················\
4-104
Luggage rack, see roof rack ··················\
··················\
·····4-107
Lumbar support ··················\
··················\
··················\
··········3-7 Main fuse ··················\
··················\
··················\
················7-46
Maintenance
Explanation of scheduled maintenance items ···········7-10Maintenance services ··················\
··················\
············· 7-3
Maintenance schedule ··················\
··················\
·············7-6
Owner maintenance ··················\
··················\
················7-4
Tire maintenance ··················\
··················\
··················\
7-35
Maintenance services ··················\
··················\
··················\
·7-3
Manual climate control system ··················\
··················\
··4-80 Air conditioning ··················\
··················\
··················\
·4-84
Climate control air filter ··················\
··················\
·······4-87
Heating and air conditioning ··················\
··················\
4-80
Manual heating and air conditioning ··················\
···········4-90
Manual transaxle ··················\
··················\
··················\
······5-12
Memory fuse ··················\
··················\
··················\
············7-45
Mirrors ················\
··················\
··················\
··················\
·····4-37 Day/night rearview mirror ··················\
··················\
···4-37
Electric chromic mirror (ECM) ··················\
·············4-37
Inside rearview mirror ··················\
··················\
··········4-37
Outside rearview mirror ··················\
··················\
·······4-43
Moonroof, see panoramic sunroof ··················\
···············4-31
Neck restraints, see headrest ··················\
················3-8, 3-15
L
M
N
K
J
Page 97 of 387

47
Features of your vehicle
D020200AAM-EU
Transmitter precautions
✽
✽NOTICE
The transmitter will not work if any of
the following occurs:
• The ignition key is in the ignition
switch.
• You exceed the operating distance limit (10 m [about 30 feet]).
• The battery in the transmitter is weak.
• Other vehicles or objects may be blocking the signal.
• The weather is extremely cold.
• The transmitter is close to a radio transmitter such as a radio station or
an airport which can interfere with
normal operation of the transmitter.
When the transmitter does not work
properly, open and close the door with
the ignition key. If you have a problem
with the transmitter, contact an author-
ized Kia dealer.
This device complies with Industry
Canada Standard RSS-210.
Operation is subject to the following two
conditions:
1. This device may not cause harmful
interference, and
2. This device must accept any interfer- ence received, including interference
that may cause undesired operation.
D020300AHM
Battery replacement
A transmitter uses a 3 volt lithium battery
which will normally last for several years.
When replacement is necessary, use the
following procedure.
1. Insert a slim tool into the slot and gen-tly pry open the transmitter center
cover.
2. Replace the battery with a new battery (CR2032). When replacing the battery,
make sure the battery positive “+” sym-
bol faces up as indicated in the illus-
tration.
3. Install the battery in the reverse order of removal.
For transmitter replacement, see an
authorized Kia dealer to reprogram the
transmitter.
CAUTION
Changes or modifications not expressly approved by the party responsible for compliance couldvoid the user’s authority to operatethe equipment. If the keyless entry system is inoperative due tochanges or modifications not expressly approved by the partyresponsible for compliance, it willnot be covered by your manufactur- er’s vehicle warranty.
CAUTION
Keep the transmitter away fromwater or any liquid. If the keylessentry system is inoperative due toexposure to water or liquids, it willnot be covered by your manufactur- er’s vehicle warranty.
OED039003A
Page 98 of 387
Features of your vehicle
84
CAUTION
The keyless entry system trans-mitter is designed to give youyears of trouble-free use, howev-er it can malfunction if exposed tomoisture or static electricity. If you are unsure how to use yourtransmitter or replace the battery,contact an authorized Kia dealer.
Using the wrong battery can cause the transmitter to malfunc-tion. Be sure to use the correctbattery.
To avoid damaging the transmit- ter, don't drop it, get it wet, orexpose it to heat or sunlight.
WARNING
An inappropriately disposed bat-
tery can be harmful to the environ-
ment and human health.
Dispose the battery according to
your local laws or regulations.
Page 102 of 387
Features of your vehicle
12
4
D040500AHM
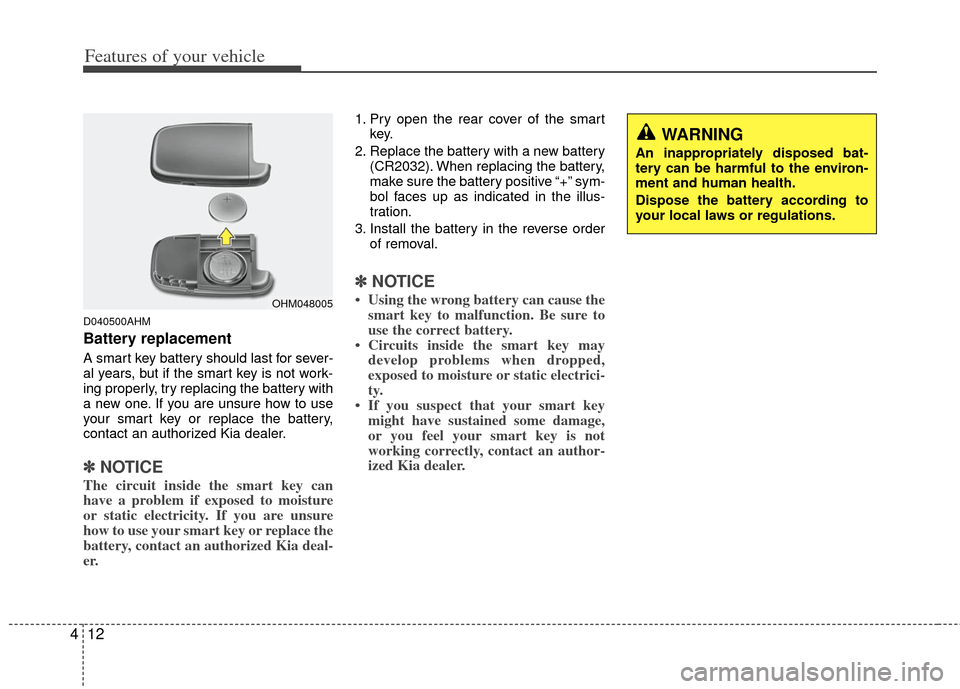
Battery replacement
A smart key battery should last for sever-
al years, but if the smart key is not work-
ing properly, try replacing the battery with
a new one. If you are unsure how to use
your smart key or replace the battery,
contact an authorized Kia dealer.
✽ ✽
NOTICE
The circuit inside the smart key can
have a problem if exposed to moisture
or static electricity. If you are unsure
how to use your smart key or replace the
battery, contact an authorized Kia deal-
er.
1. Pry open the rear cover of the smart
key.
2. Replace the battery with a new battery (CR2032). When replacing the battery,
make sure the battery positive “+” sym-
bol faces up as indicated in the illus-
tration.
3. Install the battery in the reverse order of removal.
✽ ✽NOTICE
• Using the wrong battery can cause the
smart key to malfunction. Be sure to
use the correct battery.
• Circuits inside the smart key may develop problems when dropped,
exposed to moisture or static electrici-
ty.
• If you suspect that your smart key might have sustained some damage,
or you feel your smart key is not
working correctly, contact an author-
ized Kia dealer.OHM048005
WARNING
An inappropriately disposed bat-
tery can be harmful to the environ-
ment and human health.
Dispose the battery according to
your local laws or regulations.
Page 148 of 387
Features of your vehicle
58
4
Immobilizer indicator
(if equipped)
With smart key system
If any of the following occurs in a vehicle
equipped with the smart key, the immobi-
lizer indicator illuminates, blinks or goes
off.
When the smart key is in the vehicle, if the ENGINE START/STOP button is in
the ACC or ON position, the indicator
will illuminate for approximately 30
seconds to indicate that you are able to
start the engine. However, when the
smart key is not in the vehicle, if the
ENGINE START/STOP button is
pressed, the indicator will blink for a
few seconds to indicate that you are
not be able to start the engine.
If the indicator illuminates only for 2 seconds and goes out when the
ENGINE START/STOP button is
turned to ON position with the smart
key in the vehicle, have the system
checked by an authorized Kia dealer.
When the battery is weak, if the ENGINE START/STOP button is
pressed, the indicator will blink and you
are not able to start the engine.
However, you are able to start the
engine by inserting the smart key in
the smart key holder. Also, if the smart
key system related parts have a prob-
lem, the indicator will blink.
D150320AHM-EU-U1
Malfunction Indicator Light
(MIL) (check engine light)
This indicator light is part of the Engine
Control System which monitors various
emission control system components. If
this light illuminates while driving, it indi-
cates that a potential malfunction has
been detected somewhere in the emis-
sion control system.
This light will also illuminate when the
ignition switch is turned to the ON posi-
tion, and will go out in a few seconds
after the engine is started. If it illuminates
while driving, or does not illuminate when
the ignition switch is turned to the ON
position, take your vehicle to the nearest
authorized Kia dealer and have the sys-
tem checked.
Generally, your vehicle will continue to be
drivable, but have the system checked by
an authorized Kia dealer promptly.
CAUTION
If the Emission Control SystemMalfunction Indicator Light illumi-nates, potential catalytic converterdamage is possible. This could result in loss of engine power. Havethe Engine Control System inspect- ed as soon as possible by anauthorized Kia dealer.
CAUTION
Prolonged driving with the Emission Control System MalfunctionIndicator Light illuminated may cause damage to the emission con-trol systems which could effect dri-vability and/or fuel economy.
Page 151 of 387
461
Features of your vehicle
4WD LOCK indicator (if equipped)
The 4WD LOCK indicator light is illumi-
nated when the 4WD LOCK button is
pushed. The purpose of this 4WD LOCK
mode is to increase the drive power
when driving on wet pavement, snow-
covered roads and/or off-road. The 4WD
LOCK indicator light is turned off by
pushing the button again.
LCD display warning (if equipped)
Key not in vehicle
If the smart key is not in the vehicle and
if any door is opened or closed with the
ENGINE START/STOP button in the
ACC, ON, or START position, the warn-
ing illuminates on the LCD display. Also,
the chime sounds for 5 seconds when
the smart key is not in the vehicle and the
door is closed.
Always have the smart key with you.
Key not detected
If the smart key is not in the vehicle or is
not detected and you press the ENGINE
START/STOP button, the warning illumi-
nates on the LCD display for 10 seconds.
Also, the immobilizer indicator and the
key holder light blinks for 10 seconds.
Low key battery
If the ENGINE START/STOP button turns
to the OFF position when the smart key
in the vehicle discharges, the warning
illuminates on the LCD display for about
10 seconds. Also, the warning chime
sounds once.
Replace the battery with a new one. Press brake pedal to start engine
If the ENGINE START/STOP button turns
to the ACC position twice by pressing the
button repeatedly without depressing the
brake pedal, the warning illuminates on
the LCD display for about 10 seconds to
indicate that you should depress the
brake pedal to start the engine.
Press cluch pedal to start engine
If the ENGINE START/STOP button turns
to the ACC position twice by pressing the
button repeatedly without depressing the
clutch pedal, the warning illuminates on
the LCD display for about 10 seconds to
indicate that you should depress the
clutch pedal to start the engine.
Remove key
When you turn off the engine with the
smart key in the smart key holder, the
warning illuminates on the LCD display
for about 10 seconds. Also, the smart key
holder light blinks for about 10 seconds.
To remove the smart key push the smart
key once and pull it out from the smart
key holder.
CAUTION
Do not use 4WD LOCK mode on dry
paved roads or highway, it cancause noise, vibration or damage of4WD related parts.
Page 157 of 387
467
Features of your vehicle
D190100APB
Battery saver function
The purpose of this feature is to pre-vent the battery from being discharged
if the lights are left in the ON position.
The system automatically shuts off the
parking lights 30 seconds after the
ignition key is removed and the driver’s
door is opened and closed.
With this feature, the parking lights will turn off automatically if the driver parks
on the side of the road at night and
opens the driver’s side door.
If necessary, to keep the parking lights
on when the ignition key is removed,
perform the following:
1) Open the driver-side door.
2) Turn the parking lights OFF and ON again using the light switch on the
steering column.
Headlight escort function
(if equipped)
The headlights (and/or taillights) remain
on for approximately 20 minutes after the
ignition key is removed or turned to the
ACC or LOCK position. However, if the
driver’s door (and tailgate) is opened and
closed, the headlights are turned off after
30 seconds.
The headlights can be turned off by
pressing the lock button on the transmit-
ter (or smart key) twice or turning off the
light switch from the headlight or Auto
light position.
Headlight welcome function
(if equipped)
When the headlight switch is in the ON or
AUTO position and all doors (and tail-
gate) are closed and locked, if you press
the door unlock button on the transmitter
(or smart key), the headlights will come
on for about 15 seconds.
If the headlight switch is in the AUTO
position, the function can only operate at
night.
At this time, if you press the door lock
button or unlock button (once or twice) on
the transmitter (or smart key), the head-
lights will turn off immediately.
LIGHTING
CAUTION
If the driver gets out of the vehiclethrough other doors (except dri-ver's door), the battery saver func-tion does not operate and the head- light escort function does not turnoff automatically. Therefore, It caus-es the battery to be discharged. Inthis case, make sure to turn off thelamp before getting out of the vehi-cle.