2013 KIA CEED check engine light
[x] Cancel search: check engine lightPage 995 of 1168

Driving your vehicle
70
5
To keep locks from freezing
To keep the locks from freezing, squirt an
approved de-icer fluid or glycerine into
the key opening. If a lock is covered with
ice, squirt it with an approved de-icing
fluid to remove the ice. If the lock is
frozen internally, you may be able to thaw
it out by using a heated key. Handle the
heated key with care to avoid injury.
Use approved window washer
anti-freeze in system
To keep the water in the window washer
system from freezing, add an approved
window washer anti-freeze solution in
accordance with instructions on the con-
tainer. Window washer anti-freeze is
available from an authorised Kia dealer
and most auto parts outlets. Do not useengine coolant or other types of anti-
freeze as these may damage the paintfinish. Don't let your parking brake
freeze
Under some conditions your parking
brake can freeze in the engaged position.
This is most likely to happen when there
is an accumulation of snow or ice around
or near the rear brakes or if the brakes
are wet. If there is a risk the parking
brake may freeze, apply it only temporar-
ily whilst you put the shift lever in P (auto-
matic transaxle) or in first or reverse gear
(manual transaxle) and block the rear
wheels so the vehicle cannot roll. Then
release the parking brake.
Don't let ice and snow accumu- late underneath
Under some conditions, snow and ice
can build up under the fenders and inter-
fere with the steering. When driving in
severe winter conditions where this may
happen, you should periodically check
underneath the vehicle to be sure the
movement of the front wheels and the
steering components is not obstructed.Carry emergency equipment
Depending on the severity of the weath-
er, you should carry appropriate emer-
gency equipment. Some of the items you
may want to carry include tyre chains,
tow straps or chains, flashlight, emer-
gency flares, sand, shovel, jumper
cables, window scraper, gloves, ground
cloth, coveralls, blanket, etc.
JD RHD 5.QXP 7/21/2012 1:16 PM Page 70
Page 999 of 1168

Driving your vehicle
74
5
Turn signals when towing a trailer
When you tow a trailer, your vehicle has
to have a different turn signal flasher and
extra wiring. The green arrows on your
instrument panel will flash whenever you
signal a turn or lane change. Properly
connected, the trailer lights will also flash
to alert other drivers you’re about to turn,
change lanes, or stop.
When towing a trailer, the green arrows
on your instrument panel will flash for
turns even if the bulbs on the trailer are
burned out. Thus, you may think drivers
behind you are seeing your signals
when, in fact, they are not. It is important
to check occasionally to be sure the trail-
er bulbs are still working. You must also
check the lights every time you discon-
nect and then reconnect the wires.
Do not connect a trailer lighting system
directly to your vehicle’s lighting system.
Use only an approved trailer wiring har-
ness.
An authorised Kia dealer can assist you
in installing the wiring harness.
Driving on grades
Reduce speed and shift to a lower gear
before you start down a long or steep
downgrade. If you don’t shift down, you
might have to use your brakes so much
that they would get hot and no longer
operate efficiently.
On a long uphill grade, shift down and
reduce your speed to around 70 km/h (45mph) to reduce the possibility of engine
and transaxle overheating.
If your trailer weighs more than the max-
imum trailer weight without trailer brakes
and you have an automatic transaxle,
you should drive in D (Drive) when tow-
ing a trailer.
Operating your vehicle in D (Drive) when
towing a trailer will minimize heat build up
and extend the life of your transaxle.
WARNING
Failure to use an approved trailer wiring harness could result in dam-
age to the vehicle electrical system
and/or personal injury.
CAUTION
When towing a trailer on steep grades (in excess of 6%) pay
close attention to the engine coolant temperature gauge toensure the engine does not over-heat.
If the needle of the coolant tem-perature gauge moves across thedial towards “130/H (HOT)”, pull over and stop as soon as it is safe
to do so, and allow the engine to idle until it cools down. You mayproceed once the engine has cooled sufficiently.
You must decide driving speed depending on trailer weight anduphill grade to reduce the possi-bility of engine and transaxle
overheating.
JD RHD 5.QXP 7/21/2012 1:16 PM Page 74
Page 1009 of 1168
What to do in an emergency
4
6
IF THE ENGINE DOES NOT START
If engine doesn't turn over or
turns over slowly
1. If your vehicle has an automatic transaxle, be sure the shift lever is in N
(Neutral) or P (Park) and the emer-
gency brake is set.
2. Check the battery connections to be sure they are clean and tight.
3. Turn on the interior light. If the light dims or goes out when you operate the
starter, the battery is discharged.
4. Check the starter connections to be sure they are securely tightened.
5. Do not push or pull the vehicle to start it. See instructions for "Jump starting". If engine turns over normally but
does not start
1. Check fuel level.
2. With the ignition switch in the LOCK/
OFF position, check all connectors at
ignition, coil and spark plugs.
Reconnect any that may be discon-
nected or loose.
3. Check the fuel line in the engine com- partment.
4. If the engine still does not start, we recommend that you call an autho-
rised Kia dealer.
WARNING
If the engine does not start, do not
push or pull the vehicle to start it.This could result in a collision or
cause other damage. In addition,
push or pull starting may cause the
catalytic converter (if equipped) to
be overloaded and create a fire haz-
ard.
JD RHD 6.QXP 7/21/2012 12:56 PM Page 4
Page 1044 of 1168
77
Maintenance
OWNER MAINTENANCE
We recommend that the following lists
are vehicle checks and inspections that
should be performed by the owner or an
authorised Kia dealer at the frequencies
indicated to help ensure safe, depend-
able operation of your vehicle.
If you have any question, we recommend
that you consult an authorised Kia deal-
er.
These Owner Maintenance Checks are
generally not covered by warranties and
you may be charged for labour, parts and
lubricants used. Owner maintenance schedule
When you stop for fuel:
Check the engine oil level.
Check coolant level in coolant reser-
voir.
Check the windscreen washer fluid level.
Look for low or under-inflated tyres.
Check the radiator and condenser. Check if the front of the radiator and
condenser are clean and not blocked
with leaves, dirt or insects etc.
If any of the above parts are extremely
dirty or you are not sure of their condi-
tion, we recommend that you contact
an authorised Kia dealer.
Whilst operating your vehicle:
Note any changes in the sound of theexhaust or any smell of exhaust fumes
in the vehicle.
Check for vibrations in the steering wheel. Notice any increased steering
effort or looseness in the steering
wheel, or change in its straight-aheadposition.
Notice if your vehicle constantly turns slightly or “pulls” to one side when trav-
elling on smooth, level road.
When stopping, listen and check for unusual sounds, pulling to one side,
increased brake pedal travel or “hard-
to-push” brake pedal.
If any slipping or changes in the oper- ation of your transaxle occurs, check
the transaxle fluid level.
Check manual transaxle operation, including clutch operation.
Check automatic transaxle/double clutch transmission P (Park) function.
Check parking brake.
Check for fluid leaks under your vehicle (water dripping from the air conditioning
system during or after use is normal).
WARNING
Be careful when checking your
engine coolant level when the
engine is hot. Scalding hot coolant
and steam may blow out under
pressure. This could cause burns
or other serious injury.
JD RHD 7.QXP 7/21/2012 12:46 PM Page 7
Page 1045 of 1168
Maintenance
8
7
At least monthly:
Check coolant level in the engine
coolant reservoir.
Check the operation of all exterior lights, including the stoplights, turn sig-
nals and hazard warning flashers.
Check the inflation pressures of all tyres including the spare.
At least twice a year
(i.e., every Spring and Fall) :
Check radiator, heater and air condi- tioning hoses for leaks or damage.
Check windscreen washer spray and wiper operation. Clean wiper blades
with clean cloth dampened with wash-er fluid.
Check headlight alignment.
Check muffler, exhaust pipes, shields and clamps.
Check the lap/shoulder belts for wear and function.
Check for worn tyres and loose wheel lug nuts.
At least once a year :
Clean body and door drain holes.
Lubricate door hinges and checks, andbonnet hinges.
Lubricate door and bonnet locks and latches.
Lubricate door rubber weatherstrips.
Check the air conditioning system.
Inspect and lubricate automatic transaxle linkage and controls.
Clean battery and terminals.
Check the brake (and clutch) fluid level.
JD RHD 7.QXP 7/21/2012 12:46 PM Page 8
Page 1100 of 1168
763
Maintenance
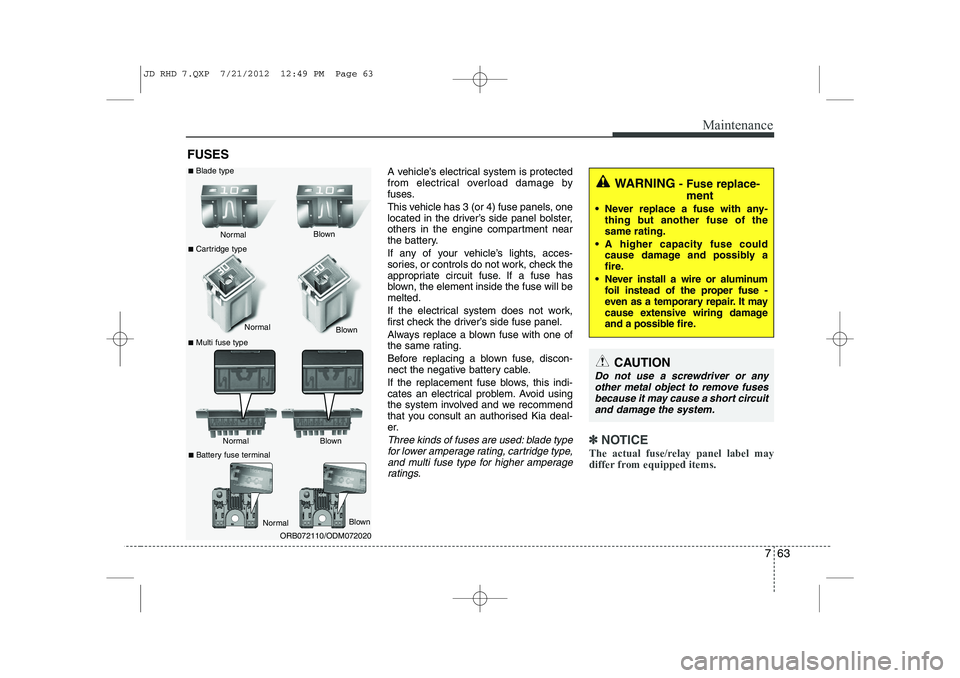
FUSESA vehicle’s electrical system is protected
from electrical overload damage by
fuses.
This vehicle has 3 (or 4) fuse panels, one
located in the driver’s side panel bolster,
others in the engine compartment near
the battery.
If any of your vehicle’s lights, acces-
sories, or controls do not work, check the
appropriate circuit fuse. If a fuse has
blown, the element inside the fuse will bemelted.
If the electrical system does not work,
first check the driver’s side fuse panel.
Always replace a blown fuse with one of
the same rating.
Before replacing a blown fuse, discon-
nect the negative battery cable.
If the replacement fuse blows, this indi-
cates an electrical problem. Avoid using
the system involved and we recommend
that you consult an authorised Kia deal-
er.
Three kinds of fuses are used: blade typefor lower amperage rating, cartridge type, and multi fuse type for higher amperageratings.✽✽ NOTICE
The actual fuse/relay panel label may
differ from equipped items.
WARNING - Fuse replace-
ment
Never replace a fuse with any- thing but another fuse of the same rating.
A higher capacity fuse could cause damage and possibly a
fire.
Never install a wire or aluminum foil instead of the proper fuse -
even as a temporary repair. It may
cause extensive wiring damage
and a possible fire.
CAUTION
Do not use a screwdriver or any
other metal object to remove fusesbecause it may cause a short circuitand damage the system.
Normal
Normal
■
Blade type
■ Cartridge type
■ Multi fuse type Blown
Blown
Normal Blown
ORB072110/ODM072020
Normal
Blown
■
Battery fuse terminal
JD RHD 7.QXP 7/21/2012 12:49 PM Page 63
Page 1101 of 1168
Maintenance
64
7
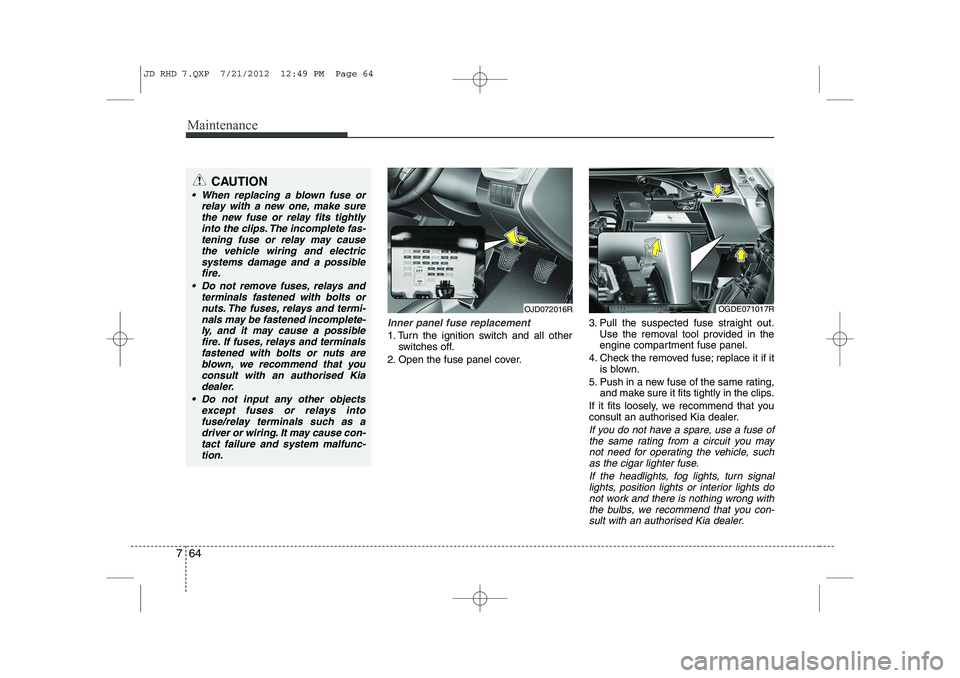
Inner panel fuse replacement
1. Turn the ignition switch and all other
switches off.
2. Open the fuse panel cover. 3. Pull the suspected fuse straight out.
Use the removal tool provided in the
engine compartment fuse panel.
4. Check the removed fuse; replace it if it is blown.
5. Push in a new fuse of the same rating, and make sure it fits tightly in the clips.
If it fits loosely, we recommend that you
consult an authorised Kia dealer.
If you do not have a spare, use a fuse of the same rating from a circuit you may
not need for operating the vehicle, suchas the cigar lighter fuse.
If the headlights, fog lights, turn signallights, position lights or interior lights do not work and there is nothing wrong with
the bulbs, we recommend that you con- sult with an authorised Kia dealer.
OJD072016ROGDE071017R
CAUTION
When replacing a blown fuse or relay with a new one, make sure
the new fuse or relay fits tightlyinto the clips. The incomplete fas-tening fuse or relay may cause the vehicle wiring and electric
systems damage and a possiblefire.
Do not remove fuses, relays and terminals fastened with bolts or
nuts. The fuses, relays and termi-nals may be fastened incomplete-ly, and it may cause a possiblefire. If fuses, relays and terminals
fastened with bolts or nuts areblown, we recommend that youconsult with an authorised Kia
dealer.
Do not input any other objects except fuses or relays intofuse/relay terminals such as adriver or wiring. It may cause con-
tact failure and system malfunc-tion.
JD RHD 7.QXP 7/21/2012 12:49 PM Page 64
Page 1118 of 1168
781
Maintenance
LIGHT BULBS
Use only the bulbs of the specifiedwattage.
✽✽ NOTICE
After driving in heavy rain or washing the vehicle, headlight and taillight lenses
could appear foggy. This condition is
caused by the temperature differencebetween the lamp inside and outside.
This is similar to the condensation on
your windows inside your vehicle during
rain and does not indicate a problem
with your vehicle. If the water leaks into
the lamp bulb circuitry, we recommendthat the system be checked by an autho-
rised Kia dealer.WARNING - Working on
the lights
Prior to working on the light, firmly
apply the parking brake, ensure
that the ignition switch is turned to
the “LOCK” position (smart key:turn off the engine) and turn off the
lights to avoid sudden movement
of the vehicle and burning your fin-
gers or getting an electric shock.
CAUTION
Be sure to replace the burned-out bulb with one of the same wattage rating. Otherwise, it may causedamage to the fuse or electricwiring system.
CAUTION
If you do not have necessary tools, the correct bulbs and the expertise,
we recommend that you consult anauthorised Kia dealer. In many cases, it is difficult to replace vehi-cle light bulbs because other parts
of the vehicle must be removedbefore you can get to the bulb. This is especially true if you have to
remove the headlight assembly to get to the bulb(s).
Removing/installing the headlightassembly can result in damage to the vehicle.
JD RHD 7.QXP 7/21/2012 12:50 PM Page 81