Page 1124 of 1168

1. Pull the wheel guard down by rotating the screws.
2. Reach your hand into the back of the front bumper.
3. Disconnect the power")
787
Maintenance
Front fog light, Daytime running light(if equipped)
1. Pull the wheel guard down by rotating the screws.
2. Reach your hand into the back of the front bumper.
3. Disconnect the power connector from the socket. 4. Remove the bulb-socket from the
housing by turning the socket counter
clockwise until the tabs on the socketalign with the slots on the housing.
5. Install the new bulb-socket into the housing by aligning the tabs on the
socket with the slots in the housing.
Push the socket into the housing and
turn the socket clockwise.
6. Connect the power connector to the socket. Headlight and front fog light aim-
ing (for Europe)Headlight aiming
Without AFLS
1. Inflate the tyres to the specified pres-
sure and remove any loads from the
vehicle except the driver, spare tyre,
and tools.
2. The vehicle should be placed on a flat floor.
3. Draw vertical lines (Vertical lines pass- ing through respective head lamp cen-
tres) and a horizontal line (Horizontalline passing through centre of headlamps) on the screen.
OJD072027OJD072050
■Fog light
■Fog light+DRL ■
DRL
OJD072061/OJD072059/OJD072060
JD RHD 7.QXP 7/21/2012 12:51 PM Page 87
Page 1125 of 1168

Maintenance
88
7
4. With the head lamp and battery in nor-
mal condition, aim the head lamps so
the brightest portion falls on the hori-
zontal and vertical lines.
5. To aim the low beam left or right, turn the driver (1) clockwise or counter-
clockwise. To aim the low beam up or
down, turn the driver (2) clockwise or
counterclockwise.
To aim the high beam up or down, turnthe driver (3) clockwise or counter-
clockwise. With AFLS
1. Turn off the engine
2. Turn the light switch to the low beam
position.
3. Position the tyres straight ahead with the steering wheel.
4. Turn on the engine.
5. Inflate the tyres to the specified pres- sure and remove any loads from the
vehicle except the driver, spare tyre,
and tools.
6. The vehicle should be placed on a flat floor.
7. Draw vertical lines (Vertical lines pass- ing through respective head lamp cen-
tres) and a horizontal line (Horizontalline passing through centre of headlamps) on the screen.
8. With the head lamp and battery in nor- mal condition, aim the head lamps so
the brightest portion falls on the hori-
zontal and vertical lines.
9. To aim the low beam left or right, turn the driver (1) clockwise or counter-
clockwise. To aim the low beam up or
down, turn the driver (2) clockwise or
counterclockwise. To aim the high
beam up or down, turn the driver (3)
clockwise or counterclockwise.
Front fog light aiming
The front fog lamp can be aimed as the same manner of the head lamps aiming.
With the front fog lamps and battery nor-
mal condition, aim the front fog lamps. To
aim the front fog lamp up or down, turn
the driver (1) clockwise or counterclock-
wise.
OJD072028
JD RHD 7.QXP 7/21/2012 12:51 PM Page 88
Page 1126 of 1168
789
Maintenance
Unit: mm (in)
Aiming point
OJD072051
< Ground Height >< Distance between lamps >
H1 : Height between the head lamp bulb center and ground (Low beam) H2 : Height between the head lamp bulb center and ground (High beam)H3 : Height between the fog lamp bulb center and groundW1 : Distance between the two head lamp bulbs centers (Low beam)W2 : Distance between the two head lamp bulbs centers (High beam)W3 : Distance between the two fog lamp bulbs centerscentre
centre
centre
centres
centres
centres
Vehicle
condition H1
H2
H3
W1
W2W3
Without AFLS With AFLS With DRLWithout
DRLWithoutAFLSWith AFLS With DRL Without
DRL
Without driver 689
(27.1) 687
(27.0)
646
(25.4) 340
(13.4)342
(13.5)
1,300
(51.2)1,299
(51.1)1,049
(41.3) 1,316
(51.8) 1,306
(51.4)
With driver 680
(26.8) 678
(26.7)
637
(25.1) 331
(13.0)333
(13.1)
JD RHD 7.QXP 7/21/2012 12:52 PM Page 89
Page 1129 of 1168
Maintenance
92
7
�
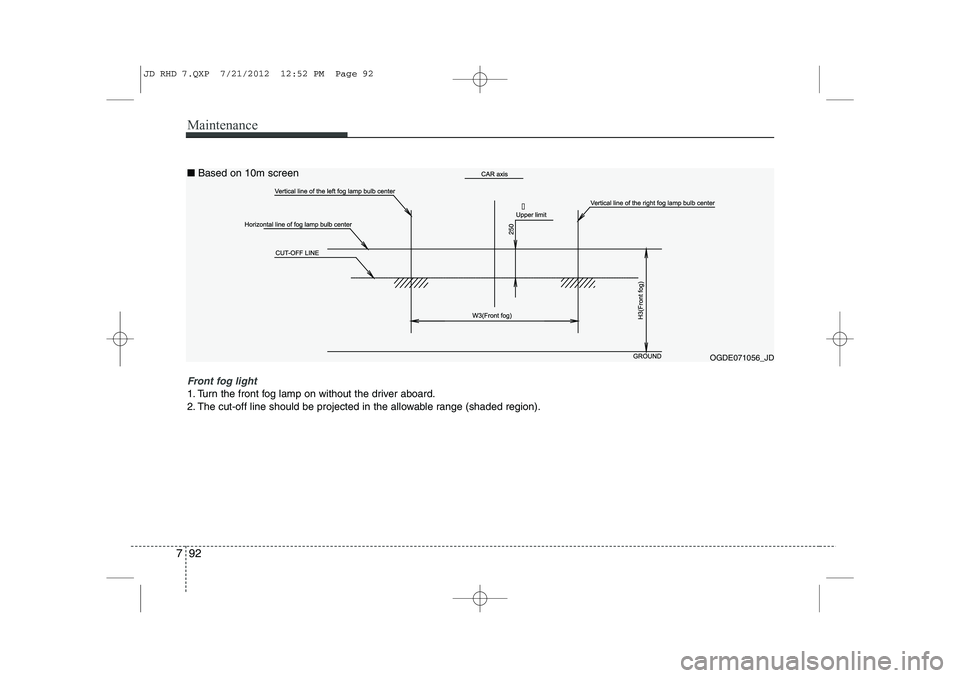
OGDE071056_JD
Front fog light
1. Turn the front fog lamp on without the driver aboard.
2. The cut-off line should be projected in the allowable range (shaded region).
■
Based on 10m screen
JD RHD 7.QXP 7/21/2012 12:52 PM Page 92
Page 1130 of 1168
793
Maintenance
Side repeater light bulb replace- ment
If the light bulb does not operate, we rec-
ommend that the system be checked by
an authorised Kia dealer.Rear combination light bulb replacement
(1) Rear turn signal light (2) Stop/tail light
(3) Back-up light (for 5Door)
(4) Tail light or stop/tail light (for LED type)
(5) Rear fog light (for 5Door)Rear fog light (Driver’s side) or
back-up light (Passenger’s side),
(for wagon) ❈
The actual rear combination lamp shape in
the vehicle may differ from illustration.
Outside light
Rear turn signal light and stop/tail light
1. Turn off the engine.
2. Open the tailgate.
3. Loosen the light assembly retaining
screws with a cross-tip screwdriver.
4. Remove the rear combination light assembly from the body of the vehicle.
OJD072045OJD072029/H
OJD072030
OJD072063
■5 Door
■Wagon
JD RHD 7.QXP 7/21/2012 12:52 PM Page 93
Page 1132 of 1168
 only for the 5 Door
vehicle.
4. Loosen the retaining nuts.
5. Disconnect the power connector.
6. Remove the rear combination light assembly from the body of")
795
Maintenance
❈These below steps (4~6) only for the 5 Door
vehicle.
4. Loosen the retaining nuts.
5. Disconnect the power connector.
6. Remove the rear combination light assembly from the body of the vehicle.
❈Rear fog light is located only on the driver’s
side (for wagon)
Tail light or tail and stop light (Bulb type)
7. Remove the socket from the assembly by turning the socket counterclockwise
until the tabs on the socket align with
the slots on the assembly. 8. Remove the bulb from the socket by
pressing it in and rotating it counter-
clockwise until the tabs on the bulb
align with the slots in the socket. Pull
the bulb out of the socket.
9. Insert a new bulb by inserting it into the socket and rotating it until it locks
into place.
10. Install the socket in the assembly by aligning the tabs on the socket with
the slots in the assembly. Push the
socket into the assembly and turn the
socket clockwise.
11. Install the service cover by putting it into the service hole.
OJD072048
OJD072058
■5 Door
■ Wagon
Rear fog light
Back up light
Stop light
OJD072065
RRRReeeeaaaarrrr ffffoooogggg////BBBBaaaacccckkkkuuuupppp lllliiiigggghhhhtttt
TTTTaaaaiiiillll lllliiiigggghhhhtttt
JD RHD 7.QXP 7/21/2012 12:52 PM Page 95
Page 1133 of 1168

7. Remove the socket from the assembly
by turning the socket counterclockwise
until the tabs on the socket align with
the slots on t")
Maintenance
96
7
Back-up light and rear fog light (if equipped)
7. Remove the socket from the assembly
by turning the socket counterclockwise
until the tabs on the socket align with
the slots on the assembly.
8. Pull the bulb out of the socket.
9. Insert a new bulb into the socket.
10. Install the socket into the assembly by aligning the tabs on the socket
with the slots on the assembly and
turning the socket clockwise.
11. Reinstall the light assembly to the body of the vehicle
❈ Rear fog light is located only on the
driver’s side. (for wagon)
Tail light or stop and tail light (LED type)
If the light does not operate, we recom-
mend that the system be checked by an
authorised Kia dealer. High mounted stop light bulb replacement
If the light does not operate, we recom-
mend that the system be checked by an
authorised Kia dealer.
License plate light bulb replace- ment
1. Turn off the engine.
2. Remove the bulb assembly by press-
ing the tabs.
3. Remove the socket by turning it coun- terclockwise.
4. Remove the bulb by pulling it straight out.
5. Install a new bulb.
6. Reinstall the bulb assembly securely with the retaining screws.
OJD072037OGD071046
JD RHD 7.QXP 7/21/2012 12:52 PM Page 96
Page 1140 of 1168

7 103
Maintenance
Interior care
Interior general precautions
Prevent chemicals such as perfume, cos-
metic oil, sun cream, hand cleaner, and
air freshener from contacting the interior
parts because they may cause damage
or discoloration. If they do contact the
interior parts, wipe them off immediately.
See the instructions that follow for the
proper way to clean vinyl.
Cleaning the upholstery and interiortrim
Vinyl
Remove dust and loose dirt from vinyl
with a whisk broom or vacuum cleaner.
Clean vinyl surfaces with a vinyl cleaner. Fabric
Remove dust and loose dirt from fabric
with a whisk broom or vacuum cleaner.Clean with a mild soap solution recom-
mended for upholstery or carpets.
Remove fresh spots immediately with a
fabric spot cleaner. If fresh spots do not
receive immediate attention, the fabriccan be stained and its colour can be
affected. Also, its fire-resistant properties
can be reduced if the material is not
properly maintained.
Cleaning the lap/shoulder belt web- bing
Clean the belt webbing with any mild
soap solution recommended for cleaning
upholstery or carpet. Follow the instruc-
tions provided with the soap. Do not
bleach or re-dye the webbing because
this may weaken it.
Cleaning the interior window glass
If the interior glass surfaces of the vehi-
cle become fogged (that is, covered with
an oily, greasy or waxy film), they should
be cleaned with glass cleaner. Follow the
directions on the glass cleaner container.
CAUTION
Never allow water or other liquidsto come in contact with
electrical/electronic components inside the vehicle as this may dam-age them.
CAUTION
Using anything but recommended
cleaners and procedures may affect the fabric’s appearance and fire-resistant properties.
CAUTION
When cleaning leather products
(steering wheel, seats etc.), useneutral detergents or low alcohol content solutions. If you use highalcohol content solutions or
acid/alkaline detergents, the colour of the leather may fade or the sur-face may get stripped off.
CAUTION
Do not scrape or scratch the insideof the rear window. This may result
in damage to the rear windowdefroster grid.
JD RHD 7.QXP 7/21/2012 12:53 PM Page 103

Aiming point
OJD072051
< Ground Height >< Distance between lamps >
H1 : Height between the head lamp bulb center and ground (Low beam) H2 : Height between the head lamp b")