Page 1121 of 1168
Maintenance
84
7
13. Connect the headlight bulb socket
connector.
14. Install the headlight bulb cover by turning it clockwise.
15. Connect the power connector to the back of the headlight assembly.Position light (3, bulb type)
Follow the steps 1 to 9 from the previous
page.
10. Pull out the socket from the assembly.
11. Pull the bulb out of the socket.
12. Insert a new bulb into the socket.
13. Install the socket into the assembly.
14. Install the headlight bulb cover byturning it clockwise.
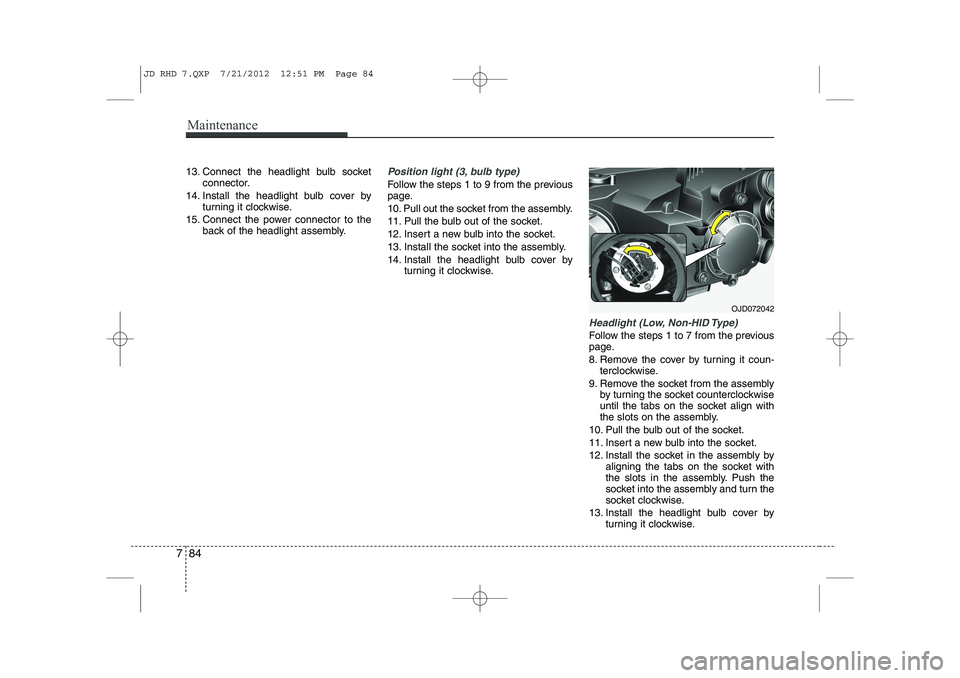
Headlight (Low, Non-HID Type)
Follow the steps 1 to 7 from the previous
page.
8. Remove the cover by turning it coun-terclockwise.
9. Remove the socket from the assembly by turning the socket counterclockwise
until the tabs on the socket align with
the slots on the assembly.
10. Pull the bulb out of the socket.
11. Insert a new bulb into the socket.
12. Install the socket in the assembly by aligning the tabs on the socket with
the slots in the assembly. Push the
socket into the assembly and turn the
socket clockwise.
13. Install the headlight bulb cover by turning it clockwise.
OJD072042
JD RHD 7.QXP 7/21/2012 12:51 PM Page 84
Page 1123 of 1168
Maintenance
86
7
Turn signal light
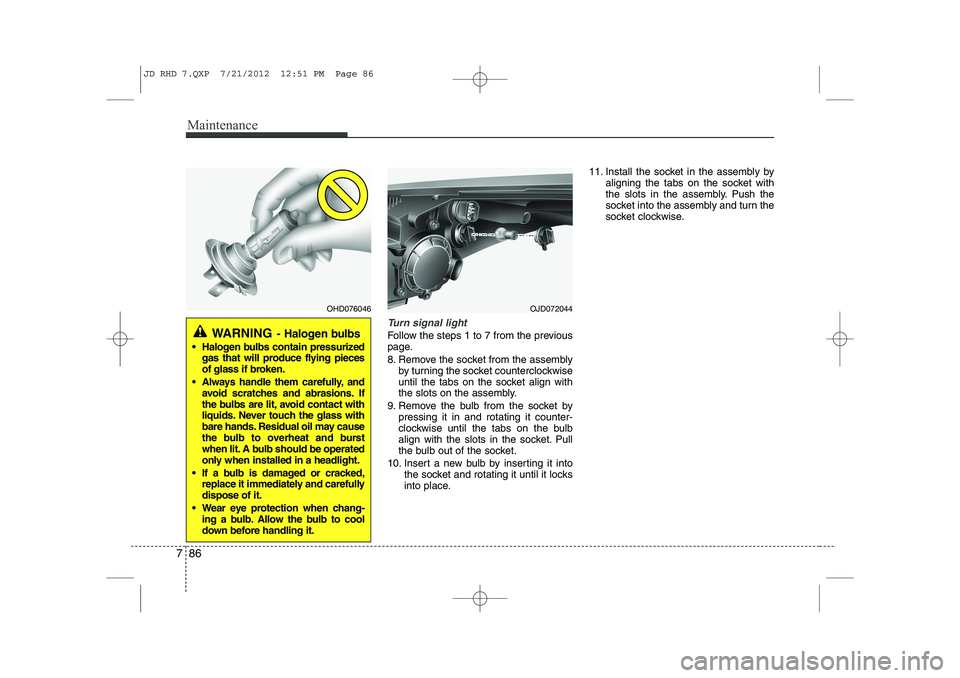
Follow the steps 1 to 7 from the previous
page.
8. Remove the socket from the assembly
by turning the socket counterclockwise
until the tabs on the socket align with
the slots on the assembly.
9. Remove the bulb from the socket by pressing it in and rotating it counter-
clockwise until the tabs on the bulb
align with the slots in the socket. Pull
the bulb out of the socket.
10. Insert a new bulb by inserting it into the socket and rotating it until it locks
into place. 11. Install the socket in the assembly by
aligning the tabs on the socket with
the slots in the assembly. Push the
socket into the assembly and turn the
socket clockwise.
OHD076046
WARNING - Halogen bulbs
Halogen bulbs contain pressurized
gas that will produce flying pieces
of glass if broken.
Always handle them carefully, and avoid scratches and abrasions. If
the bulbs are lit, avoid contact with
liquids. Never touch the glass with
bare hands. Residual oil may cause
the bulb to overheat and burst
when lit. A bulb should be operated
only when installed in a headlight.
If a bulb is damaged or cracked, replace it immediately and carefullydispose of it.
Wear eye protection when chang- ing a bulb. Allow the bulb to cool
down before handling it.
OJD072044
JD RHD 7.QXP 7/21/2012 12:51 PM Page 86
Page 1124 of 1168
787
Maintenance
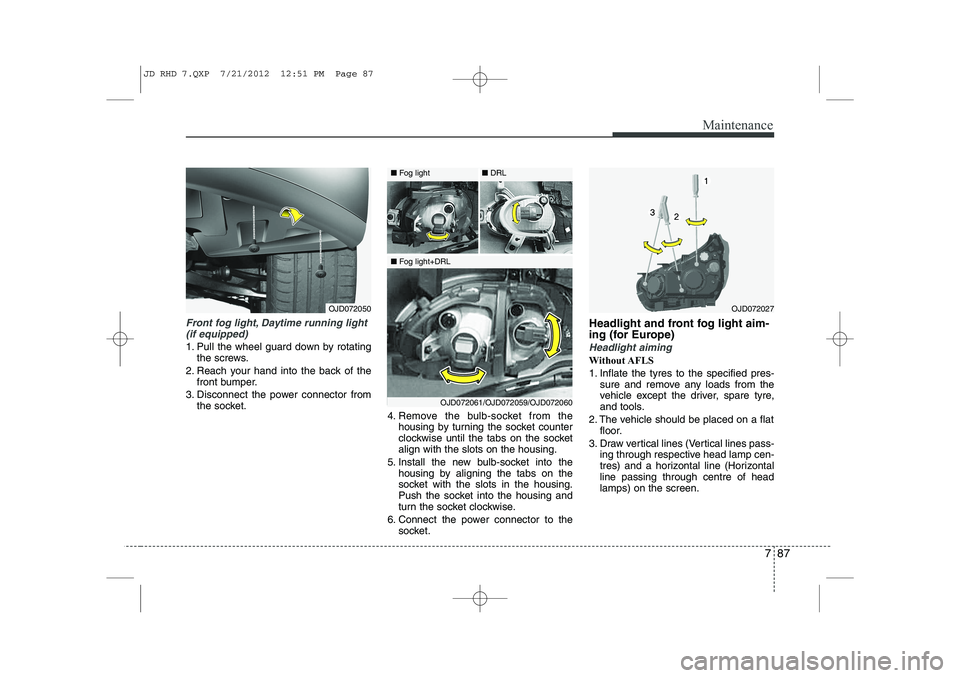
Front fog light, Daytime running light(if equipped)
1. Pull the wheel guard down by rotating the screws.
2. Reach your hand into the back of the front bumper.
3. Disconnect the power connector from the socket. 4. Remove the bulb-socket from the
housing by turning the socket counter
clockwise until the tabs on the socketalign with the slots on the housing.
5. Install the new bulb-socket into the housing by aligning the tabs on the
socket with the slots in the housing.
Push the socket into the housing and
turn the socket clockwise.
6. Connect the power connector to the socket. Headlight and front fog light aim-
ing (for Europe)Headlight aiming
Without AFLS
1. Inflate the tyres to the specified pres-
sure and remove any loads from the
vehicle except the driver, spare tyre,
and tools.
2. The vehicle should be placed on a flat floor.
3. Draw vertical lines (Vertical lines pass- ing through respective head lamp cen-
tres) and a horizontal line (Horizontalline passing through centre of headlamps) on the screen.
OJD072027OJD072050
■Fog light
■Fog light+DRL ■
DRL
OJD072061/OJD072059/OJD072060
JD RHD 7.QXP 7/21/2012 12:51 PM Page 87
Page 1131 of 1168
Maintenance
94
7
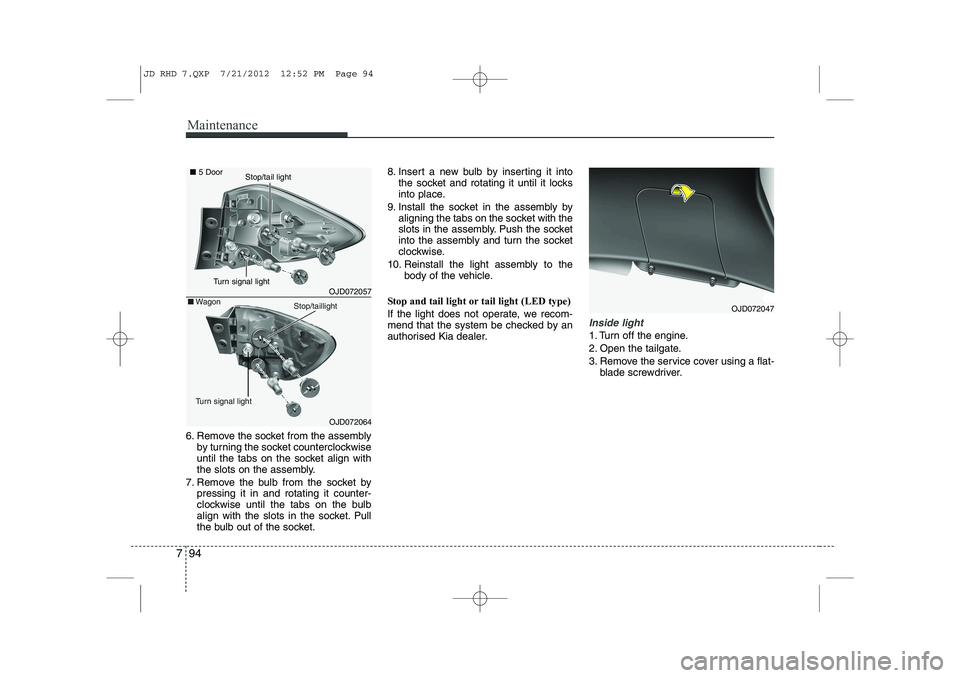
6. Remove the socket from the assembly
by turning the socket counterclockwise
until the tabs on the socket align with
the slots on the assembly.
7. Remove the bulb from the socket by pressing it in and rotating it counter-
clockwise until the tabs on the bulb
align with the slots in the socket. Pull
the bulb out of the socket. 8. Insert a new bulb by inserting it into
the socket and rotating it until it locks
into place.
9. Install the socket in the assembly by aligning the tabs on the socket with the
slots in the assembly. Push the socket
into the assembly and turn the socket
clockwise.
10. Reinstall the light assembly to the body of the vehicle.
Stop and tail light or tail light (LED type)
If the light does not operate, we recom-
mend that the system be checked by an
authorised Kia dealer.
Inside light
1. Turn off the engine.
2. Open the tailgate.
3. Remove the service cover using a flat- blade screwdriver.
OJD072047
OJD072057
OJD072064
■5 Door
■Wagon
Turn signal light
Stop/taillight
Turn signal light
Stop/tail light
JD RHD 7.QXP 7/21/2012 12:52 PM Page 94
Page 1132 of 1168
795
Maintenance
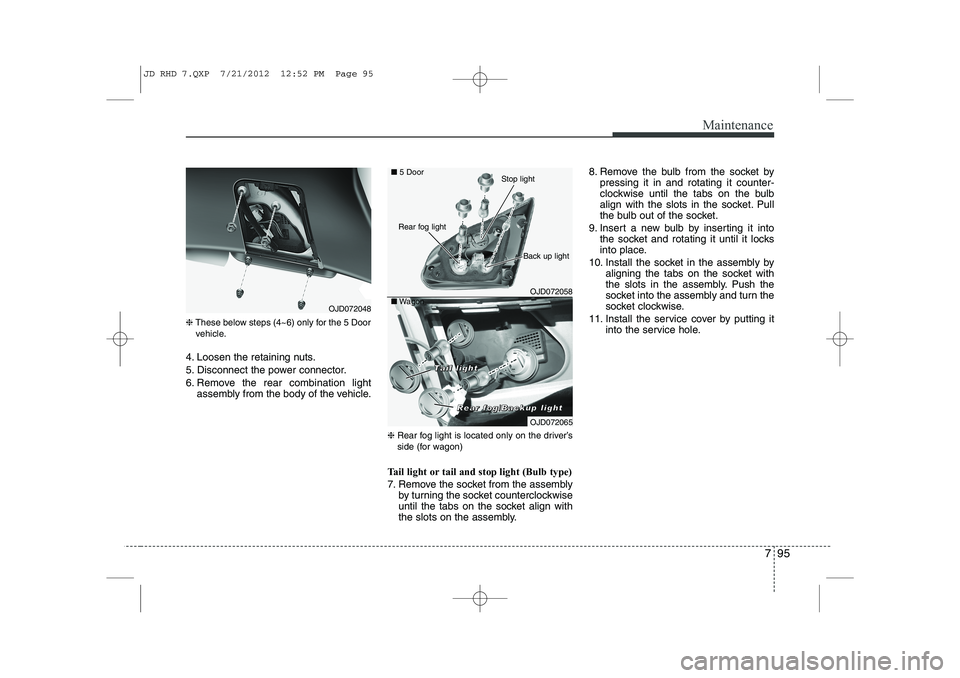
❈These below steps (4~6) only for the 5 Door
vehicle.
4. Loosen the retaining nuts.
5. Disconnect the power connector.
6. Remove the rear combination light assembly from the body of the vehicle.
❈Rear fog light is located only on the driver’s
side (for wagon)
Tail light or tail and stop light (Bulb type)
7. Remove the socket from the assembly by turning the socket counterclockwise
until the tabs on the socket align with
the slots on the assembly. 8. Remove the bulb from the socket by
pressing it in and rotating it counter-
clockwise until the tabs on the bulb
align with the slots in the socket. Pull
the bulb out of the socket.
9. Insert a new bulb by inserting it into the socket and rotating it until it locks
into place.
10. Install the socket in the assembly by aligning the tabs on the socket with
the slots in the assembly. Push the
socket into the assembly and turn the
socket clockwise.
11. Install the service cover by putting it into the service hole.
OJD072048
OJD072058
■5 Door
■ Wagon
Rear fog light
Back up light
Stop light
OJD072065
RRRReeeeaaaarrrr ffffoooogggg////BBBBaaaacccckkkkuuuupppp lllliiiigggghhhhtttt
TTTTaaaaiiiillll lllliiiigggghhhhtttt
JD RHD 7.QXP 7/21/2012 12:52 PM Page 95
Page 1133 of 1168
Maintenance
96
7
Back-up light and rear fog light (if equipped)
7. Remove the socket from the assembly
by turning the socket counterclockwise
until the tabs on the socket align with
the slots on the assembly.
8. Pull the bulb out of the socket.
9. Insert a new bulb into the socket.
10. Install the socket into the assembly by aligning the tabs on the socket
with the slots on the assembly and
turning the socket clockwise.
11. Reinstall the light assembly to the body of the vehicle
❈ Rear fog light is located only on the
driver’s side. (for wagon)
Tail light or stop and tail light (LED type)
If the light does not operate, we recom-
mend that the system be checked by an
authorised Kia dealer. High mounted stop light bulb replacement
If the light does not operate, we recom-
mend that the system be checked by an
authorised Kia dealer.
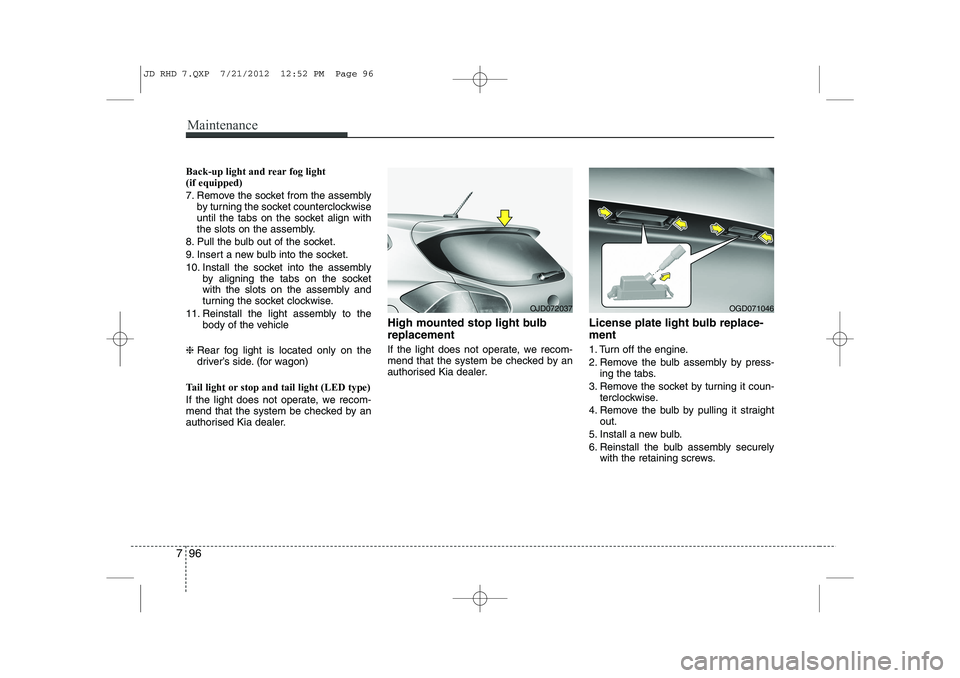
License plate light bulb replace- ment
1. Turn off the engine.
2. Remove the bulb assembly by press-
ing the tabs.
3. Remove the socket by turning it coun- terclockwise.
4. Remove the bulb by pulling it straight out.
5. Install a new bulb.
6. Reinstall the bulb assembly securely with the retaining screws.
OJD072037OGD071046
JD RHD 7.QXP 7/21/2012 12:52 PM Page 96
Page 1134 of 1168
797
Maintenance
Interior light bulb replacement
Map lamp, vanity mirror lamp,room lamp, luggage room lamp and glove box lamp
1. Using a flat-blade screwdriver, gently pry the lens from the interior light housing.
2. Remove the bulb by pulling it straight out.
3. Install a new bulb in the socket.
4. Align the lens tabs with the interior light housing notches and snap the
lens into place.
■Map lamp
■Glove box lamp
■Vanity mirror lamp
■ Luggage room lamp
■Room lamp
OGD071039/OTD079035/H/OJD072043/H/OJD072038/OGDE071057/OGD071038 ---- TTTTyyyyppppeeee AAAA
---- TTTTyyyyppppeeee BBBB
WARNING
Prior to working on the interior
lights, ensure that the light is off to
avoid burning your fingers or
receiving an electric shock.
CAUTION
Be careful not to dirt or damage lens, lens tab, and plastic housings.
JD RHD 7.QXP 7/21/2012 12:53 PM Page 97
Page 1141 of 1168
Maintenance
104
7
EMISSION CONTROL SYSTEM
The emission control system of your
vehicle is covered by a written limited
warranty. Please see the warranty infor-
mation contained in the Service Passport
in your vehicle.
Your vehicle is equipped with an emis- sion control system to meet all emission
regulations. There are three emission control sys-
tems which are as follows.
(1) Crankcase emission control system
(2) Evaporative emission control system(3) Exhaust emission control system In order to assure the proper function of
the emission control systems, it is rec-
ommended that you have your car
inspected and maintained by an autho-
rised Kia dealer in accordance with the
maintenance schedule. Caution for the Inspection and
Maintenance Test (With Electronic
Stability Control (ESC) system)
To prevent the vehicle from misfir-
ing during dynamometer testing,
turn the Electronic Stability Control
(ESC) system off by pressing the
ESC switch.
After dynamometer testing is com- pleted, turn the ESC system back on
by pressing the ESC switch again.
1. Crankcase emission control system
The positive crankcase ventilation sys-
tem is employed to prevent air pollution
caused by blow-by gases being emitted
from the crankcase. This system supplies
fresh filtered air to the crankcase through
the air intake hose. Inside the crankcase,
the fresh air mixes with blow-by gases,
which then pass through the PCV valveinto the induction system. 2. Evaporative emission control
System
The Evaporative Emission Control
System is designed to prevent fuel
vapours from escaping into the atmos-
phere.
Canister
Fuel vapours generated inside the fuel tank are absorbed and stored in the
onboard canister. When the engine is
running, the fuel vapours absorbed in the
canister are drawn into the surge tank
through the purge control solenoid valve.
Purge Control Solenoid Valve (PCSV)
The purge control solenoid valve is con-
trolled by the Engine Control Module
(ECM); when the engine coolant temper-
ature is low during idling, the PCSV clos-
es so that evaporated fuel is not taken
into the engine. After the engine warms-
up during ordinary driving, the PCSV
opens to introduce evaporated fuel to the
engine.
JD RHD 7.QXP 7/21/2012 12:53 PM Page 104