2013 KIA CEED wheel
[x] Cancel search: wheelPage 1095 of 1168
Maintenance
58
7
Compact spare tyre replacement
(if equipped)
A compact spare tyre has a shorter
tread life than a regular size tyre.
Replace it when you can see the
tread wear indicator bars on the tyre.The replacement compact spare tyre
should be the same size and design
tyre as the one provided with your
new vehicle and should be mountedon the same compact spare tyre
wheel. The compact spare tyre is notdesigned to be mounted on a regular
size wheel, and the compact spare
tyre wheel is not designed for mount-
ing a regular size tyre. Wheel replacement
When replacing the metal wheels for
any reason, make sure the new
wheels are equivalent to the original
factory units in diameter, rim widthand offset.
(Continued)
The use of any other tyre size
or type may seriously affect
ride, handling, ground clear-
ance, stopping distance, body
to tyre clearance, snow tyre
clearance, and speedometer
reliability.
It is best to replace all four tyres at the same time. If that
is not possible, or necessary,
then replace the two front or
two rear tyres as a pair.Replacing just one tyre can
seriously affect your vehicle’shandling.
The ABS works by comparing the speed of the wheels. Tyre
size can affect wheel speed.
When replacing tyres, all 4
tyres must use the same size
originally supplied with the
vehicle. Using tyres of a dif-
ferent size can cause the ABS
(Anti-lock Brake System) and
ESC (Electronic Stability
Control) to work irregularly.
WARNING
A wheel that is not the correct
size may adversely affect wheel
and bearing life, braking and
stopping abilities, handling
characteristics, ground clear-
ance, body-to-tyre clearance,
snow chain clearance,speedometer and odometer cal-
ibration, headlight aim and
bumper height.
JD RHD 7.QXP 7/21/2012 12:48 PM Page 58
Page 1096 of 1168
759
Maintenance
Tyre traction
Tyre traction can be reduced if you
drive on worn tyres, tyres that are
improperly inflated or on slippery
road surfaces. Tyres should be
replaced when tread wear indicators
appear. To reduce the possibility of
losing control, slow down whenever
there is rain, snow or ice on the road.
Tyre maintenance In addition to proper inflation, correct wheel alignment helps to decrease
tyre wear. If you find a tyre is worn
unevenly, have your dealer check thewheel alignment.
When you have new tyres installed,
make sure they are balanced. This
will increase vehicle ride comfort and
tyre life. Additionally, a tyre should
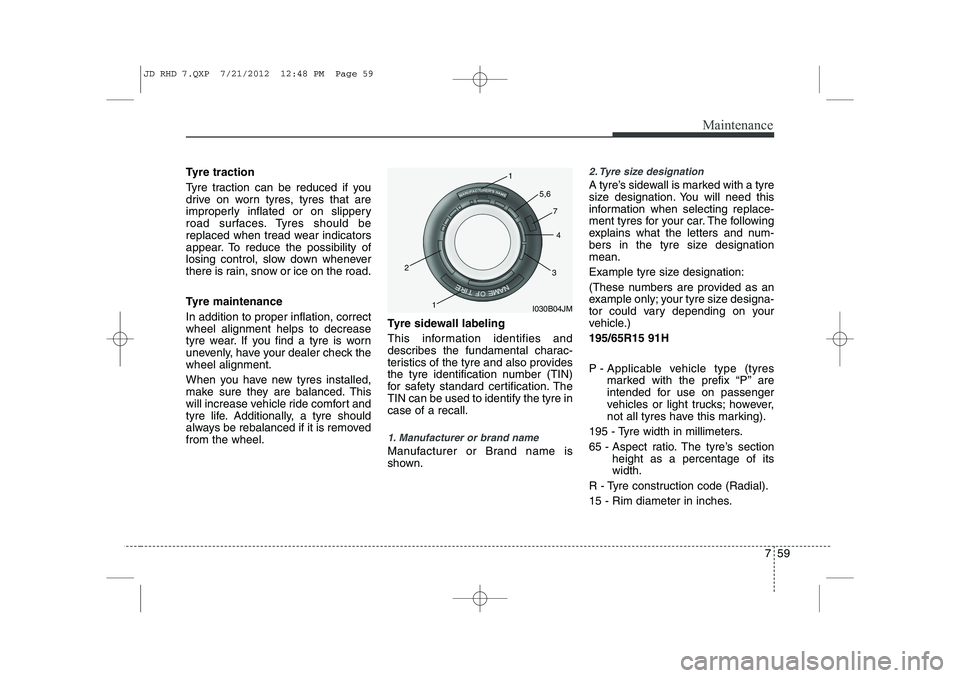
always be rebalanced if it is removedfrom the wheel.Tyre sidewall labeling
This information identifies and
describes the fundamental charac-
teristics of the tyre and also provides
the tyre identification number (TIN)
for safety standard certification. TheTIN can be used to identify the tyre incase of a recall.
1. Manufacturer or brand name
Manufacturer or Brand name is
shown.
2. Tyre size designation
A tyre’s sidewall is marked with a tyre
size designation. You will need this
information when selecting replace-
ment tyres for your car. The following
explains what the letters and num-
bers in the tyre size designationmean.
Example tyre size designation:
(These numbers are provided as an
example only; your tyre size designa-
tor could vary depending on your
vehicle.) 195/65R15 91H
P - Applicable vehicle type (tyres
marked with the prefix “P’’ are
intended for use on passenger
vehicles or light trucks; however,
not all tyres have this marking).
195 - Tyre width in millimeters.
65 - Aspect ratio. The tyre’s section height as a percentage of its width.
R - Tyre construction code (Radial).
15 - Rim diameter in inches.
I030B04JM
1
1
2
34
5,6
7
JD RHD 7.QXP 7/21/2012 12:48 PM Page 59
Page 1097 of 1168
Maintenance
60
7
S 180 km/h (112 mph)
T 190 km/h (118 mph)
H 210 km/h (130 mph)
V 240 km/h (149 mph) Z Above 240 km/h (149 mph)
Maximum Speed
Speed
Rating
Symbol
91 - Load Index, a numerical code
associated with the maximum
load the tyre can carry.
H - Speed Rating Symbol. See the speed rating chart in this section
for additional information.
Wheel size designation
Wheels are also marked with impor-
tant information that you need if you
ever have to replace one. The follow-
ing explains what the letters and
numbers in the wheel size designa-tion mean.
Example wheel size designation: 6.0JX15
6.0 - Rim width in inches. J - Rim contour designation.
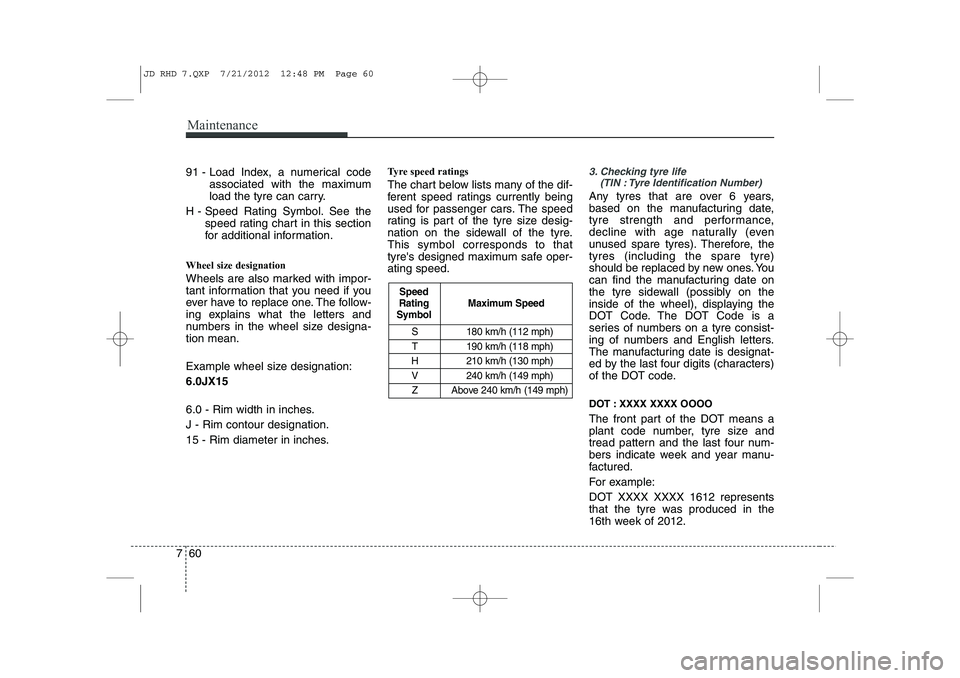
15 - Rim diameter in inches. Tyre speed ratings
The chart below lists many of the dif-
ferent speed ratings currently being
used for passenger cars. The speed
rating is part of the tyre size desig-
nation on the sidewall of the tyre.This symbol corresponds to that
tyre's designed maximum safe oper-ating speed.3. Checking tyre life
(TIN : Tyre Identification Number)
Any tyres that are over 6 years,
based on the manufacturing date,
tyre strength and performance,
decline with age naturally (even
unused spare tyres). Therefore, thetyres (including the spare tyre)
should be replaced by new ones. You
can find the manufacturing date on
the tyre sidewall (possibly on the
inside of the wheel), displaying the
DOT Code. The DOT Code is a
series of numbers on a tyre consist-
ing of numbers and English letters.
The manufacturing date is designat-
ed by the last four digits (characters)
of the DOT code.
DOT : XXXX XXXX OOOO
The front part of the DOT means a
plant code number, tyre size and
tread pattern and the last four num-
bers indicate week and year manu-
factured.
For example:
DOT XXXX XXXX 1612 represents
that the tyre was produced in the
16th week of 2012.
JD RHD 7.QXP 7/21/2012 12:48 PM Page 60
Page 1099 of 1168
Maintenance
62
7
Traction - AA, A, B & C
The traction grades, from highest to
lowest, are AA, A, B and C. Those
grades represent the tyres ability to
stop on wet pavement as measuredunder controlled conditions on spec-
ified government test surfaces of
asphalt and concrete. A tyre marked
C may have poor traction perform-
ance. Temperature -A, B & C
The temperature grades are A (the highest), B and C representing the
tyre’s resistance to the generation ofheat and its ability to dissipate heatwhen tested under controlled condi-
tions on a specified indoor laboratorytest wheel.
Sustained high temperature can
cause the material of the tyre to
degenerate and reduce tyre life, and
excessive temperature can lead to
sudden tyre failure. Grades B and A
represent higher levels of perform-
ance on the laboratory test wheel
than the minimum required by the
law.
WARNING
The traction grade assigned to this tyre is based on straight-ahead braking traction tests,
and does not include accelera-
tion, cornering, hydroplaning,
or peak traction characteristics.
WARNING - Tyre temperature
The temperature grade for this
tyre is established for a tyre that
is properly inflated and not
overloaded. Excessive speed,
underinflation, or excessive
loading, either separately or in
combination, can cause heat
build-up and possible sudden
tyre failure. This can cause loss
of vehicle control and serious
injury or death.
JD RHD 7.QXP 7/21/2012 12:48 PM Page 62
Page 1106 of 1168
769
Maintenance
No.Fuse ratingSymbolFuse NameProtected component
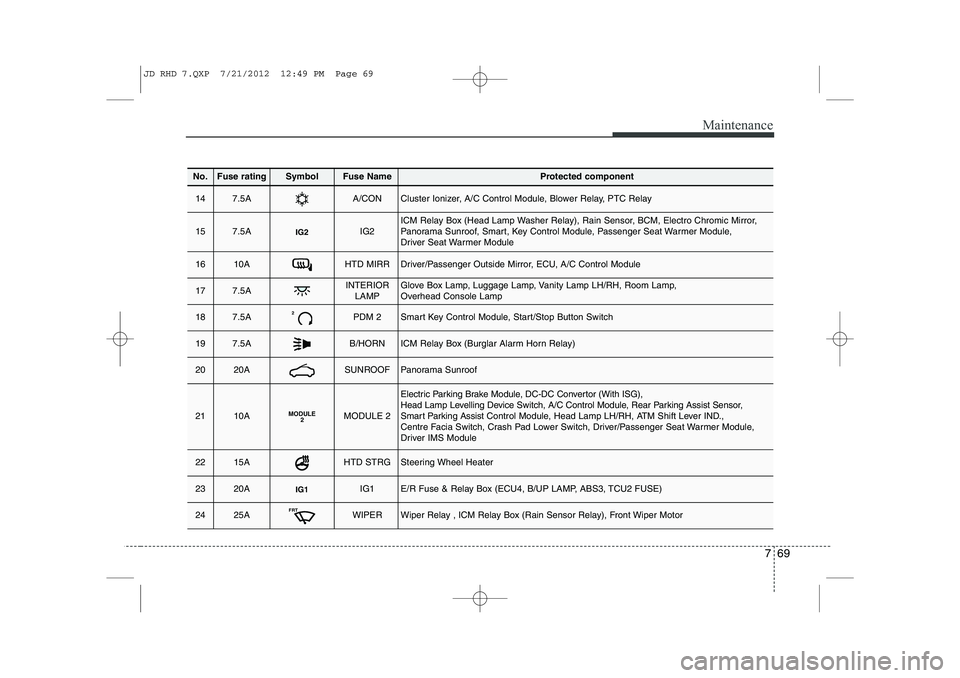
147.5AA/CONCluster Ionizer, A/C Control Module, Blower Relay, PTC Relay
157.5AIG2IG2ICM Relay Box (Head Lamp Washer Relay), Rain Sensor, BCM, Electro Chromic Mirror,
Panorama Sunroof, Smart, Key Control Module, Passenger Seat Warmer Module,
Driver Seat Warmer Module
1610AHTD MIRRDriver/Passenger Outside Mirror, ECU, A/C Control Module
177.5AINTERIORLAMPGlove Box Lamp, Luggage Lamp, Vanity Lamp LH/RH, Room Lamp,
Overhead Console Lamp
187.5A2PDM 2Smart Key Control Module, Start/Stop Button Switch
197.5AB/HORNICM Relay Box (Burglar Alarm Horn Relay)
2020ASUNROOFPanorama Sunroof
2110AMODULE 2MODULE 2
Electric Parking Brake Module, DC-DC Convertor (With ISG),
Head Lamp Levelling Device Switch, A/C Control Module, Rear Parking Assist Sensor,
Smart Parking Assist Control Module, Head Lamp LH/RH, ATM Shift Lever IND.,
Centre Facia Switch, Crash Pad Lower Switch, Driver/Passenger Seat Warmer Module,
Driver IMS Module
2215AHTD STRGSteering Wheel Heater
2320AIG1IG1E/R Fuse & Relay Box (ECU4, B/UP LAMP, ABS3, TCU2 FUSE)
2425AFRTWIPERWiper Relay , ICM Relay Box (Rain Sensor Relay), Front Wiper Motor
JD RHD 7.QXP 7/21/2012 12:49 PM Page 69
Page 1124 of 1168
787
Maintenance
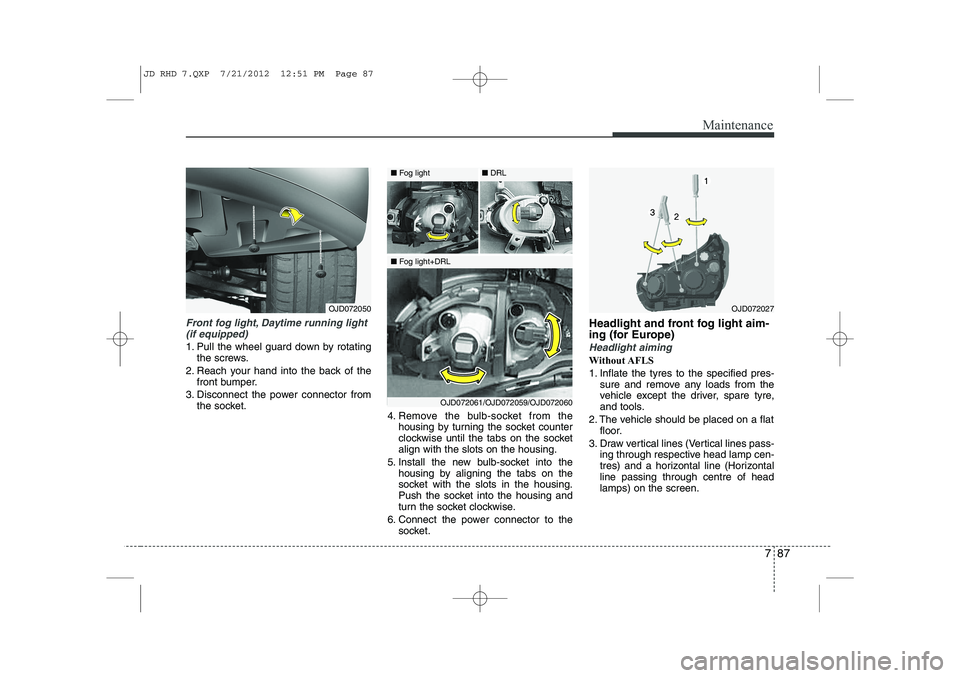
Front fog light, Daytime running light(if equipped)
1. Pull the wheel guard down by rotating the screws.
2. Reach your hand into the back of the front bumper.
3. Disconnect the power connector from the socket. 4. Remove the bulb-socket from the
housing by turning the socket counter
clockwise until the tabs on the socketalign with the slots on the housing.
5. Install the new bulb-socket into the housing by aligning the tabs on the
socket with the slots in the housing.
Push the socket into the housing and
turn the socket clockwise.
6. Connect the power connector to the socket. Headlight and front fog light aim-
ing (for Europe)Headlight aiming
Without AFLS
1. Inflate the tyres to the specified pres-
sure and remove any loads from the
vehicle except the driver, spare tyre,
and tools.
2. The vehicle should be placed on a flat floor.
3. Draw vertical lines (Vertical lines pass- ing through respective head lamp cen-
tres) and a horizontal line (Horizontalline passing through centre of headlamps) on the screen.
OJD072027OJD072050
■Fog light
■Fog light+DRL ■
DRL
OJD072061/OJD072059/OJD072060
JD RHD 7.QXP 7/21/2012 12:51 PM Page 87
Page 1125 of 1168
Maintenance
88
7
4. With the head lamp and battery in nor-
mal condition, aim the head lamps so
the brightest portion falls on the hori-
zontal and vertical lines.
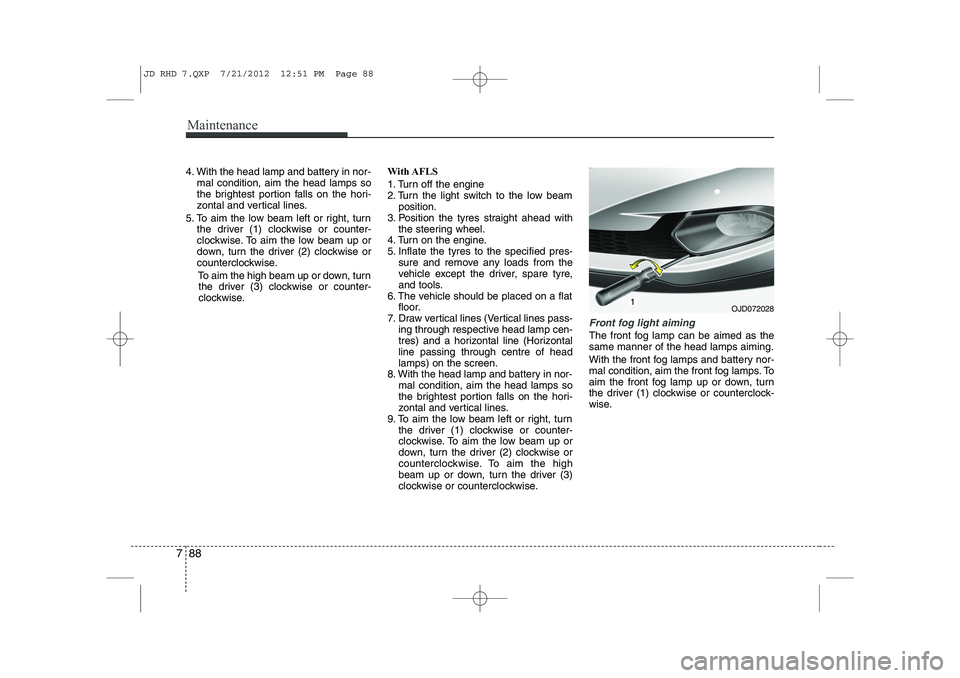
5. To aim the low beam left or right, turn the driver (1) clockwise or counter-
clockwise. To aim the low beam up or
down, turn the driver (2) clockwise or
counterclockwise.
To aim the high beam up or down, turnthe driver (3) clockwise or counter-
clockwise. With AFLS
1. Turn off the engine
2. Turn the light switch to the low beam
position.
3. Position the tyres straight ahead with the steering wheel.
4. Turn on the engine.
5. Inflate the tyres to the specified pres- sure and remove any loads from the
vehicle except the driver, spare tyre,
and tools.
6. The vehicle should be placed on a flat floor.
7. Draw vertical lines (Vertical lines pass- ing through respective head lamp cen-
tres) and a horizontal line (Horizontalline passing through centre of headlamps) on the screen.
8. With the head lamp and battery in nor- mal condition, aim the head lamps so
the brightest portion falls on the hori-
zontal and vertical lines.
9. To aim the low beam left or right, turn the driver (1) clockwise or counter-
clockwise. To aim the low beam up or
down, turn the driver (2) clockwise or
counterclockwise. To aim the high
beam up or down, turn the driver (3)
clockwise or counterclockwise.
Front fog light aiming
The front fog lamp can be aimed as the same manner of the head lamps aiming.
With the front fog lamps and battery nor-
mal condition, aim the front fog lamps. To
aim the front fog lamp up or down, turn
the driver (1) clockwise or counterclock-
wise.
OJD072028
JD RHD 7.QXP 7/21/2012 12:51 PM Page 88
Page 1137 of 1168
Maintenance
100
7
Bright-metal maintenance
To remove road tar and insects, use a
tar remover, not a scraper or other
sharp object.
To protect the surfaces of bright-metal parts from corrosion, apply a coating of
wax or chrome preservative and rub to
a high luster.
During winter weather or in coastal areas, cover the bright metal parts with
a heavier coating of wax or preserva-
tive. If necessary, coat the parts with
non-corrosive petroleum jelly or other
protective compound.
Underbody maintenance
Corrosive materials used for ice and
snow removal and dust control may col-
lect on the underbody. If these materials
are not removed, accelerated rusting can
occur on underbody parts such as the
fuel lines, frame, floor pan and exhaust
system, even though they have been
treated with rust protection.
Thoroughly flush the vehicle underbody
and wheel openings with lukewarm or
cold water once a month, after off-road
driving and at the end of each winter. Payspecial attention to these areas because
it is difficult to see all the mud and dirt. It
will do more harm than good to wet down
the road grime without removing it. The
lower edges of doors, rocker panels, and
frame members have drain holes that
should not be allowed to clog with dirt;
trapped water in these areas can cause
rusting.WARNING
After washing the vehicle, test the
brakes whilst driving slowly to see
if they have been affected by water.
If braking performance is impaired,
dry the brakes by applying them
lightly whilst maintaining a slow
forward speed.
JD RHD 7.QXP 7/21/2012 12:53 PM Page 100