2013 KIA CEED headlight bulb
[x] Cancel search: headlight bulbPage 564 of 1168

Specifications & Consumer information
4
8
BULB WATTAGE
Light Bulb5 DoorWagon
WattageBulb typeWattageBulb type
Front
HeadlightsLow55 or 35
(AFLS with HID)H7LL or D1S*55 or 35
(AFLS with HID)H7LL or D1S*
High55H7LL55H7LL
Static bending light*55H7LL55H7LL
Daytime running light21/LEDP21/5WXL/LED21/LEDP21/5WXL/LED
Front turn signal lights21PY21WLL21PY21WLL
Position lights5/LEDW5WLL/LED5/LEDW5WLL/LED
Side repeater lights55W55W
Front fog lights35H8L21P21WL
Rear
Rear fog light21P21WL21P21WL
Stop and tail lights 21/5 or LEDP21/5WL or LED21/5 or LEDP21/5WL or LED
Rear turn signal lights 21P21WL21P21WL
Tail light 5 or LEDP21/5WL or LED5 or LEDP21WL or LED
Back-up lights 16W16W21P21WL
High mounted stop lightLEDLEDLEDLED
License plate lights5W5W5W5W
Interior
Map lamps8FESTOON8FESTOON
Room lamps8FESTOON8FESTOON
Luggage lamp8FESTOON8FESTOON
Glove box lamp5FESTOON5FESTOON
Vanity mirror lamps5FESTOON5FESTOON
HID : High Intensity Discharge
AFLS : Adaptive Front-Lighting System
* : if equipped
JD eng 8.QXP 7/18/2012 12:53 PM Page 4
Page 577 of 1168

Index
6
I
Gauge (Normal vision)
Engine temperature gauge. . . . . . . . . . . . . . . . . . . . 4-54
Fuel gauge . . . . . . . . . . . . . . . . . . . . . . . . . . . . . . . . . 4-48
Gauge (Super vision) Engine temperature gauge. . . . . . . . . . . . . . . . . . . . 4-67
Fuel gauge . . . . . . . . . . . . . . . . . . . . . . . . . . . . . . . . . 4-61
Glove box . . . . . . . . . . . . . . . . . . . . . . . . . . . . . . . . . . 4-152
Glove box lamp . . . . . . . . . . . . . . . . . . . . . . . . . . . . . 4-124
Hazard warning flasher . . . . . . . . . . . . . . . . . . . . . . 4-109
Hazardous driving conditions . . . . . . . . . . . . . . . . . . 5-64
Headlamp delay function . . . . . . . . . . . . . . . . . . . . . 4-110
Headlight (Headlamp) welcome function . . . . . . . . 4-110
Headlight bulb replacement. . . . . . . . . . . . . . . . . . . . 7-82
Headlight leveling device . . . . . . . . . . . . . . . . . . . . . 4-116
Headlight position . . . . . . . . . . . . . . . . . . . . . . . . . . . 4-112
Headlight washer . . . . . . . . . . . . . . . . . . . . . . . . . . . 4-121
Headrest(front) . . . . . . . . . . . . . . . . . . . . . . . . . . . . . . 3-10
Headrest(rear) . . . . . . . . . . . . . . . . . . . . . . . . . . . . . . . 3-13
Heated steering wheel. . . . . . . . . . . . . . . . . . . . . . . . . 4-38
High - beam operation . . . . . . . . . . . . . . . . . . . . . . . 4-113
Hight adjustment (seat belt) . . . . . . . . . . . . . . . . . . . 3-21
Highway driving . . . . . . . . . . . . . . . . . . . . . . . . . . . . . 5-66 Hill-start assist control (HAC). . . . . . . . . . . . . . . . . . 5-48
Hood . . . . . . . . . . . . . . . . . . . . . . . . . . . . . . . . . . . . . . . 4-28
Horn . . . . . . . . . . . . . . . . . . . . . . . . . . . . . . . . . . . . . . . 4-39
How to use this manual . . . . . . . . . . . . . . . . . . . . . . . . 1-2
Icy road warning . . . . . . . . . . . . . . . . . . . . . . . . . . . . . 4-89
Indicator symbols on the instrument cluster . . . . . . . 1-6
Indicators and warnings . . . . . . . . . . . . . . . . . . . . . . 4-77
Inside rearview mirror . . . . . . . . . . . . . . . . . . . . . . . . 4-42Instrument cluster
LCD display information . . . . . . . . . . . . . . . . . . . . . 4-71
Warning and indicators . . . . . . . . . . . . . . . . . . . . . . 4-77
Instrument cluster (Normal vision). . . . . . . . . . . . . . 4-46
Automatic transaxle shift position indicator . . . . . 4-49
Double clutch transmission shift indicator . . . . . . 4-49
Fuel gauge . . . . . . . . . . . . . . . . . . . . . . . . . . . . . . . . . 4-48
Instrument panel illumination . . . . . . . . . . . . . . . . 4-47
Manual transaxle shift indicator. . . . . . . . . . . . . . . 4-48
Odometer . . . . . . . . . . . . . . . . . . . . . . . . . . . . . . . . . . 4-50
Speed limiter indicator. . . . . . . . . . . . . . . . . . . . . . . 4-50
Speedometer . . . . . . . . . . . . . . . . . . . . . . . . . . . . . . . 4-47
Tachometer . . . . . . . . . . . . . . . . . . . . . . . . . . . . . . . . 4-47
Trip computer . . . . . . . . . . . . . . . . . . . . . . . . . . . . . . 4-51
User Settings . . . . . . . . . . . . . . . . . . . . . . . . . . . . . . . 4-56
G
H
I
JD eng Index.qxp 7/21/2012 11:45 AM Page 6
Page 579 of 1168

Index
8
I
Label
Air bag warning label . . . . . . . . . . . . . . . . . . . . . . . 3-63
Air conditioner compressor label . . . . . . . . . . . . . . 8-11
Refrigerant label . . . . . . . . . . . . . . . . . . . . . . . . . . . . 8-11
Tire sidewall labeling . . . . . . . . . . . . . . . . . . . . . . . . 7-59
Tire specification and pressure label . . . . . . . . . . . 8-10
Vehicle certification label . . . . . . . . . . . . . . . . . . . . . . 8-9
Lane Departure Warning System . . . . . . . . . . . . . . . 5-59
Lane Departure Warning System Mode. . . . . . . . . . 4-67
Lap/shoulder belt . . . . . . . . . . . . . . . . . . . . . . . . . . . . 3-21
LCD display information . . . . . . . . . . . . . . . . . . . . . . 4-71LCD display warnings and indicators (instrument panel display) . . . . . . . . . . . . . . . . . . . . 4-88
Calender . . . . . . . . . . . . . . . . . . . . . . . . . . . . . . . . . . 4-88
Clock . . . . . . . . . . . . . . . . . . . . . . . . . . . . . . . . . . . . . 4-88
Icy road warning . . . . . . . . . . . . . . . . . . . . . . . . . . . 4-89
Outside ambient Temperature . . . . . . . . . . . . . . . . 4-88
LDWS (Lane Departure Warning System) . . . . . . . 5-59
Light bulbs. . . . . . . . . . . . . . . . . . . . . . . . . . . . . . . . . . 7-81
Lighting . . . . . . . . . . . . . . . . . . . . . . . . . . . . . . . . . . . 4-110 AFLS (Adaptive Front Lighting System) . . . . . . . 4-117
Auto light/AFLS position . . . . . . . . . . . . . . . . . . . . 4-112
Battery saver function . . . . . . . . . . . . . . . . . . . . . . 4-110
Daytime running light (DRL) . . . . . . . . . . . . . . . . 4-115
Front fog light . . . . . . . . . . . . . . . . . . . . . . . . . . . . . 4-115 Headlamp delay function . . . . . . . . . . . . . . . . . . . . 4-110
Headlight (Headlamp) welcome function . . . . . . . 4-110
Headlight leveling device . . . . . . . . . . . . . . . . . . . . 4-116
Headlight position . . . . . . . . . . . . . . . . . . . . . . . . . . 4-112
High - beam operation . . . . . . . . . . . . . . . . . . . . . . 4-113
Position light position . . . . . . . . . . . . . . . . . . . . . . . 4-111
Rear fog light. . . . . . . . . . . . . . . . . . . . . . . . . . . . . . 4-115
Static bending light . . . . . . . . . . . . . . . . . . . . . . . . . 4-111
Turn signals . . . . . . . . . . . . . . . . . . . . . . . . . . . . . . . 4-114
Lubricants and capacities . . . . . . . . . . . . . . . . . . . . . . 8-6
Luggage net (holder) . . . . . . . . . . . . . . . . . . . . . . . . 4-159
Luggage rail system . . . . . . . . . . . . . . . . . . . . . . . . . 4-164
Luggage room lamp . . . . . . . . . . . . . . . . . . . . . . . . . 4-124
Luggage side tray . . . . . . . . . . . . . . . . . . . . . . . . . . . 4-153
Luggage tray . . . . . . . . . . . . . . . . . . . . . . . . . . . . . . . 4-153
Lumbar support (Automatic Seat) . . . . . . . . . . . . . . . 3-7
Lumbar support (Manual seat) . . . . . . . . . . . . . . . . . . 3-5
Main fuse . . . . . . . . . . . . . . . . . . . . . . . . . . . . . . . . . . . 7-66 Maintenance
Explanation of scheduled maintenance items . . . . 7-32
Maintenance services . . . . . . . . . . . . . . . . . . . . . . . . . 7-5
Maintenance under severe usage conditions (except Europe, for Russia) . . . . . . . . . . . . . . . . . . 7-30
Maintenance under severe usage conditions (for Europe, except Russia) . . . . . . . . . . . . . . . . . . 7-19
M
L
JD eng Index.qxp 7/21/2012 11:45 AM Page 8
Page 1101 of 1168
Maintenance
64
7
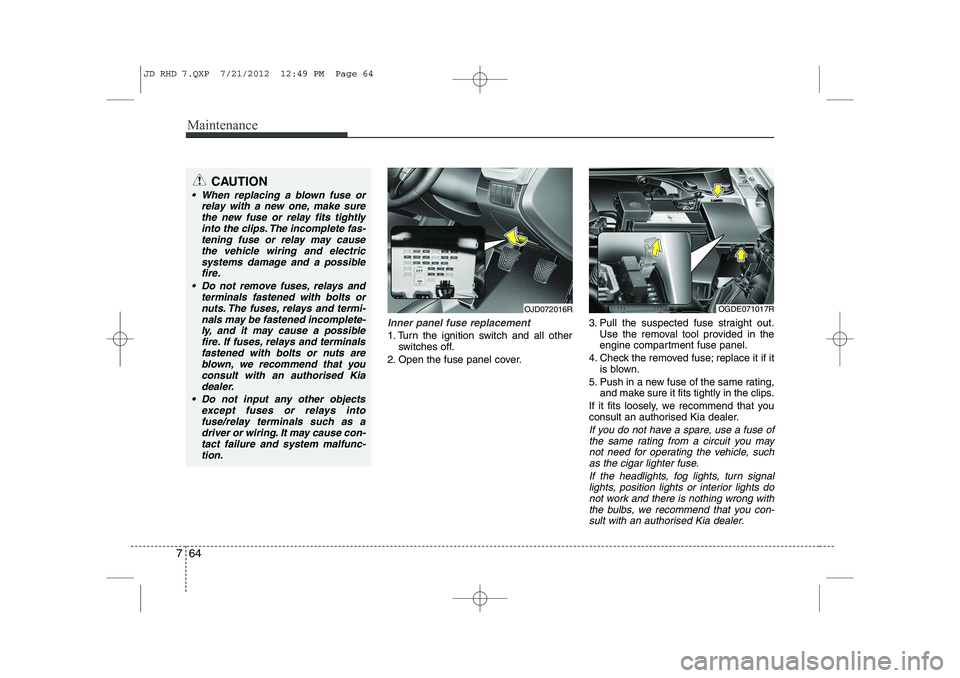
Inner panel fuse replacement
1. Turn the ignition switch and all other
switches off.
2. Open the fuse panel cover. 3. Pull the suspected fuse straight out.
Use the removal tool provided in the
engine compartment fuse panel.
4. Check the removed fuse; replace it if it is blown.
5. Push in a new fuse of the same rating, and make sure it fits tightly in the clips.
If it fits loosely, we recommend that you
consult an authorised Kia dealer.
If you do not have a spare, use a fuse of the same rating from a circuit you may
not need for operating the vehicle, suchas the cigar lighter fuse.
If the headlights, fog lights, turn signallights, position lights or interior lights do not work and there is nothing wrong with
the bulbs, we recommend that you con- sult with an authorised Kia dealer.
OJD072016ROGDE071017R
CAUTION
When replacing a blown fuse or relay with a new one, make sure
the new fuse or relay fits tightlyinto the clips. The incomplete fas-tening fuse or relay may cause the vehicle wiring and electric
systems damage and a possiblefire.
Do not remove fuses, relays and terminals fastened with bolts or
nuts. The fuses, relays and termi-nals may be fastened incomplete-ly, and it may cause a possiblefire. If fuses, relays and terminals
fastened with bolts or nuts areblown, we recommend that youconsult with an authorised Kia
dealer.
Do not input any other objects except fuses or relays intofuse/relay terminals such as adriver or wiring. It may cause con-
tact failure and system malfunc-tion.
JD RHD 7.QXP 7/21/2012 12:49 PM Page 64
Page 1118 of 1168
781
Maintenance
LIGHT BULBS
Use only the bulbs of the specifiedwattage.
✽✽ NOTICE
After driving in heavy rain or washing the vehicle, headlight and taillight lenses
could appear foggy. This condition is
caused by the temperature differencebetween the lamp inside and outside.
This is similar to the condensation on
your windows inside your vehicle during
rain and does not indicate a problem
with your vehicle. If the water leaks into
the lamp bulb circuitry, we recommendthat the system be checked by an autho-
rised Kia dealer.WARNING - Working on
the lights
Prior to working on the light, firmly
apply the parking brake, ensure
that the ignition switch is turned to
the “LOCK” position (smart key:turn off the engine) and turn off the
lights to avoid sudden movement
of the vehicle and burning your fin-
gers or getting an electric shock.
CAUTION
Be sure to replace the burned-out bulb with one of the same wattage rating. Otherwise, it may causedamage to the fuse or electricwiring system.
CAUTION
If you do not have necessary tools, the correct bulbs and the expertise,
we recommend that you consult anauthorised Kia dealer. In many cases, it is difficult to replace vehi-cle light bulbs because other parts
of the vehicle must be removedbefore you can get to the bulb. This is especially true if you have to
remove the headlight assembly to get to the bulb(s).
Removing/installing the headlightassembly can result in damage to the vehicle.
JD RHD 7.QXP 7/21/2012 12:50 PM Page 81
Page 1119 of 1168
Maintenance
82
7
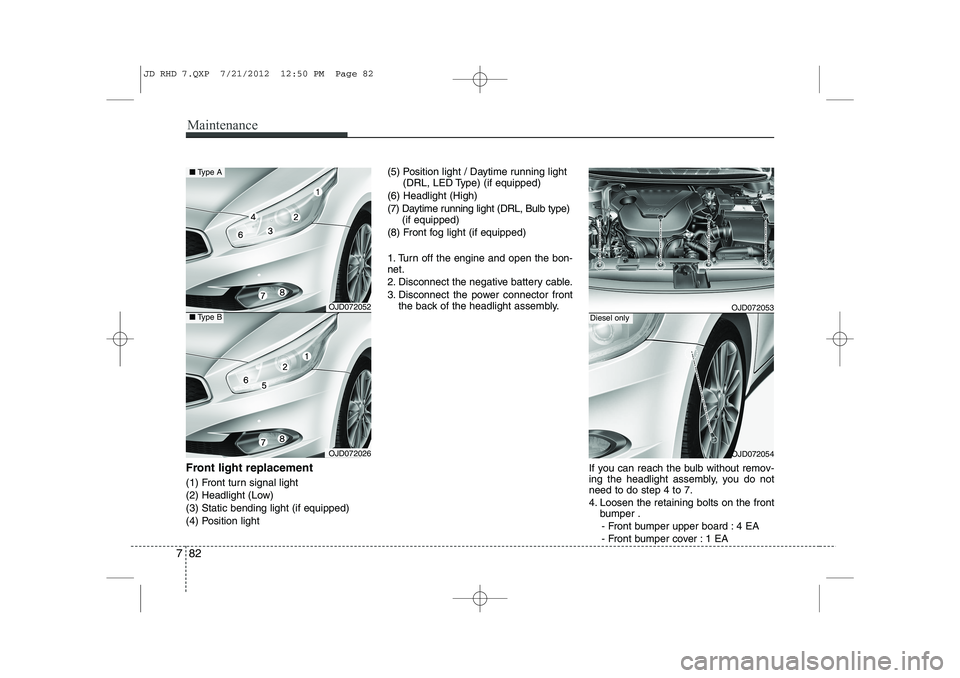
Front light replacement
(1) Front turn signal light
(2) Headlight (Low)(3) Static bending light (if equipped)
(4) Position light (5) Position light / Daytime running light
(DRL, LED Type) (if equipped)
(6) Headlight (High)
(7) Daytime running light (DRL, Bulb type) (if equipped)
(8) Front fog light (if equipped)
1. Turn off the engine and open the bon- net.
2. Disconnect the negative battery cable.
3. Disconnect the power connector front the back of the headlight assembly.
If you can reach the bulb without remov-
ing the headlight assembly, you do notneed to do step 4 to 7.
4. Loosen the retaining bolts on the frontbumper .
- Front bumper upper board : 4 EA
- Front bumper cover : 1 EA
OJD072052
OJD072026
■ Type A
■Type BOJD072053
OJD072054
Diesel only
JD RHD 7.QXP 7/21/2012 12:50 PM Page 82
Page 1120 of 1168
783
Maintenance
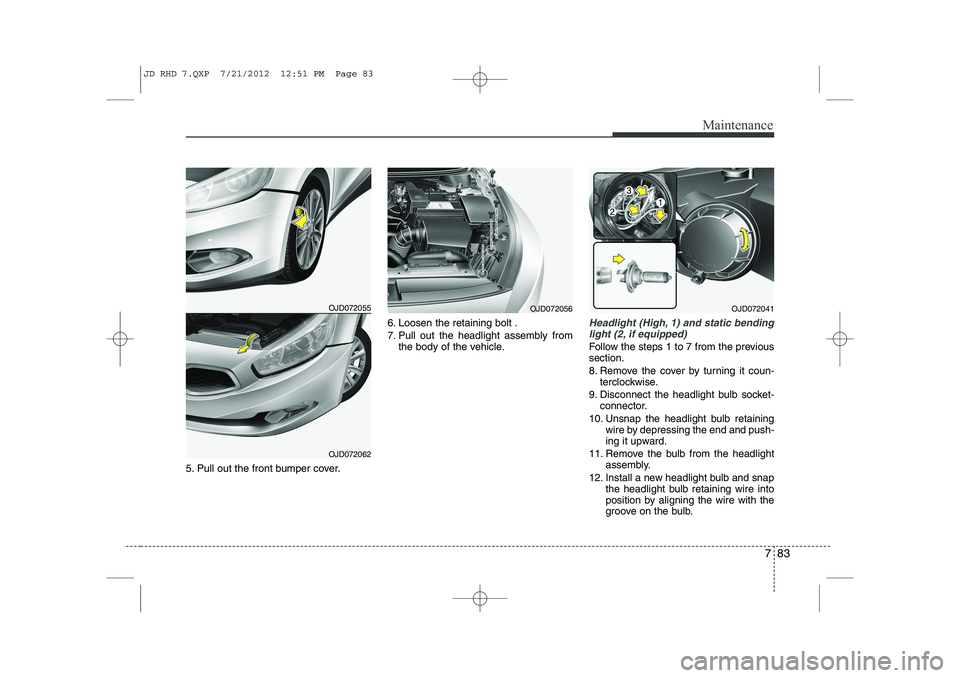
5. Pull out the front bumper cover.6. Loosen the retaining bolt .
7. Pull out the headlight assembly from
the body of the vehicle.
Headlight (High, 1) and static bending
light (2, if equipped)
Follow the steps 1 to 7 from the previous section.
8. Remove the cover by turning it coun- terclockwise.
9. Disconnect the headlight bulb socket- connector.
10. Unsnap the headlight bulb retaining wire by depressing the end and push-
ing it upward.
11. Remove the bulb from the headlight assembly.
12. Install a new headlight bulb and snap the headlight bulb retaining wire into
position by aligning the wire with the
groove on the bulb.
OJD072041OJD072055
OJD072062
OJD072056
JD RHD 7.QXP 7/21/2012 12:51 PM Page 83
Page 1121 of 1168
Maintenance
84
7
13. Connect the headlight bulb socket
connector.
14. Install the headlight bulb cover by turning it clockwise.
15. Connect the power connector to the back of the headlight assembly.Position light (3, bulb type)
Follow the steps 1 to 9 from the previous
page.
10. Pull out the socket from the assembly.
11. Pull the bulb out of the socket.
12. Insert a new bulb into the socket.
13. Install the socket into the assembly.
14. Install the headlight bulb cover byturning it clockwise.
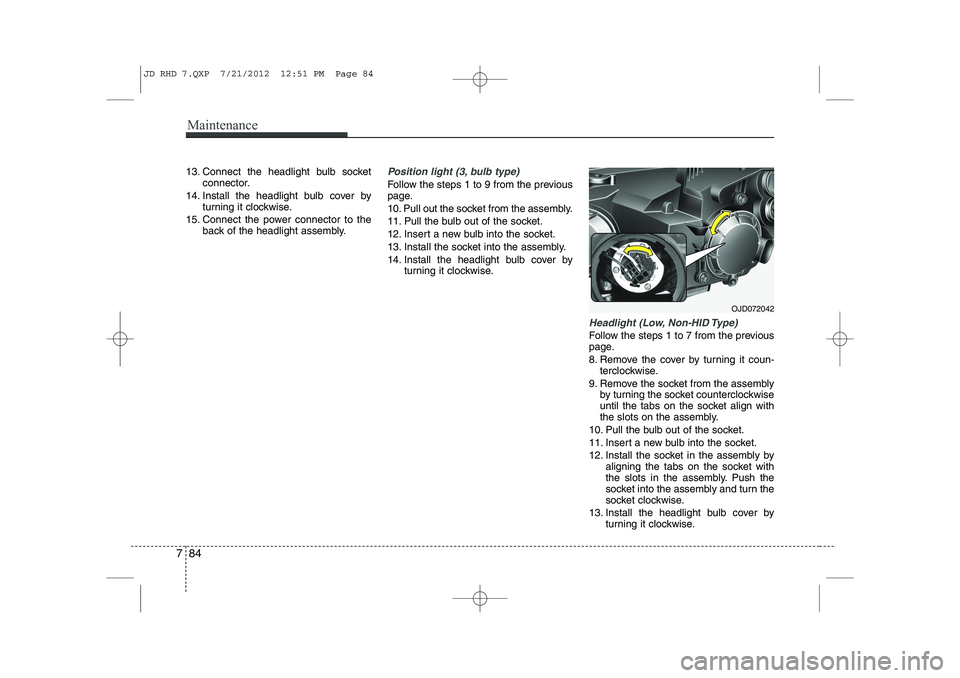
Headlight (Low, Non-HID Type)
Follow the steps 1 to 7 from the previous
page.
8. Remove the cover by turning it coun-terclockwise.
9. Remove the socket from the assembly by turning the socket counterclockwise
until the tabs on the socket align with
the slots on the assembly.
10. Pull the bulb out of the socket.
11. Insert a new bulb into the socket.
12. Install the socket in the assembly by aligning the tabs on the socket with
the slots in the assembly. Push the
socket into the assembly and turn the
socket clockwise.
13. Install the headlight bulb cover by turning it clockwise.
OJD072042
JD RHD 7.QXP 7/21/2012 12:51 PM Page 84