Page 430 of 661
•Using the remote control’s Up and Down cursor
buttons to set the value for the current digit and the
remote control’s Right cursor button to select digits,
enter the new password.
• After the four-digit password is entered, press the
remote control’s ENTER button to accept the change.
DVD Player Level Menu
428 UNDERSTANDING YOUR INSTRUMENT PANEL
Page 431 of 661
To set the rating, activate the DVD Setup Menu and
follow these additional instructions:
•Using the remote control’s Left and Right cursor
buttons, select the Rating tab.
• Highlight �Change Rating�, and then press the remote
control’s ENTER button.
• Enter the current password. Select a digit, use the
remote control’s Up and Down cursor buttons to set
the value for the current digit, and then press the
remote control’s Right cursor button to select the next
digit. Repeat this digit selection sequence for all four
digits.
• After the four-digit password is entered, press the
remote control’s ENTER button. If the password is
correct, the Rating Level menu is displayed. •
Using the remote control’s Up and Down cursor
buttons, select the new rating level, and then press the
remote control’s ENTER button to accept the change.
Product Agreement
This product incorporates copyright protection technol-
ogy that is protected by U.S. patents and other intellec-
tual property rights. Use of this copyright protection
technology must be authorized by Macrovision, and is
intended for home or other limited viewing uses other-
wise authorized by Macrovision. Reverse engineering or
disassembly is prohibited.
Dolby� Digital and MLP Lossless Manufactured
under license from Dolby Laboratories. �Dolby�,�MLP
Lossless�, and the double-D symbol are trademarks of
Dolby Laboratories. Confidential unpublished works.
Copyright 1992-1997 Dolby Laboratories. All right
reserved.
4
UNDERSTANDING YOUR INSTRUMENT PANEL 429
Page 432 of 661
General Information
This system complies with Part 15 of the FCC Operation
is subject to the following two conditions:
1. This device may not cause harmful interference.
2. This device must accept any interference received,including interference that may cause undesired op-
eration.
HARMAN KARDON� HIGH PERFORMANCE
SOUND SYSTEM WITH DRIVER-SELECTABLE
SURROUND (DSS) – IF EQUIPPED
Your vehicle is equipped with a Harman Kardon�
GreenEdge™ audio system which offers superior sound
quality and high Sound Pressure Levels (SPL) with
minimum energy consumption. The new system utilizes
unique amplifier and speaker technologies delivering
substantial increases in component and system efficiency
levels.
The 12 Channel High Voltage GreenEdge™ Class D ampli-
fier provides 7.1-channel simulated surround sound from
any stereo audio source. The Harman Kardon �audio
system offers the ability to choose surround sound for any
audio source while the high-efficiency speaker designs
ensure higher SPL with a dramatic increase in dynamic
sound quality. The speakers are tuned for maximum effi-
ciency and perfectly matched to the amplifier output stage
ensuring state of the art multi-seat surround sound pro-
cessing.
“Audio Surround” is optimized for front seat passengers
for any audio source. This surround effect is available for
audio from any source – AM/FM/CD/ Satellite Radio or
AUX – and is activated through the Electronic Vehicle
Information Center (EVIC). Refer to “Driver-Selectable
Surround Sound (DSS)” under “Electronic Vehicle Infor-
mation Center (EVIC)” in “Understanding Your Instru-
ment Panel”.
430 UNDERSTANDING YOUR INSTRUMENT PANEL
Page 433 of 661
DSS modes for audio sources are “Stereo” and “Audio
Surround,” which is surround sound equalized for the
front seat occupants. The “Video Surround” mode is
described under Driver-Selectable Surround (DSS). The
Video Surround Mode will only be available for video
media sources (DVDs, Video CDs, or other video media
supported by the radio). Some audio will sound better in
DSS modes, others in Stereo mode.
When in “Audio Surround” mode, balance is set auto-
matically. Fader control is available in surround mode
but should be set to the center position for optimal
surround performance.
STEERING WHEEL AUDIO CONTROLS
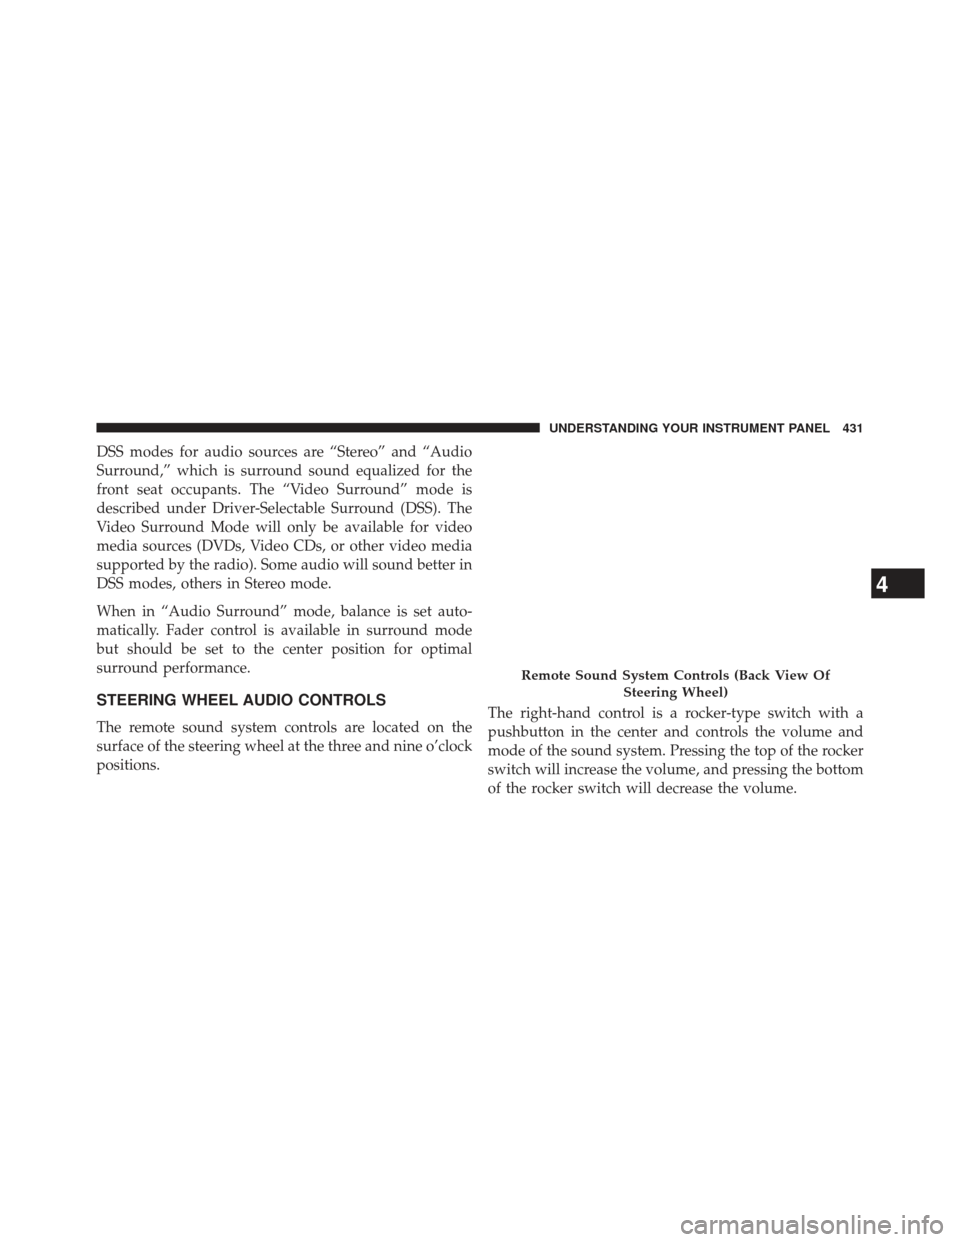
The remote sound system controls are located on the
surface of the steering wheel at the three and nine o’clock
positions.The right-hand control is a rocker-type switch with a
pushbutton in the center and controls the volume and
mode of the sound system. Pressing the top of the rocker
switch will increase the volume, and pressing the bottom
of the rocker switch will decrease the volume.
Remote Sound System Controls (Back View Of
Steering Wheel)
4
UNDERSTANDING YOUR INSTRUMENT PANEL 431
Page 434 of 661
Pressing the center button will make the radio switch
between the various modes available (AM/FM/SAT/
CD/HDD/AUX/VES, etc.).
The left-hand control is a rocker-type switch with a
pushbutton in the center. The function of the left-hand
control is different depending on which mode you are in.
The following describes the left-hand control operation in
each mode.
Radio Operation
Pressing the top of the switch will “Seek” up for the next
listenable station and pressing the bottom of the switch
will “Seek” down for the next listenable station.
The button located in the center of the left-hand control
will tune to the next preset station that you have pro-
grammed in the radio preset pushbutton.
CD Player
Pressing the top of the switch once will go to the next
track on the CD. Pressing the bottom of the switch once
will go to the beginning of the current track, or to the
beginning of the previous track if it is within one second
after the current track begins to play.
If you press the switch up or down twice, it plays the
second track; three times, it will play the third, etc.
The center button on the left side rocker switch has no
function for a single-disc CD player. However, when a
multiple-disc CD player is equipped on the vehicle, the
center button will select the next available CD in the
player.
432 UNDERSTANDING YOUR INSTRUMENT PANEL
Page 435 of 661
CD/DVD DISC MAINTENANCE
To keep a CD/DVD in good condition, take the following
precautions:
1. Handle the disc by its edge; avoid touching thesurface.
2. If the disc is stained, clean the surface with a soft cloth, wiping from center to edge.
3. Do not apply paper or tape to the disc; avoid scratch- ing the disc.
4. Do not use solvents such as benzene, thinner, cleaners, or anti-static sprays.
5. Store the disc in its case after playing.
6. Do not expose the disc to direct sunlight.
7. Do not store the disc where temperatures may become too high. NOTE:
If you experience difficulty in playing a particu-
lar disc, it may be damaged (i.e., scratched, reflective
coating removed, a hair, moisture or dew on the disc)
oversized, or have protection encoding. Try a known
good disc before considering disc player service.
RADIO OPERATION AND MOBILE PHONES
Under certain conditions, the mobile phone being on in
your vehicle can cause erratic or noisy performance from
your radio. This condition may be lessened or eliminated
by relocating the mobile phone antenna. This condition is
not harmful to the radio. If your radio performance does
not satisfactorily “clear” by the repositioning of the
antenna, it is recommended that the radio volume be
turned down or off during mobile phone operation when
not using Uconnect� (if equipped).4
UNDERSTANDING YOUR INSTRUMENT PANEL 433
Page 436 of 661
CLIMATE CONTROLS
The air conditioning and heating system is designed to
make you comfortable in all types of weather.
Dual-Zone Automatic Temperature Control
(ATC) — If Equipped
•The Automatic Temperature Control (ATC) allows
both driver and front passenger seat occupants to
select individual comfort settings.
• When occupants in the vehicle select an Auto mode
operation, Auto blower operation is set by using a
push button on the control unit and a comfort tem-
perature setting by using the temperature up and
down buttons.
• The system provides set-and-forget operation for op-
timum comfort and convenience.
• The system can be controlled manually, if desired. The ATC system automatically maintains the interior
comfort level desired by the driver and passenger.
Automatic Temperature Control (ATC) Panel
434 UNDERSTANDING YOUR INSTRUMENT PANEL
Page 437 of 661
1. A/C Button
Press and release to change the current Air Conditioning
(A/C) setting, the indicator illuminates when A/C is ON.
Performing this function will cause the ATC to switch
into manual mode.
2. Recirculation Control Button
Press and release to change the current setting, the
indicator illuminates when ON.
3. Left Front Seat Occupant Temperature Display
This display shows the temperature setting for the left
front seat occupant.
4. Mode Display
This display shows the current Mode selection (Panel,
Bi-Level, Floor, Mix).
5. Blower Control Display
This display shows the current Blower speed selection.
6. Right Front Seat Occupant Temperature Display
This display shows the temperature setting for the right
front seat occupant.
7. Front Defrost Button
Press and release to change the current setting, the
indicator illuminates when ON. Performing this function
will cause the ATC to switch into manual mode. The
blower will engage immediately if the Defrost mode is
selected.
8. Passenger Temperature Control Up Button
Provides the passenger with independent temperature
control. Push the button for warmer temperature set-
tings.
4
UNDERSTANDING YOUR INSTRUMENT PANEL 435