2013 JEEP GRAND CHEROKEE lights
[x] Cancel search: lightsPage 190 of 408

Remote Unlock Sequence
WhenUnlock Driver Door Only On 1st Press
is selected, only the driver’s door will unlock on
the first press of the RKE transmitter UNLOCK
button. When Driver Door 1st Press is selected,
you must press the RKE transmitter UNLOCK
button twice to unlock the passenger’s doors.
When Unlock All Doors On 1st Press is
selected, all of the doors will unlock on the first
press of the RKE transmitter UNLOCK button.
To make your selection, scroll up or down until
the preferred setting is highlighted, then press
and release the SELECT button until a check-
mark appears next to the setting, showing that
the setting has been selected.
NOTE:
If the vehicle is equipped with Keyless
Enter-N-Go™ (Passive Entry) and the EVIC
is programmed to Unlock All Doors 1st
Press, all doors will unlock no matter which
Passive Entry equipped door handle is
grasped. If Driver Door 1st Press is pro-
grammed, only the driver’s door will unlock
when the driver’s door is grasped. With Passive Entry, if Driver Door 1st Press is
programmed touching the handle more than
once will only result in the driver’s door
opening. If driver door first is selected, once
the driver door is opened, the interior door
lock/unlock switch can be used to unlock all
doors (or use RKE transmitter).
RKE Linked To Memory
When this feature is selected, you can use your
RKE transmitter to recall one of two pre-
programmed memory profiles. Each memory
profile contains desired position settings for the
driver seat, side mirror, adjustable pedals (if
equipped), power tilt and telescopic steering
column (if equipped), and a set of desired radio
station presets. When OFF is selected, only the
MEMORY switch on the driver’s door trim panel
will recall memory profiles. To make your selec-
tion, press and release the SELECT button a
check-mark appears next to the feature show-
ing the system has been activated or the check-
mark is removed showing the system has been
deactivated. Refer to “Driver Memory Seat” in
“Understanding The Features Of Your Vehicle”.
Flash Lamps With Lock
When this feature is selected, the front and rear
turn signals will flash when the doors are locked
or unlocked with the RKE transmitter. To make
your selection, press and release the SELECT
button until a check-mark appears next to the
feature showing the system has been activated
or the check-mark is removed showing the
system has been deactivated.
Headlamp Off Delay
When this feature is selected, the driver can
choose to have the headlights remain on for 0,
30, 60, or 90 seconds when exiting the vehicle.
To make your selection, scroll up or down until
the preferred setting is highlighted, then press
and release the SELECT button until a check-
mark appears next to the setting, showing that
the setting has been selected.
Headlamps with Wipers (Available with
Automatic Headlamps Only)
When this feature is selected, and the headlight
switch is in the AUTO position, the headlights
will turn on approximately 10 seconds after the
wipers are turned on. The headlights will also
186
Page 191 of 408

turn off when the wipers are turned off if they
were turned on by this feature. To make your
selection, press and release the SELECT but-
ton until a check-mark appears next to the
feature showing the system has been activated
or the check-mark is removed showing the
system has been deactivated.
NOTE:
Turning the headlights on during the day-
time causes the instrument panel lights to
dim. To increase the brightness, refer to
“Lights” in “Understanding The Features Of
Your Vehicle”.
Tilt Mirror in Reverse — If Equipped
When this feature is selected, the outside rear-
view mirrors will tilt downward when the ignition
switch is in the RUN position and the transmis-
sion shift lever is in the REVERSE position. The
mirrors will move back to their previous position
when the transmission is shifted out of RE-
VERSE. To make your selection, press and
release the SELECT button until a check-mark
appears next to the feature showing the system
has been activated or the check-mark is re-
moved showing the system has been deacti-
vated.Auto High Beams (Available with
SmartBeam™ Only)
When this feature is selected, the high beam
headlights will deactivate automatically under
certain conditions. To make your selection,
press and release the SELECT button until a
check-mark appears next to the feature show-
ing the system has been activated or the check-
mark is removed showing the system has been
deactivated. Refer to “Lights/SmartBeam™ — If
Equipped” in “Understanding The Features Of
Your Vehicle” for further information.
Wiper Mode — If Equipped
When this feature is selected, the system will
automatically activate the windshield wipers if it
senses moisture on the windshield. To make
your selection, press and release the SELECT
button until a check-mark appears next to the
feature showing the system has been activated
or the check-mark is removed showing the
system has been deactivated. When this fea-
ture is deactivated, the system reverts to the
standard intermittent wiper operation.
Easy Entry/Exit Seat (Available with
Memory Seat Only)
This feature provides automatic driver seat po-
sitioning to enhance driver mobility when enter-
ing and exiting the vehicle. To make your selec-
tion, press and release the SELECT button until
a check-mark appears next to the feature show-
ing the system has been activated or the check-
mark is removed showing the system has been
deactivated.
NOTE:
The seat will return to the memorized seat
location (if Recall Memory with Remote Key
Unlock is set to ON) when the RKE transmit-
ter is used to unlock the door. Refer to
“Driver Memory Seat” in “Understanding
The Features Of Your Vehicle” for further
information.
187
Page 192 of 408

Key-Off Power DelayWhen this feature is selected, the power window
switches, radio, hands-free system (if equipped),
DVD video system (if equipped), power sunroof (if
equipped), and power outlets will remain active
for up to 10 minutes after the ignition switch is
turned OFF. Opening either front vehicle door will
cancel this feature. To make your selection, scroll
up or down until the preferred setting is high-
lighted, then press and release the SELECT
button until a check-mark appears next to the
setting, showing that the setting has been se-
lected.
Illuminated Approach
When this feature is selected, the headlights will
activate and remain on for 0, 30, 60, or 90 sec-
onds when the doors are unlocked with the RKE
transmitter. To make your selection, scroll up or
down until the preferred setting is highlighted,
then press and release the SELECT button until
a check-mark appears next to the setting, show-
ing that the setting has been selected.Hill Start Assist (HSA) — If Equipped
When this feature is selected, the HSA system
is active. Refer to “Electronic Brake Control
System” in “Starting And Operating” for system
function and operating information. To make
your selection, press and release the SELECT
button until a check-mark appears next to the
feature showing the system has been activated
or the check-mark is removed showing the
system has been deactivated.
Keyless Enter-N-Go™ (Passive Entry)
This feature allows you to lock and unlock the
vehicle’s door(s) without having to press the
RKE transmitter lock or unlock buttons. To make
your selection, press and release the SELECT
button until a check-mark appears next to the
feature showing the system has been activated
or the check-mark is removed showing the
system has been deactivated. Refer to “Keyless
Enter-N-Go™” in “Things To Know Before Start-
ing Your Vehicle”.
Display Units of Measure In
The EVIC, odometer, and Uconnect® gps (if
equipped) can be changed between English
and Metric units of measure. To make your
selection, press and release the SELECT but-
ton until “ENGLISH” or “METRIC” appears.
Display Fuel Saver — If Equipped
The “ECO” message is located in the Compass/
Temperature display; this message can be
turned on or off. To make your selection, press
and release the SELECT button until a check-
mark appears next to the setting, showing that
the setting has been selected.
Calibrate Compass
Refer to “Compass Display” for more information.
Compass VarianceRefer to “Compass Display” for more information.
SOUND SYSTEMS
Refer to your Sound Systems Booklet.
188
Page 227 of 408
Clearing A Flooded Engine (Using ENGINE
START/STOP Button)
If the engine fails to start after you have followed
the “Normal Starting” or “Extreme Cold Weather"
procedures, it may be flooded. To clear any
excess fuel:
1. Press and hold the brake pedal.
2. Press the accelerator pedal all the way to the
floor and hold it.
3. Press and release the ENGINE START/
STOP button once.
The starter motor will engage automatically, run
for 10 seconds, and then disengage. Once this
occurs, release the accelerator pedal and the
brake pedal, wait 10 to 15 seconds, then repeat
the “Normal Starting” procedure. Clearing A Flooded Engine
(Using Fob With Integrated Key)
If the engine fails to start after you have followed
the “Normal Starting” or “Extreme Cold Weather”
procedures, it may be flooded. To clear any
excess fuel:
1. Press the accelerator pedal all the way to the
floor and hold it.
2.
Turn the ignition switch to the START position
and release it as soon as the starter engages.
The starter motor will disengage automatically
in 10 seconds. Once this occurs, release the
accelerator pedal, turn the ignition switch to the
LOCK position, wait 10 to 15 seconds, then
repeat the “Normal Starting” procedure.
CAUTION!
To prevent damage to the starter, wait 10 to
15 seconds before trying again.
After StartingThe idle speed is controlled automatically and it
will decrease as the engine warms up.
Normal Starting – Diesel EngineObserve the following when the engine is oper-
ating.
• All message center lights are off.
• Malfunction Indicator Light (MIL) is off.
• Low Oil Pressure Light is off.
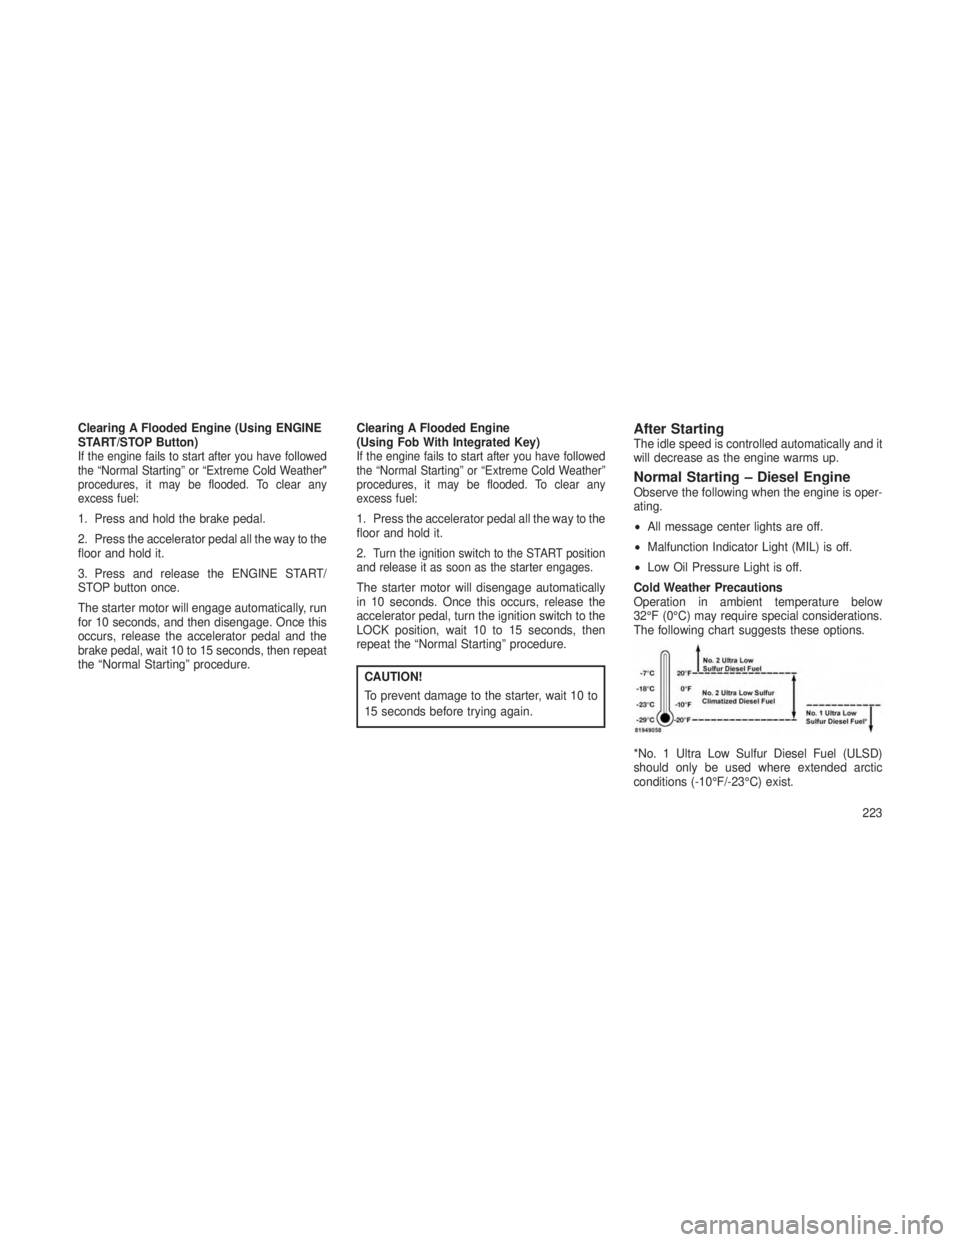
Cold Weather Precautions
Operation in ambient temperature below
32°F (0°C) may require special considerations.
The following chart suggests these options.
*No. 1 Ultra Low Sulfur Diesel Fuel (ULSD)
should only be used where extended arctic
conditions (-10°F/-23°C) exist.
223
Page 247 of 408

The system requires that the engine be running
for all changes. When lowering the vehicle all of
the doors, including the liftgate, must be closed.
If a door is opened at any time while the vehicle
is lowering the change will not be completed
until the open door(s) is closed.
The Quadra-Lift™ air suspension system uses
a lifting and lowering pattern which keeps the
headlights from incorrectly shining into oncom-
ing traffic. When raising the vehicle, the rear of
the vehicle will move up first and then the front.
When lowering the vehicle, the front will move
down first and then the rear.
After the engine is turned off, it may be noticed
that the air suspension system operates briefly,
this is normal. The system is correcting the
position of the vehicle to ensure a proper ap-
pearance.
To assist with changing a spare tire, the
Quadra-Lift™ air suspension system has a fea-
ture which allows the automatic leveling to be
disabled. Press and hold both the “Up” and
“Down” buttons simultaneously between 5 and
10 seconds, a message will appear in the EVIC
stating leveling has been disabled immediatelyafter both buttons have been released. Refer to
“Electronic Vehicle Information Center (EVIC)”
in “Understanding Your Instrument Panel” for
further information. Driving the vehicle over
5 mph (8 km/h) will return the air suspension to
normal operation. Refer to “Jacking and Tire
Changing” in “What To Do In Emergencies” for
further information.
WARNING!
The air suspension system uses a high pres-
sure volume of air to operate the system. To
avoid personal injury or damage to the sys-
tem, see your authorized dealer for service.
Electronic Vehicle Information
Center (EVIC) Display Messages
When the appropriate conditions exist, a mes-
sage will appear in the EVIC display. Refer to
“Electronic Vehicle Information Center (EVIC)”
in “Understanding Your Instrument Panel” for
further information.
An audible chime will be heard whenever a
system error has been detected.
OperationThe indicator lamps 3 through 6 will illuminate to
show the current position of the vehicle. Flash-
ing indicator lamps will show a position which
the system is working to achieve. When raising,
if multiple indicator lamps are flashing on the
“Up” button, the highest flashing indicator lamp
is the position the system is working to achieve.
When lowering, if multiple indicators are flash-
ing on the
"Up"button the lowest solid indicator
lamp is the position the system is working to
achieve.
Pressing the “UP” button once will move the
suspension one position higher from the current
position, assuming all conditions are met (i.e.
engine running, speed below threshold, etc).
The “UP” button can be pressed multiple times,
each press will raise the requested level by one
position up to a maximum position of OR2 or the
highest position allowed based on current con-
ditions (i.e. vehicle speed, etc).
243
Page 288 of 408

Towing Requirements – Trailer Lights And
Wiring
Whenever you pull a trailer, regardless of the
trailer size, stop lights and turn signals on the
trailer are required for motoring safety.
The Trailer Tow Package includes a 13 pin
wiring harness. Use a factory approved trailer
harness and connector.
NOTE:
Do not cut or splice wiring into the vehicles
wiring harness.
The electrical connections are all complete to
the vehicle but you must mate the harness to a
trailer connector.
Pin
Number Function Wire
Color
1 Left Turn Signal Black/ White
2 Rear Fog Light White
3
aGround/Common
Return for Contacts (Pins) 1 and 2 and 4to8 Brown
4 Right Turn Signal Black/ Green
Pin
Number Function Wire
Color
5
Right Rear Position, Side Marker Lights,and Rear Registra- tion Plate Illumina- tion Device.
b
Green/Red
6 Stop Lights Black/
Red
7 Left Rear Position, Side Marker Lights,and Rear Registra- tion Plate Illumina- tion Device.
b
Green/Black
8 Reverse lights Blue/ Red
9 Permanent Power Supply (+12V) Red
10 Power Supply Con- trolled by IgnitionSwitch (+12V) Yellow13–Pin Connector
284
Page 294 of 408

•The ignition switch must be in the ON/
RUN position for a shift to take place and
for the position indicator lights to be op-
erable. If the ignition switch is not in the
ON/RUN position, the shift will not take
place and no position indicator lights will
be on or flashing.
• A flashing NEUTRAL (N) position indica-
tor light indicates that shift requirements
have not been met.
Shifting Out Of NEUTRAL (N)
Use the following procedure to prepare your
vehicle for normal usage.
1. Bring the vehicle to a complete stop, leaving
it connected to the tow vehicle.
2. Firmly apply the parking brake.
3. Reconnect the negative battery cable.
4. Turn the ignition switch to the LOCK/OFF
position.
5. Turn the ignition switch to the ON/RUN po-
sition, but do not start the engine. 6. Press and hold the brake pedal.
7. Shift the transmission into NEUTRAL.
8. Using the point of a ballpoint pen or similar
object, press and hold the recessed transfer
case NEUTRAL (N) button (located by the se-
lector switch) for one second.
NOTE:
When shifting out of transfer case NEUTRAL
(N), turning the engine OFF may be required
to avoid gear clash.
9. After the NEUTRAL (N) indicator light turns
off, release the NEUTRAL (N) button.
10. After the NEUTRAL (N) button has been
released, the transfer case will shift to the
position indicated by the selector switch.
11. Shift the transmission into PARK.
12. Release the brake pedal.
13. Disconnect vehicle from the tow vehicle.
14. Start the engine.
15. Press and hold the brake pedal.
16. Release the parking brake.
17. Shift the transmission into DRIVE, release
the brake pedal, and check that the vehicle
operates normally.
18.
The Keyless Enter-N Go™ button (if
equipped) may now be reinstalled if desired. Refer
to “Starting Procedures/Keyless Enter-N-Go™” in
“Starting and Operating” for further information.NEUTRAL (N) Switch
290
Page 295 of 408

NOTE:
•Steps 1 through 7 are requirements that
must be met before pressing the NEU-
TRAL (N) button, and must continue to be
met until the shift has been completed. If
any of these requirements are not met
before pressing the NEUTRAL (N) button
or are no longer met during the shift, the
NEUTRAL (N) indicator light will flash
continuously until all requirements are
met or until the NEUTRAL (N) button is
released. •
The ignition switch must be in the ON/
RUN position for a shift to take place and
for the position indicator lights to be op-
erable. If the ignition switch is not in the
ON/RUN position, the shift will not take
place and no position indicator lights will
be on or flashing.
• A flashing NEUTRAL (N) position indica-
tor light indicates that shift requirements
have not been met.
291