2013 JAGUAR XJ change time
[x] Cancel search: change timePage 11 of 16

JAGUAR XJ JAGUAR XJ JAGUAR XJ
Radio
Satellite radio
Touch screen and audio
Use channel 184 to preview satellite radio. The SIRIUS telephone number and ID number will be displayed. When the preview time expires you will need to subscribe to SIRIUS to enable further satellite reception.
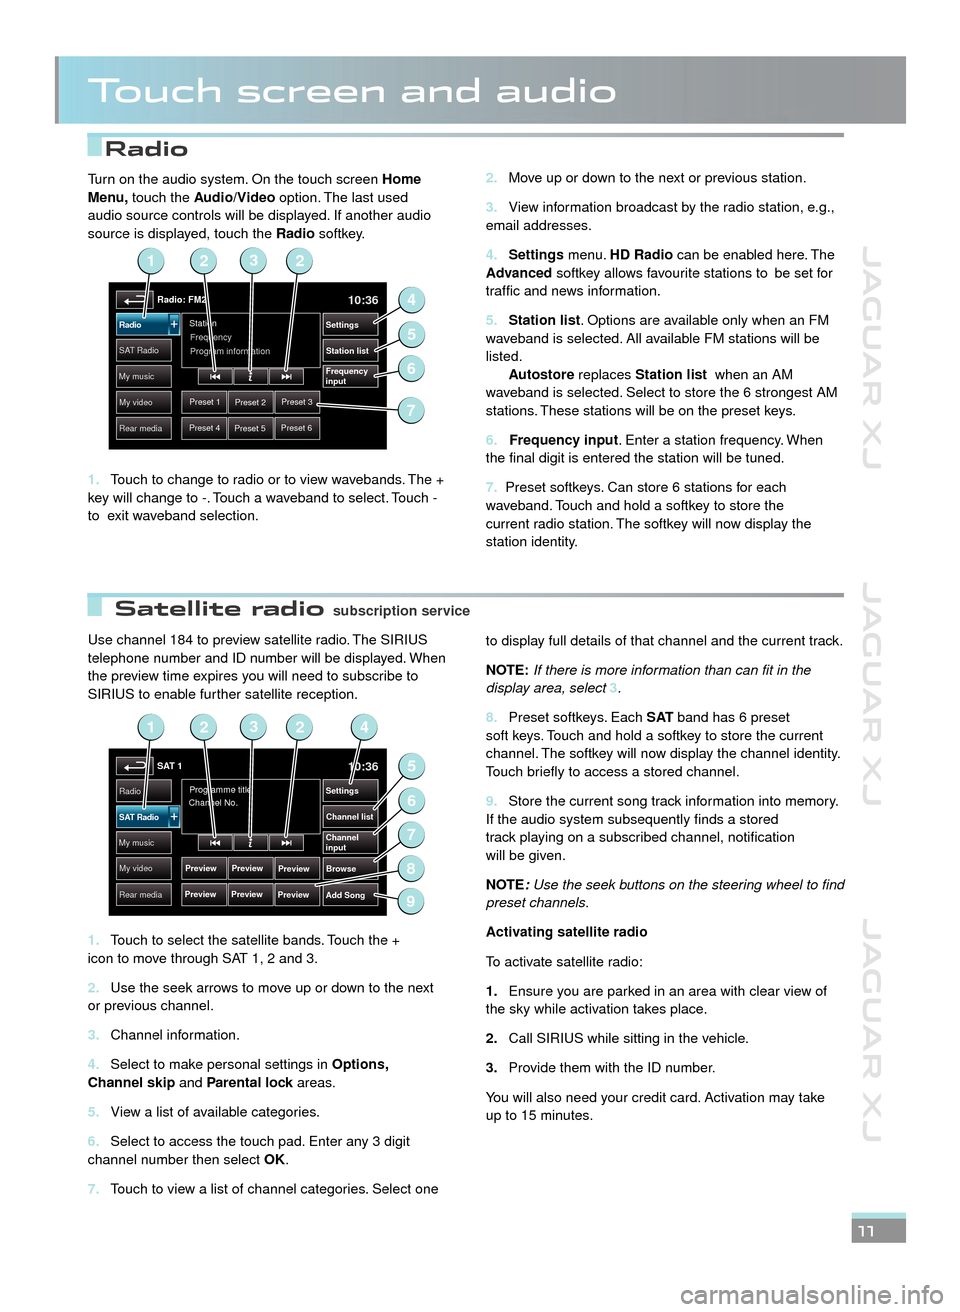
Touch to select the satellite bands. Touch the + 1. icon to move through SAT 1, 2 and 3.
Use the seek arrows to move up or down to the next 2. or previous channel.
Channel information.3.
Select to make personal settings in 4. Options, Channel skip and Parental lock areas.Parental lock areas.Parental lock
View a list of available categories.5.
Select to access the touch pad. Enter any 3 digit 6. channel number then select OK.
Touch to view a list of channel categories. Select one 7.
to display full details of that channel and the current track.
NOTE:If there is more information than can fit in the display area, select 3.
Preset softkeys. Each 8. S AT band has 6 preset soft keys. Touch and hold a softkey to store the current channel. The softkey will now display the channel identity. Touch briefly to access a stored channel.
Store the current song track information into memory. 9. If the audio system subsequently finds a stored track playing on a subscribed channel, notification will be given.
NOTE:Use the seek buttons on the steering wheel to find preset channels.
Activating satellite radio
To activate satellite radio:
Ensure you are parked in an area with clear view of 1.the sky while activation takes place.
Call SIRIUS while sitting in the vehicle.2.
Provide them with the ID number. 3.
You will also need your credit card. Activation may take up to 15 minutes.
11
Move up or down to the next or previous station.2.
View information broadcast by the radio station, e.g., 3. email addresses.
Settings4. menu. HD Radio can be enabled here. The Advanced softkey allows favourite stations to be set for traffic and news information.
Station list5. . Options are available only when an FM waveband is selected. All available FM stations will be listed. Autostore replaces Station list when an AM waveband is selected. Select to store the 6 strongest AM stations. These stations will be on the preset keys.
6. Frequency input. Enter a station frequency. When the final digit is entered the station will be tuned.
7. Preset softkeys. Can store 6 stations for each waveband. Touch and hold a softkey to store the current radio station. The softkey will now display the station identity.
Turn on the audio system. On the touch screen Home Menu, touch the Audio/Video option. The last used audio source controls will be displayed. If another audio source is displayed, touch the Radio softkey.
Touch to change to radio or to view wavebands. The + 1. key will change to -. Touch a waveband to select. Touch - to exit waveband selection.
Radio: FM210:36
Preset 1Preset 2Preset 3
Preset 4Preset 5Preset 6
Station
Frequency
SA T RadioStation list
Settings
Frequency
input
Radio
My music
My video
Rear media
Program information
2
4
6
5
123
7
SAT 110:36
Preview
Preview
Programme title
Channel No.Radio
Channel list
Settings
Browse
Channel
input
Add Song
SAT Radio
My music
My video
Rear media
Preview
Preview Preview
Preview
2
5
7
6
9
1423
8
subscription servicesubscription service
JJM189634131.indd 11JJM189634131.indd 11JJM189634131.indd 11JJM189634131.indd 11JJM189634131.indd 11JJM189634131.indd 11JJM189634131.indd 11JJM189634131.indd 11JJM189634131.indd 11JJM189634131.indd 1122/05/2012 14:13:3222/05/2012 14:13:3222/05/2012 14:13:3222/05/2012 14:13:3222/05/2012 14:13:3222/05/2012 14:13:3222/05/2012 14:13:3222/05/2012 14:13:3222/05/2012 14:13:3222/05/2012 14:13:3222/05/2012 14:13:32
Page 14 of 16

JAGUAR XJ JAGUAR XJ JAGUAR XJ
Touch screen navigation Touch screen navigation
Navigation
14
On initial activation, ensure that both the correct country and search area have been selected.
For more information refer to the Navigation section of the Owner’s Handbook.
NOTE: To access navigation press either the N AV hard key or touch the Nav icon on the Home menu.
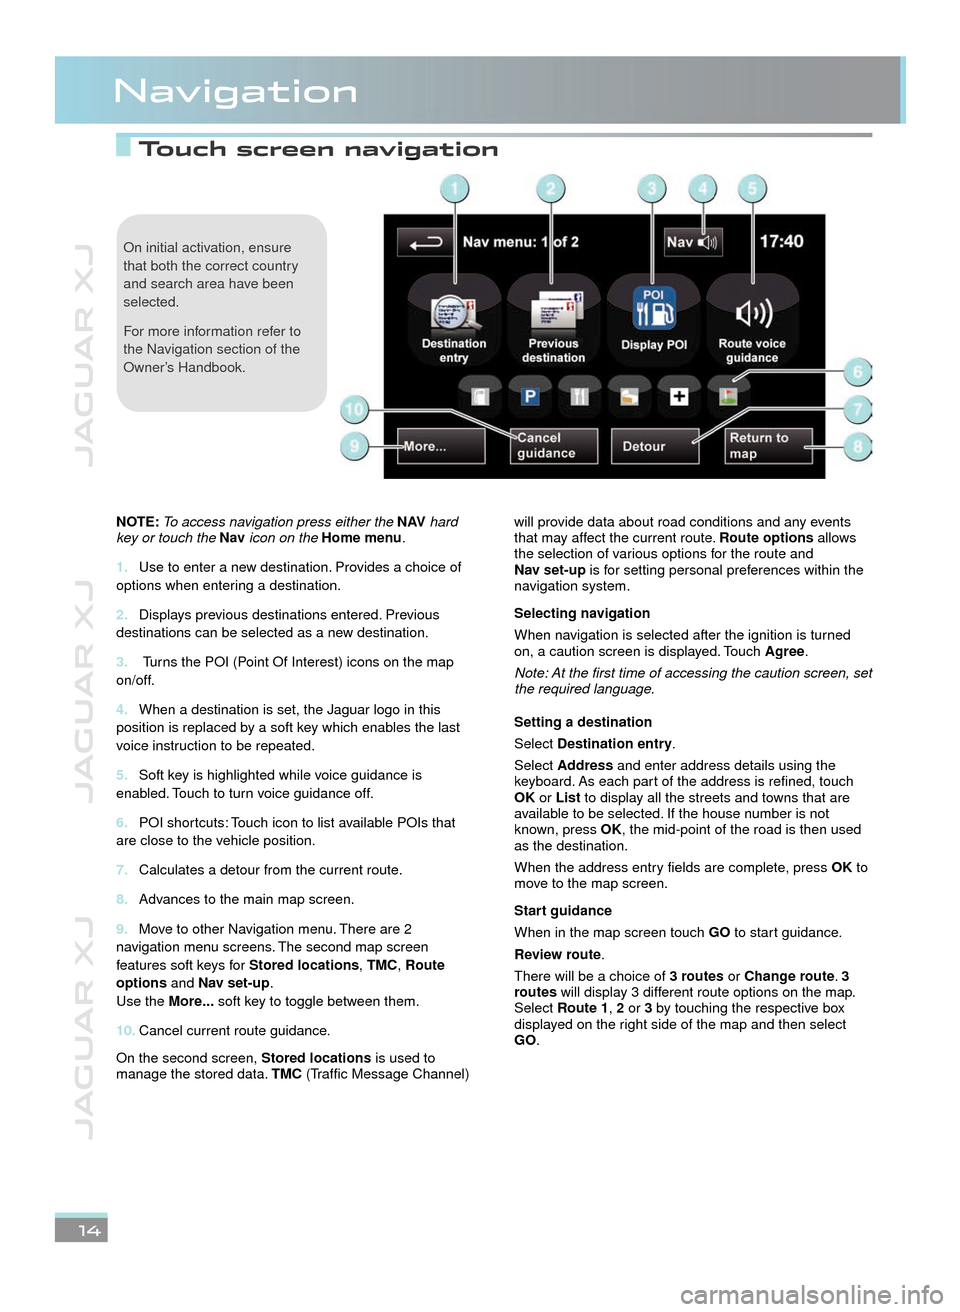
Use to enter a new destination. Provides a choice of 1. options when entering a destination.
Displays previous destinations entered. Previous 2. destinations can be selected as a new destination.
3. Turns the POI (Point Of Interest) icons on the map on/off.
When a destination is set, the Jaguar logo in this 4. position is replaced by a soft key which enables the last voice instruction to be repeated.
Soft key is highlighted while voice guidance is 5. enabled. Touch to turn voice guidance off.
POI shortcuts: Touch icon to list available POIs that 6. are close to the vehicle position.
Calculates a detour from the current route.7.
Advances to the main map screen.8.
Move to other Navigation menu. There are 2 9. navigation menu screens. The second map screen features soft keys for Stored locations, TMC, Route options and Nav set-up. Use the More... soft key to toggle between them.
Cancel current route guidance.10.
On the second screen, Stored locations is used to manage the stored data. TMC (Traffic Message Channel)
will provide data about road conditions and any events that may affect the current route. Route options allows the selection of various options for the route and Nav set-up is for setting personal preferences within the navigation system.
Selecting navigation
When navigation is selected after the ignition is turned on, a caution screen is displayed. Touch Agree.
Note: At the first time of accessing the caution screen, set the required language.
Setting a destination
Select Destination entry.
Select Address and enter address details using the keyboard. As each part of the address is refined, touch OK or List to display all the streets and towns that are available to be selected. If the house number is not known, press OK, the mid-point of the road is then used as the destination.
When the address entry fields are complete, press OK to move to the map screen.
Start guidance
When in the map screen touch GO to start guidance.
Review route.
There will be a choice of 3 routes or Change route. 3 routes will display 3 different route options on the map. Select Route1, 2 or 3 by touching the respective box displayed on the right side of the map and then select GO.
22/05/2012 14:13:3322/05/2012 14:13:3322/05/2012 14:13:33