Page 9 of 16

JAGUAR XJ JAGUAR XJ JAGUAR XJ
JaguarDrive control JaguarDrive control See page 2, items See page 2, items 17, 20 17, 20 and 21and 21and
Parking aids Parking aids
Blind spot monitoring Blind spot monitoring
Driving aids
9
When Reverse is selected, the rear and front parking aids and rear camera will activate.
The touch screen will display a vehicle graphic and indicate the approximate distance to any object detected. An audible alert will increase in frequency as the object is approached.
When moving forward into a space, activate the front sensors with the parking aid switch in the overhead panel. Alternatively, select R then Drive.
Audible alert volume can be adjusted via the touch screen. Select the Home menu then Setup followed by System. Now select Volume presets. Use the + or -soft keys alongside Parking aid to adjust volume.
Cancelling the parking aid screen
Touch the screen to return to the previous view.
Rear camera
Activates when Reverse is selected. Guidance lines to aid reversing appear on the touch screen.
The camera is deactivated when Drive is selected and vehicle speed exceeds 10 mph (16 km/h).
Winter mode, Dynamic mode and Dynamic Stability Control (DSC) allow the driver to more finely tune the vehicle driving characteristics to suit prevailing conditions.
Winter mode. Use in slippery road conditions. Selects 1. 2nd gear for driving away, moderates engine response and modifies gear change strategy to ensure maximum possible traction is achieved.
Dynamic mode. Delivers a high performance driving 2. experience. If Sport mode is now used with paddle gear selection, there is no automatic gear change, even if the rev limit is reached.
DSC. The default condition at engine start is DSC 3. on and is designed to control vehicle stability. TracDSC is an alternative setting that optimises the DSC settings for maximum traction in difficult conditions. To select TracDSC, depress the DSC switch for less than 10 seconds. Touch the switch again to return to DSC. To turn DSC off, depress the switch for more than 10 seconds.
1
2
3
Each mirror displays amber icons to warn of overtaking vehicles in adjacent lanes. The monitored area extends approximately 20 ft (6 meters) behind the rear wheels and 8.2 ft (2.5 meters) to the sides.
It switches on automatically at speeds above 10 mph (16km/h) while in a forward gear.
JJM189634131.indd 9JJM189634131.indd 9JJM189634131.indd 9JJM189634131.indd 9JJM189634131.indd 9JJM189634131.indd 9JJM189634131.indd 9JJM189634131.indd 9JJM189634131.indd 922/05/2012 14:13:3122/05/2012 14:13:3122/05/2012 14:13:3122/05/2012 14:13:3122/05/2012 14:13:3122/05/2012 14:13:3122/05/2012 14:13:3122/05/2012 14:13:3122/05/2012 14:13:3122/05/2012 14:13:3122/05/2012 14:13:3122/05/2012 14:13:3122/05/2012 14:13:31
Page 10 of 16

JAGUAR XJ JAGUAR XJ JAGUAR XJ
Home menu
Touch screen and audio
Destination entry8. . Touch for direct access to the Destination entry menu.
Climate.9. Secondary controls menu. Climate control primary settings are made from the hard controls below the touch screen.
AV.10. Hard key selection of the audio/video sources menu.
Displays the 11. Home menu.
PHONE.12. For Phone settings, Digit Dial, Phonebook and Last 10 numbers dialled.
N AV13. . Hard key selection of the navigation options menu.
Audio tone and balance settings. 14.
The touch screen requires only light touches. Excess pressure could result in damage.
10
Valet1. . Select valet mode to lock the trunk and glove box when using attendant parking. When returning to the vehicle, touch Valet again and follow the on-screen instructions.
Setup.2. Personalize screen view, system settings, voice and volume presets.
Audio settings3. . Tone, balance and fade.
Phone4. . Phone menu.
Shortcut soft keys. Up to 2 personal shortcuts can be 5. set to quickly access any available part of the system. Shortcuts are made in the Setup menu.
Audio/Video.6. Select any of the audio and video sources, set personal preferences and store stations to pre-sets.
N a v.7. On the first navigation screen, touch Agree to move to the main menu or select Language if you need to select a different navigation language.
Operating note
Always run the engine during prolonged use of the touch screen.
Steering wheel control Steering wheel control See page 2, item See page 2, item 28
Short press to move to next available audio or video source. Long press to 1. scroll through sub menu of selected source.
Press to increase volume.2.
Press to decrease volume.3.
Short press to select next radio preset station or next CD/MP3 track. Long 4. press to search up for the next radio station or to advance through the CD/MP3 tracks.
Has the same action as 5. 4 but moves in the opposite direction.
1
54
2
3
Page 11 of 16

JAGUAR XJ JAGUAR XJ JAGUAR XJ
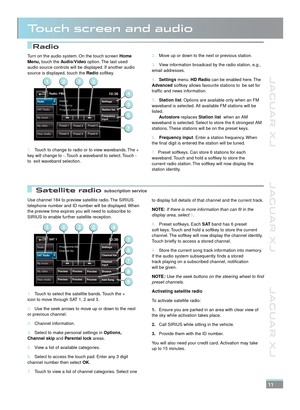
Radio
Satellite radio
Touch screen and audio
Use channel 184 to preview satellite radio. The SIRIUS telephone number and ID number will be displayed. When the preview time expires you will need to subscribe to SIRIUS to enable further satellite reception.
Touch to select the satellite bands. Touch the + 1. icon to move through SAT 1, 2 and 3.
Use the seek arrows to move up or down to the next 2. or previous channel.
Channel information.3.
Select to make personal settings in 4. Options, Channel skip and Parental lock areas.Parental lock areas.Parental lock
View a list of available categories.5.
Select to access the touch pad. Enter any 3 digit 6. channel number then select OK.
Touch to view a list of channel categories. Select one 7.
to display full details of that channel and the current track.
NOTE:If there is more information than can fit in the display area, select 3.
Preset softkeys. Each 8. S AT band has 6 preset soft keys. Touch and hold a softkey to store the current channel. The softkey will now display the channel identity. Touch briefly to access a stored channel.
Store the current song track information into memory. 9. If the audio system subsequently finds a stored track playing on a subscribed channel, notification will be given.
NOTE:Use the seek buttons on the steering wheel to find preset channels.
Activating satellite radio
To activate satellite radio:
Ensure you are parked in an area with clear view of 1.the sky while activation takes place.
Call SIRIUS while sitting in the vehicle.2.
Provide them with the ID number. 3.
You will also need your credit card. Activation may take up to 15 minutes.
11
Move up or down to the next or previous station.2.
View information broadcast by the radio station, e.g., 3. email addresses.
Settings4. menu. HD Radio can be enabled here. The Advanced softkey allows favourite stations to be set for traffic and news information.
Station list5. . Options are available only when an FM waveband is selected. All available FM stations will be listed. Autostore replaces Station list when an AM waveband is selected. Select to store the 6 strongest AM stations. These stations will be on the preset keys.
6. Frequency input. Enter a station frequency. When the final digit is entered the station will be tuned.
7. Preset softkeys. Can store 6 stations for each waveband. Touch and hold a softkey to store the current radio station. The softkey will now display the station identity.
Turn on the audio system. On the touch screen Home Menu, touch the Audio/Video option. The last used audio source controls will be displayed. If another audio source is displayed, touch the Radio softkey.
Touch to change to radio or to view wavebands. The + 1. key will change to -. Touch a waveband to select. Touch - to exit waveband selection.
Radio: FM210:36
Preset 1Preset 2Preset 3
Preset 4Preset 5Preset 6
Station
Frequency
SA T RadioStation list
Settings
Frequency
input
Radio
My music
My video
Rear media
Program information
2
4
6
5
123
7
SAT 110:36
Preview
Preview
Programme title
Channel No.Radio
Channel list
Settings
Browse
Channel
input
Add Song
SAT Radio
My music
My video
Rear media
Preview
Preview Preview
Preview
2
5
7
6
9
1423
8
subscription servicesubscription service
JJM189634131.indd 11JJM189634131.indd 11JJM189634131.indd 11JJM189634131.indd 11JJM189634131.indd 11JJM189634131.indd 11JJM189634131.indd 11JJM189634131.indd 11JJM189634131.indd 11JJM189634131.indd 1122/05/2012 14:13:3222/05/2012 14:13:3222/05/2012 14:13:3222/05/2012 14:13:3222/05/2012 14:13:3222/05/2012 14:13:3222/05/2012 14:13:3222/05/2012 14:13:3222/05/2012 14:13:3222/05/2012 14:13:3222/05/2012 14:13:32
Page 12 of 16

JAGUAR XJ JAGUAR XJ JAGUAR XJ
Touch screen and audio
12
CD player and portable media CD player and portable media
From the Audio/Video menu, select My music to display the portable media menu. Select a source.
CD player
The content of 10 CDs can be loaded onto the hard drive plus 1 CD in the player.
Select a CD option to begin play of the currently loaded CD or from the hard drive.
Select Upload alongside an empty slot to upload the currently loaded CD onto the hard drive. If the drive is full, select Replace to overwrite an existing CD.
Portable media
Connecting ports for auxiliary devices, iPod, USB and Bluetooth devices are located in the cubby box and rear centre armrest. AUX socket devices are controlled from the device itself. All other devices are controlled from the touch screen.
NOTE: Jaguar Cars Limited does not supply connecting leads.
The system will play MP3, WMA, WAV and AAC files from a memory stick or a USB connected MP3 player or cell phone.
Some MP3 players use proprietary file systems that are not supported by the vehicle system. MP3 players must be set to Removable Device or Mass Storage Device mode (see the manufacturer’s information).
Use Track list, Search or Browse to find a track. Select the track to play.
Incompatible disc types
The use of discs with paper labels or dual format discs (Dual Discs or DVD Plus) should be avoided as they could become jammed inside the player.
My video
Radio
Rear media
My music10:36
SAT Radio
My musicStored
CDs USB
AUX
DVD/CD iPod
Blue-
tooth
HD radio can provide much improved audio quality when compared to normal AM/FM reception. It can also provide additional information about available channel services.
When HD radio is activated and standard AM/FM is in use, if an HD signal is detected the radio will gradually transfer to the digital broadcast. Generally, no action is required but HD radio volume may be greater.
HD radio and AM/FM broadcasts are broadcast simultaneously, however, when switching between HD and AM/FM there may be a slight time difference in delivery.
When an HD radio channel is being received, the station name is prefixed with HD.
If the prefix is HD1, further sub channels are available from that channel broadcaster.
To enable HD radio:
Select the 1.Settings soft key on the Radio menu screen.
Select 2.HD On to activate.
In areas of poor HD reception, automatic switching between HD and AM/FM will be more frequent. If this becomes unacceptable, either tune to an alternative channel or switch HD radio off via the Settings soft key.
HD radio
Page 13 of 16

JAGUAR XJ JAGUAR XJ JAGUAR XJ
Climate control See page 2, items See page 2, items 13, 14, 15 and 3813, 14, 15 and 38
Rear climate control from the touch screen
Heating and ventilation
Primary controls
AUTO. This is the recommended operating mode. 1. Automatically adjusts air conditioning, blower speed, air intake and airflow distribution to maintain the selected temperature(s). Helps to prevent screen fogging.
Temperature control. Temperature is displayed on the 2. touch screen.
Defrost. Fastest method to remove frost or heavy 3. fogging from the windshield.
Recirculation. Helps prevent fumes from entering.4.
Blower speed. Rotate to adjust airflow speed 5. through the vents.
Press for cooled and dehumidified air.6.
Heated windshield.7.
Heated rear screen.8.
Heated seats. Press to access menu options.9.
Operating note
Seat heating and ventilating will operate only while the engine is running. This is to prevent the battery becoming discharged.
External water deposits
The air conditioning system removes moisture from the air and deposits the excess water beneath the vehicle. Puddles may form but this is normal and no cause for concern.
Touch screen secondary controls
To access the secondary climate control menu, touch Climate on the Homemenu.
Settings1. . Air quality sensor sensitivity and temperature scale.
Front seats2. . Temperature, ventilation and massage settings.
Rear climate3. . Displays rear climate control menu.
Climate Off4. . When climate control is turned off, select again to turn on.
Sync5. . Synchronises all front and rear settings to match the driver’s.
Air distribution to windshield, face and feet.6.
Indication of selected blower speed. Use the rotary 7. control to adjust.
13
67
22
143
1
58
9
08:20
Settings
Front seats
Rear
climate
Climate
Climate Off
Ext 62°F
Sync
73°F
Left
Right
66°F
A/C
1
2
3
56
4
7
The touch screen controls for rear climate are very similar to those for the front climate. Areas of difference are:
AUTO. This is the recommended operating mode.1.
Temperature adjustment. Select red to increase 2. and blue to decrease temperature.
Rear seats temperature and ventilation control.3.
Rear control panel lock. Will disable the rear 4. climate control panel. Select again to re-enable.
Indication of selected blower speed. Use the rotary 5. control to adjust.
07:20
Rear seats
Rear panel
lock
Rear climate Ext 60°F
74°FLeft Right66°FAuto
Auto
Auto
A/C1
34
2
5
JJM189634131.indd 13JJM189634131.indd 13JJM189634131.indd 13JJM189634131.indd 13JJM189634131.indd 13JJM189634131.indd 13JJM189634131.indd 13JJM189634131.indd 13JJM189634131.indd 1322/05/2012 14:13:3322/05/2012 14:13:3322/05/2012 14:13:3322/05/2012 14:13:3322/05/2012 14:13:3322/05/2012 14:13:3322/05/2012 14:13:3322/05/2012 14:13:3322/05/2012 14:13:3322/05/2012 14:13:33
Page 14 of 16

JAGUAR XJ JAGUAR XJ JAGUAR XJ
Touch screen navigation Touch screen navigation
Navigation
14
On initial activation, ensure that both the correct country and search area have been selected.
For more information refer to the Navigation section of the Owner’s Handbook.
NOTE: To access navigation press either the N AV hard key or touch the Nav icon on the Home menu.
Use to enter a new destination. Provides a choice of 1. options when entering a destination.
Displays previous destinations entered. Previous 2. destinations can be selected as a new destination.
3. Turns the POI (Point Of Interest) icons on the map on/off.
When a destination is set, the Jaguar logo in this 4. position is replaced by a soft key which enables the last voice instruction to be repeated.
Soft key is highlighted while voice guidance is 5. enabled. Touch to turn voice guidance off.
POI shortcuts: Touch icon to list available POIs that 6. are close to the vehicle position.
Calculates a detour from the current route.7.
Advances to the main map screen.8.
Move to other Navigation menu. There are 2 9. navigation menu screens. The second map screen features soft keys for Stored locations, TMC, Route options and Nav set-up. Use the More... soft key to toggle between them.
Cancel current route guidance.10.
On the second screen, Stored locations is used to manage the stored data. TMC (Traffic Message Channel)
will provide data about road conditions and any events that may affect the current route. Route options allows the selection of various options for the route and Nav set-up is for setting personal preferences within the navigation system.
Selecting navigation
When navigation is selected after the ignition is turned on, a caution screen is displayed. Touch Agree.
Note: At the first time of accessing the caution screen, set the required language.
Setting a destination
Select Destination entry.
Select Address and enter address details using the keyboard. As each part of the address is refined, touch OK or List to display all the streets and towns that are available to be selected. If the house number is not known, press OK, the mid-point of the road is then used as the destination.
When the address entry fields are complete, press OK to move to the map screen.
Start guidance
When in the map screen touch GO to start guidance.
Review route.
There will be a choice of 3 routes or Change route. 3 routes will display 3 different route options on the map. Select Route1, 2 or 3 by touching the respective box displayed on the right side of the map and then select GO.
22/05/2012 14:13:3322/05/2012 14:13:3322/05/2012 14:13:33
Page 15 of 16

JAGUAR XJ JAGUAR XJ JAGUAR XJ
Bluetooth® phones phones
Telephone
15
Connection must be made with ignition on or engine running.
Use the following procedure in conjunction with your
Bluetooth® phone manufacturer’s instructions.® phone manufacturer’s instructions.®
Pairing and connecting using your phone
NOTE: The process of pairing and connecting a phone to the vehicle will vary depending on the type of phone used.
Switch the ignition on and ensure that the touch 1.screen is active.
From the 2.Home menu, select Phone.
A menu will appear. If no phone is connected, select 3.Search new, otherwise select Change phone and then select Search new.
Select 4.Device to vehicle option.
NOTE: The vehicle’s Bluetooth® system is discoverable for only 3 minutes.
Using your phone, search for Bluetooth® devices. 5.On some phones, this is referred to as new paired device. See your phone’s operating instructions for further information.
When the vehicle’s Bluetooth® system is discovered, 6.begin the pairing process and follow the on-screen instructions.
When requested, enter a PIN of your choice into your 7.phone and the vehicle system.
Once your phone is paired it may automatically 8.connect to the vehicle system. If not, use the device list shown on the touch screen or use your phone.
NOTE: Some phones require the Bluetooth® pairing to be set as ‘authorized’ or ‘trusted’ in order to automatically connect. Please refer to your phone’s operating instructions for further information.
Downloading phonebook entries
When a phone with phonebook download capability is paired and docked, its phonebook directory can be automatically downloaded to the vehicle system.
See PHONEBOOK in the Owner’s Handbook for more information.
Telephone echo
If echo is experienced when using the phone, reduce the audio system volume during the call.
Calls via the touch screen
With a phone paired and active, press the PHONE button below the touch screen.
Select 1.Digit Dial, Phonebook or Phonebook or PhonebookLast 10. With Digit Dial selected, use the keypad to enter the number. With Phonebook selected, chose a number from the Phonebook selected, chose a number from the Phonebookdownloaded phonebook. Last 10 displays the previous 10 calls. Choose one to dial.
To make the call touch the connect icon . 2.The icon will change to a connected call icon.
To end a call touch 3..
Calls via the steering wheel controls
See page 2, item 26.
Connect. Press and release to send or accept a call or to access the last 10 dialled list. Press and hold to access the phonebook.
Disconnect. Use to end or reject a call.
Voice control talk button. The screen will display available options. Say ‘Phone’ and follow instructions.
Press to increase call volume.
Press to decrease call volume.
Press to scroll up or down lists of calls or phonebook entries.
Phonebook
Last 10
Phone10:36
Digit Dial Settings
DeleteChange
phone
Name
01234567890_
Use
handsetPQRS
TUVWXYZ
1ABC
DEF
JKL MNO
GHI2
3
4 5
6
7 8
9
0 #
+
Jaguar Bluetooth Connectivity
Compatible Bluetooth® phones can communicate ® phones can communicate ®
with the vehicle’s inbuilt telephone system. For the latest compatibility information, refer to the Ownership section of the Jaguar website at www.jaguar.com
JJM189634131.indd 15JJM189634131.indd 15JJM189634131.indd 15JJM189634131.indd 15JJM189634131.indd 15JJM189634131.indd 15JJM189634131.indd 15JJM189634131.indd 15JJM189634131.indd 1522/05/2012 14:13:3422/05/2012 14:13:3422/05/2012 14:13:3422/05/2012 14:13:3422/05/2012 14:13:3422/05/2012 14:13:3422/05/2012 14:13:3422/05/2012 14:13:3422/05/2012 14:13:3422/05/2012 14:13:34
Page 16 of 16

JAGUAR XJ JAGUAR XJ JAGUAR XJ
Part No. JJM 18 96 34 131 © Jaguar Cars Limited16
Gas station information
Gas filler flap opening
The gas filler flap can be opened only when the vehicle is unlocked. Press the flap firmly approximately 1.4 in (35 mm) from the left hand edge and release.
Gas cap
Twist the gas cap counter-clockwise to release.
A hook is provided on the flap hinge to hold the cap while refueling. After refueling, tighten the gas cap until it clicks 3 times.
Fuel specification
The correct fuel specification for your vehicle is shown on the inside of the gas filler flap.
Incorrect fueling
Do not use E85 fuels (85% Ethanol content). Equipment necessary for the use of fuels containing more than 10% Ethanol is not fitted to this vehicle. If E85 fuels are used serious engine and fuel system damage will occur.
Avoid using fuel containing Methanol. If it is unavoidable, do not use a fuel with more than 10% Methanol content. The fuel must contain co-solvents and corrosion inhibitors. Fuel system damage and engine performance problems can occur when Methanol is used.
No responsibility is accepted for damage caused by using incorrect fuels.
If the vehicle is filled with the wrong type of fuel:
•DO NOT start the engine!
•Call for qualified assistance!
Hood release
The hood release is located in the left-hand front footwell.
Tire pressure label location
Tire pressures are shown on a label attached to the driver’s side center doorpost.
In ambient temperatures above or below 68oF (20oC), tire pressure compensation may be required. Refer to TIRE PRESSURE COMPENSATION in the Owner’s Handbook.