Page 209 of 554

Others settings
Select the “Others” key using the INFINITI con-
troller. The voice recognition, language and units
setting screen will be displayed.Display settings
The display as illustrated will appear when press-
ing the SETTING button and selecting the “Oth-
ers” key and then selecting the “Display” key.
Display Adjustment:
To adjust the display settings, select the “Display
Adjustment” key. The following settings are avail-
able.
● Display
To turn off the screen, press the ENTER button
and turn the “Display” indicator off. The other method is to press and hold the
OFF button for more than two seconds.
When any mode button is pressed with the
screen off, the screen turns on for further opera-
tion. The screen will turn off automatically five
seconds after the operation is finished.
To turn on the screen, set this item to the ON
position, or press and hold the
OFF but-
ton.
● Brightness/Contrast/Background Color
To adjust the brightness and contrast of the
screen, select the “Brightness” or “Contrast” key.
Use the INFINITI controller to adjust each item.
For information on the “Background Color” key,
refer to the separate Navigation System Owner’s
Manual.
Color Theme:
Choose between “Black”, “Brown” or “Silver” for
the theme color of the menu screen.
LHA2156LHA1237
4-24Monitor, climate, audio, phone and voice recognition systems
Page 210 of 554

Comfort settings
Select the “Others” key using the INFINITI con-
troller, then select the “Comfort” key. The Com-
fort settings screen will be displayed.
You can set the following operating conditions by
selecting the desired item using the INFINITI
controller. The indicator light (box at the right of
the selected item) alternately turns on and off
each time the item is touched or the ENTER
button is pressed.
Indicator light is illuminated — ON
Indicator light is not illuminated — OFFLift Steering Wheel on Exit:
Select to turn on
or turn off the steering wheel moving upward for
easy exit when the ignition switch is in the OFF
position and the driver’s door is opened. After
getting into the vehicle and placing the ignition
switch in the ACC position, the steering wheel
moves to the previous position.
Slide Driver Seat Back on Exit: Select to turn
on or turn off the driver’s seat moving backward
for easy exit when the ignition switch is in the OFF
position and the driver’s door is opened. After
getting into the vehicle and placing the ignition
switch in the ACC position, the driver’s seat
moves to the previous position.
Return All Settings to Default: Select to
change all the comfort systems to their default
settings. Clock
The following display will appear after pressing
the SETTING button, then selecting the “Clock”
key using the INFINITI controller.
On-screen Clock:
When this item is enabled (indicator light illumi-
nated) , a clock is always displayed in the upper
right corner of the screen.
This clock will indicate the time almost exactly
because it is always adjusted by the GPS system.
LHA2157LHA2456
Monitor, climate, audio, phone and voice recognition systems4-25
Page 211 of 554

Clock Format (24h):
When this item is enabled (indicator light illumi-
nated) , the clock format will change from the
default 12-hour display to a 24-hour display.
Offset (hour):
Adjust the time by increasing or decreasing the
hours.
Offset (minute):
Adjust the time by increasing or decreasing the
minutes.
Daylight Savings Time:
When this item is enabled (indicator light illumi-
nated) , daylight savings time is on. To turn off the
daylight savings time, touch the “ON” key; the
amber indicator light will go out.Time Zone:
Select the “Time Zone” key; the Time Zone
screen will appear.
Select one of the following zones, depending on
the current location, by selecting the correct time
zone key to enable that time zone (indicator light
will illuminate for that location) .
● Pacific
● Mountain
● Central
● Eastern
● Atlantic ●
Newfoundland
● Hawaii
● Alaska
After selection/settings, press the BACK button
or any other mode button to accept the changes.
LHA1243
4-26Monitor, climate, audio, phone and voice recognition systems
Page 212 of 554

Language & Units:
Use the INFINITI controller to select the “Lan-
guage & Units” key. Select which setting you
want to change using the INFINITI controller and
selecting either the “Select Language” key or the
“Select Units” key.Select Language:
Select the “English” key or the “Français” key to
change the language shown on the display.
If you select the “Français” key, French language
will be displayed, so please use the French Own-
er’s Manual. To obtain a French Owner’s Manual,
please see “Owner’s Manual/Service Manual Or-
der Information” in the “Technical and consumer
information” section.Select Units:
Select the “US” (mi, °F, MPG) key or the “Metric”
(km, °C, L/100 km) key to change the units
shown on the display.
Voice Recognition:
For Voice Recognition settings, refer to “INFINITI
Voice Recognition system” later in this section.
Camera settings
Select the “Camera” key. The Camera settings
screen will appear.
LHA1250LHA1251LHA1252
Monitor, climate, audio, phone and voice recognition systems4-27
Page 213 of 554

When this option is on (indicator light illumi-
nated) , predictive course lines will be displayed
when the RearView monitor is displayed on the
screen. See “RearView Monitor” in this section
for more information.
Image viewer settings
For information about these settings, refer to
“Image viewer” in this section.
OFF BUTTON
To change the display brightness, press
the
OFF button. Press the button again to
change the display to the day
or the
night
display. The brightness can then be
adjusted using the INFINITI controller.
If no operation is performed within 5 seconds, the
display will return to the previous display.
Press and hold the
OFF button for more
than two seconds to turn the display off. Press
the button again to turn the display on.
USING THE IMAGE VIEWER
When a compatible portable storage device is
plugged into the USB jack located in the center
console, compatible image files stored on the
device can be viewed on the control panel de-
vice.
Connecting the portable storage
device
To connect a portable storage device to the sys-
tem so that images stored on it can be viewed,
insert the device into the USB jack located in the
center console.
Viewing images
To view an image, press the SETTING button and
then select the “Image Viewer” key with the
INFINITI controller. The Image Viewer screen will
be displayed.
A list of compatible images on the storage device
is displayed on the left side of the screen, while
the selected image is displayed on the right side
of the screen. To choose a different picture from
the list, use the INFINITI controller to scroll
through the list once the desired image is high-
lighted.
LHA1309
IMAGE VIEWER (if so equipped)
4-28Monitor, climate, audio, phone and voice recognition systems
Page 214 of 554

Select the “Full Screen Display” key and press
the ENTER button to view a full screen version of
the image.
Image requirements:● Image type: JPEG
● File extensions: *.jpg, *.jpeg
● Maximum resolution: 2048 x 1536
● Maximum size: 2 MB
● Colors: 32,768 (15-bit)
● Maximum file name length: 253 bytes (dis-
play only shows first 8 characters)
● Maximum folders: 500
● Maximum images per folder: 1024
Viewing images in a slideshow
To view all of the images on the device in a slide-
show, first enter the full screen mode while viewing
one of the images. The slideshow control buttons
are located on the right side of the screen.
Select the play keyto begin the slideshow.
The images shown on the screen will periodically
change at a given interval of time. To skip through
the images without waiting for them to change
automatically, select the
key to skip back-
ward or the
key to skip forward. Select the
stop key
to end the slideshow and return
to the full screen display of the image currently on
the screen.
Slideshow settings
While in slideshow mode, select the “Settings”
key. The Slideshow Settings screen will be dis-
played. The following settings can be accessed:
LHA1310LHA1311
Monitor, climate, audio, phone and voice recognition systems4-29
Page 215 of 554

Slideshow speed:
To change the interval of time at which images are
changed during a slideshow, select the desired
interval key. The indicator light to the right of the
interval will come on to show that it is selected.
If the option “No Auto Change” is chosen, the
slideshow will not change images automatically.
The slideshow can then only be operated using
the manual controls.
To return to the slideshow screen, select the
“Back” key or press the BACK button on the
control panel.Slideshow order:
Select the “Random” key to display the images in
a random order during a slideshow. Select the
“Order List” key to display the images in the order
in which they are stored on the storage device.
Select the “Back” key or press the BACK button
on the control panel to return to the slideshow
screen.When the shift selector is shifted into the R
(Reverse) position, the monitor display shows a
rearward view from the vehicle.
The system is designed as an aid to the driver in
situations such as slot parking or parallel parking.
WARNING
●
The RearView Monitor is a convenience
but it is not a substitute to check behind
the vehicle when backing up.
● The driver is always responsible for
safety during parking and other
maneuvers.
● Objects viewed in the RearView Moni-
tor differ from actual distance because
a wide-angle lens is used.
● Make sure that the liftgate is securely
closed when backing up.
● Underneath the bumper and the corner
areas of the bumper cannot be viewed
on the RearView Monitor because of its
monitoring range limitation.
● Do not put anything on the rear view
camera. The rear view camera is in-
stalled above the license plate.
LHA1312LHA1313
REARVIEW MONITOR (if so
equipped)
4-30Monitor, climate, audio, phone and voice recognition systems
Page 216 of 554

●When washing the vehicle with high-
pressure water, be sure not to spray it
around the camera. Otherwise, water
may enter the camera unit causing wa-
ter condensation on the lens, a mal-
function, fire or an electric shock.
● Do not strike the camera. It is a preci-
sion instrument. Otherwise, it may mal-
function or cause damage resulting in a
fire or an electric shock.
● Objects in the rearview will appear visu-
ally opposite than when viewed in the
rearview and outside mirrors.
CAUTION
Do not scratch the camera lens when
cleaning dirt or snow from the lens.
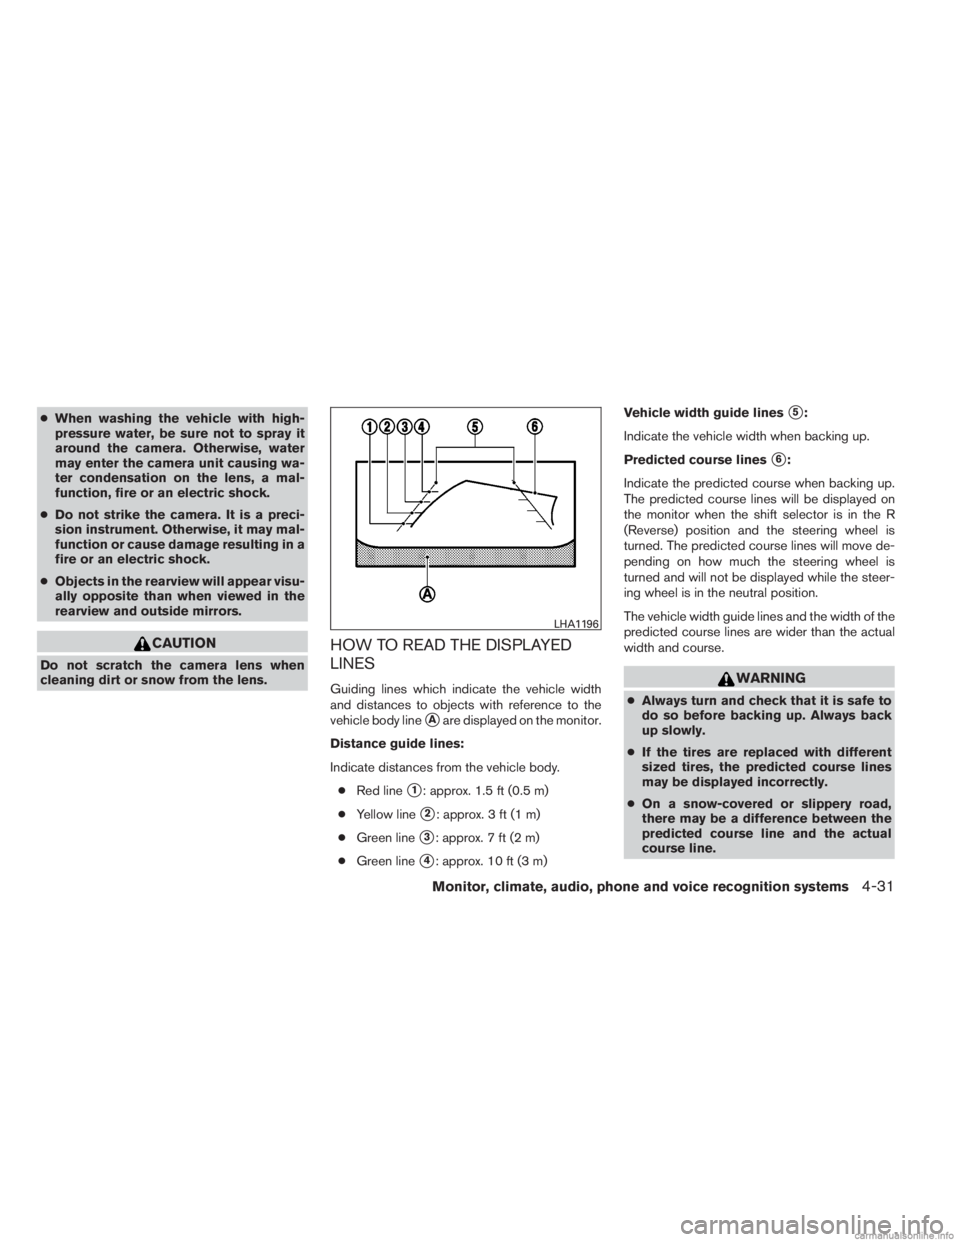
HOW TO READ THE DISPLAYED
LINES
Guiding lines which indicate the vehicle width
and distances to objects with reference to the
vehicle body line
Aare displayed on the monitor.
Distance guide lines:
Indicate distances from the vehicle body. ● Red line
1: approx. 1.5 ft (0.5 m)
● Yellow line
2: approx. 3 ft (1 m)
● Green line
3: approx. 7 ft (2 m)
● Green line
4: approx. 10 ft (3 m) Vehicle width guide lines
5:
Indicate the vehicle width when backing up.
Predicted course lines
6:
Indicate the predicted course when backing up.
The predicted course lines will be displayed on
the monitor when the shift selector is in the R
(Reverse) position and the steering wheel is
turned. The predicted course lines will move de-
pending on how much the steering wheel is
turned and will not be displayed while the steer-
ing wheel is in the neutral position.
The vehicle width guide lines and the width of the
predicted course lines are wider than the actual
width and course.
WARNING
● Always turn and check that it is safe to
do so before backing up. Always back
up slowly.
● If the tires are replaced with different
sized tires, the predicted course lines
may be displayed incorrectly.
● On a snow-covered or slippery road,
there may be a difference between the
predicted course line and the actual
course line.
LHA1196
Monitor, climate, audio, phone and voice recognition systems4-31