2013 HYUNDAI VELOSTER ignition
[x] Cancel search: ignitionPage 215 of 372
Driving your vehicle
34 5
The cruise control system allows you to
program the vehicle to maintain a con-
stant speed without resting your foot on
the accelerator pedal.
This system is designed to function
above approximately 25 mph (40 km/h).
✽ ✽
NOTICE
During normal cruise control operation,
when the SET switch is activated or
reactivated after applying the brakes,
the cruise control will energize after
approximately 3 seconds. This delay is
normal.
✽ ✽
NOTICE
To activate cruise control, depress the
brake pedal at least once after turning
the ignition switch to the ON position or
starting the engine. This is to check if
the brake switch which is important
part to cancel cruise control is in normal
condition.
CRUISE CONTROL SYSTEM (IF EQUIPPED)
WARNING
If the cruise control is left on,
(CRUISE indicator light in the
instrument cluster illuminated)
the cruise control can be activat-
ed unintentionally. Keep the
cruise control system off
(CRUISE indicator light OFF)
when the cruise control is not in
use, to avoid inadvertently set-
ting a speed.
Use the cruise control system
only when traveling on open
highways in good weather.
Do not use the cruise control
when it may not be safe to keep
the car at a constant speed, for
instance, driving in heavy or
varying traffic, or on slippery
(rainy, icy or snow-covered) or
winding roads or over 6% up-hill
or down-hill roads.
Pay particular attention to the
driving conditions whenever
using the cruise control system.
Be careful when driving downhill
using the cruise control system,
which may increase the vehicle
speed.
CAUTION
During cruise-speed driving of a
manual transaxle vehicle, do not
shift into neutral without depress-
ing the clutch pedal, since the
engine will be overrevved. If this
happens, depress the clutch pedal
or release the cruise control ON-
OFF switch.
Page 218 of 372
537
Driving your vehicle
Each of these actions will cancel cruise
control operation (the SET indicator light
in the instrument cluster will go off), but it
will not turn the system off. If you wish to
resume cruise control operation, move
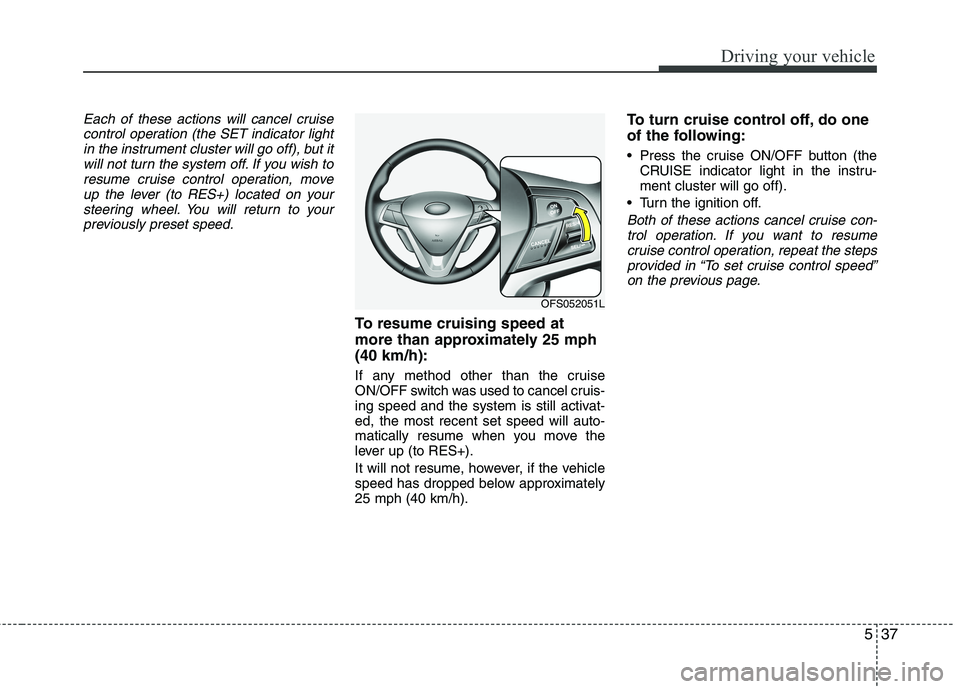
up the lever (to RES+) located on your
steering wheel. You will return to your
previously preset speed.
To resume cruising speed at
more than approximately 25 mph
(40 km/h):
If any method other than the cruise
ON/OFF switch was used to cancel cruis-
ing speed and the system is still activat-
ed, the most recent set speed will auto-
matically resume when you move the
lever up (to RES+).
It will not resume, however, if the vehicle
speed has dropped below approximately
25 mph (40 km/h).
To turn cruise control off, do one
of the following:
Press the cruise ON/OFF button (the
CRUISE indicator light in the instru-
ment cluster will go off).
Turn the ignition off.
Both of these actions cancel cruise con-
trol operation. If you want to resume
cruise control operation, repeat the steps
provided in “To set cruise control speed”
on the previous page.
OFS052051L
Page 221 of 372
Driving your vehicle
40 5
Remember, your vehicle does not
require extended warm-up. After the
engine has started, allow the engine to
run for 10 to 20 seconds prior to plac-
ing the vehicle in gear. In very cold
weather, however, give your engine a
slightly longer warm-up period.
Don't "lug" or "over-rev" the engine.
Lugging is driving too slowly in too high
a gear resulting in the engine bucking.
If this happens, shift to a lower gear.
Over-revving is racing the engine
beyond its safe limit. This can be avoid-
ed by shifting at the recommended
speeds. Use your air conditioning sparingly.
The air conditioning system is operat-
ed by engine power so your fuel econ-
omy is reduced when you use it.
Open windows at high speeds can
reduce fuel economy.
Fuel economy is less in crosswinds
and headwinds. To help offset some of
this loss, slow down when driving in
these conditions.
Keeping a vehicle in good operating con-
dition is important both for economy and
safety. Therefore, have an authorized
HYUNDAI dealer perform scheduled
inspections and maintenance.
WARNING - Engine off dur-
ing motion
Never turn the engine off to coast
down hills or anytime the vehicle is
in motion. The power steering and
power brakes will not function
properly without the engine run-
ning. Instead, keep the engine on
and downshift to an appropriate
gear for engine braking effect. In
addition, turning off the ignition
while driving could engage the
steering wheel lock resulting in
loss of vehicle steering which
could cause serious injury or
death.
Page 228 of 372

547
Driving your vehicle
Use high quality ethylene glycol
coolant
Your vehicle is delivered with high quality
ethylene glycol coolant in the cooling
system. It is the only type of coolant that
should be used because it helps prevent
corrosion in the cooling system, lubri-
cates the water pump and prevents
freezing. Be sure to replace or replenish
your coolant in accordance with the
maintenance schedule in section 7.
Before winter, have your coolant tested to
assure that its freezing point is sufficient
for the temperatures anticipated during
the winter.
Check battery and cables
Winter puts additional burdens on the
battery system. Visually inspect the bat-
tery and cables as described in section
7. The level of charge in your battery can
be checked by an authorized HYUNDAI
dealer or a service station.
Change to "winter weight" oil if
necessary
In some climates it is recommended that
a lower viscosity "winter weight" oil be
used during cold weather. See section 8
for recommendations. If you aren't sure
what weight oil you should use, consult
an authorized HYUNDAI dealer.
Check spark plugs and ignition
system
Inspect your spark plugs as described in
section 7 and replace them if necessary.
Also check all ignition wiring and compo-
nents to be sure they are not cracked,
worn or damaged in any way.
WARNING- Tire chains
The use of chains may adversely
affect vehicle handling.
Do not exceed 20 mph (30 km/h)
or the chain manufacturer’s rec-
ommended speed limit, whichev-
er is lower.
Drive carefully and avoid bumps,
holes, sharp turns, and other
road hazards, which may cause
the vehicle to bounce.
Avoid sharp turns or locked-
wheel braking.
CAUTION
Chains that are the wrong size or
improperly installed can damage
your vehicle's brake lines, sus-
pension, body and wheels.
Stop driving and retighten the
chains any time you hear them
hitting the vehicle.
Page 239 of 372

63
What to do in an emergency
2. When the vehicle is stopped, turn on
your emergency hazard flashers, set
the parking brake and put the transaxle
in P (Automatic transaxle / EcoShift
dual clutch transmission) or reverse
(manual transaxle).
3. Have all passengers get out of the car.
Be sure they all get out on the side of
the car that is away from traffic.
4. When repairing a flat tire, follow the
instruction provided later in this section.
If engine stalls while driving
1. Reduce your speed gradually, keeping
a straight line. Move cautiously off the
road to a safe place.
2. Turn on your emergency flashers.
3. Try to start the engine again. If your
vehicle will not start, contact an
authorized HYUNDAI dealer or seek
other qualified assistance.
If engine doesn't turn over or
turns over slowly
1. If your vehicle has an Automatic
transaxle / EcoShift dual clutch trans-
mission, be sure the shift lever is in N
(Neutral) or P (Park) and the emer-
gency brake is set.
2. Check the battery connections to be
sure they are clean and tight.
3. Turn on the interior light. If the light
dims or goes out when you operate the
starter, the battery is discharged.
4. Do not push or pull the vehicle to start
it. See instructions for "Jump starting".
If engine turns over normally but
does not start
1. Check fuel level.
2. With the ignition switch in the LOCK
position, check all connectors at igni-
tion coils and spark plugs. Reconnect
any that may be disconnected or
loose.
3. If the engine still does not start, call an
authorized HYUNDAI dealer or seek
other qualified assistance.
IF THE ENGINE WILL NOT START
WARNING
If the engine will not start, do not
push or pull the vehicle to start it.
This could result in a collision or
cause other damage. In addition,
push or pull starting may cause the
catalytic converter to be over-
loaded and create a fire hazard.
Page 240 of 372
What to do in an emergency
4 6
EMERGENCY STARTING
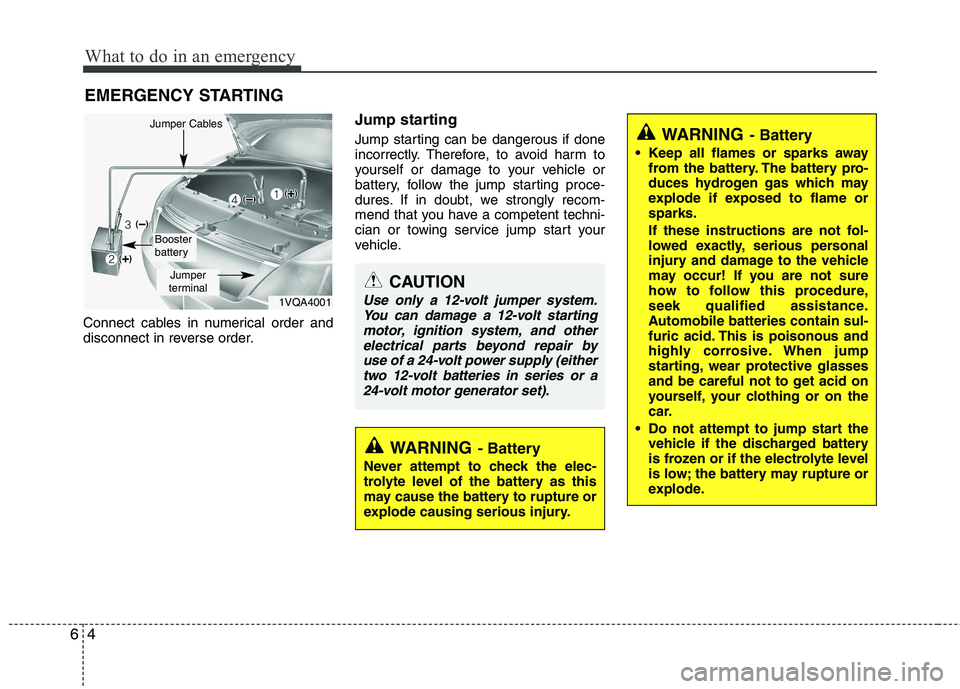
Connect cables in numerical order and
disconnect in reverse order.
Jump starting
Jump starting can be dangerous if done
incorrectly. Therefore, to avoid harm to
yourself or damage to your vehicle or
battery, follow the jump starting proce-
dures. If in doubt, we strongly recom-
mend that you have a competent techni-
cian or towing service jump start your
vehicle.
CAUTION
Use only a 12-volt jumper system.
You can damage a 12-volt starting
motor, ignition system, and other
electrical parts beyond repair by
use of a 24-volt power supply (either
two 12-volt batteries in series or a
24-volt motor generator set).
WARNING- Battery
• Keep all flames or sparks away
from the battery. The battery pro-
duces hydrogen gas which may
explode if exposed to flame or
sparks.
If these instructions are not fol-
lowed exactly, serious personal
injury and damage to the vehicle
may occur! If you are not sure
how to follow this procedure,
seek qualified assistance.
Automobile batteries contain sul-
furic acid. This is poisonous and
highly corrosive. When jump
starting, wear protective glasses
and be careful not to get acid on
yourself, your clothing or on the
car.
Do not attempt to jump start the
vehicle if the discharged battery
is frozen or if the electrolyte level
is low; the battery may rupture or
explode.
WARNING- Battery
Never attempt to check the elec-
trolyte level of the battery as this
may cause the battery to rupture or
explode causing serious injury.
1VQA4001
Jumper
terminal
Jumper Cables
Booster
battery
Page 259 of 372
623
What to do in an emergency
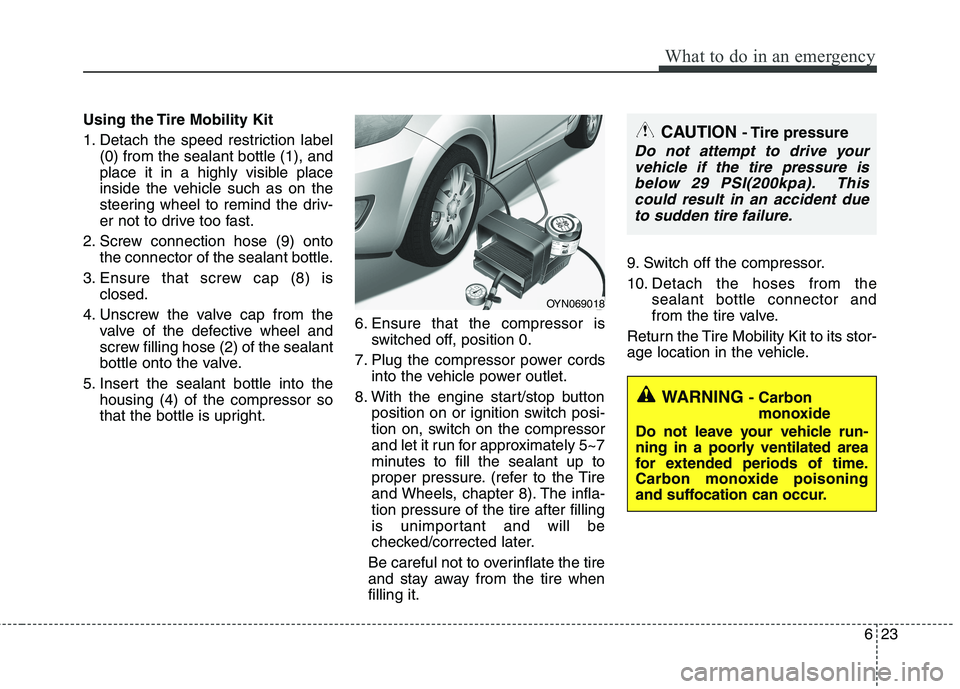
Using the Tire Mobility Kit
1. Detach the speed restriction label
(0) from the sealant bottle (1), and
place it in a highly visible place
inside the vehicle such as on the
steering wheel to remind the driv-
er not to drive too fast.
2. Screw connection hose (9) onto
the connector of the sealant bottle.
3. Ensure that screw cap (8) is
closed.
4. Unscrew the valve cap from the
valve of the defective wheel and
screw filling hose (2) of the sealant
bottle onto the valve.
5. Insert the sealant bottle into the
housing (4) of the compressor so
that the bottle is upright.6. Ensure that the compressor is
switched off, position 0.
7. Plug the compressor power cords
into the vehicle power outlet.
8. With the engine start/stop button
position on or ignition switch posi-
tion on, switch on the compressor
and let it run for approximately 5~7
minutes to fill the sealant up to
proper pressure. (refer to the Tire
and Wheels, chapter 8). The infla-
tion pressure of the tire after filling
is unimportant and will be
checked/corrected later.
Be careful not to overinflate the tire
and stay away from the tire when
filling it.9. Switch off the compressor.
10. Detach the hoses from the
sealant bottle connector and
from the tire valve.
Return the Tire Mobility Kit to its stor-
age location in the vehicle.CAUTION - Tire pressure
Do not attempt to drive your
vehicle if the tire pressure is
below 29 PSI(200kpa). This
could result in an accident due
to sudden tire failure.
WARNING - Carbon
monoxide
Do not leave your vehicle run-
ning in a poorly ventilated area
for extended periods of time.
Carbon monoxide poisoning
and suffocation can occur.
OYN069018
Page 260 of 372
What to do in an emergency
24 6
Distributing the sealant
11. Immediately drive approximately
4~6miles (7~10km or, about
10min) to evenly distribute the
sealant in the tire.
Do not exceed a speed of 50 mph
(80 km/h). If possible, do not fall
below a speed of 12 mph (20 km/h).
While driving, if you experience any
unusual vibration, ride disturbance or
noise, reduce your speed and drive
with caution until you can safely pull
off of the side of the road.
Call for road side service or towing.
When you use the Tire Mobility Kit,
the tire pressure sensors and wheel
may be damaged by sealant. Have
the wheel and tire pressure sensors
inspected at an authorized dealer.Checking the tire inflation pres-
sure
1.After driving approximately 4
~6miles(7~10km or about 10min),
stop at a safety location.
2.Connect connection hose (9) of the
compressor directly to the tire
valve.
3.Plug the compressor power cord
into the vehicle power outlet.
4.Adjust the tire inflation pressure to
the recomended tire inflation.
With the ignition switched on, pro-
ceed as follows.
- To increase the inflation pres-
sure :Switch on the compressor,
position I. To check the current
inflation pressure setting, briefly
switch off the compressor.✽ ✽
NOTICE
The pressure gauge may show high-
er than actual reading when the
compressor is running. To get an
accurate tire pressure, the compres-
sor needs to be turned off.
- To reduce the inflation pres-
sure:Loosen the screw cap (8)
on the compressor hose.