2013 HYUNDAI TUCSON check engine
[x] Cancel search: check enginePage 319 of 397
719
Maintenance
Vacuum crankcase ventilation hoses
Inspect the surface of hoses for evidence
of heat and/or mechanical damage. Hard
and brittle rubber, cracking, tears, cuts,
abrasions, and excessive swelling indi-
cate deterioration. Particular attention
should be paid to examine those hose
surfaces nearest to high heat sources,
such as the exhaust manifold. Inspect the hose routing to assure that the hoses do not come in contact with
any heat source, sharp edges or movingcomponent which might cause heat dam-
age or mechanical wear. Inspect all hose
connections, such as clamps and cou-
plings, to make sure they are secure, and
that no leaks are present. Hoses should
be replaced immediately if there is any
evidence of deterioration or damage.
Air cleaner filter
A Genuine HYUNDAI air cleaner filter isrecommended when the filter is replaced.
Spark plugs
Make sure to install new spark plugs of
the correct heat range.
Valve clearance
Inspect for excessive valve noise and/or
engine vibration and adjust if necessary.
An authorized HYUNDAI dealer should
perform the operation.
Cooling system
Check for cooling system components,
such as radiator, coolant reservoir, hoses
and connections for leakage and dam-
age. Replace any damaged parts.
Coolant
The coolant should be changed at the
intervals specified in the maintenance
schedule.
Manual transaxle fluid (if equipped)
Inspect the manual transaxle fluid
according to the maintenance schedule.
Automatic transaxle fluid (if equipped)
Automatic transaxle fluid should not be
checked under normal usage conditions.
But in severe conditions, the fluid should
be changed at an authorized HYUNDAIdealer in accordance to the scheduledmaintenance at the beginning of this
chapter.
✽✽NOTICE
Automatic transaxle fluid color is basi-
cally red.
As the vehicle is driven, the automatic
transaxle fluid will begin to look darker.
It is normal condition and you should
not judge the need to replace the fluid
based upon the changed color.
Page 320 of 397
Maintenance
20
7
Brake hoses and lines
Visually check for proper installation,
chafing, cracks, deterioration and any
leakage. Replace any deteriorated or
damaged parts immediately.
Brake/Clutch* fluid
Check the brake fluid level in the brake
fluid reservoir. The level should be
between “MIN” and “MAX” marks on the
side of the reservoir. Use only hydraulic
brake fluid conforming to DOT 3 or DOT 4 specification.
* : if equipped
Parking brake
Inspect the parking brake system includ-
ing the parking brake pedal and cables.
Brake discs, pads, calipers and
rotors
Check the pads for excessive wear, discs
for run out and wear, and calipers for fluid
leakage.
Exhaust pipe and muffler
Visually inspect the exhaust pipes, muf-
fler and hangers for cracks, deterioration,
or damage. Start the engine and listen
carefully for any exhaust gas leakage.
Tighten connections or replace parts as
necessary.
Suspension mounting bolts
Check the suspension connections for
looseness or damage. Retighten to the
specified torque.
Steering gear box, linkage &
boots/lower arm ball joint
With the vehicle stopped and engine off,
check for excessive free-play in the
steering wheel.
Check the linkage for bends or damage.
Check the dust boots and ball joints for
deterioration, cracks, or damage.
Replace any damaged parts.
Drive shafts and boots
Check the drive shafts, boots and clamps
for cracks, deterioration, or damage.
Replace any damaged parts and, if nec-
essary, repack the grease.
Air conditioning refrigerant
Check the air conditioning lines and con-
nections for leakage and damage.
CAUTION
The use of a non-specified fluid
could result in transaxle malfunc-tion and failure.
Use only specified automatictransaxle fluid. (Refer to “Recommended lubricants andcapacities” in section 8.)
Page 321 of 397
721
Maintenance
ENGINE OIL
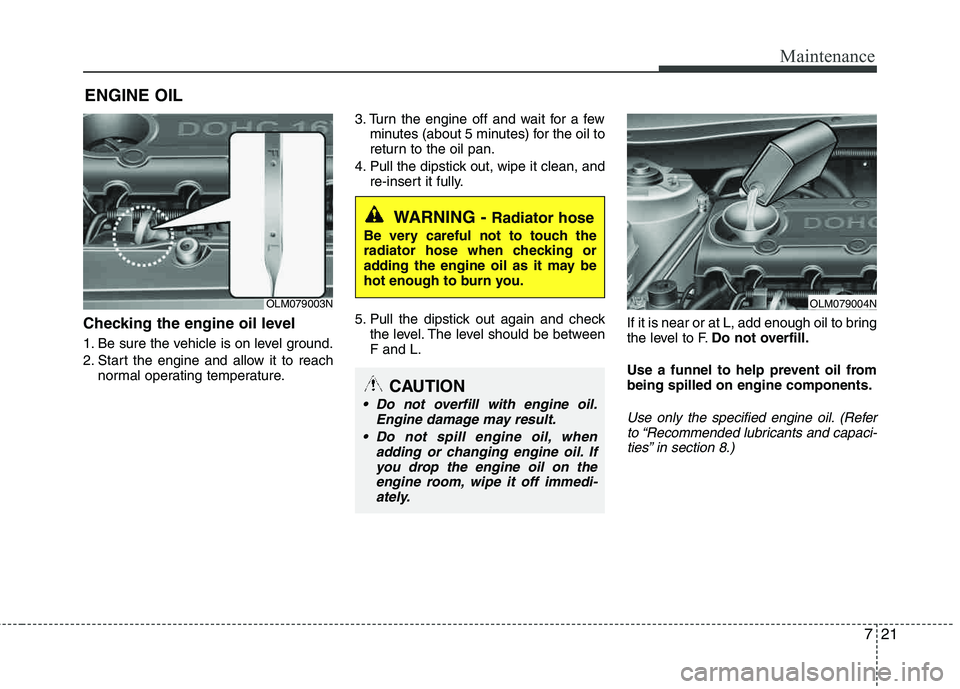
Checking the engine oil level
1. Be sure the vehicle is on level ground.
2. Start the engine and allow it to reachnormal operating temperature. 3. Turn the engine off and wait for a few
minutes (about 5 minutes) for the oil to
return to the oil pan.
4. Pull the dipstick out, wipe it clean, and re-insert it fully.
5. Pull the dipstick out again and check the level. The level should be between F and L. If it is near or at L, add enough oil to bring
the level to F.
Do not overfill.
Use a funnel to help prevent oil frombeing spilled on engine components.
Use only the specified engine oil. (Refer to “Recommended lubricants and capaci-
ties” in section 8.)
WARNING - Radiator hose
Be very careful not to touch the
radiator hose when checking or
adding the engine oil as it may be
hot enough to burn you.
OLM079003NOLM079004N
CAUTION
Do not overfill with engine oil. Engine damage may result.
Do not spill engine oil, when adding or changing engine oil. Ifyou drop the engine oil on the
engine room, wipe it off immedi-ately.
Page 322 of 397
Maintenance
22
7
Changing the engine oil and filter
Have engine oil and filter changed by an
authorized HYUNDAI dealer according tothe Maintenance Schedule at the begin- ning of this section. The high-pressure cooling system has a
reservoir filled with year-round antifreeze
coolant. The reservoir is filled at the fac-
tory.
Check the antifreeze protection and
coolant level at least once a year, at the beginning of the winter season, and
before traveling to a colder climate.
Checking the coolant level
ENGINE COOLANT
WARNING
Removing radiator cap
Never attempt to remove the radi-
ator cap while the engine is oper-
ating or hot. Doing so might leadto cooling system and engine
damage. Also, hot coolant or steam could cause serious per-
sonal injury.
(Continued)
CALIFORNIA PROPOSI-
TION 65 WARNING
Engine oil contains chemicals
known to the State of California to
cause cancer, birth defects, and
reproductive harm.
Used engine oil may cause irrita- tion or cancer of the skin if left in
contact with the skin for prolonged
periods of time. Used engine oil
contains chemicals that have
caused cancer in laboratory ani-
mals. Always protect your skin by
washing your hands thoroughly with soap and warm water as soon
as possible after handling used oil.
Page 323 of 397
723
Maintenance
Check the condition and connections of all cooling system hoses and heater
hoses. Replace any swollen or deterio-
rated hoses.
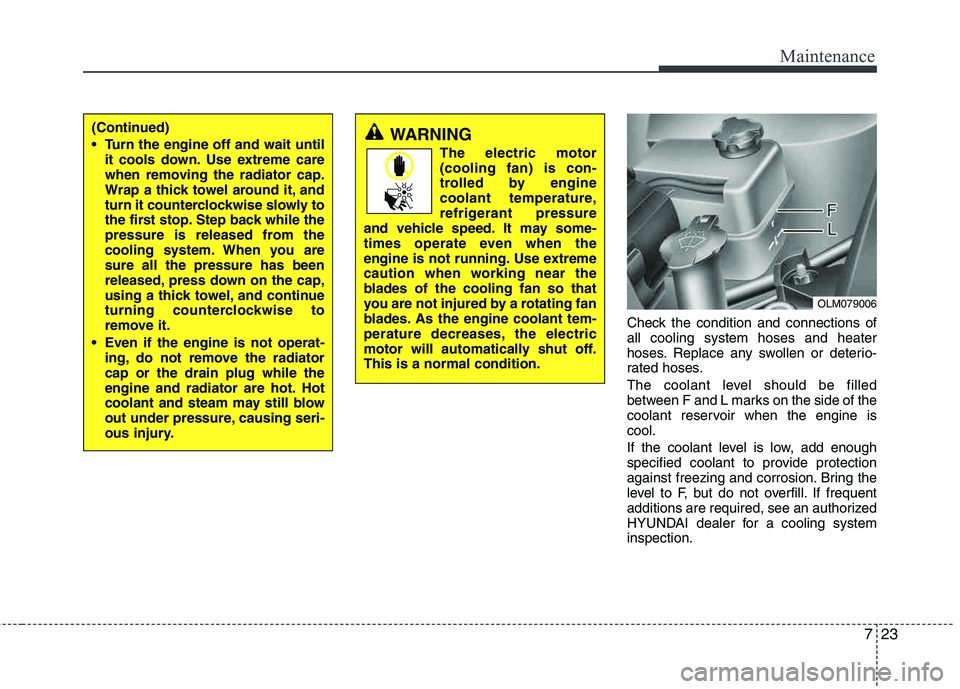
The coolant level should be filled
between F and L marks on the side of the
coolant reservoir when the engine iscool.
If the coolant level is low, add enough
specified coolant to provide protection
against freezing and corrosion. Bring the
level to F, but do not overfill. If frequent
additions are required, see an authorized
HYUNDAI dealer for a cooling systeminspection.
OLM079006
(Continued)
Turn the engine off and wait untilit cools down. Use extreme care
when removing the radiator cap.
Wrap a thick towel around it, and
turn it counterclockwise slowly to
the first stop. Step back while the
pressure is released from the
cooling system. When you are sure all the pressure has been
released, press down on the cap,
using a thick towel, and continue
turning counterclockwise to
remove it.
Even if the engine is not operat- ing, do not remove the radiator cap or the drain plug while the
engine and radiator are hot. Hot
coolant and steam may still blow
out under pressure, causing seri-
ous injury.WARNING
The electric motor (cooling fan) is con-
trolled by engine
coolant temperature,
refrigerant pressure
and vehicle speed. It may some-
times operate even when the
engine is not running. Use extreme
caution when working near the
blades of the cooling fan so that
you are not injured by a rotating fan
blades. As the engine coolant tem-
perature decreases, the electric
motor will automatically shut off. This is a normal condition.
Page 325 of 397
725
Maintenance
Checking the brake/clutch* fluid
level
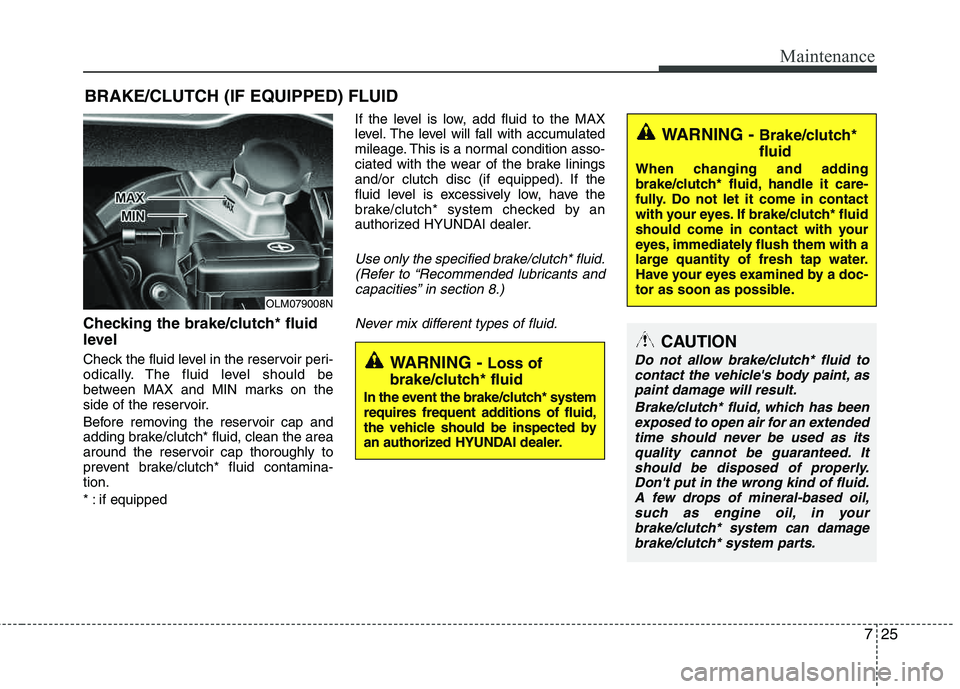
Check the fluid level in the reservoir peri-
odically. The fluid level should be
between MAX and MIN marks on the
side of the reservoir.
Before removing the reservoir cap and
adding brake/clutch* fluid, clean the area
around the reservoir cap thoroughly to
prevent brake/clutch* fluid contamina-tion. *
:if equippedIf the level is low, add fluid to the MAX
level. The level will fall with accumulated
mileage. This is a normal condition asso-
ciated with the wear of the brake linings
and/or clutch disc (if equipped). If the
fluid level is excessively low, have the
brake/clutch* system checked by an
authorized HYUNDAI dealer.
Use only the specified brake/clutch* fluid.
(Refer to “Recommended lubricants andcapacities” in section 8.)
Never mix different types of fluid.
WARNING - Loss of
brake/clutch* fluid
In the event the brake/clutch* system
requires frequent additions of fluid,
the vehicle should be inspected by
an authorized HYUNDAI dealer.
OLM079008N
BRAKE/CLUTCH (IF EQUIPPED) FLUID
WARNING - Brake/clutch* fluid
When changing and adding
brake/clutch* fluid, handle it care-
fully. Do not let it come in contact
with your eyes. If brake/clutch* fluid
should come in contact with your
eyes, immediately flush them with a
large quantity of fresh tap water.
Have your eyes examined by a doc-
tor as soon as possible.
CAUTION
Do not allow brake/clutch* fluid to
contact the vehicle's body paint, aspaint damage will result.
Brake/clutch* fluid, which has beenexposed to open air for an extendedtime should never be used as itsquality cannot be guaranteed. Itshould be disposed of properly.
Don't put in the wrong kind of fluid.A few drops of mineral-based oil,such as engine oil, in yourbrake/clutch* system can damage
brake/clutch* system parts.
Page 336 of 397
Maintenance
36
7
Reset items
Items should be reset after the battery
has been discharged or the battery has been disconnected.
Auto up/down window (See section 4)
Sunroof (See section 4)
Trip computer (See section 4)
Climate control system
(See section 4)
Clock (See section 4)
Audio (See section 4)(Continued)
Wear eye protection when check- ing the battery during charging.
Disconnect the battery charger in the following order.
1. Turn off the battery charger main switch.
2. Unhook the negative clamp from the negative battery terminal.
3. Unhook the positive clamp from the positive battery terminal.
WARNING
Before performing maintenance or recharging the battery, turn off all accessories and stop the
engine.
The negative battery cable must be removed first and installed
last when the battery is discon-nected.
Page 350 of 397
Maintenance
50
7
FUSES
A vehicle’s electrical system is protected
from electrical overload damage by
fuses.
This vehicle has 3 fuse panels, one locat-
ed in the driver’s side panel bolster, the
other in the engine compartment.
If any of your vehicle’s lights, accessories,
or controls do not work, check the appro-
priate circuit fuse. If a fuse has blown, the element inside the fuse will melt.
If the electrical system does not work,
first check the driver’s side fuse panel.
Before replacing a blown fuse, discon-
nect the negative battery cable.
Always replace a blown fuse with one of
the same rating.
If the replacement fuse blows, this indi-
cates an electrical problem. Avoid using
the system involved and immediately
consult an authorized HYUNDAI dealer.
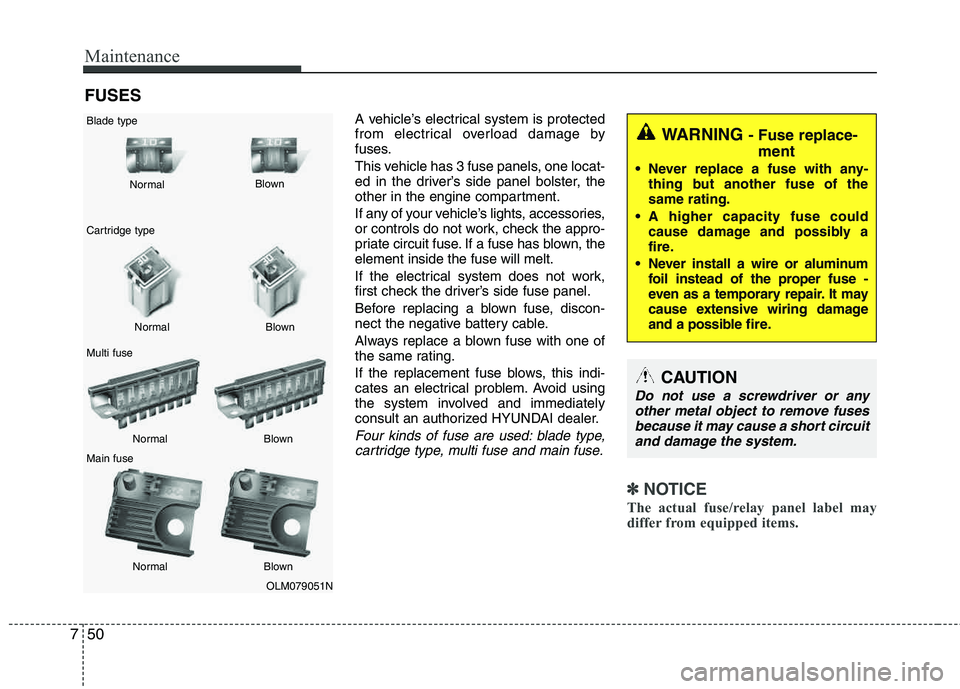
Four kinds of fuse are used: blade type,cartridge type, multi fuse and main fuse.
✽✽ NOTICE
The actual fuse/relay panel label may
differ from equipped items.
WARNING - Fuse replace- ment
Never replace a fuse with any- thing but another fuse of the same rating.
A higher capacity fuse could cause damage and possibly a
fire.
Never install a wire or aluminum foil instead of the proper fuse -
even as a temporary repair. It may
cause extensive wiring damage
and a possible fire.
CAUTION
Do not use a screwdriver or any
other metal object to remove fusesbecause it may cause a short circuit
and damage the system.
OLM079051N
Normal
Normal
Blade type
Cartridge type Multi fuse Main fuse Blown
Blown
Normal Blown
Normal Blown