2013 HYUNDAI TUCSON stop start
[x] Cancel search: stop startPage 255 of 397
547
Driving your vehicle
Your vehicle's fuel economy depends
mainly on your style of driving, where you
drive and when you drive.
Each of these factors affects how many
miles (kilometers) you can get from a gal-
lon (liter) of fuel. To operate your vehicle
as economically as possible, use the fol-
lowing driving suggestions to help save
money in both fuel and repairs:
Drive smoothly. Accelerate at a moder-ate rate. Don't make "jack-rabbit" starts or full-throttle shifts and maintain a
steady cruising speed. Don't race
between stoplights. Try to adjust your
speed to the traffic so you don't have to
change speeds unnecessarily. Avoid
heavy traffic whenever possible.
Always maintain a safe distance from
other vehicles so you can avoid unnec-
essary braking. This also reduces
brake wear.
Drive at a moderate speed. The faster you drive the more fuel your vehicle
uses. Driving at a moderate speed, in
the highest gear appropriate for the
conditions, especially on the highway,
is one of the most effective ways to reduce fuel consumption. Don't "ride" the brake pedal or clutch
pedal. This can increase fuel consump-
tion and also increase wear on these
components. In addition, driving with
your foot resting on the brake pedal
may cause the brakes to overheat,
which reduces their effectiveness and
may lead to more serious conse-
quences.
Take care of your tires. Keep them inflated to the recommended pressure.
Incorrect inflation, either too much or
too little, results in unnecessary tire
wear. Check the tire pressures at leastonce a month.
Be sure that the wheels are aligned correctly. Improper alignment can
result from hitting curbs or driving too
fast over irregular surfaces. Poor align-
ment causes faster tire wear and may
also result in other problems as well as
greater fuel consumption. Keep your vehicle in good condition.
For better fuel economy and reduced
maintenance costs, maintain your vehi- cle in accordance with the mainte-
nance schedule in section 7. If you
drive your vehicle in severe conditions, more frequent maintenance is required
(see section 7 for details).
Keep your vehicle clean. For maximum service, your vehicle should be kept
clean and free of corrosive materials. It
is especially important that mud, dirt,
ice, etc. not be allowed to accumulate
on the underside of the vehicle. This
extra weight can result in increased
fuel consumption and also contributeto corrosion.
Travel lightly. Don't carry unnecessary weight in your vehicle. Weight reduces
fuel economy.
Don't let the engine idle longer than necessary. If you are waiting (and not
in traffic), turn off your engine and
restart only when you're ready to go.
ECONOMICAL OPERATION
Page 267 of 397
559
Driving your vehicle
Driving with a trailer
Towing a trailer requires a certain
amount of experience. Before setting out
for the open road, you must get to know
your trailer. Acquaint yourself with the
feel of handling and braking with the
added weight of the trailer. And always
keep in mind that the vehicle you are
driving is now a good deal longer and not
nearly so responsive as your vehicle is
by itself.
Before you start, check the trailer hitch
and platform, safety chains, electrical
connector(s), lights, tires and mirror
adjustment. If the trailer has electric
brakes, start your vehicle and trailer mov-
ing and then apply the trailer brake con-
troller by hand to be sure the brakes are
working. This lets you check your electri-
cal connection at the same time.
During your trip, check occasionally to be
sure that the load is secure, and that the
lights and any trailer brakes are still work-ing.
Following distance
Stay at least twice as far behind the vehi-
cle ahead as you would when driving
your vehicle without a trailer. This can
help you avoid situations that require
heavy braking and sudden turns.
Passing
You’ll need more passing distance up
ahead when you’re towing a trailer. And,
because of the increased vehicle length,
you’ll need to go much farther beyond the
passed vehicle before you can return to
your lane. Due to the added load to the
engine when going uphill the vehicle may
also take longer to pass than it would on
flat ground.
Backing up
Hold the bottom of the steering wheel
with one hand. Then, to move the trailer
to the left, just move your hand to the left.
To move the trailer to the right, move your
hand to the right. Always back up slowly
and, if possible, have someone guide
you.
Making turns
When you’re turning with a trailer, make
wider turns than normal. Do this so your
trailer won’t strike soft shoulders, curbs,
road signs, trees, or other objects. Avoid
jerky or sudden maneuvers. Signal well in
advance before turning or lane changes.
Turn signals when towing a trailer
When you tow a trailer, your vehicle has
to have a different turn signal flasher and
extra wiring. The green arrows on your
instrument panel will flash whenever you
signal a turn or lane change. Properly
connected, the trailer lights will also flash
to alert other drivers you’re about to turn,
change lanes, or stop.
When towing a trailer, the green arrows
on your instrument panel will flash for
turns even if the bulbs on the trailer are
burned out. Thus, you may think drivers
behind you are seeing your signals
when, in fact, they are not. It’s important
to check occasionally to be sure the trail-
er bulbs are still working. You must also
check the lights every time you discon-
nect and then reconnect the wires.
Do not connect a trailer lighting system
directly to your vehicle’s lighting system.
Use only an approved trailer wiring har-
ness.
Page 268 of 397
Driving your vehicle
60
5
An authorized HYUNDAI dealer can
assist you in installing the wiring harness.
Driving on grades
Reduce speed and shift to a lower gear
before you start down a long or steep
downgrade. If you don’t shift down, you
might have to use your brakes so much
that they would get hot and no longer
operate efficiently.
On a long uphill grade, shift down and
reduce your speed to around 45 mph (70 km/h) to reduce the possibility of engine
and transaxle overheating.
If your trailer weighs more than the max-
imum trailer weight without trailer brakes
and you have an automatic transaxle,
you should drive in D (Drive) when tow-
ing a trailer.
Operating your vehicle in D (Drive) when
towing a trailer will minimize heat build up
and extend the life of your transaxle.
Parking on hills
Generally, if you have a trailer attached to
your vehicle, you should not park your
vehicle on a hill. People can be seriously
or fatally injured, and both your vehicle
and the trailer can be damaged if they
unexpectedly roll down hill. However, if you ever have to park your
trailer on a hill, here's how to do it:
1. Pull the vehicle into the parking space.
Turn the steering wheel in the direction
of the curb (right if headed down hill, left if headed up hill).
2. If the vehicle has a manual transaxle, place the car in neutral. If the vehicle
has an automatic transaxle, place the
car in P (Park).
3. Set the parking brake and shut off the vehicle.
4. Place chocks under the trailer wheels on the down hill side of the wheels.
5. Start the vehicle, hold the brakes, shift to neutral, release the parking brake
and slowly release the brakes until the
trailer chocks absorb the load.
6. Reapply the brakes, reapply the park- ing brake and shift the vehicle to R
(Reverse) for manual transaxle or P
(Park) automatic transaxle.
CAUTION
When towing a trailer on steep
grades (in excess of 6%) payclose attention to the engine
coolant temperature gauge toensure the engine does not over-heat. If the needle of the coolanttemperature gauge moves across
the dial towards “H” (HOT), pullover and stop as soon as it is safe to do so, and allow the engine to
idle until it cools down. You mayproceed once the engine hascooled sufficiently.
You must decide driving speed depending on trailer weight anduphill grade to reduce the possi-bility of engine and transaxle
overheating.
WARNING
Failure to use an approved trailer wiring harness could result in dam-
age to the vehicle electrical system
and/or personal injury.
WARNING- Parking on a hill
Parking your vehicle on a hill with a
trailer attached could cause serious
injury or death, should the trailer
break loose or brake stops working.
Page 269 of 397
561
Driving your vehicle
7. Shut off the vehicle and release thevehicle brakes but leave the parking
brake set.
When you are ready to leave after park-
ing on a hill
1. With the manual transaxle in Neutral or automatic transaxle in P (Park),
apply your brakes and hold the brake
pedal down while you:
and
2. Slowly remove your foot from the brake pedal.
3. Drive slowly until the trailer is clear of the chocks.
4. Stop and have someone pick up and store the chocks.Maintenance when trailer towing
Your vehicle will need service more often
when you regularly pull a trailer.
Important items to pay particular atten- tion to include engine oil, automatic
transaxle fluid, axle lubricant and cooling
system fluid. Brake condition is another
important item to frequently check. Each
item is covered in this manual, and the
Index will help you find them quickly. If
you’re trailering, it’s a good idea to review
these sections before you start your trip.
Don’t forget to also maintain your trailer
and hitch. Follow the maintenance
schedule that accompanied your trailer
and check it periodically. Preferably, con-
duct the check at the start of each day’s
driving. Most importantly, all hitch nuts and bolts should be tight.
WARNING- Parking brake
It can be dangerous to get out of
your vehicle if the parking brake is
not firmly set.
If you have left the engine running,
the vehicle can move suddenly. You
or others could be seriously or
fatally injured.
CAUTION
Due to higher load during trailer
usage, overheating might occurin hot days or during uphill driv-
ing. If the coolant gauge indicatesover-heating, switch off the A/Cand stop the vehicle in a safe area to cool down the engine.
When towing check transaxle fluid more frequently.
If your vehicle is not equipped with air conditioning, you shouldinstall a condenser fan to improveengine performance when towinga trailer.
Page 279 of 397
63
What to do in an emergency
2. When the vehicle is stopped, turn onyour emergency hazard flashers, set
the parking brake and put the transaxle
in P (automatic transaxle) or reverse
(manual transaxle).
3. Have all passengers get out of the vehicle. Be sure they all get out on the
side of the vehicle that is away from
traffic.
4. When changing a flat tire, follow the instruction provided later in this sec- tion.
If engine stalls while driving
1. Reduce your speed gradually, keeping a straight line. Move cautiously off the
road to a safe place.
2. Turn on your emergency flashers.
3. Try to start the engine again. If your vehicle will not start, contact an
authorized HYUNDAI dealer or seek
other qualified assistance.
If engine doesn't turn over or
turns over slowly
1. If your vehicle has an automatic
transaxle, be sure the shift lever is in N
(Neutral) or P (Park) and the emer-
gency brake is set.
2. Check the battery connections to be sure they are clean and tight.
3. Turn on the interior light. If the light dims or goes out when you operate the
starter, the battery is discharged.
4. Check the starter connections to be sure they are securely tightened.
5. Do not push or pull the vehicle to start it. See instructions for "Jump starting".
If engine turns over normally but
does not start
1. Check fuel level.
2. With the ignition switch in the LOCKposition, check all connectors at igni-
tion coils and spark plugs. Reconnect
any that may be disconnected or
loose.
3. Check the fuel line in the engine com- partment.
4. If the engine still does not start, call an authorized HYUNDAI dealer or seek
other qualified assistance.
IF THE ENGINE WILL NOT START
WARNING
If the engine will not start, do not
push or pull the vehicle to start it.This could result in a collision or
cause other damage. In addition,
push or pull starting may cause the
catalytic converter to be over-
loaded and create a fire hazard.
Page 283 of 397
67
What to do in an emergency
TIRE PRESSURE MONITORING SYSTEM (TPMS)
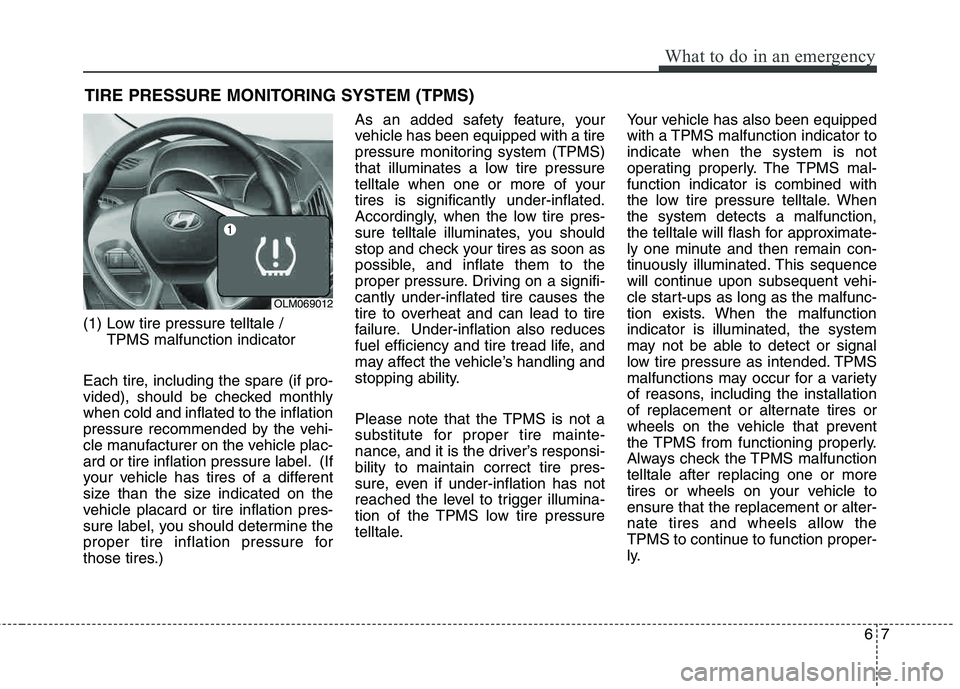
(1) Low tire pressure telltale / TPMS malfunction indicator
Each tire, including the spare (if pro-
vided), should be checked monthlywhen cold and inflated to the inflation
pressure recommended by the vehi-
cle manufacturer on the vehicle plac-
ard or tire inflation pressure label. (If
your vehicle has tires of a different
size than the size indicated on the
vehicle placard or tire inflation pres-
sure label, you should determine the
proper tire inflation pressure for
those tires.) As an added safety feature, your
vehicle has been equipped with a tire
pressure monitoring system (TPMS)
that illuminates a low tire pressure
telltale when one or more of yourtires is significantly under-inflated.
Accordingly, when the low tire pres-
sure telltale illuminates, you should
stop and check your tires as soon as
possible, and inflate them to the
proper pressure. Driving on a signifi-cantly under-inflated tire causes the
tire to overheat and can lead to tire
failure. Under-inflation also reduces
fuel efficiency and tire tread life, and
may affect the vehicle’s handling and
stopping ability.
Please note that the TPMS is not a
substitute for proper tire mainte-
nance, and it is the driver’s responsi-bility to maintain correct tire pres-
sure, even if under-inflation has not
reached the level to trigger illumina-
tion of the TPMS low tire pressure
telltale.
Your vehicle has also been equipped
with a TPMS malfunction indicator toindicate when the system is not
operating properly. The TPMS mal-function indicator is combined with
the low tire pressure telltale. Whenthe system detects a malfunction,
the telltale will flash for approximate-
ly one minute and then remain con-
tinuously illuminated. This sequence
will continue upon subsequent vehi-
cle start-ups as long as the malfunc-
tion exists. When the malfunctionindicator is illuminated, the system
may not be able to detect or signal
low tire pressure as intended. TPMS
malfunctions may occur for a variety
of reasons, including the installation
of replacement or alternate tires or
wheels on the vehicle that prevent
the TPMS from functioning properly.
Always check the TPMS malfunctiontelltale after replacing one or more
tires or wheels on your vehicle toensure that the replacement or alter-
nate tires and wheels allow the
TPMS to continue to function proper-
ly.
OLM069012
Page 320 of 397
Maintenance
20
7
Brake hoses and lines
Visually check for proper installation,
chafing, cracks, deterioration and any
leakage. Replace any deteriorated or
damaged parts immediately.
Brake/Clutch* fluid
Check the brake fluid level in the brake
fluid reservoir. The level should be
between “MIN” and “MAX” marks on the
side of the reservoir. Use only hydraulic
brake fluid conforming to DOT 3 or DOT 4 specification.
* : if equipped
Parking brake
Inspect the parking brake system includ-
ing the parking brake pedal and cables.
Brake discs, pads, calipers and
rotors
Check the pads for excessive wear, discs
for run out and wear, and calipers for fluid
leakage.
Exhaust pipe and muffler
Visually inspect the exhaust pipes, muf-
fler and hangers for cracks, deterioration,
or damage. Start the engine and listen
carefully for any exhaust gas leakage.
Tighten connections or replace parts as
necessary.
Suspension mounting bolts
Check the suspension connections for
looseness or damage. Retighten to the
specified torque.
Steering gear box, linkage &
boots/lower arm ball joint
With the vehicle stopped and engine off,
check for excessive free-play in the
steering wheel.
Check the linkage for bends or damage.
Check the dust boots and ball joints for
deterioration, cracks, or damage.
Replace any damaged parts.
Drive shafts and boots
Check the drive shafts, boots and clamps
for cracks, deterioration, or damage.
Replace any damaged parts and, if nec-
essary, repack the grease.
Air conditioning refrigerant
Check the air conditioning lines and con-
nections for leakage and damage.
CAUTION
The use of a non-specified fluid
could result in transaxle malfunc-tion and failure.
Use only specified automatictransaxle fluid. (Refer to “Recommended lubricants andcapacities” in section 8.)
Page 355 of 397
755
Maintenance
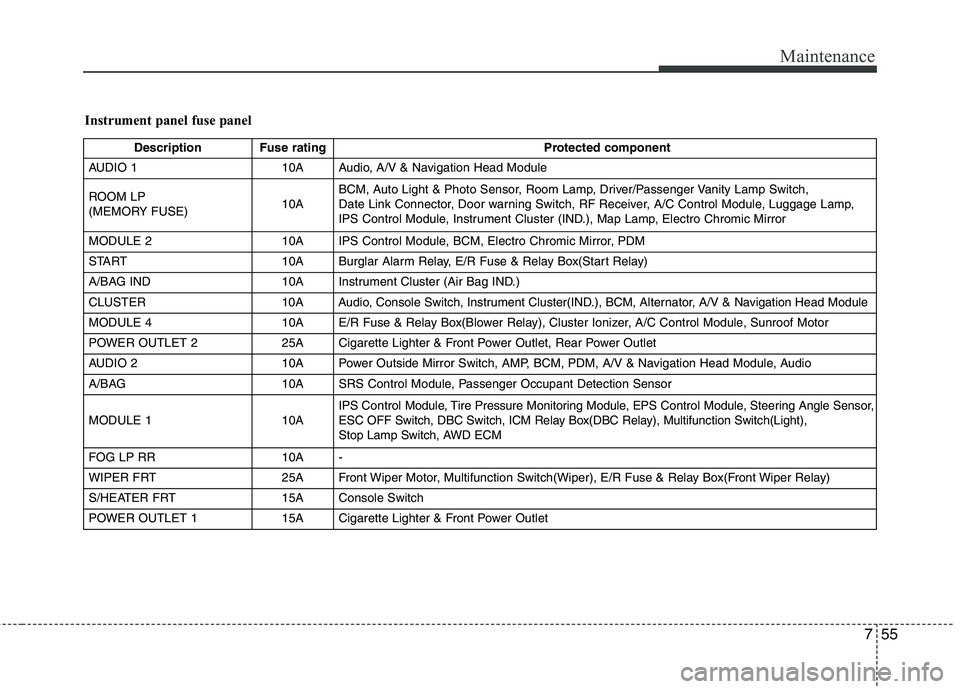
Instrument panel fuse panel
Description Fuse ratingProtected component
AUDIO 1 10A Audio, A/V & Navigation Head Module
ROOM LP
(MEMORY FUSE) 10ABCM, Auto Light & Photo Sensor, Room Lamp, Driver/Passenger Vanity Lamp Switch,
Date Link Connector, Door warning Switch, RF Receiver, A/C Control Module, Luggage Lamp,
IPS Control Module, Instrument Cluster (IND.), Map Lamp, Electro Chromic Mirror
MODULE 2 10A IPS Control Module, BCM, Electro Chromic Mirror, PDM
START 10A Burglar Alarm Relay, E/R Fuse & Relay Box(Start Relay)
A/BAG IND 10A Instrument Cluster (Air Bag IND.)
CLUSTER 10A Audio, Console Switch, Instrument Cluster(IND.), BCM, Alternator, A/V & Navigation Head Module
MODULE 4 10A E/R Fuse & Relay Box(Blower Relay), Cluster Ionizer, A/C Control Module, Sunroof Motor
POWER OUTLET 2 25A Cigarette Lighter & Front Power Outlet, Rear Power Outlet
AUDIO 2 10A Power Outside Mirror Switch, AMP, BCM, PDM, A/V & Navigation Head Module, Audio
A/BAG 10A SRS Control Module, Passenger Occupant Detection Sensor
MODULE 1 10A IPS
Control Module, Tire Pressure Monitoring Module, EPS ControlModule, Steering Angle Sensor,
ESC OFF Switch, DBC Switch, ICM Relay Box(DBC Relay), Multifunction Switch(Light),
Stop Lamp Switch, AWD ECM
FOG LP RR 10A -
WIPER FRT 25A Front Wiper Motor, Multifunction Switch(Wiper), E/R Fuse & Relay Box(Front Wiper Relay)
S/HEATER FRT 15A Console Switch
POWER OUTLET 1 15A Cigarette Lighter & Front Power Outlet