2013 Hyundai Sonata Eco button
[x] Cancel search: Eco buttonPage 96 of 410

415
Features of your vehicle
Lock the doors by pressing the lock but-
ton on the smart key.
After completion of the steps above, the
hazard warning lights and chime will
operate once to indicate that the system
is armed.
If any door, trunk lid or engine hood
remains open, the hazard warning lights
and chime won't operate and theft-alarm
will not arm. After this, if all doors, trunk
lid and engine hood are closed, the haz-
ard warning lights blink once.
Using the transmitterPark the vehicle and stop the engine.
Arm the system as described below.
1. Turn off the engine and remove the
ignition key from the ignition switch.
2. Make sure that all doors, the engine
hood and trunk lid are closed and
latched.
3. Lock the doors by pressing the lock
button on the transmitter.
After completion of the steps above, the
hazard warning lights will blink once to
indicate that the system is armed. If the
lock button is pressed once more within 4
seconds, hazard warning lights blink and
the horn sounds once to confirm that the
system is armed.
If any door, trunk lid or engine hood
remains open, the hazard warning lights
(or/and horn) won't operate and theft-
alarm will not arm. After this, if all doors,
trunk lid and engine hood are closed, the
hazard warning lights blink once.
Using the mechanical keyPark the vehicle and stop the engine.
Arm the system as described below.
1. Turn off the engine and remove the key
from the ignition switch(if equipped).
2. Make sure that all doors, the engine
hood and trunk lid are closed and
latched.
3. Lock the doors by inserting the key into
the key hole on the front outside door
handle and turning the key toward the
front of the vehicle.
If any door, trunk lid or engine hood
remains open, the theft-alarm will not
arm.✽ ✽
NOTICEIf you lock or unlock the doors by using
the mechanical key, the hazard warning
light and chime sound won't operate.
YF HMA 4a-111.qxp 1/16/2012 6:28 PM Page 15
Page 98 of 410

417
Features of your vehicle
Disarmed stageUsing the smart keyThe system will be disarmed when the
doors are unlocked by pressing the
unlock button on the smart key or press-
ing the lock/unlock button of the front out-
side door handle with the smart key in
your possession.
After unlocking the doors, the hazard
warning lights and chime will operate
twice to indicate that the system is dis-
armed.
After unlocking the doors, if any door is
not opened within 30 seconds, the sys-
tem will be rearmed.Using the transmitterThe system will be disarmed when the
doors are unlocked with by pressing the
unlock button on the transmitter.
After unlocking the doors, the hazard
warning lights will blink twice to indicate
that the system is disarmed.
After unlocking the doors, if any door is
not opened within 30 seconds, the sys-
tem will be rearmed.
Using the mechanical keyThe system will be disarmed when the
doors are unlocked with the mechanical
key.✽ ✽
NOTICEIf you lock or unlock the doors by
using the mechanical key, the hazard
warning light and chime sound won't
operate.✽ ✽
NOTICE -
Non-immobilizer
system
• Avoid trying to start the engine while
the alarm is activated. The vehicle
starting motor is disabled during the
theft-alarm stage.
If the system is not disarmed with the
transmitter, insert the key into the
ignition switch, turn the ignition
switch to the ON position and wait for
30 seconds. Then the system will be
disarmed.
• If you lose your keys, consult your
authorized HYUNDAI dealer.
✽ ✽
NOTICE
- Immobilizer system
or smart key system
• If the system is not disarmed with the
transmitter or smart key, insert the
key into the ignition switch and start
the engine or start the engine with the
smart key. Then the system will be
disarmed.
• If you lose your keys, consult your
authorized HYUNDAI dealer.
CAUTION
Do not change, alter or adjust the
theft-alarm system because it could
cause the theft-alarm system to
malfunction and should only be
serviced by an authorized HYUNDAI
dealer.
Malfunctions caused by improper
alterations, adjustments or modifi-
cations to the theft-alarm system
are not covered by your vehicle
manufacturer warranty.
YF HMA 4a-111.qxp 1/16/2012 6:28 PM Page 17
Page 99 of 410

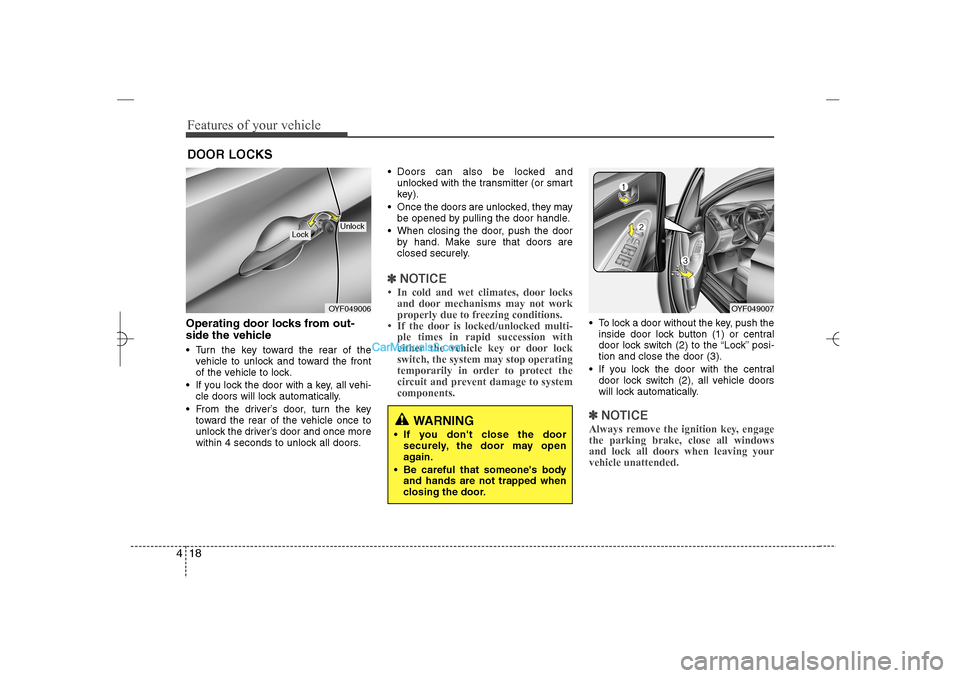
Features of your vehicle18 4Operating door locks from out-
side the vehicle Turn the key toward the rear of the
vehicle to unlock and toward the front
of the vehicle to lock.
If you lock the door with a key, all vehi-
cle doors will lock automatically.
From the driver’s door, turn the key
toward the rear of the vehicle once to
unlock the driver’s door and once more
within 4 seconds to unlock all doors. Doors can also be locked and
unlocked with the transmitter (or smart
key).
Once the doors are unlocked, they may
be opened by pulling the door handle.
When closing the door, push the door
by hand. Make sure that doors are
closed securely.
✽ ✽
NOTICE• In cold and wet climates, door locks
and door mechanisms may not work
properly due to freezing conditions.
• If the door is locked/unlocked multi-
ple times in rapid succession with
either the vehicle key or door lock
switch, the system may stop operating
temporarily in order to protect the
circuit and prevent damage to system
components.
To lock a door without the key, push the
inside door lock button (1) or central
door lock switch (2
) to the “Lock” posi-
tion and close the door (3).
If you lock the door with the central
door lock switch (2), all vehicle doors
will lock automatically.✽ ✽
NOTICEAlways remove the ignition key, engage
the parking brake, close all windows
and lock all doors when leaving your
vehicle unattended.
DOOR LOCKS
OYF049006
Lock
Unlock
OYF049007
WARNING
If you don't close the door
securely, the door may open
again.
Be careful that someone's body
and hands are not trapped when
closing the door.
YF HMA 4a-111.qxp 1/16/2012 6:28 PM Page 18
Page 103 of 410

Features of your vehicle22 4Opening the trunk To open the trunk, press the trunk
unlock button for more than 1 second
on the transmitter (or smart key), press
the button on the trunk handle with the
smart key in your possession, or insert
the master key (or mechanical key of
the smart key) into the lock and turn it
clockwise. To open the trunk from inside the vehi-
cle, press the trunk lid release button.
Once the trunk is opened and then
closed, the trunk is locked automatically.✽ ✽
NOTICEIn cold and wet climates, door locks and
door mechanisms may not work proper-
ly due to freezing conditions.
Closing the trunkTo close the trunk, lower the trunk lid,
then press down on it until it locks. To be
sure the trunk lid is securely fastened,
always check by trying to pull it up again.
TRUNK
OYF049012
CAUTION
Make certain that you close the
trunk before driving your vehicle.
Possible damage may occur to the
trunk lift cylinders and attached
hardware if the trunk is not closed
prior to driving.
WARNING
The trunk swing upward. Make sure
no objects or people are near the
rear of the vehicle when opening
the trunk.
WARNING
The trunk lid should be always kept
completely closed while the vehicle
is in motion. If it is left open or ajar,
poisonous exhaust gases may
enter the vehicle and serious ill-
ness or death may result.
OYF049011NOYF049231N
■Type A■Type B
YF HMA 4a-111.qxp 1/16/2012 6:28 PM Page 22
Page 123 of 410

Features of your vehicle42 4(1) Telematics button
(2) Telematics button
(3) Telematics button
(4) Compass control button & Dimming
ON/OFF button
(5) Status indicator LED
(6) Channel 1 button
(7) Channel 2 button
(8) Channel 3 button
(9) Compass display
(10) Rear light sensorAutomatic-Dimming Night Vision
Safety™ (NVS
®) Mirror
The NVS
®Mirror in your vehicle is the
most advanced way to reduce annoying
glare in the rearview mirror during any
driving situation. For more information
regarding NVS
®mirrors and other appli-
cations, please refer to the Gentex web-
site:
www.gentex.com
✽ ✽
NOTICEThe NVS
®Mirror automatically reduces
glare during driving conditions based
upon light levels monitored in front of
the vehicle and from the rear of the vehi-
cle. These light sensors are visible
through openings in the front and rear
of the mirror case. Any object that
obstructs either light sensor will
degrade the automatic dimming control
feature.
Automatic-dimming function
Your mirror will automatically dim upon
detecting glare from the vehicles travel-
ing behind you. The auto-dimming func-
tion can be controlled by the Dimming
ON/OFF Button:
1. Pressing and hold the button for 3
seconds turns the autodimming func-
tion OFF which is indicated by the
green Status Indicator LED turning off.
2. Pressing and hold the button for 3
seconds again turns the auto-dimming
function ON which is indicated by the
green Status Indicator LED turning on.
The mirror defaults to the ON position
each time the vehicle is started.
OYF042250N
YF HMA 4a-111.qxp 1/16/2012 6:30 PM Page 42
Page 124 of 410

443
Features of your vehicle
Z-Nav™ Compass Display
The NVS™ Mirror in your vehicle is also
equipped with a Z-Nav™ Compass that
shows the vehicle Compass heading in
the Display Window using the 8 basic
cardinal headings (N, NE, E, SE, etc.).
Compass function
The Compass can be turned ON and
OFF and will remember the last state
when the ignition is cycled. To turn the
display feature ON/OFF:
1. Press and release the button within
1 second to turn the display feature
OFF.
2. Press and release the button again
within 1 second to turn the display
back ON.
Additional options can be set with press
and hold sequences of the button and
are detailed below.
There is a difference between magnetic
north and true north. The compass in the
mirror can compensate for this difference
when it knows the Magnetic Zone in
which it is operating. This is set either by
the dealer or by the user. The operating
Zone Numbers for North America are
shown in the figure on the following sec-
tion.
B520C05NF
YF HMA 4a-111.qxp 1/16/2012 6:30 PM Page 43
Page 125 of 410

Features of your vehicle44 4To adjust the Zone setting:
1. Determine the desired Zone Number
based upon your current location on
the Zone Map.
2. Press and hold the button for 6 sec-
onds, the current Zone Number will
appear on the display.
3. Pressing and holding the button
again will cause the numbers to incre-
ment (Note: they will repeat …13, 14,
15, 1, 2, …). Releasing the button
when the desired Zone Number
appears on the display will set the new
Zone.
4. Within about 5 seconds the compass
will start displaying a compass head-
ing again.
There are some conditions that can
cause changes to the vehicle magnets,
such as installing a ski rack or a CB
antenna. Body repair work on the vehicle
can also cause changes to the vehicle's
magnetic field. In these situations, the
compass will need to be re-calibrated to
quickly correct for these changes. To re-
calibrate the compass:1. Press and hold the button for more
than 9 seconds. When the compass
memory is cleared a "C" will appear in
the display.
2. To calibrate the compass, drive the
vehicle in 2 complete circles at less
than 5 mph (8 km/h).
Integrated HomeLink
®Wireless Control
System
The HomeLink
®Wireless Control System
provides a convenient way to replace up
to three hand-held radio-frequency (RF)
transmitters with a single built-in device.
This innovative feature will learn the
radio frequency codes of most current
transmitters to operate devices such as
gate operators, garage door openers,
entry door locks, security systems, even
home lighting. Both standard and rolling
code-equipped transmitters can be pro-
grammed by following the outlined proce-
dures. Additional HomeLink
®information
can be found at: www.homelink.com or
by calling 1-800-355-3515.Retain the original transmitter of the RF
device you are programming for use in
other vehicles as well as for future
HomeLink
®programming. It is also sug-
gested that upon the sale of the vehicle,
the programmed HomeLink
®buttons be
erased for security purposes.
WARNING
Before programming HomeLink
®to
a garage door opener or gate oper-
ator, make sure that people and
objects are out of the way of the
device to prevent potential harm or
damage. Do not use HomeLink®
with any garage door opener that
lacks the safety stop and reverse
features required by U.S. federal
safety standards (this includes any
garage door opener model manu-
factured before April 1, 1982). A
garage door that cannot detect an
object - signaling the door to stop
and reverse - does not meet current
U.S. federal safety standards. Using
a garage door opener without these
features increases the risk of seri-
ous injury or death.
YF HMA 4a-111.qxp 1/16/2012 6:30 PM Page 44
Page 126 of 410

445
Features of your vehicle
Programming HomeLink
®
✽ ✽
NOTICE• When programming a garage door
opener, it is advised to park the vehi-
cle outside of the garage.
• It is recommended that a new battery
be placed in the hand-held transmit-
ter of the device being programmed to
HomeLink
®for quicker training and
accurate transmission of the radio-
frequency signal.
• Some vehicles may require the igni-
tion switch to be turned to the second
(or "accessories") position for pro-
gramming and/or operation of
HomeLink.
• In the event that there are still pro-
gramming difficulties or questions
after following the programming steps
listed below, contact HomeLink
®at:
www.homelink.com or 1-800-355-
3515.
Programming
To train most devices, follow these
instructions:
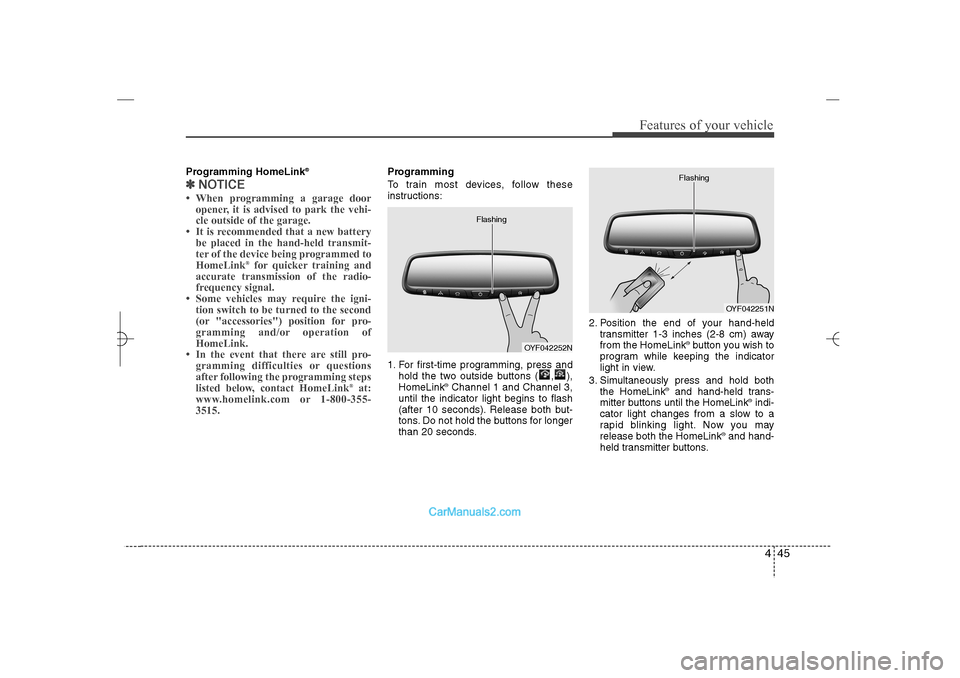
1. For first-time programming, press and
hold the two outside buttons ( , ),
HomeLink
®Channel 1 and Channel 3,
until the indicator light begins to flash
(after 10 seconds). Release both but-
tons. Do not hold the buttons for longer
than 20 seconds.2. Position the end of your hand-held
transmitter 1-3 inches (2-8 cm) away
from the HomeLink
®button you wish to
program while keeping the indicator
light in view.
3. Simultaneously press and hold both
the HomeLink
®and hand-held trans-
mitter buttons until the HomeLink
®indi-
cator light changes from a slow to a
rapid blinking light. Now you may
release both the HomeLink
®and hand-
held transmitter buttons.
OYF042252N Flashing
OYF042251N Flashing
YF HMA 4a-111.qxp 1/16/2012 6:30 PM Page 45