2013 Hyundai Sonata Hybrid instrument panel
[x] Cancel search: instrument panelPage 154 of 425

Features of your vehicle
74 4
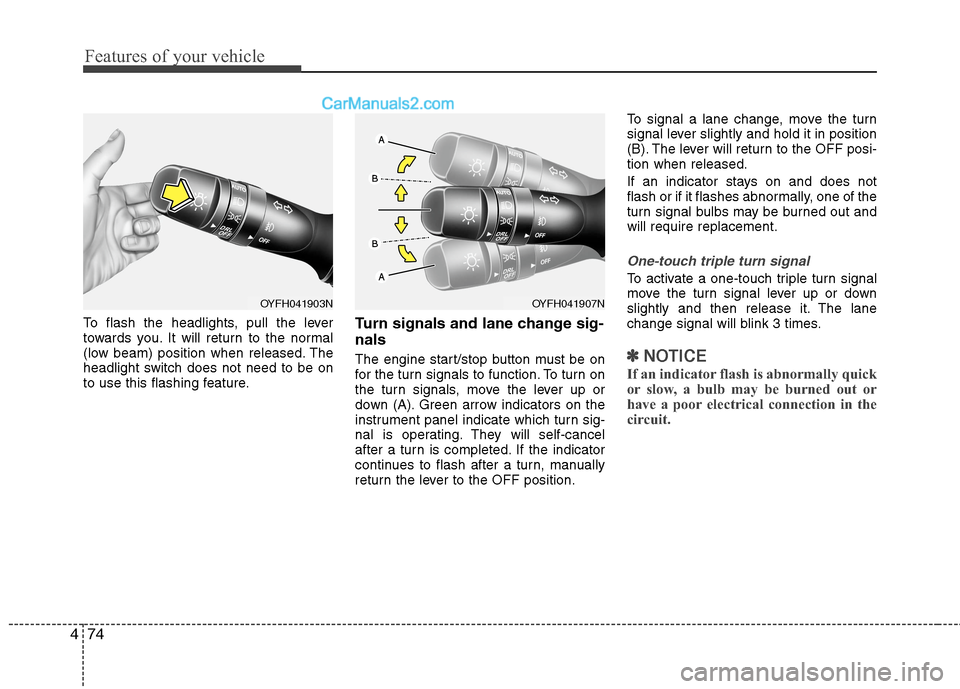
To flash the headlights, pull the lever
towards you. It will return to the normal
(low beam) position when released. The
headlight switch does not need to be on
to use this flashing feature.Turn signals and lane change sig-
nals
The engine start/stop button must be on
for the turn signals to function. To turn on
the turn signals, move the lever up or
down (A). Green arrow indicators on the
instrument panel indicate which turn sig-
nal is operating. They will self-cancel
after a turn is completed. If the indicator
continues to flash after a turn, manually
return the lever to the OFF position.To signal a lane change, move the turn
signal lever slightly and hold it in position
(B). The lever will return to the OFF posi-
tion when released.
If an indicator stays on and does not
flash or if it flashes abnormally, one of the
turn signal bulbs may be burned out and
will require replacement.
One-touch triple turn signal
To activate a one-touch triple turn signal
move the turn signal lever up or down
slightly and then release it. The lane
change signal will blink 3 times.
✽ ✽
NOTICE
If an indicator flash is abnormally quick
or slow, a bulb may be burned out or
have a poor electrical connection in the
circuit.
OYFH041903NOYFH041907N
Page 161 of 425

481
Features of your vehicle
✽ ✽
NOTICE
If you want to defrost and defog the
front windshield, refer to “Windshield
defrosting and defogging” in this sec-
tion.
Rear window defroster
The defroster heats the window to
remove frost, fog and thin ice from the
rear window, while the engine is running.
To activate the rear window defroster,
press the rear window defroster button
located in the center facia switch panel.The indicator on the rear window
defroster button illuminates when the
defroster is ON.
If there is heavy accumulation of snow on
the rear window, brush it off before oper-
ating the rear defroster.
The rear window defroster automatically
turns off after approximately 20 minutes
or when the engine start/stop button is
turned off. To turn off the defroster, press
the rear window defroster button again.
Outside rearview mirror defroster
(if equipped)
If your vehicle is equipped with the out-
side rearview mirror defrosters, they will
operate at the same time you turn on the
rear window defroster.
CAUTION
To prevent damage to the conduc-
tors bonded to the inside surface of
the rear window, never use sharp
instruments or window cleaners
containing abrasives to clean the
window.
DEFROSTER
OYF049155
Page 163 of 425

483
Features of your vehicle
Automatic heating and air condi-
tioning
1. Press the AUTO button.
The modes, fan speeds, air intake and
air-conditioning will be controlled auto-
matically according to the temperature
setting.2. Turn the temperature control knob to
set the desired temperature.✽ ✽
NOTICE
• To turn the automatic operation off,
select any button of the following:
- Mode selection button
- Front windshield defrost button
- Fan speed control button
The selected function will be con-
trolled manually while other functions
operate automatically.
• For your convenience and to improve
the effectiveness of the climate con-
trol, use the AUTO button and set the
temperature to 73°F (23°C).
✽ ✽
NOTICE
Never place anything over the sensor
located on the instrument panel to
ensure better control of the heating and
cooling system.
OYF049122OYF049121OYF049161N
Page 166 of 425

Features of your vehicle
86 4
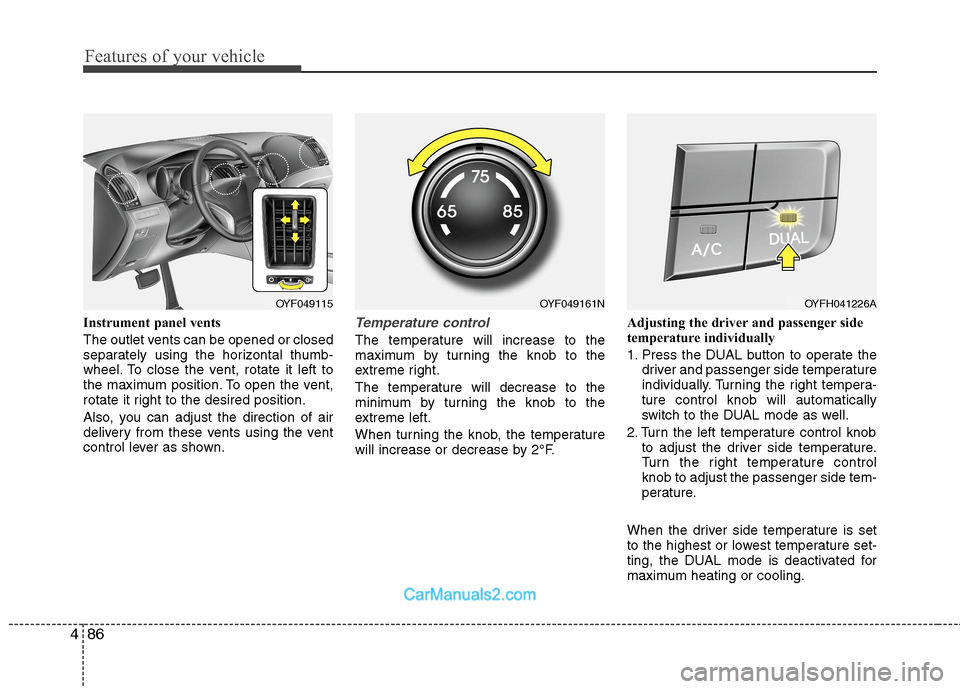
Instrument panel vents
The outlet vents can be opened or closed
separately using the horizontal thumb-
wheel. To close the vent, rotate it left to
the maximum position. To open the vent,
rotate it right to the desired position.
Also, you can adjust the direction of air
delivery from these vents using the vent
control lever as shown.Temperature control
The temperature will increase to the
maximum by turning the knob to the
extreme right.
The temperature will decrease to the
minimum by turning the knob to the
extreme left.
When turning the knob, the temperature
will increase or decrease by 2°F.Adjusting the driver and passenger side
temperature individually
1. Press the DUAL button to operate the
driver and passenger side temperature
individually. Turning the right tempera-
ture control knob will automatically
switch to the DUAL mode as well.
2. Turn the left temperature control knob
to adjust the driver side temperature.
Turn the right temperature control
knob to adjust the passenger side tem-
perature.
When the driver side temperature is set
to the highest or lowest temperature set-
ting, the DUAL mode is deactivated for
maximum heating or cooling.
OYF049115OYF049161NOYFH041226A
Page 174 of 425

Features of your vehicle
94 4
Automatic heating and air condi-
tioning
1. Press the AUTO button.
The modes, fan speeds, air intake and
air-conditioning will be controlled auto-
matically according to the temperature
setting.2. Turn the temperature control knob to
set the desired temperature.
✽ ✽
NOTICE
• To turn the automatic operation off,
select any button of the following:
- Mode selection button
- Front windshield defrost button
- Fan speed control button
The selected function will be con-
trolled manually while other functions
operate automatically.
• For your convenience and to improve
the effectiveness of the climate con-
trol, use the AUTO button and set the
temperature to 73°F (23°C).
✽ ✽
NOTICE
Never place anything over the sensor
located on the instrument panel to
ensure better control of the heating and
cooling system.
OYF049122OYFH041345AOYFH041343A
Page 177 of 425

497
Features of your vehicle
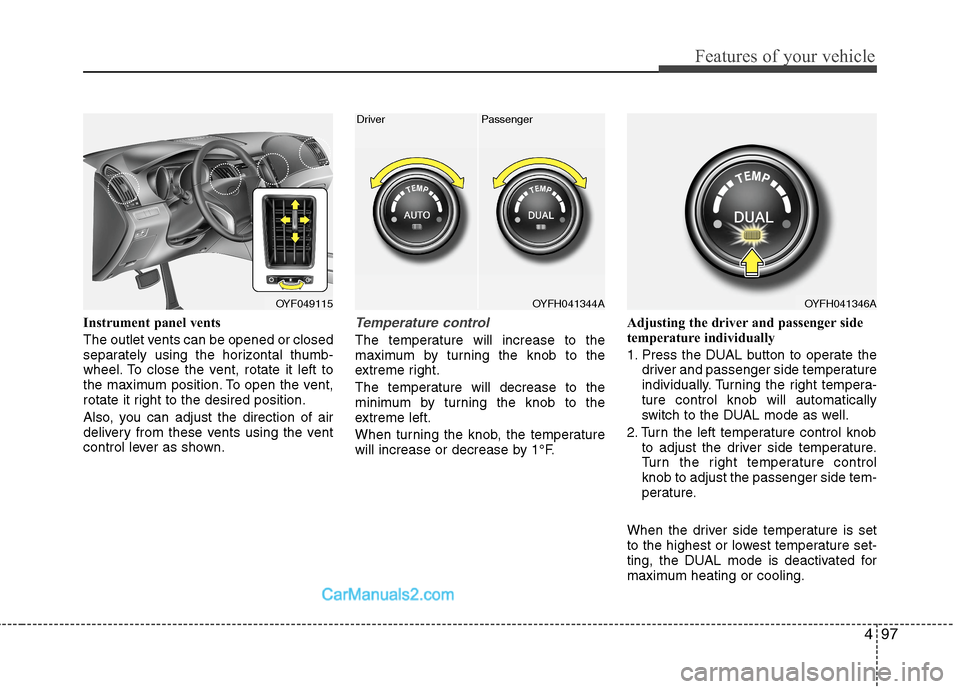
Instrument panel vents
The outlet vents can be opened or closed
separately using the horizontal thumb-
wheel. To close the vent, rotate it left to
the maximum position. To open the vent,
rotate it right to the desired position.
Also, you can adjust the direction of air
delivery from these vents using the vent
control lever as shown.Temperature control
The temperature will increase to the
maximum by turning the knob to the
extreme right.
The temperature will decrease to the
minimum by turning the knob to the
extreme left.
When turning the knob, the temperature
will increase or decrease by 1°F.Adjusting the driver and passenger side
temperature individually
1. Press the DUAL button to operate the
driver and passenger side temperature
individually. Turning the right tempera-
ture control knob will automatically
switch to the DUAL mode as well.
2. Turn the left temperature control knob
to adjust the driver side temperature.
Turn the right temperature control
knob to adjust the passenger side tem-
perature.
When the driver side temperature is set
to the highest or lowest temperature set-
ting, the DUAL mode is deactivated for
maximum heating or cooling.
OYF049115OYFH041344A
Driver Passenger
OYFH041346A
Page 365 of 425

751
Maintenance
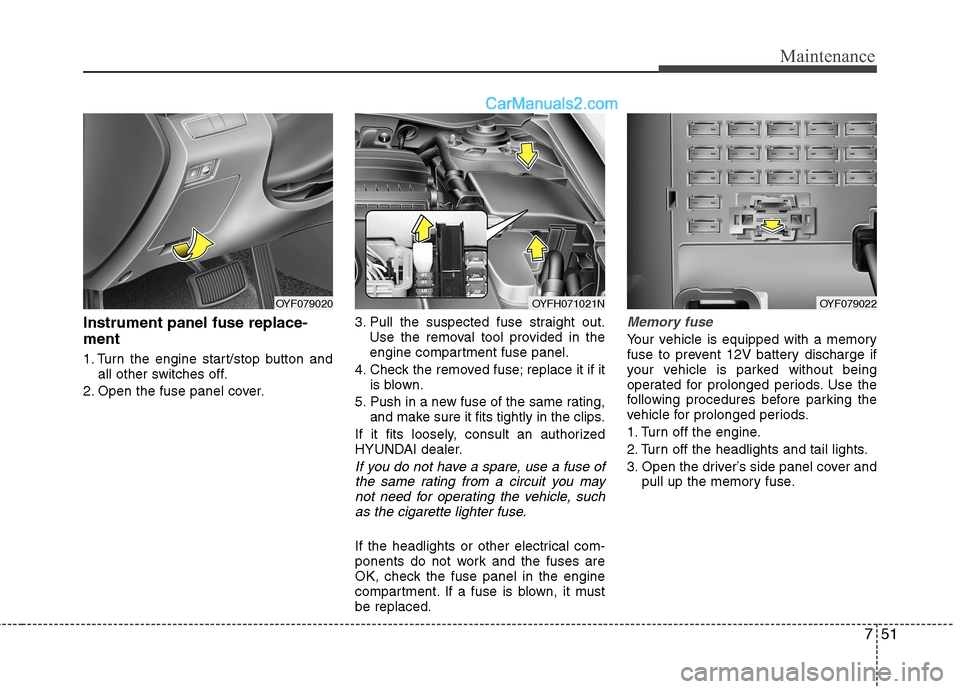
Instrument panel fuse replace-
ment
1. Turn the engine start/stop button and
all other switches off.
2. Open the fuse panel cover.3. Pull the suspected fuse straight out.
Use the removal tool provided in the
engine compartment fuse panel.
4. Check the removed fuse; replace it if it
is blown.
5. Push in a new fuse of the same rating,
and make sure it fits tightly in the clips.
If it fits loosely, consult an authorized
HYUNDAI dealer.
If you do not have a spare, use a fuse of
the same rating from a circuit you may
not need for operating the vehicle, such
as the cigarette lighter fuse.
If the headlights or other electrical com-
ponents do not work and the fuses are
OK, check the fuse panel in the engine
compartment. If a fuse is blown, it must
be replaced.
Memory fuse
Your vehicle is equipped with a memory
fuse to prevent 12V battery discharge if
your vehicle is parked without being
operated for prolonged periods. Use the
following procedures before parking the
vehicle for prolonged periods.
1. Turn off the engine.
2. Turn off the headlights and tail lights.
3. Open the driver’s side panel cover and
pull up the memory fuse.
OYF079020OYFH071021NOYF079022
Page 419 of 425

I3
Index
Capacity/Weight ······························································8-2
Care
Exterior care ······························································7-69
Interior care ·······························································7-73
Tire care·····································································7-37
Cargo weight ··································································5-43
Center console storage ·················································4-107
Central door lock switch················································4-12
Certification label ··························································5-41
Certification label ····························································8-7
Chains
Tire chains ·································································5-35
Changing tires (with spare tire) ·····································6-15
Checking tire inflation pressure·····································7-38
Child restraint system ····················································3-27
Lower anchor system ················································3-33
Seat belt ·····································································3-29
Tether anchor system·················································3-31
Child-protector rear door lock ·······································4-14
Climate control air filter ···························4-92, 4-103, 7-30
Clock (Digital) ·····························································4-110
Clothes hanger······························································4-111
Combined instrument, see instrument cluster ···············4-40
Compact spare tire (with spare tire) ······························6-15
Compact spare tire replacement ····································7-42
Components of the tire mobility kit ······························6-24
Consumer information ·····················································8-9
Coolant ···········································································7-24Cooling fluid, see engine coolant ··································7-24
Crankcase emission control system ·······························7-75
Cruise control system ····················································5-24
Cup holder ···································································4-108
Curtain air bag ·······························································3-53
Dashboard illumination,
see instrument panel illumination·······························4-41
Dashboard, see instrument cluster ·································4-40
Defogging (Windshield) ··············································4-104
Defogging logic (Windshield) ·····································4-106
Defroster (Rear window) ···············································4-81
Defrosting (Windshield) ··············································4-104
Digital clock·································································4-110
Dimensions ······································································8-3
Display illumination, see instrument panel illumination··4-41
Displays, see instrument cluster ····································4-40
Door locks ······································································4-11
Central door lock switch ···········································4-12
Child-protector rear door lock ··································4-14
Drinks holders, see cup holders···································4-108
Driver's 3-point system with emergency
locking retractor··························································3-17
Driver's air bag·······························································3-48
Driving at night······························································5-31
Driving in flooded areas ················································5-32
Driving in the rain ·························································5-32
Driving off-road ·····························································5-32
D