Page 27 of 711
Safety features of your vehicle
2 3
Front seat
(1) Forward and backward
(2) Seatback angle
(3) Seat cushion height (Driver’s seat)
(4) Lumbar support (Driver’s seat)*
(5) Seat warmer* /
Seat cooler (air ventilation seat)*
(6) Headrest
2nd row seat
(7) Forward and backward
(8) Seatback angle and folding
(9) Walk-in seat lever*
(10) Headrest
(11) Armrest
(12) Seat warmer*
3rd row seat*
(13) Seatback folding
(14) Headrest
* if equipped
SEATS
ODM032001
Manual seat
Power seat
■Left-Hand drive type
Page 28 of 711
33
Safety features of your vehicle
Front seat
(1) Forward and backward
(2) Seatback angle
(3) Seat cushion height (Driver’s seat)
(4) Lumbar support (Driver’s seat)*
(5) Seat warmer* /
Seat cooler (air ventilation seat)*
(6) Headrest
2nd row seat
(7) Forward and backward
(8) Seatback angle and folding
(9) Walk-in seat lever*
(10) Headrest
(11) Armrest
(12) Seat warmer*
3rd row seat*
(13) Seatback folding
(14) Headrest
* if equippedODMESA2001R
Manual seat
Power seat
■Right-Hand drive type
Page 31 of 711

Safety features of your vehicle
6 3
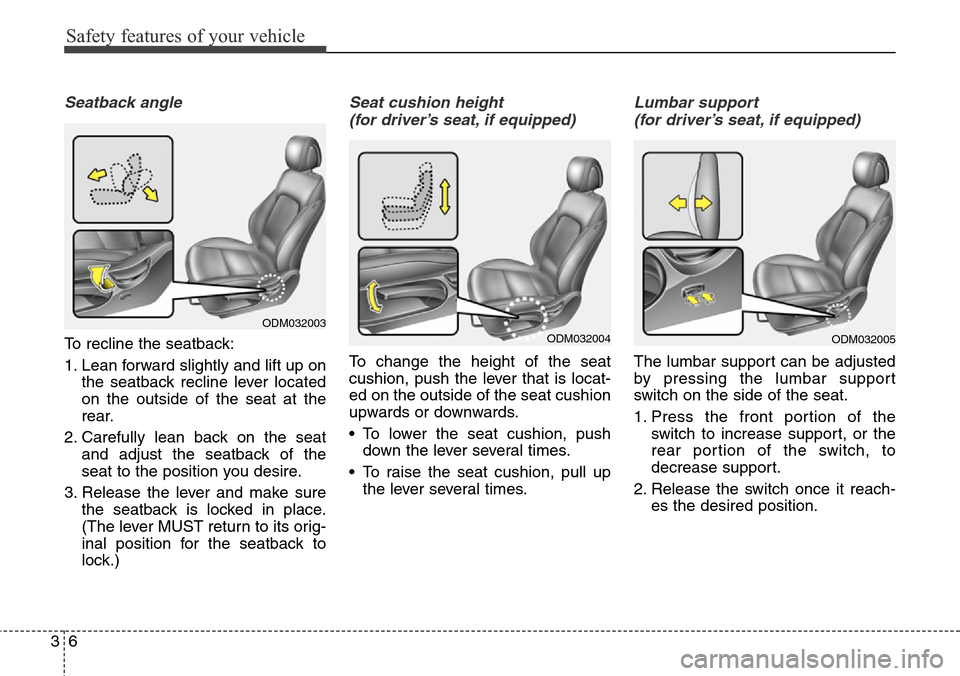
Seatback angle
To recline the seatback:
1. Lean forward slightly and lift up on
the seatback recline lever located
on the outside of the seat at the
rear.
2. Carefully lean back on the seat
and adjust the seatback of the
seat to the position you desire.
3. Release the lever and make sure
the seatback is locked in place.
(The lever MUST return to its orig-
inal position for the seatback to
lock.)
Seat cushion height
(for driver’s seat, if equipped)
To change the height of the seat
cushion, push the lever that is locat-
ed on the outside of the seat cushion
upwards or downwards.
• To lower the seat cushion, push
down the lever several times.
• To raise the seat cushion, pull up
the lever several times.
Lumbar support
(for driver’s seat, if equipped)
The lumbar support can be adjusted
by pressing the lumbar support
switch on the side of the seat.
1. Press the front portion of the
switch to increase support, or the
rear portion of the switch, to
decrease support.
2. Release the switch once it reach-
es the desired position.
ODM032003ODM032004ODM032005
Page 33 of 711

Safety features of your vehicle
8 3
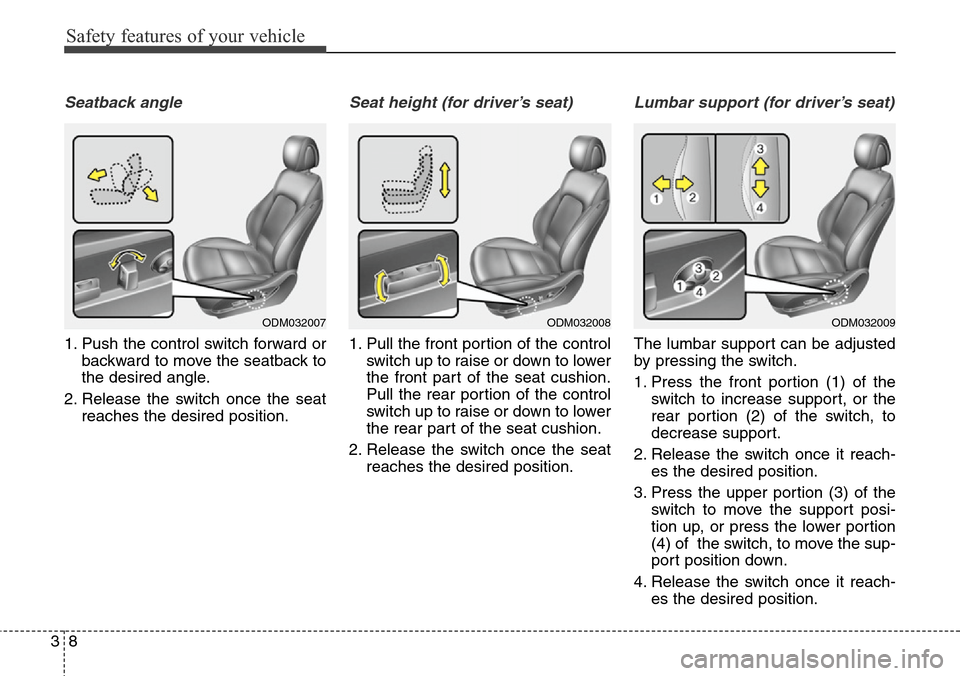
Seatback angle
1. Push the control switch forward or
backward to move the seatback to
the desired angle.
2. Release the switch once the seat
reaches the desired position.
Seat height (for driver’s seat)
1. Pull the front portion of the control
switch up to raise or down to lower
the front part of the seat cushion.
Pull the rear portion of the control
switch up to raise or down to lower
the rear part of the seat cushion.
2. Release the switch once the seat
reaches the desired position.
Lumbar support (for driver’s seat)
The lumbar support can be adjusted
by pressing the switch.
1. Press the front portion (1) of the
switch to increase support, or the
rear portion (2) of the switch, to
decrease support.
2. Release the switch once it reach-
es the desired position.
3. Press the upper portion (3) of the
switch to move the support posi-
tion up, or press the lower portion
(4) of the switch, to move the sup-
port position down.
4. Release the switch once it reach-
es the desired position.
ODM032007ODM032008ODM032009
Page 36 of 711

311
Safety features of your vehicle
Forward and backward adjustment
(if equipped)
The headrest may be adjusted for-
ward to 4 different positions by
pulling the headrest forward to the
desired detent. To adjust the head-
rest to it’s furthest backwards posi-
tion, pull it fully forward to the farthest
position and release it. Adjust the
headrest so that it properly supports
the head and neck.
Adjusting the height up and down
To raise the headrest :
1. Pull it up to the desired position (1).
To lower the headrest :
1. Push and hold the release button
(2) on the headrest support.
2. Lower the headrest to the desired
position (3).
WARNING
• For maximum effectiveness in
case of an accident, the head-
rest should be adjusted so the
middle of the headrest is at the
same height as the center of
gravity of an occupant's head.
Generally, the center of gravity
of most people's head is simi-
lar with the height of the top of
their eyes. Also, adjust the
headrest as close to your head
as possible. For this reason,
the use of a cushion that holds
the body away from the seat-
back is not recommended.
• Do not operate the vehicle with
the headrests removed as
severe injury to the occupants
may occur in the event of an
accident. Headrests may pro-
vide protection against neck
injuries when properly adjust-
ed.
• Do not adjust the headrest
position of the driver's seat
while the vehicle is in motion.
ODM032011
ODM032010
Page 38 of 711
313
Safety features of your vehicle
3. Adjust the headrest to the appro-
priate height.Seat warmer (if equipped)
The seat warmer is provided to warm
the front seats during cold weather.
With the ignition switch in the ON
position, push either of the switches
to warm the driver's seat or the front
passenger's seat.During mild weather or under condi-
tions where the operation of the seat
warmer is not needed, keep the
switches in the "OFF" position.
ODM032013
ODM032014
■Type A
■Type BODM032015
ODM032016
■Type C
■Type D
WARNING
Always make sure the headrest
locks into position after rein-
stalling and adjusting it proper-
ly.
Page 47 of 711

Safety features of your vehicle
22 3
Headrest (for rear seat)
The rear seat(s) is equipped with
headrests in all the seating positions
for the occupant's safety and com-
for t.
The headrest not only provides com-
fort for passengers, but also helps
protect the head and neck in the
event of a collision.
WARNING- Cargo
Cargo should always be
secured to prevent it from being
thrown about the vehicle in a
collision and causing injury to
the vehicle occupants. Do not
place objects in the rear (2nd
and/or 3rd row) seats, since they
cannot be properly secured and
may hit the front seat occupants
in a collision.
WARNING - Cargo loading
Make sure the engine is off, the
automatic transaxle is in P (Park)
or the manual transaxle is in R
(Reverse) or 1st, and the parking
brake is securely applied when-
ever loading or unloading cargo.
Failure to take these steps may
allow the vehicle to move if the
shift lever is inadvertently
moved to another position.
OHM038049N
*
*
* if equipped
WARNING
• For maximum effectiveness in
case of an accident, the head-
rest should be adjusted so the
middle of the headrest is at
the same height as the center
of gravity of an occupant's
head. Generally, the center of
gravity of most people's head
is similar with the height of
the top of their eyes. Also
adjust the headrest as close
to your head as possible. For
this reason, the use of a cush-
ion that holds the body away
from the seatback is not rec-
ommended.
(Continued)
Page 48 of 711

323
Safety features of your vehicle
Adjusting the height up and down
To raise the headrest :
1. Pull it up to the desired position
(1).
To lower the headrest :
1. Push and hold the release button
(2) on the headrest support
2. Lower the headrest to the desired
position (3).
Removal and installation
To remove the headrest :
1. Raise it as far as it can go.
2. Press the release button (1) while
pulling upward (2).
To reinstall the headrest :
1. Put the headrest poles (3) into the
holes while pressing the release
button (1).
2. Adjust the headrest to the appro-
priate height.
ODM032023ODM032024
(Continued)
• Do not operate the vehicle
with the headrests removed.
Severe injury to an occupant
may occur in the event of an
accident. Headrests may pro-
vide protection against severe
neck injuries when properly
adjusted.
CAUTION
When there is no occupant in
the rear seats, adjust the height
of the headrest to the lowest
position. The rear seat headrest
can reduce the visibility of the
rear area.