2013 Hyundai Santa Fe ECU
[x] Cancel search: ECUPage 117 of 711

Features of your vehicle
16 4
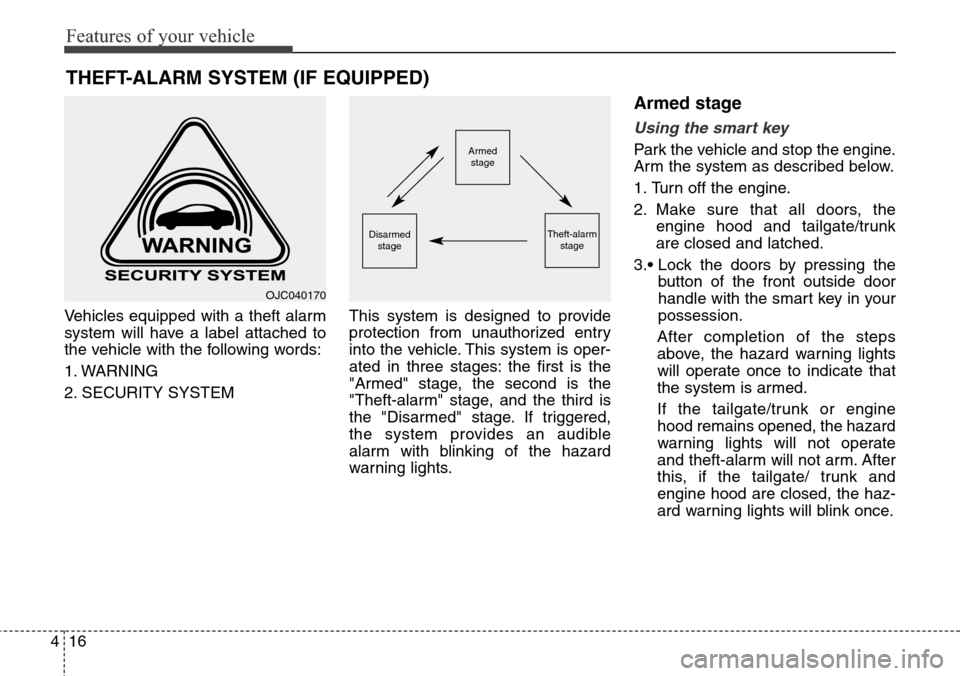
Vehicles equipped with a theft alarm
system will have a label attached to
the vehicle with the following words:
1. WARNING
2. SECURITY SYSTEMThis system is designed to provide
protection from unauthorized entry
into the vehicle. This system is oper-
ated in three stages: the first is the
"Armed" stage, the second is the
"Theft-alarm" stage, and the third is
the "Disarmed" stage. If triggered,
the system provides an audible
alarm with blinking of the hazard
warning lights.
Armed stage
Using the smart key
Park the vehicle and stop the engine.
Arm the system as described below.
1. Turn off the engine.
2. Make sure that all doors, the
engine hood and tailgate/trunk
are closed and latched.
3.• Lock the doors by pressing the
button of the front outside door
handle with the smart key in your
possession.
After completion of the steps
above, the hazard warning lights
will operate once to indicate that
the system is armed.
If the tailgate/trunk or engine
hood remains opened, the hazard
warning lights will not operate
and theft-alarm will not arm. After
this, if the tailgate/ trunk and
engine hood are closed, the haz-
ard warning lights will blink once.
THEFT-ALARM SYSTEM (IF EQUIPPED)
Armed
stage
Theft-alarm
stageDisarmed
stage
OJC040170
Page 120 of 711

419
Features of your vehicle
Operating door locks from
outside the vehicle
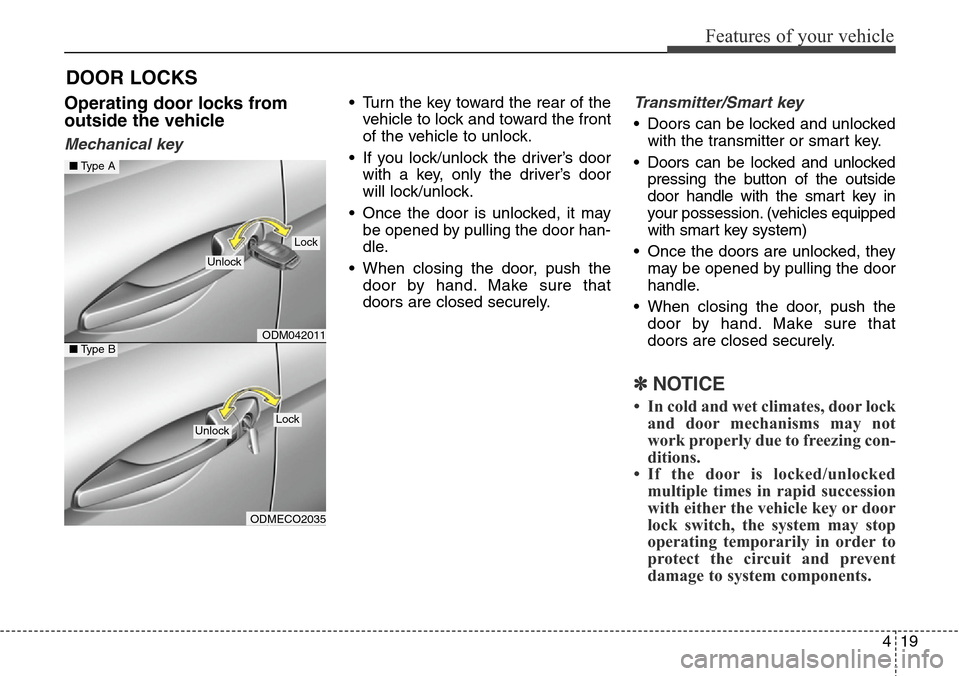
Mechanical key
• Turn the key toward the rear of the
vehicle to lock and toward the front
of the vehicle to unlock.
• If you lock/unlock the driver’s door
with a key, only the driver’s door
will lock/unlock.
• Once the door is unlocked, it may
be opened by pulling the door han-
dle.
• When closing the door, push the
door by hand. Make sure that
doors are closed securely.Transmitter/Smart key
• Doors can be locked and unlocked
with the transmitter or smart key.
• Doors can be locked and unlocked
pressing the button of the outside
door handle with the smart key in
your possession. (vehicles equipped
with smart key system)
• Once the doors are unlocked, they
may be opened by pulling the door
handle.
• When closing the door, push the
door by hand. Make sure that
doors are closed securely.
✽NOTICE
• In cold and wet climates, door lock
and door mechanisms may not
work properly due to freezing con-
ditions.
• If the door is locked/unlocked
multiple times in rapid succession
with either the vehicle key or door
lock switch, the system may stop
operating temporarily in order to
protect the circuit and prevent
damage to system components.
DOOR LOCKS
ODM042011
ODMECO2035
■Type A
■Type B
Lock
Unlock
LockUnlock
Page 121 of 711

Features of your vehicle
20 4
Operating door locks from
inside the vehicle
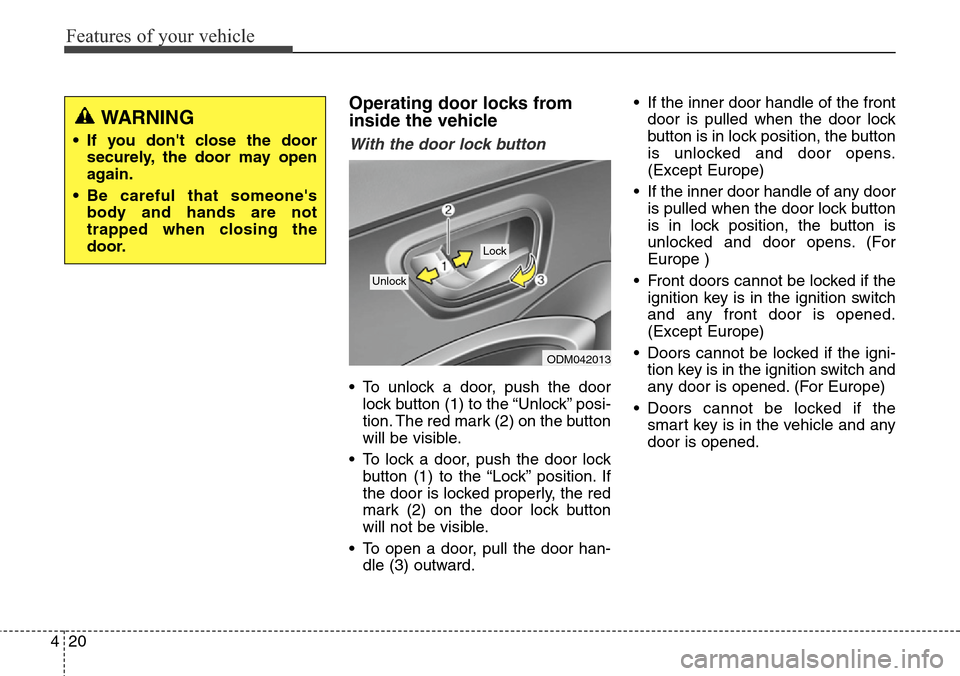
With the door lock button
• To unlock a door, push the door
lock button (1) to the “Unlock” posi-
tion. The red mark (2) on the button
will be visible.
• To lock a door, push the door lock
button (1) to the “Lock” position. If
the door is locked properly, the red
mark (2) on the door lock button
will not be visible.
• To open a door, pull the door han-
dle (3) outward.• If the inner door handle of the front
door is pulled when the door lock
button is in lock position, the button
is unlocked and door opens.
(Except Europe)
• If the inner door handle of any door
is pulled when the door lock button
is in lock position, the button is
unlocked and door opens. (For
Europe )
• Front doors cannot be locked if the
ignition key is in the ignition switch
and any front door is opened.
(Except Europe)
• Doors cannot be locked if the igni-
tion key is in the ignition switch and
any door is opened. (For Europe)
• Doors cannot be locked if the
smart key is in the vehicle and any
door is opened.
ODM042013
Lock
Unlock
WARNING
• If you don't close the door
securely, the door may open
again.
• Be careful that someone's
body and hands are not
trapped when closing the
door.
Page 123 of 711

Features of your vehicle
22 4
Deadlocks (if equipped)
Some vehicles are equipped with a
deadlock system. Deadlocks prevent
opening of a door from either inside
or outside the vehicle once the dead-
locks have been activated providing
an additional measure of vehicle
security.
To lock the vehicle using the deadlock
function, the doors must be locked by
using the transmitter or smart key. To
unlock the vehicle, the transmitter or
smart key must be used again.
Door lock/unlock features
Impact sensing door unlock sys-
tem
All doors will automatically unlock
when an impact causes the air bags
to deploy.
Speed sensing door lock system
(if equipped)
All doors will automatically lock after
the vehicle speed exceeds 15 km/h.
You can activate or deactivate the
auto door lock/unlock features in the
vehicle. Refer to "User setting" in this
section.
WARNING
Do not lock the doors with the
transmitter or the smart key
with anybody left in the vehicle.
The passenger in the vehicle
cannot unlock the doors with
the door lock button. For exam-
ple, if the door is locked with
the transmitter, the passenger
in the vehicle cannot unlock the
door without the transmitter.
WARNING- Unlocked
vehicles
Leaving your vehicle unlocked
can invite theft or possible harm
to you or others from someone
hiding in your vehicle while you
are gone. Always remove the
ignition key, engage the parking
brake, close all windows and
lock all doors when leaving
your vehicle unattended.
WARNING- Unattended
children
An enclosed vehicle can
become extremely hot, causing
death or severe injury to unat-
tended children or animals who
cannot escape the vehicle.
Furthermore, children might
operate features of the vehicle
that could injure them, or they
could encounter other harm,
possibly from someone gaining
entry to the vehicle. Never leave
children or animals unattended
in your vehicle.
Page 125 of 711

Features of your vehicle
24 4
Opening the tailgate
• The tailgate is locked or unlocked
when all doors are locked or
unlocked with the key, transmitter,
smart key or central door
lock/unlock switch.
• Only the tailgate is unlocked if the
tailgate unlock button on the trans-
mitter or smart key is pressed for
approximately 1 second.
• If unlocked, the tailgate can be
opened by pressing the handle and
pulling it up.
• Once the tailgate is opened and
then closed, the tailgate locks auto-
matically. (All doors must be locked.)
✽NOTICE
In cold and wet climates, door lock
and door mechanisms may not work
properly due to freezing conditions.
Closing the tailgate
Lower and push down the tailgate
firmly. Make sure that the tailgate is
securely latched.
TAILGATE
ODM042016
WARNING
The tailgate swings upward.
Make sure no objects or people
are near the rear of the vehicle
when opening the tailgate.
CAUTION
Make certain that you close the
tailgate before driving your
vehicle. Possible damage may
occur to the tailgate lift cylin-
ders and attaching hardware if
the tailgate is not closed prior to
driving.
ODM042017
WARNING
Make sure your hands, feet and
other parts of your body are
safely out of the way before
closing the tailgate.
Page 134 of 711

433
Features of your vehicle
Closing the hood
1. Before closing the hood, check the
following:
• All filler caps in engine compart-
ment must be correctly installed.
• Gloves, rags or any other com-
bustible material must be
removed from the engine com-
partment.
2. Lower the hood halfway and push
it down. Make sure the hood is
locked securelyWARNING
• Always double check to be
sure that the hood is firmly
latched before driving away. If
it is not latched, the hood
could fly open while the vehi-
cle is being driven, causing a
total loss of visibility, which
might result in an accident.
• Do not move the vehicle with
the hood raised. The view will
be blocked and the hood
could fall or be damaged.
WARNING
When you check the engine
compartment, please make sure
your head is not injured by the
hood safety hook which is
located inside of the hood.WARNING - Hood
• Before closing the hood,
ensure that all obstructions
are removed from the hood
opening. Closing the hood
with an obstruction present in
the hood opening may result
in property damage or severe
personal injury.
• Do not leave gloves, rags or
any other combustible materi-
al in the engine compartment.
Doing so may cause a heat-
induced fire.
ODMNMC2034
Page 135 of 711

Features of your vehicle
34 4
Opening the fuel filler lid
The fuel-filler lid must be opened
from inside the vehicle by pulling up
on the fuel-filler lid opener located on
the driver’s door.
✽NOTICE
If the fuel-filler lid will not open
because ice has formed around it,
tap lightly or push on the lid to break
the ice and release the lid. Do not pry
on the lid. If necessary, spray around
the lid with an approved de-icer fluid
(do not use radiator anti-freeze) or
move the vehicle to a warm place
and allow the ice to melt.
1. Stop the engine.
2. To open the fuel filler lid, pull the
fuel filler lid opener up.
3. Pull the fuel filler lid (1) out to fully
open.
4. To remove the cap (2), turn the
fuel tank cap counterclockwise.
5. Refuel as needed.
Closing the fuel filler lid
1. To install the cap, turn it clockwise
until it “clicks”. This indicates that
the cap is securely tightened.
2. To close the lid, press the edge of
the lid. Make sure it is securely
closed.
FUEL FILLER LID
ODM042025
ODM042026
WARNING - Refueling
• If pressurized fuel sprays out,
it can cover your clothes or
skin and thus subject you to
the risk of fire and burns.
Always remove the fuel cap
carefully and slowly. If the cap
is venting fuel or if you hear a
hissing sound, wait until the
condition stops before com-
pletely removing the cap.
• Do not "top off" after the noz-
zle automatically shuts off
when refueling.
• Always check that the fuel cap
is installed securely to pre-
vent fuel spillage in the event
of an accident.
Page 137 of 711

Features of your vehicle
36 4
Emergency fuel filler lid
release
If the fuel filler lid does not open
using the remote fuel filler lid
release, you can open it manually.
Remove the panel in the luggage
compartment area. Pull the handle
out slightly.
(Continued)
• When refueling, always shut
the engine off. Sparks pro-
duced by electrical compo-
nents related to the engine
can ignite fuel vapors causing
a fire. Once refueling is com-
plete, check to make sure the
filler cap and filler door are
securely closed, before start-
ing the engine.
• DO NOT use matches or a
lighter and DO NOT SMOKE or
leave a lit cigarette in your
vehicle while at a gas station
especially during refueling.
Automotive fuel is highly
flammable and can, when
ignited, result in fire.
• If a fire breaks out during refu-
eling, leave the vicinity of the
vehicle, and immediately con-
tact the manager of the gas
station and then contact the
local fire department. Follow
any safety instructions they
provide.CAUTION
• Make sure to refuel your vehi-
cle according to the "Fuel
requirements" suggested in
section 1.
• If the fuel filler cap requires
replacement, please make
sure that you use parts
designed for replacement in
your vehicle. An incorrect fuel
filler cap can result in a seri-
ous malfunction of the fuel
system or emission control
system. For more detailed
information, we recommend
that you contact an authorized
HYUNDAI dealer.
• Do not spill fuel on the exteri-
or surfaces of the vehicle. Any
type of fuel spilled on painted
surfaces may damage the
paint.
• After refueling, make sure the
fuel cap is installed securely
to prevent fuel spillage in the
event of an accident.
CAUTION
Do not pull the handle exces-
sively, otherwise the luggage
compartment area trim or
release handle may be damaged.
ODM042027