2013 Hyundai Santa Fe wheel
[x] Cancel search: wheelPage 12 of 711
17
Introduction
No special break-in period is need-
ed. By following a few simple precau-
tions for the first 1,000 km (600
miles) you may add to the perform-
ance, economy and life of your vehi-
cle.
• Do not race the engine.
• While driving, keep your engine
speed (rpm, or revolutions per
minute) between 2,000 rpm and
4,000 rpm.
• Do not maintain a single speed for
long periods of time, either fast or
slow. Varying engine speed is
needed to properly break-in the
engine.
• Avoid hard stops, except in emer-
gencies, to allow the brakes to seat
properly.
• Don't tow a trailer during the first
2,000 km (1,200 miles) of opera-
tion.As with other vehicles of this type,
failure to operate this vehicle correct-
ly may result in loss of control, an
accident or vehicle rollover.
Specific design characteristics (high-
er ground clearance, track, etc.) give
this vehicle a higher center of gravity
than other types of vehicles. In other
words they are not designed for cor-
nering at the same speeds as con-
ventional 2-wheel drive vehicles.
Avoid sharp turns or abrupt maneu-
vers. Again, failure to operate this
vehicle correctly may result in loss of
control, an accident or vehicle
rollover.Be sure to read the
“Reducing the risk of a rollover”
driving guidelines, in section 5 of
this manual.
VEHICLE HANDLING
INSTRUCTIONS VEHICLE BREAK-IN
PROCESS
Page 14 of 711

Your vehicle at a glance
2 2
EXTERIOR OVERVIEW
1. Towing hook ........................................... 6-32
2. Front windshield wiper blades ................7-52
3. Outside rearview mirror ..........................4-54
4. Door locks...............................................4-19
5. Headlamp ...............................................7-88
6. Front fog light ........................................4-127
7. Hood .......................................................4-32
8. Tires and wheels .............................7-58, 8-4
9. Panorama sunroof ..................................4-37
ODM012001
■Front view
❈The actual shape may differ from the illustration.
Page 16 of 711
Your vehicle at a glance
4 2
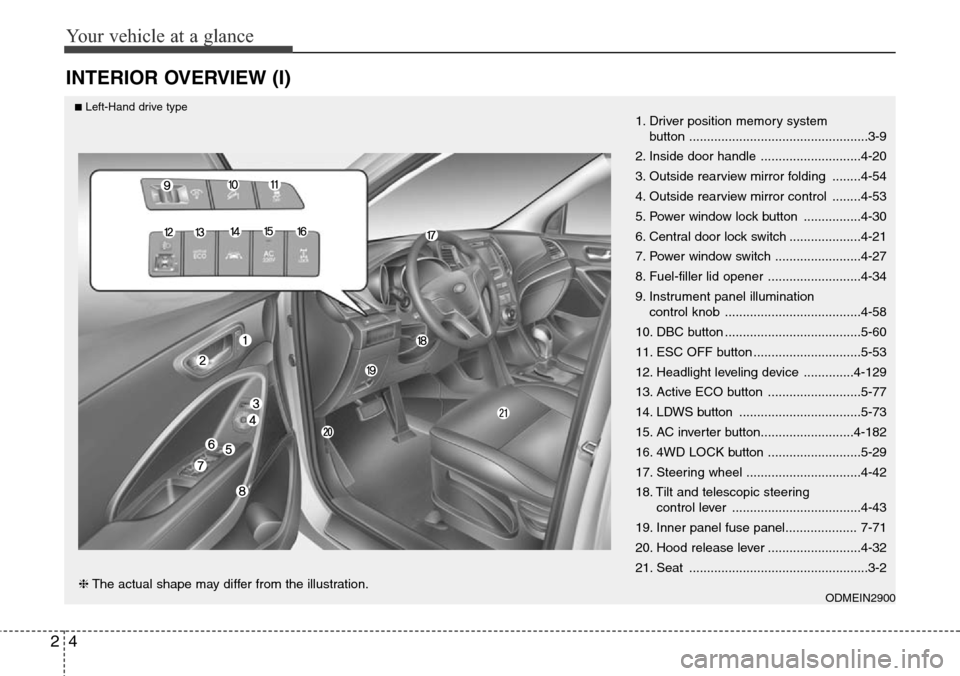
INTERIOR OVERVIEW (I)
1. Driver position memory system
button ..................................................3-9
2. Inside door handle ............................4-20
3. Outside rearview mirror folding ........4-54
4. Outside rearview mirror control ........4-53
5. Power window lock button ................4-30
6. Central door lock switch ....................4-21
7. Power window switch ........................4-27
8. Fuel-filler lid opener ..........................4-34
9. Instrument panel illumination
control knob ......................................4-58
10. DBC button ......................................5-60
11. ESC OFF button ..............................5-53
12. Headlight leveling device ..............4-129
13. Active ECO button ..........................5-77
14. LDWS button ..................................5-73
15. AC inverter button..........................4-182
16. 4WD LOCK button ..........................5-29
17. Steering wheel ................................4-42
18. Tilt and telescopic steering
control lever ....................................4-43
19. Inner panel fuse panel.................... 7-71
20. Hood release lever ..........................4-32
21. Seat ..................................................3-2
ODMEIN2900❈The actual shape may differ from the illustration.
■Left-Hand drive type
Page 17 of 711
25
Your vehicle at a glance
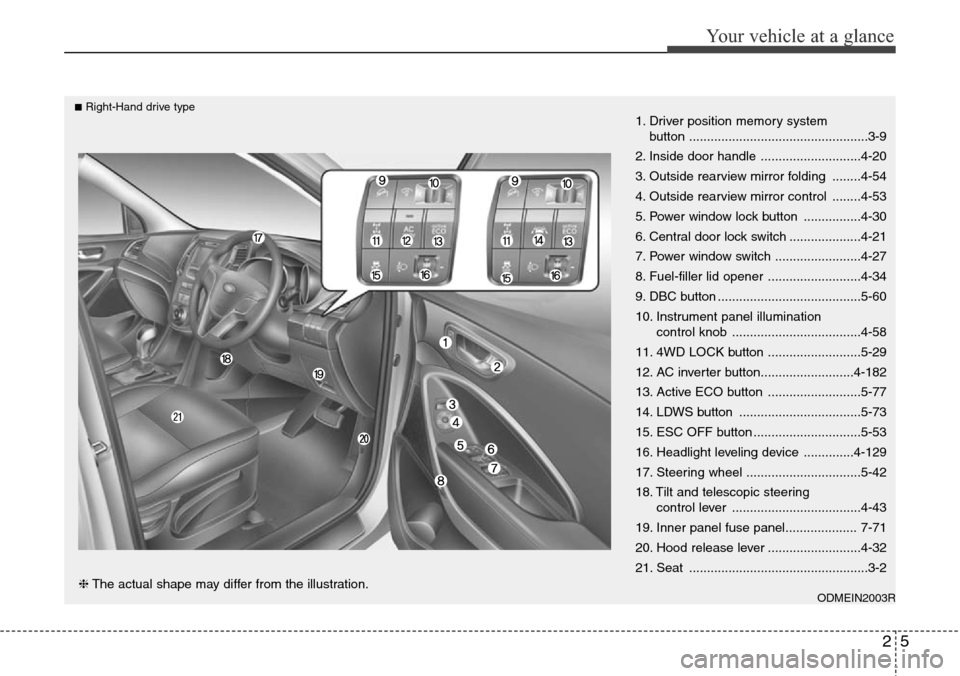
1. Driver position memory system
button ..................................................3-9
2. Inside door handle ............................4-20
3. Outside rearview mirror folding ........4-54
4. Outside rearview mirror control ........4-53
5. Power window lock button ................4-30
6. Central door lock switch ....................4-21
7. Power window switch ........................4-27
8. Fuel-filler lid opener ..........................4-34
9. DBC button ........................................5-60
10. Instrument panel illumination
control knob ....................................4-58
11. 4WD LOCK button ..........................5-29
12. AC inverter button..........................4-182
13. Active ECO button ..........................5-77
14. LDWS button ..................................5-73
15. ESC OFF button ..............................5-53
16. Headlight leveling device ..............4-129
17. Steering wheel ................................5-42
18. Tilt and telescopic steering
control lever ....................................4-43
19. Inner panel fuse panel.................... 7-71
20. Hood release lever ..........................4-32
21. Seat ..................................................3-2
ODMEIN2003R❈The actual shape may differ from the illustration.
■Right-Hand drive type
Page 30 of 711
35
Safety features of your vehicle
Front seat adjustment - Manual
(if equipped)
Forward and backward
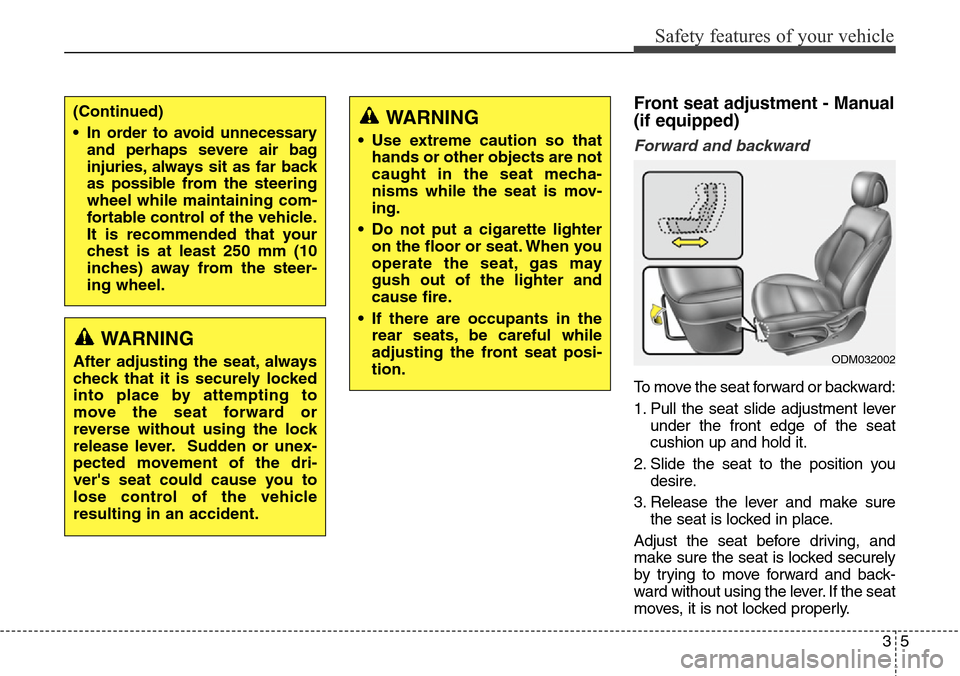
To move the seat forward or backward:
1. Pull the seat slide adjustment lever
under the front edge of the seat
cushion up and hold it.
2. Slide the seat to the position you
desire.
3. Release the lever and make sure
the seat is locked in place.
Adjust the seat before driving, and
make sure the seat is locked securely
by trying to move forward and back-
ward without using the lever. If the seat
moves, it is not locked properly.
WARNING
After adjusting the seat, always
check that it is securely locked
into place by attempting to
move the seat forward or
reverse without using the lock
release lever. Sudden or unex-
pected movement of the dri-
ver's seat could cause you to
lose control of the vehicle
resulting in an accident.
(Continued)
• In order to avoid unnecessary
and perhaps severe air bag
injuries, always sit as far back
as possible from the steering
wheel while maintaining com-
fortable control of the vehicle.
It is recommended that your
chest is at least 250 mm (10
inches) away from the steer-
ing wheel.WARNING
• Use extreme caution so that
hands or other objects are not
caught in the seat mecha-
nisms while the seat is mov-
ing.
• Do not put a cigarette lighter
on the floor or seat. When you
operate the seat, gas may
gush out of the lighter and
cause fire.
• If there are occupants in the
rear seats, be careful while
adjusting the front seat posi-
tion.
ODM032002
Page 32 of 711
37
Safety features of your vehicle
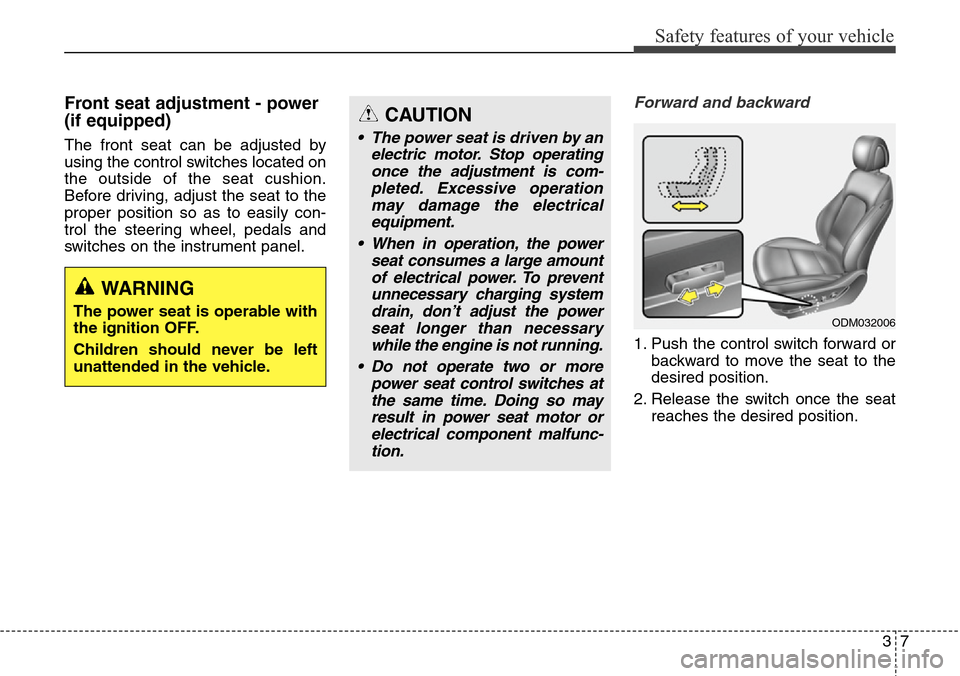
Front seat adjustment - power
(if equipped)
The front seat can be adjusted by
using the control switches located on
the outside of the seat cushion.
Before driving, adjust the seat to the
proper position so as to easily con-
trol the steering wheel, pedals and
switches on the instrument panel.
Forward and backward
1. Push the control switch forward or
backward to move the seat to the
desired position.
2. Release the switch once the seat
reaches the desired position.
CAUTION
• The power seat is driven by an
electric motor. Stop operating
once the adjustment is com-
pleted. Excessive operation
may damage the electrical
equipment.
• When in operation, the power
seat consumes a large amount
of electrical power. To prevent
unnecessary charging system
drain, don’t adjust the power
seat longer than necessary
while the engine is not running.
• Do not operate two or more
power seat control switches at
the same time. Doing so may
result in power seat motor or
electrical component malfunc-
tion.
WARNING
The power seat is operable with
the ignition OFF.
Children should never be left
unattended in the vehicle.ODM032006
Page 76 of 711

351
Safety features of your vehicle
How does the air bag system
operate
• Air bags are activated (able to
inflate if necessary) only when the
ignition switch is turned to the ON
or START position.
• Air bags inflate instantly in the
event of serious frontal or side col-
lision (if equipped with side impact
air bag or curtain air bag) in order
to help protect the occupants from
serious physical injury.
✽NOTICE - if equipped with
rollover sensor
Also, the air bags inflate instantly in
the event of a rollover (if equipped
with a side airbag or curtain air bag)
in order to help protect the occu-
pants from serious physical injury.
• There is no single speed at which
the air bags will inflate.
Generally, air bags are designed to
inflate based upon the severity of a
collision and its direction. These
two factors determine whether the
sensors produce an electronic
deployment/inflation signal.
• Air bag deployment depends on a
number of factors including vehicle
speed, angles of impact and the
density and stiffness of the vehi-
cles or objects which your vehicle
hits in the collision. The determin-
ing, factors are not limited to those
mentioned above.
• The front air bags will completely
inflate and deflate in an instant.
It is virtually impossible for you to
see the air bags inflate during an
accident. It is much more likely that
you will simply see the deflated air
bags hanging out of their storage
compartments after the collision.• In order to help provide protection
in a severe collision, the air bags
must inflate rapidly. The speed of
air bag inflation is a consequence
of extremely short time in which a
collision occurs and the need to
get the air bag between the occu-
pant and the vehicle structures
before the occupant impacts those
structures. This speed of inflation
reduces the risk of serious or life-
threatening injuries in a severe col-
lision and is thus a necessary part
of air bag design.
However, air bag inflation can also
cause injuries which can include
facial abrasions, bruises and bro-
ken bones because the inflation
speed also causes the air bags to
expand with a great deal of force.
• There are even circumstances
under which contact with the
steering wheel air bag can cause
fatal injuries, especially if the
occupant is positioned exces-
sively close to the steering wheel.(Continued)
• Keep the SRS parts and
wirings away from water or
any liquid. If the SRS compo-
nents are inoperative due to
exposure to water or liquids, it
may cause fire or severe
injury.
Page 77 of 711

Safety features of your vehicle
52 3
Noise and smoke
When the air bags inflate, they make
a loud noise and they leave smoke
and powder in the air inside of the
vehicle. This is normal and is a result
of the ignition of the air bag inflator.
After the air bag inflates, you may
feel substantial discomfort in breath-
ing due to the contact of your chest
with both the seat belt and the air
bag, as well as from breathing the
smoke and powder.Open your
doors and/or windows as soon as
possible after impact in order to
reduce discomfort and prevent
prolonged exposure to the smoke
and powder.
Though smoke and powder are non-
toxic, it may cause irritation to the
skin (eyes, nose and throat, etc.). If
this is the case, wash and rinse with
cold water immediately and consult
the doctor if the symptom persists.WARNING
• To avoid severe personal
injury or death caused by
deploying air bags in a colli-
sion, the driver should sit as
far back from the steering
wheel air bag as possible (at
least 250 mm (10 inches)
away). The front passenger
should always move their seat
as far back as possible and sit
back in their seat.
• Air bag inflates instantly in an
event of a collision, passen-
gers may be injured by the air
bag expansion force if they
are not in a proper position.
• Air bag inflation may cause
injuries including facial or
bodily abrasions, injuries
from broken glasses or burns.
WARNING
When the air bags deploy, the
air bag related parts in the
steering wheel, instrument
panel and/or in both sides of the
roof rails above the front and
rear doors are very hot. To pre-
vent injury, do not touch the air
bag storage areas internal com-
ponents immediately after an
air bag has inflated.