2013 HYUNDAI I40 length
[x] Cancel search: lengthPage 45 of 534

Downloaded from www.Manualslib.com manuals search engine 321
Safety system of your vehicle
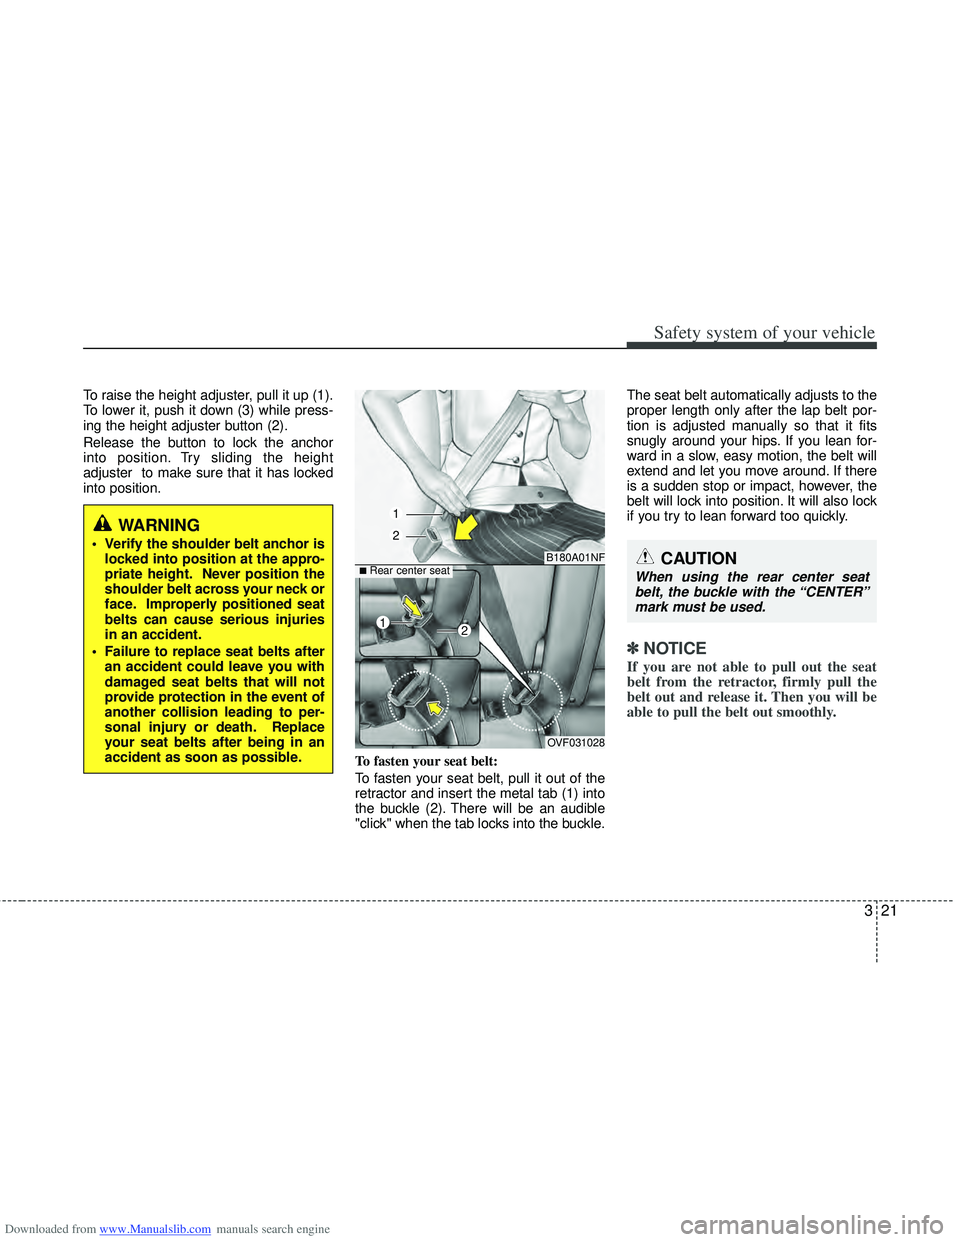
To raise the height adjuster, pull it up (1).
To lower it, push it down (3) while press-
ing the height adjuster button (2).
Release the button to lock the anchor
into position. Try sliding the height
adjuster to make sure that it has locked
into position.To fasten your seat belt:
To fasten your seat belt, pull it out of the
retractor and insert the metal tab (1) into
the buckle (2). There will be an audible
"click" when the tab locks into the buckle.The seat belt automatically adjusts to the
proper length only after the lap belt por-
tion is adjusted manually so that it fits
snugly around your hips. If you lean for-
ward in a slow, easy motion, the belt will
extend and let you move around. If there
is a sudden stop or impact, however, the
belt will lock into position. It will also lock
if you try to lean forward too quickly.
✽ ✽
NOTICE
If you are not able to pull out the seat
belt from the retractor, firmly pull the
belt out and release it. Then you will be
able to pull the belt out smoothly.
WARNING
Verify the shoulder belt anchor is
locked into position at the appro-
priate height. Never position the
shoulder belt across your neck or
face. Improperly positioned seat
belts can cause serious injuries
in an accident.
Failure to replace seat belts after an accident could leave you with
damaged seat belts that will not
provide protection in the event of
another collision leading to per-
sonal injury or death. Replace
your seat belts after being in an
accident as soon as possible.B180A01NF
1
2
OVF031028
■Rear center seatCAUTION
When using the rear center seatbelt, the buckle with the “CENTER”mark must be used.
12
Page 238 of 534

Downloaded from www.Manualslib.com manuals search engine 4151
Features of your vehicle
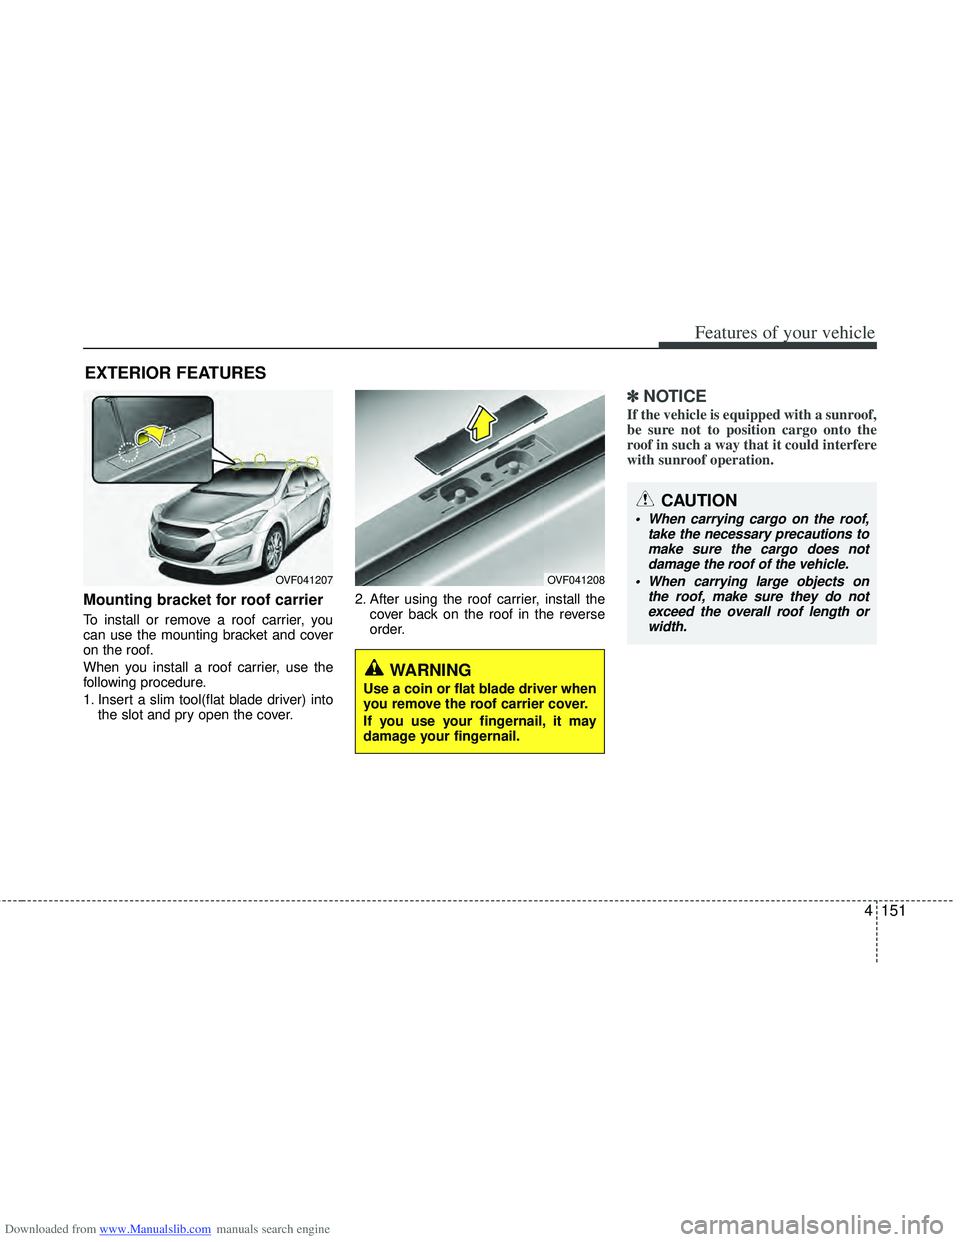
Mounting bracket for roof carrier
To install or remove a roof carrier, you
can use the mounting bracket and cover
on the roof.
When you install a roof carrier, use the
following procedure.
1. Insert a slim tool(flat blade driver) intothe slot and pry open the cover. 2. After using the roof carrier, install the
cover back on the roof in the reverse
order.
✽ ✽NOTICE
If the vehicle is equipped with a sunroof,
be sure not to position cargo onto the
roof in such a way that it could interfere
with sunroof operation.
EXTERIOR FEATURES
OVF041207OVF041208
WARNING
Use a coin or flat blade driver when
you remove the roof carrier cover.
If you use your fingernail, it may
damage your fingernail.
CAUTION
When carrying cargo on the roof,
take the necessary precautions tomake sure the cargo does not damage the roof of the vehicle.
When carrying large objects on the roof, make sure they do notexceed the overall roof length or width.
Page 289 of 534

Downloaded from www.Manualslib.com manuals search engine Features of your vehicle
202
4
✽
✽
NOTICE
- The system can recognize single digits
from zero to nine. Numbers that are
ten or greater cannot be recognized.
- You can enter each digit individually or group digits together in preferred
string lengths.
- To speed up input, it is a good idea to group all digits into a continuous
string.
- Recommend to enter the numbers con- stituted an grouping within all digit
numbers to dial 995 / 734 / 0000.
- The display corresponding to each operation appears on the screen as fol-
lows:
Input operation example: 1. Say: “Nine, nine, five”
\b Display: “995”
2. And say: “Seven, three, four”
\b Display: “995734”
1. Press button.
2. Say “Phonebook”.
3. Say “Add Entry” after prompt.
4. Say “By Phone” to proceed.
5. Say “Yes” to confirm.
6. Your phone will start to transfer phone/contact list to the audio system.
This process may take over 10 minutes
depending on the phone model and
number of entries
7. Wait till the audio displays “Transfer Complete” message.
Changing Name
The registered names can be modified.
1. Press button.
2. Say “Phonebook”.
3. Say “Change Name” after prompt.
4. Say the name of the entry (voice tag).
5. Say “Yes” to confirm.
6. Say new desired name.
Deleting Name
The registered names can be deleted.
1. Press button.
2. Say “Phonebook”.
3. Say “Delete Name” after prompt.
4. Say the name of the entry (voice tag).
5. Say “Yes” to confirm.
■Making a Phone Call
A phone call can be made by speaking
names registered in the audio system.
1. Press button.
2. Say “Call”.
3. Say “Name” when prompted.
4. Say desired name (voice tag).
5. Say desired location (phone number type). Only stored locations can be
selected.
6. Say “Yes” to confirm and make a call.
✽ ✽ Tip
A shortcut to each of the following func-
tions is available:
1. Say “Call Name”
2. Say “Call
3. Say “Call
Page 368 of 534

Downloaded from www.Manualslib.com manuals search engine 575
Driving your vehicle
Trailer brakes
If your trailer is equipped with a braking
system, make sure it conforms to your
country’s regulations and that it is prop-
erly installed and operating correctly.
If your trailer weight exceeds the maxi-
mum allowed weight without trailer
brakes, then the trailer will also require its
own brakes as well. Be sure to read and
follow the instructions for the trailer
brakes so you’ll be able to install, adjust
and maintain them properly.
Do not tap into or modify your vehicle'sbrake system.
Driving with a trailer
Towing a trailer requires a certain
amount of experience. Before setting out
for the open road, you must get to know
your trailer. Acquaint yourself with the
feel of handling and braking with the
added weight of the trailer. And always
keep in mind that the vehicle you are
driving is now a good deal longer and not
nearly so responsive as your vehicle is
by itself.
Before you start, check the trailer hitch
and platform, safety chains, electrical
connector(s), lights, tires and mirror
adjustment. If the trailer has electric
brakes, start your vehicle and trailer mov-
ing and then apply the trailer brake con-
troller by hand to be sure the brakes are
working. This lets you check your electri-
cal connection at the same time.
During your trip, check occasionally to be
sure that the load is secure, and that the
lights and any trailer brakes are still work-
ing.
Following distance
Stay at least twice as far behind the vehi-
cle ahead as you would when driving
your vehicle without a trailer. This can
help you avoid situations that require
heavy braking and sudden turns.
Passing
You’ll need more passing distance up
ahead when you’re towing a trailer. And,
because of the increased vehicle length,
you’ll need to go much farther beyond the
passed vehicle before you can return to
your lane.
Backing up
Hold the bottom of the steering wheel
with one hand. Then, to move the trailer
to the left, just move your hand to the left.
To move the trailer to the right, move your
hand to the right. Always back up slowly
and, if possible, have someone guide
you.
Making turns
When you’re turning with a trailer, make
wider turns than normal. Do this so your
trailer won’t strike soft shoulders, curbs,
road signs, trees, or other objects. Avoid
jerky or sudden maneuvers. Signal well
in advance.
WARNING- Trailer brakes
Do not use a trailer with its own
brakes unless you are absolutely
certain that you have properly set
up the brake system. This is not a
task for amateurs. Use an experi-
enced, competent trailer shop for
this work.
Page 515 of 534

Downloaded from www.Manualslib.com manuals search engine Specifications & Consumer information
28
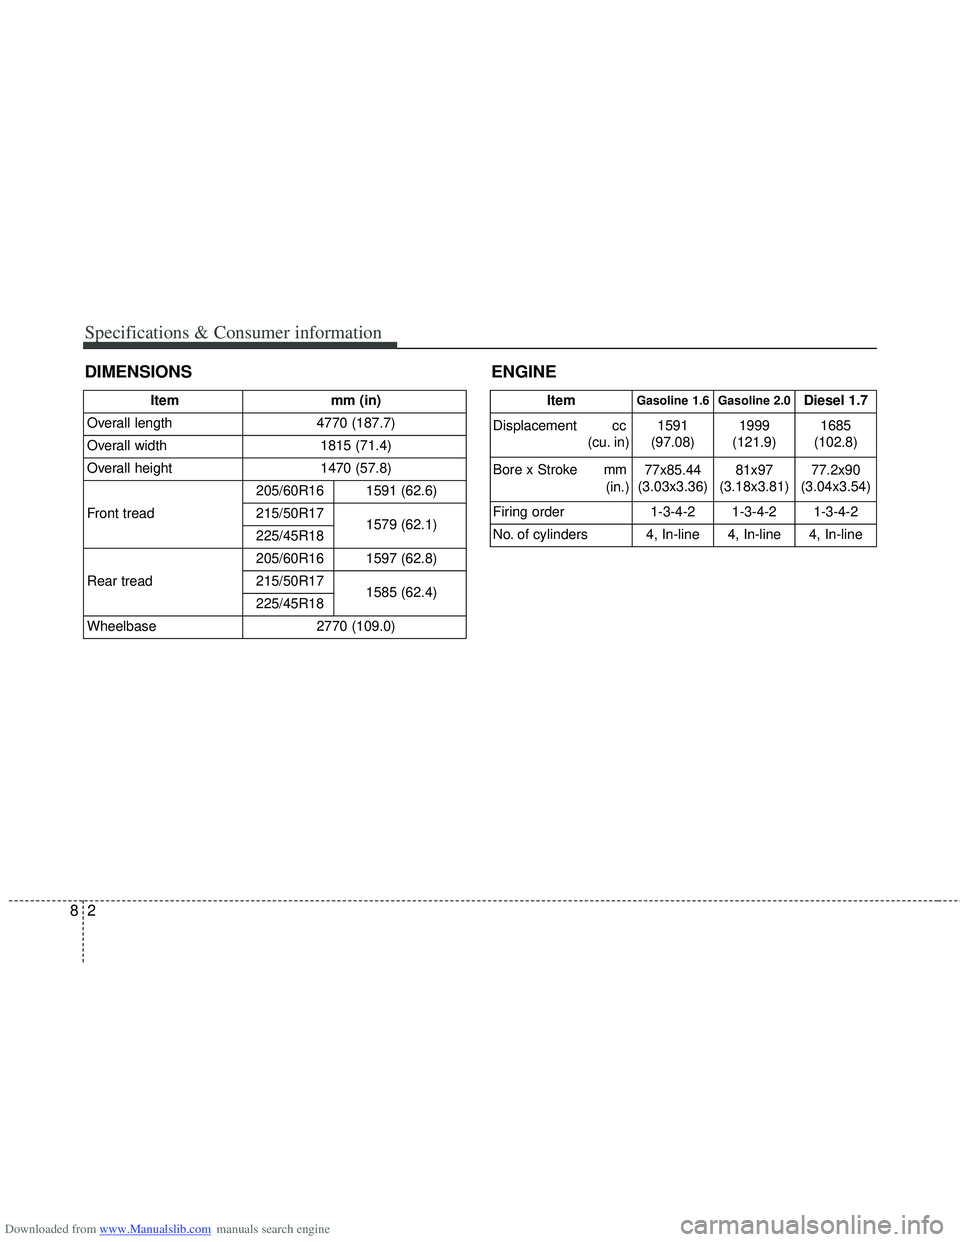
DIMENSIONSENGINE
ItemGasoline 1.6 Gasoline 2.0Diesel 1.7
Displacement cc (cu. in) 1591
(97.08) 1999
(121.9) 1685
(102.8)
Bore x Stroke mm (in.)77x85.44
(3.03x3.36) 81x97
(3.18x3.81) 77.2x90
(3.04x3.54)
Firing order 1-3-4-2 1-3-4-2 1-3-4-2
No. of cylinders 4, In-line 4, In-line 4, In-lineItemmm (in)
Overall length4770 (187.7)
Overall width1815 (71.4)
Overall height 1470 (57.8)
Front tread
205/60R161591 (62.6)
215/50R171579 (62.1)225/45R18
Rear tread
205/60R161597 (62.8)
215/50R171585 (62.4)225/45R18
Wheelbase2770 (109.0)