2013 HYUNDAI I40 engine overheat
[x] Cancel search: engine overheatPage 393 of 534

Downloaded from www.Manualslib.com manuals search engine What to do in an emergency
18
6
TPMS (Tire Pressure
Monitoring System)
malfunction indicator
The TPMS malfunction indicator will
illuminate after it blinks for approxi-
mately one minute when there is a
problem with the Tire Pressure
Monitoring System. If the system is
able to correctly detect an under infla-
tion warning at the same time as sys-
tem failure then the TPMS malfunc-
tion indicator remains illuminated
after blinking for approximately 1
minute and the low tire pressure posi-
tion telltale will illuminate e.g. if Front
Left sensor fails, the TPMS malfunc-
tion indicator remains illuminated
after blinking for approximately 1
minute, but if the Front Right, Rear
Left, or Rear Right tire is under-inflat-
ed, the low tire pressure position tell-
tales may illuminate together with the
TPMS malfunction indicator.
Have the system checked by an
authorized HYUNDAI dealer as soon
as possible to determine the cause
of the problem.
WARNING - Low pressure damage
Significantly low tire pressure
makes the vehicle unstable and
can contribute to loss of vehicle
control and increased braking
distances.
Continued driving on low pres-
sure tires can cause the tires to
overheat and fail.CAUTION
In winter or cold weather, the low tire pressure telltale mayilluminate if the tire pressurewas adjusted to the recom-mended tire inflation pressurein warm weather. It does notmean your TPMS is malfunction-ing because the decreased tem-perature leads to a proportionallowering of tire pressure.
When you drive your vehiclefrom a warm area to a cold areaor from a cold area to a warmarea, or the outside temperatureis greatly higher or lower, youshould check the tire inflationpressure and adjust the tires tothe recommended tire inflationpressure.
Page 399 of 534

Downloaded from www.Manualslib.com manuals search engine What to do in an emergency
24
6
Distributing the sealant
Immediately drive approximately 3 km
(2 miles) to evenly distribute the
sealant in the tire. Producing the tire inflation pres-
sure
1) After driving approximately 3 km (2
miles), stop at a suitable location.
2) Connect connection hose 9 of the compressor directly to the tire
valve.
3) Connect between compressor and the vehicle power outlet using
the cable and connectors.
4) Adjust the tire inflation pressure to the recommended tire pressure in
section 8. With the ignition
switched on, proceed as follows.
- To increase the inflation pres- sure: Switch on the compressor,
position I. To check the current
inflation pressure setting, briefly
switch off the compressor. - To reduce the inflation pres-
sure: Press the button 8 on the
compressor.
WARNING
Do not let the compressor run for
more than 10 minutes, otherwise
the device will overheat and may
be damaged.
WARNING
The tire inflation pressure must
be at least 200 kPa (29 psi). If it is
not, do not continue driving. Call
for road side service or towing.
CAUTION
Do not exceed a speed of 80 km/h (50 mph). If possible, donot fall below a speed of 20km/h (12 mph).
While driving, if you experienceany unusual vibration, ride dis-turbance or noise, reduce yourspeed and drive with cautionuntil you can safely pull off ofthe side of the road.
Call for road side service or tow-ing.
CAUTION
If the inflation pressure is notmaintained, drive the vehicle asecond time, refer toDistributing the sealant. Thenrepeat steps 1 to 4.
Use of the TireMobilityKit maybe ineffectual for tire damagelarger than approximately 4 mm(0.16 in).
Please contact the nearestHYUNDAI dealer, or a workshopthat works according toHYUNDAI repair procedureswith correspondingly trainedpersonnel if the tire cannot bemade roadworthy with theTireMobilityKit.
Page 400 of 534

Downloaded from www.Manualslib.com manuals search engine 625
What to do in an emergency
Notes on the safe use of the
TireMobilityKit
Park your car at the side of theroad so that you can work with the
TireMobilityKit away from moving
traffic. Place your warning triangle
in a prominent place to make pass-
ing vehicles aware of your location.
To be sure your vehicle won't move, even when you're on fairly
level ground, always set your park-
ing brake.
Only use the TireMobilityKit for sealing/inflation passenger car
tires. Do not use on motorcycles,
bicycles or any other type of tires.
Do not remove any foreign objects- such as nails or screws -that have
penetrated the tire.
Before using the TireMobilityKit, read the precautionary advice
printed on the sealant bottle!
Provided the car is outdoors, leave the engine running. Otherwise
operating the compressor may
eventually drain the car battery.
Never leave the TireMobilityKit unattended while it is being used.
Do not leave the compressor run- ning for more than 10 min. at a time
or it may overheat. Do not use the TireMobilityKit if the
ambient temperature is below -
30°C (-22°F).
Do not use the sealing compound after its expiration date which can
be found on the label of the bottle.
Keep away from children. Technical Data
System voltage: DC 12 V
Working voltage: DC 10 - 15 V
Amperage rating: max. 15 A
Suitable for use at temperatures:
-30 ~ +70°C (-22 ~ +158°F)
Max. working pressure: 6 bar (87 psi)
Size
Compressor: 168 x 150 x 68 mm (6.6 x 5.9 x 2.7 in.)
Sealant bottle: 104 x ø 85 mm (4.1 x ø 3.3 in.)
Compressor weight: 1.05 kg (2.31 lbs)
Sealant volume: 300 ml (18.3 cu. in.)
✽ ✽NOTICE
Sealing compound and spare parts can
be obtained and replaced at an author-
ized vehicle or tire dealer. Empty sealing
compound bottles may be disposed of at
home. Liquid residue from the sealing
compound should be disposed of by your
vehicle or tire dealer or in accordance
with local waste disposal regulations.
WARNING
Have your tire repaired as soon
as possible. The tire may loose
air pressure at any time after
inflating with the TMK.
CAUTION
The Tire Mobility Kit is a tempo-
rary fix to the tire and the tireshould be inspected by anauthorized HYUNDAI dealer assoon as possible.
CAUTION -TPMS
(if equipped
)
When using Tire Mobility Kit, thetire sealant can damage the tirepressure sensor. After using theTire Mobility Kit, have the tirepressure sensor checked by anauthorized HYUNDAI dealer.
Page 404 of 534

Downloaded from www.Manualslib.com manuals search engine 629
What to do in an emergency
Use a towing strap less than 5 m (16feet) long. Attach a white or red cloth
(about 30 cm (12 inches) wide) in the
middle of the strap for easy visibility.
Drive carefully so that the towing strap is not loosened during towing.
Emergency towing precautions
Turn the ignition switch to ACC so thesteering wheel isn’t locked.
Place the transaxle shift lever in N (Neutral).
Release the parking brake.
Press the brake pedal with more force than normal since you will have
reduced brake performance.
More steering effort will be required because the power steering system
will be disabled.
If you are driving down a long hill, the brakes may overheat and brake per-
formance will be reduced. Stop often
and let the brakes cool off.
OXM069009
CAUTION - Automatic transaxle
If the car is being towed with all
four wheels on the ground, it canbe towed only from the front. Besure that the transaxle is in neu-tral. Be sure the steering isunlocked by placing the ignition switch in the ACC position. Adriver must be in the towed vehi- cle to operate the steering andbrakes.
To avoid serious damage to the automatic transaxle, limit thevehicle speed to 15 km/h (10 mph)and drive less than 1.5 km (1mile) when towing.
Before towing, check the auto- matic transaxle fluid leak underyour vehicle. If the automatic transaxle fluid is leaking, aflatbed equipment or towing dollymust be used.
Page 492 of 534

Downloaded from www.Manualslib.com manuals search engine 787
Maintenance
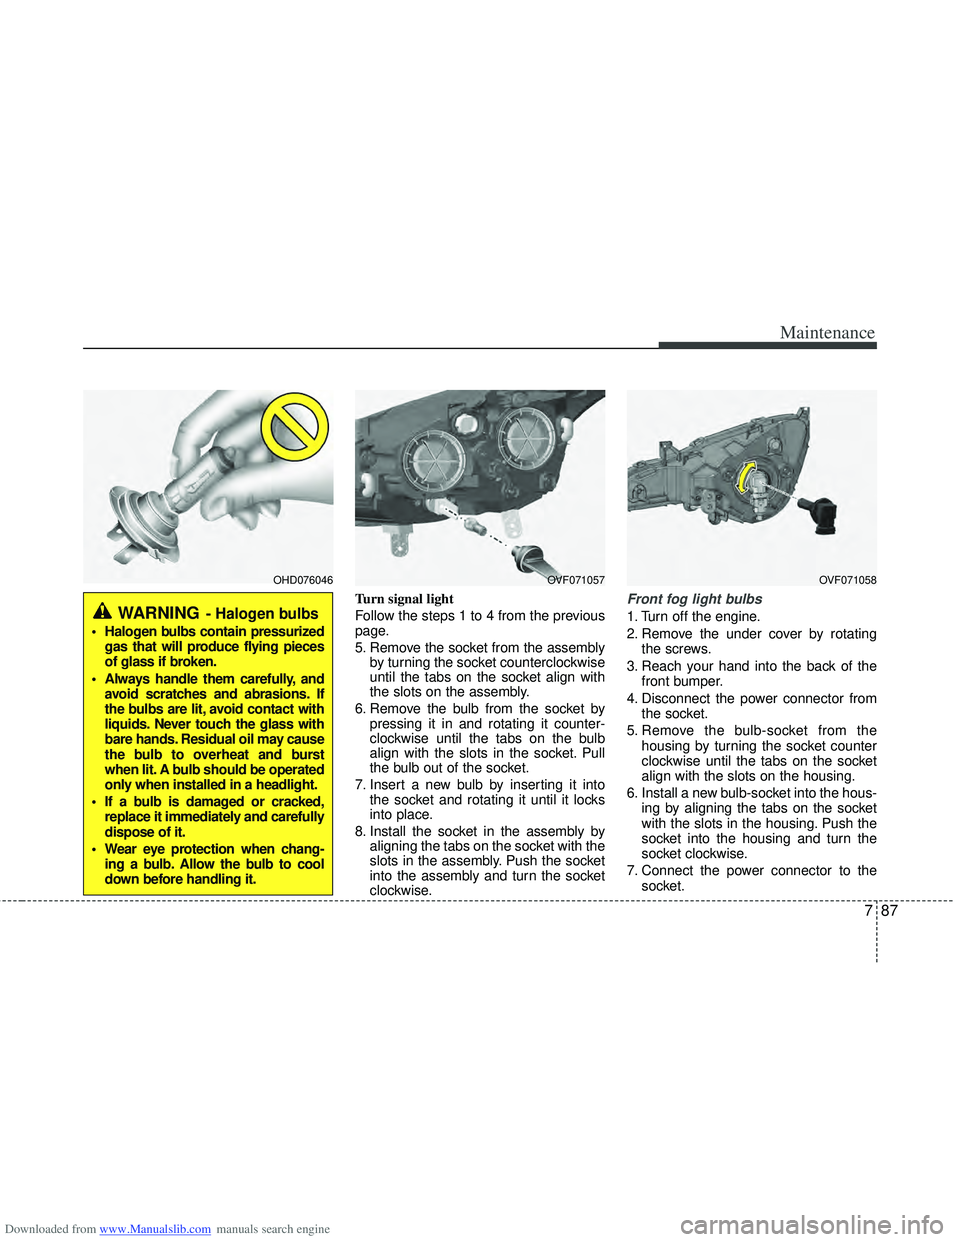
Turn signal light
Follow the steps 1 to 4 from the previous
page.
5. Remove the socket from the assemblyby turning the socket counterclockwise
until the tabs on the socket align with
the slots on the assembly.
6. Remove the bulb from the socket by pressing it in and rotating it counter-
clockwise until the tabs on the bulb
align with the slots in the socket. Pull
the bulb out of the socket.
7. Insert a new bulb by inserting it into the socket and rotating it until it locks
into place.
8. Install the socket in the assembly by aligning the tabs on the socket with the
slots in the assembly. Push the socket
into the assembly and turn the socket
clockwise.Front fog light bulbs
1. Turn off the engine.
2. Remove the under cover by rotating
the screws.
3. Reach your hand into the back of the front bumper.
4. Disconnect the power connector from the socket.
5. Remove the bulb-socket from the housing by turning the socket counter
clockwise until the tabs on the socket
align with the slots on the housing.
6. Install a new bulb-socket into the hous- ing by aligning the tabs on the socket
with the slots in the housing. Push the
socket into the housing and turn the
socket clockwise.
7. Connect the power connector to the socket.
OHD076046
WARNING- Halogen bulbs
Halogen bulbs contain pressurizedgas that will produce flying pieces
of glass if broken.
Always handle them carefully, and avoid scratches and abrasions. If
the bulbs are lit, avoid contact with
liquids. Never touch the glass with
bare hands. Residual oil may cause
the bulb to overheat and burst
when lit. A bulb should be operated
only when installed in a headlight.
If a bulb is damaged or cracked, replace it immediately and carefully
dispose of it.
Wear eye protection when chang- ing a bulb. Allow the bulb to cool
down before handling it.
OVF071057OVF071058
Page 527 of 534

Downloaded from www.Manualslib.com manuals search engine Index
4I
Defrosting (Windshield) ..............................................4-133
Dimensions ......................................................................8-\
2
Display illumination, see instrument panel illumination........................................................................\
............4-49
Displays, see instrument cluster ....................................4-48
Door locks......................................................................4-\
15 Central door lock switch .............................................4-16
Child-protector rear door lock .....................................4-19
Deadlocks ....................................................................4-18\
Drinks holders, see cup holders...................................4-141
Driver's and passenger's front air bag............................3-48
Driver's position memory system ..................................4-39
Driving at night..............................................................5-66
Driving in flooded areas ................................................5-67
Driving in the rain .........................................................5-67
Easy access function ......................................................4-40
Economical operation ....................................................5-63
Electric chromic mirror (ECM) .....................................4-44
Electric parking brake....................................................5-31
Electric power steering ..................................................4-41
Electronic stability program (ESP)................................5-41
E-mark label...................................................................8-10
Emergency commodity ..................................................6-30 Emergency starting ..........................................................6-5
Jump starting .................................................................6-5
Push starting ..................................................................6-6
Emergency Stop Signal (ESS) .......................................5-45
Emergency while driving.................................................6-3
Emission control system ..............................................7-105 Crankcase emission control system...........................7-105
Evaporative emission control System .......................7-105
Exhaust emission control system ..............................7-106
Engine ........................................................................\
......8-2
Engine compartment ................................................2-8, 7-2
Engine coolant ...............................................................7-45
Engine number .................................................................8-9
Engine oil .......................................................................7\
-44
Engine overheats..............................................................6-7
Engine start/stop button ...................................................5-8
Engine temperature gauge .............................................4-50
Engine will not start.........................................................6-4
Evaporative emission control System .........................7-105
Exhaust emission control system.................................7-106
Explanation of scheduled maintenance items ...............7-41
Exterior care...................................................................7-99
Exterior features Mounting bracket for roof carrier .............................4-151
E
Page 531 of 534

Downloaded from www.Manualslib.com manuals search engine Index
8I
Scheduled maintenance service .....................................7-9
Tire maintenance .........................................................7-67
Maintenance schedule......................................................7-9 Maintenance under severe usage conditions .....7-19,30,39
Normal maintenance schedule...........................7-10,21,32
Maintenance services .......................................................7-5
Manual climate control system ....................................4-112 Air conditioning.........................................................4-117
Climate control air filter ............................................4-120
Heating and air conditioning .....................................4-113
Manual transaxle............................................................5-19
Manual transaxle shift indicator ....................................4-52
Map lamp .....................................................................4-1\
08
Memory system .............................................................4-39
Mirrors ........................................................................\
...4-44 Day/night rearview mirror ...........................................4-44
Electric chromic mirror (ECM) ...................................4-44
Inside rearview mirror .................................................4-44
Outside rearview mirror ..............................................4-45
Moonroof, see panorama sunroof ..................................4-35
Mounting bracket for roof carrier................................4-151
Multi fuse .......................................................................7\
-74
Non-powered tailgate.....................................................4-20 Odometer .......................................................................4\
-53
Oil (Engine) ...................................................................7-44
Outside rearview mirror.................................................4-45
Outside temperature .......................................................4-51
Overheats ........................................................................\
.6-7
Owner maintenance .........................................................7-7
Paddle shifter .................................................................5-25
Panorama sunroof ..........................................................4-35
Parking light position.....................................................4-97
Passenger’s front air bag ON indicator .........................3-44
Passenger’s front air bag ON/OFF switch.....................3-50
Power brakes..................................................................5-29
Power outlet .................................................................4-142
Power tailgate ................................................................4-21
Power window lock button ............................................4-29
Pre-tensioner seat belt....................................................3-23
Push starting.....................................................................6-6\
Rear parking assist system.............................................4-79
Rear seat........................................................................\
.3-12
N
O
P
R