Page 176 of 479

487
Features of your vehicle
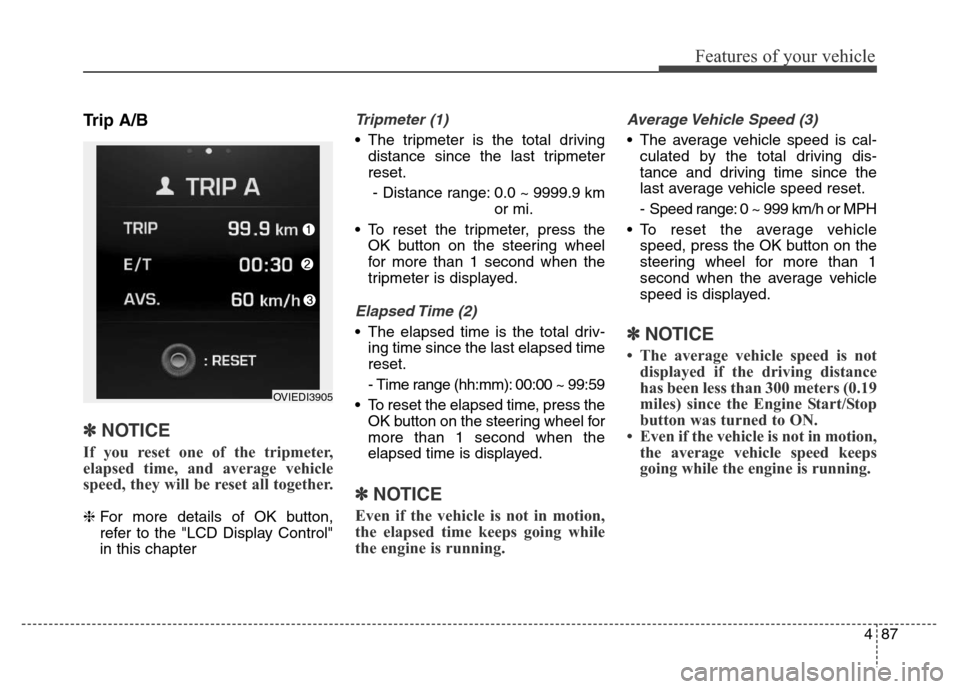
Trip A/B
✽NOTICE
If you reset one of the tripmeter,
elapsed time, and average vehicle
speed, they will be reset all together.
❈For more details of OK button,
refer to the "LCD Display Control"
in this chapter
Tripmeter (1)
• The tripmeter is the total driving
distance since the last tripmeter
reset.
- Distance range: 0.0 ~ 9999.9 km
or mi.
• To reset the tripmeter, press the
OK button on the steering wheel
for more than 1 second when the
tripmeter is displayed.
Elapsed Time (2)
• The elapsed time is the total driv-
ing time since the last elapsed time
reset.
- Time range (hh:mm): 00:00 ~ 99:59
• To reset the elapsed time, press the
OK button on the steering wheel for
more than 1 second when the
elapsed time is displayed.
✽NOTICE
Even if the vehicle is not in motion,
the elapsed time keeps going while
the engine is running.
Average Vehicle Speed (3)
• The average vehicle speed is cal-
culated by the total driving dis-
tance and driving time since the
last average vehicle speed reset.
- Speed range: 0 ~ 999 km/h or MPH
• To reset the average vehicle
speed, press the OK button on the
steering wheel for more than 1
second when the average vehicle
speed is displayed.
✽NOTICE
• The average vehicle speed is not
displayed if the driving distance
has been less than 300 meters (0.19
miles) since the Engine Start/Stop
button was turned to ON.
• Even if the vehicle is not in motion,
the average vehicle speed keeps
going while the engine is running.
OVIEDI3905
Page 178 of 479
489
Features of your vehicle
Manual reset
To clear the average fuel economy
manually, press the OK button on the
steering wheel for more than 1 sec-
ond when the average fuel economy
is displayed.
❈For more details of OK button,
refer to the "LCD Display Control"
in this chapterAutomatic reset
To make the average fuel economy
be reset automatically whenever refu-
eling, select the "Auto Reset" mode in
User Setting menu of the LCD display
(Refer to "LCD Display").
Under "Auto Reset" mode, the aver-
age fuel economy will be cleared to
zero (---) when the vehicle speed
exceeds 1 km/h after refueling more
than 6 liters (1.6 gallons).
✽NOTICE
The average fuel economy is not dis-
played for more accurate calculation
if the vehicle does not drive more
than 300 meters (0.19 miles) since
the Engine Start/Stop button is
turned to ON.
Page 180 of 479

491
Features of your vehicle
Parking Brake & Brake
Fluid Warning Light
This warning light illuminates:
• Once you set the ignition switch or
Engine Start/Stop Button to the ON
position.
- It illuminates for approximately 3
seconds
- It remains on if the parking brake
is applied.
• When the parking brake is applied.
• When the brake fluid level in the
reservoir is low.
- If the warning light illuminates
with the parking brake released, it
indicates the brake fluid level in
reservoir is low.If the brake fluid level in the reservoir
is low:
1. Drive carefully to the nearest safe
location and stop your vehicle.
2. With the engine stopped, check
the brake fluid level immediately
and add fluid as required (For
more details, refer to "Brake Fluid"
in chapter 7). Then check all brake
components for fluid leaks. If any
leak on the brake system is still
found, the warning light remains
on, or the brakes do not operate
properly, do not drive the vehicle.
In this case, we recommend that
you have the vehicle towed to an
authorized HYUNDAI dealer and
inspected.Dual-diagonal braking system
Your vehicle is equipped with dual-
diagonal braking systems. This
means you still have braking on two
wheels even if one of the dual sys-
tems should fail.
With only one of the dual systems
working, more than normal pedal
travel and greater pedal pressure are
required to stop the vehicle.
Also, the vehicle will not stop in as
short a distance with only a portion
of the brake system working.
If the brakes fail while you are driv-
ing, shift to a lower gear for addition-
al engine braking and stop the vehi-
cle as soon as it is safe to do so.
Page 203 of 479
Features of your vehicle
114 4
5. Turn the steering wheel so that the
parking guide line is aligned with
the parking area.
6. Hold the steering wheel and care-
fully back up the vehicle until the
screen changes.7. Carefully back up the vehicle while
fitting the steering wheel guide line
to the parking area by turning the
steering wheel.
8. After parking, you can check the
bottom of the rear bumper by
selecting the icon "Top View" on
the screen.
Parallel parking
1. Stop the vehicle at a distance of
approximately 1 meter (3 feet) par-
allel to the parked vehicle (1) that
is in front of the desired parking
space. Make sure that the front of
the parked vehicle (1) is parallel to
your rear wheel.
2. Stop the vehicle and shift the trans-
mission lever to the R position.
3. Select the parallel parking mode
by touching the icon on
the screen.
OVI049173OVI049172
OVI049177
Page 204 of 479
4115
Features of your vehicle
4. Back up carefully parallel to the
parked vehicle (1) until the vertical
red guide line (2) is at the end of
the parked vehicle (1).
5. Stop the vehicle.
6. With the vehicle at standstill, turn
the steering wheel to the direction
of the parking space. The guide
lines will blink.
7. Continue turning the steering
wheel until the guide lines stop
blinking.8. Hold the steering wheel and care-
fully back up the vehicle until the
green guide line (1) is aligned with
the target parking line.
9. Stop the vehicle
10. With the vehicle at standstill, turn
the steering wheel to the oppo-
site direction until the screen
changes.11. Carefully back up the vehicle by
referring to the steering wheel
guide line (2).
12. After parking, you can check the
bottom of the rear bumper by
selecting the icon "Top View" on
the screen.
OVI049175OVI049179OVI049180L
Page 228 of 479
4139
Features of your vehicle
Defrost-Level (A)
Most of the air flow is directed to the
windshield with a small amount of air
directed to the side window defrosters.Instrument panel vents
The outlet vents can be opened or
closed separately using the thumb-
wheel. To close the vent, rotate it left
to the maximum position. To open the
vent, rotate it right to the desired
position.
Also, you can adjust the direction of
air delivery from these vents using
the vent control lever as shown.
Temperature control
The temperature will increase to the
maximum (HI) by turning the knob to
the right for the front seat and pressing
the up ( ) button for the rear seat.
OVI043112OVI043113OVI043116
OVI043404
■Front
■Rear
Page 256 of 479
4167
Features of your vehicle
Steering wheel audio control
The steering wheel audio control but-
ton is installed to promote safe driving.
CAUTION
• Do not clean the inside of the
rear window glass with a
cleaner or use a scraper to
remove foreign deposits as
this may cause damage to the
antenna elements.
• Avoid adding metallic coat-
ings such as Ni, Cd, and so
on. These can disturb receiv-
ing AM and FM broadcast sig-
nals.
OVI043155
CAUTION
Do not operate audio remote
control buttons simultaneously.
CAUTION
• To prevent damage to the rear
glass antenna, never use
sharp instruments or window
cleaner containing abrasives
to clean the window. Clean the
inside surface of the rear
glass window with a piece of
soft cloth.
• When putting a sticker on the
inside surface of the rear win-
dow, be careful not to damage
to the rear glass antenna.
• Do not put sharp instruments
nearby the rear glass antenna.
• Tinted rear window may affect
the proper functioning of the
antenna.
Page 262 of 479

55
Driving your vehicle
WARNING- Driving under
the influence of alcohol or
drugs
Drinking and driving is danger-
ous. Drunk driving is the num-
ber one contributor to the high-
way death toll each year. Even a
small amount of alcohol will
affect your reflexes, percep-
tions and judgment. Driving
while under the influence of
drugs is as dangerous or more
dangerous than driving drunk.
You are much more likely to
have a serious accident if you
drink or take drugs and drive.
If you are drinking or taking
drugs, don’t drive. Do not ride
with a driver who has been
drinking or taking drugs.
Choose a designated driver or
call a cab.WARNING
Always check the surrounding
areas near your vehicle for peo-
ple, especially children, before
putting a vehicle into D (Drive)
or R (Reverse).
WARNING
• When you intend to park or
stop the vehicle with the
engine on, be careful not to
depress the accelerator pedal
for a long period of time. It
may overheat the engine or
exhaust system and cause
fire.
• When you make a sudden
stop or turn the steering
wheel rapidly, loose objects
may drop on the floor and it
could interfere with the opera-
tion of the foot pedals, possi-
bly causing an accident. Keep
all things in the vehicle safely
stored.
• If you do not focus on driving,
it may cause an accident. Be
careful when operating what
may disturb driving such as
audio or heater. It is the
responsibility of the driver to
always drive safely.