Page 229 of 479
Features of your vehicle
140 4
The temperature will decrease to the
minimum (Lo) by turning the knob to
the left for the front seat and pressing
the down ( ) button for the rear seat.
When turning the knob for the front
seat and pressing the button for the
rear seat, the temperature will
increase or decrease by 0.5°C/1°F.
When set to the lowest temperature
setting, the air conditioning will oper-
ate continuously.If you turn the front passenger's tem-
perature knob or if you press the rear
temperature button, the indicator on
the 3 Zone button will be illuminated,
and you can adjust the front passen-
ger's and rear temperature individual-
ly. If you press the 3 Zone button, the
indicator on the 3 Zone button will be
turned off, and the front passenger's
and rear temperature will be adjusted
like the driver's temperature.
Temperature conversion
If the battery has been discharged or
disconnected, the temperature mode
display will reset to Centigrade.
This is a normal condition. You can
switch the temperature mode between
Centigrade to Fahrenheit as follows;
While pressing the OFF button,
depress the AUTO button for 3 sec-
onds or more. The display will change
from Centigrade to Fahrenheit, or
from Fahrenheit to Centigrade.Air intake control
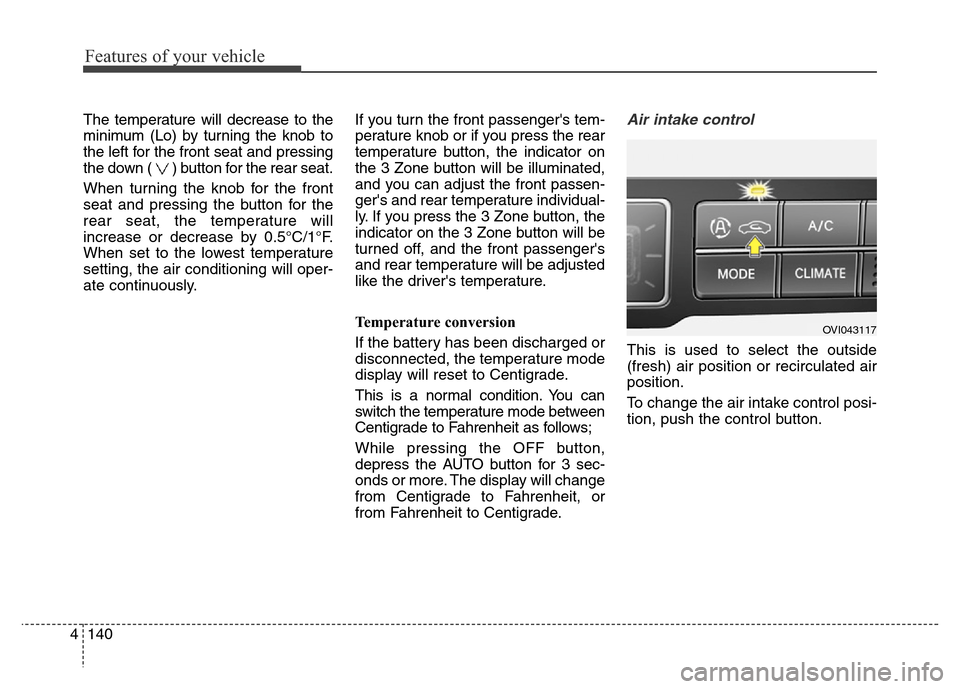
This is used to select the outside
(fresh) air position or recirculated air
position.
To change the air intake control posi-
tion, push the control button.
OVI043117
Page 239 of 479
Features of your vehicle
150 4
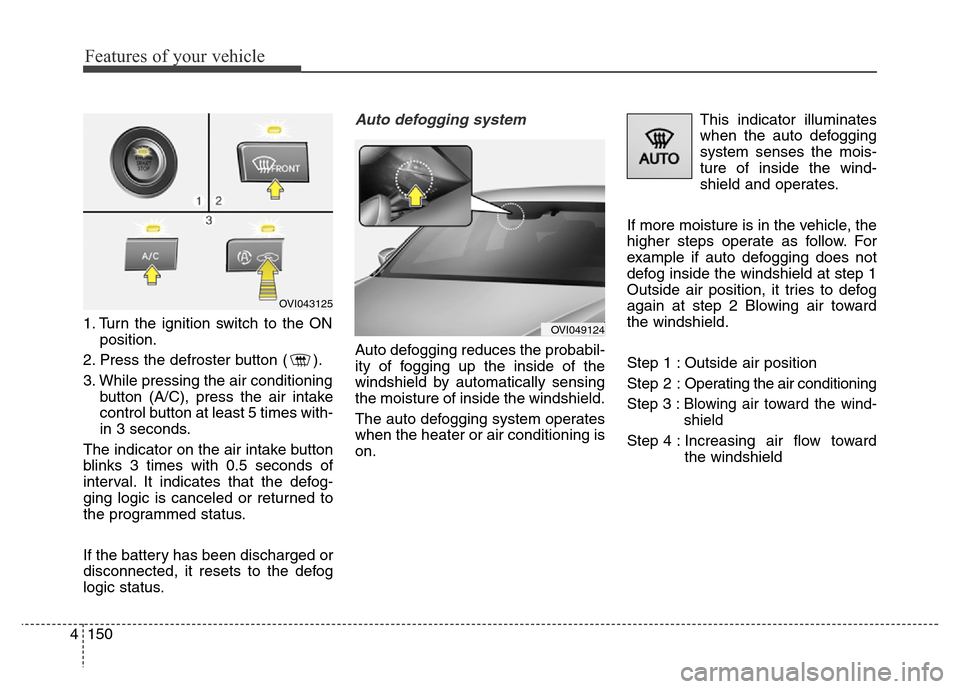
1. Turn the ignition switch to the ON
position.
2. Press the defroster button ( ).
3. While pressing the air conditioning
button (A/C), press the air intake
control button at least 5 times with-
in 3 seconds.
The indicator on the air intake button
blinks 3 times with 0.5 seconds of
interval. It indicates that the defog-
ging logic is canceled or returned to
the programmed status.
If the battery has been discharged or
disconnected, it resets to the defog
logic status.
Auto defogging system
Auto defogging reduces the probabil-
ity of fogging up the inside of the
windshield by automatically sensing
the moisture of inside the windshield.
The auto defogging system operates
when the heater or air conditioning is
on.This indicator illuminates
when the auto defogging
system senses the mois-
ture of inside the wind-
shield and operates.
If more moisture is in the vehicle, the
higher steps operate as follow. For
example if auto defogging does not
defog inside the windshield at step 1
Outside air position, it tries to defog
again at step 2 Blowing air toward
the windshield.
Step 1 : Outside air position
Step 2 :Operating the air conditioning
Step 3 :Blowing air toward the wind-
shield
Step 4 : Increasing air flow toward
the windshield
OVI043125
OVI049124
Page 240 of 479
4151
Features of your vehicle
If your vehicle is equipped with the
auto defogging system, it is automat-
ically activated when the conditions
are met. However, if you would like to
cancel the auto defogging system,
press the front defroster button 4
times within 2 seconds while press-
ing the AUTO button. The front
defroster indicator will blink 3 times
to notify you that the system is can-
celled. To use the auto defogging
system again, follow the procedures
mentioned above.
If the battery has been disconnected
or discharged, it resets to the auto
defogging status.✽NOTICE
• If the A/C off is manually selected
while the auto defogging system is
on, the auto defogging indicator
will blink 3 times to give notice
that manual operation is canceled.
• If the air quality system (AQS) is
selected while the auto defogging
system is operating at the step 1
outside air position, the recirculat-
ed air position may operate when
the outside air is polluted.
CAUTION
Do not remove the sensor cover
located on the upper end of the
passenger side windshield
glass. Damage to system parts
could occur and may not be cov-
ered by your vehicle warranty.
Page 248 of 479
4159
Features of your vehicle
Sunvisor
Use the sunvisor to shield direct light
through the front or side windows.
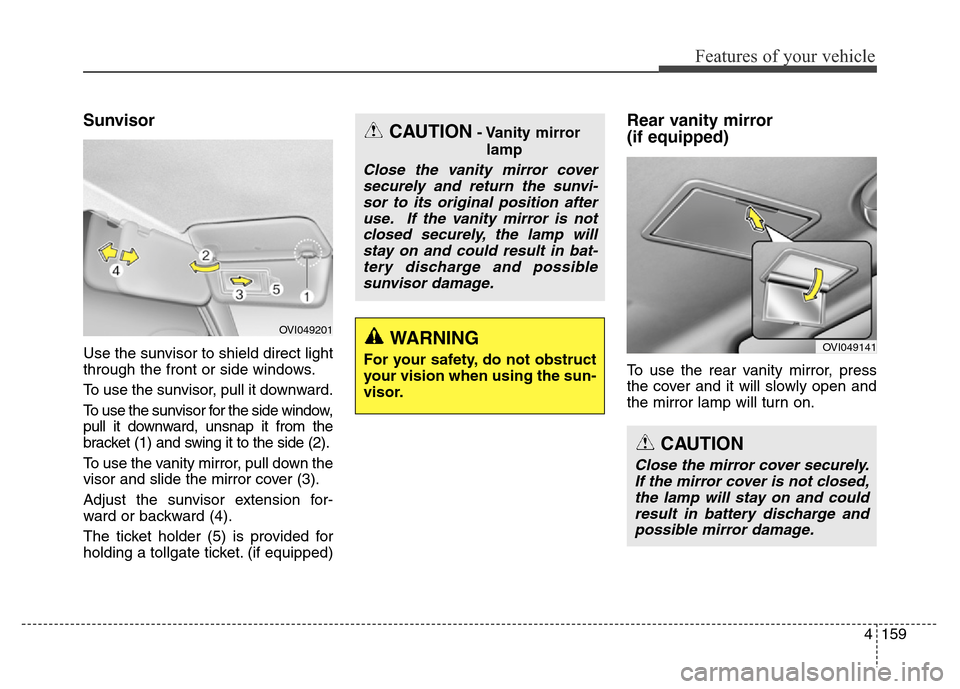
To use the sunvisor, pull it downward.
To use the sunvisor for the side window,
pull it downward, unsnap it from the
bracket (1) and swing it to the side (2).
To use the vanity mirror, pull down the
visor and slide the mirror cover (3).
Adjust the sunvisor extension for-
ward or backward (4).
The ticket holder (5) is provided for
holding a tollgate ticket. (if equipped)
Rear vanity mirror
(if equipped)
To use the rear vanity mirror, press
the cover and it will slowly open and
the mirror lamp will turn on.
CAUTION- Vanity mirror
lamp
Close the vanity mirror cover
securely and return the sunvi-
sor to its original position after
use. If the vanity mirror is not
closed securely, the lamp will
stay on and could result in bat-
tery discharge and possible
sunvisor damage.
WARNING
For your safety, do not obstruct
your vision when using the sun-
visor.
OVI049201
OVI049141
CAUTION
Close the mirror cover securely.
If the mirror cover is not closed,
the lamp will stay on and could
result in battery discharge and
possible mirror damage.
Page 250 of 479
4161
Features of your vehicle
Clock
You can set the clock by using the
Audio or Navigation system.
CAUTION
• Use the power outlet only
when the engine is running
and remove the accessory
plug after use. Using the
accessory plug for prolonged
periods of time with the
engine off could cause the
battery to discharge.
• Only use 12V electric acces-
sories which are less than 10A
in electric capacity.
• Adjust the air-conditioner or
heater to the lowest operating
level when using the power
outlet.
• Close the cover when not in
use.
• Some electronic devices can
cause electronic interference
when plugged into a vehicle’s
power outlet. These devices
may cause excessive audio
static and malfunctions in
other electronic systems or
devices used in your vehicle.
WARNING
Do not put a finger or a foreign
element (pin, etc.) into a power
outlet and do not touch with a
wet hand. You may get an elec-
tric shock.
OVI014005
Page 259 of 479

Economical operation . . . . . . . . . . . . . . . . . . . . . . 5-84
Special driving conditions . . . . . . . . . . . . . . . . . . . 5-86
• Hazardous driving conditions . . . . . . . . . . . . . . . . . . 5-86
• Rocking the vehicle . . . . . . . . . . . . . . . . . . . . . . . . . . . 5-86
• Smooth cornering . . . . . . . . . . . . . . . . . . . . . . . . . . . . 5-87
• Driving at night . . . . . . . . . . . . . . . . . . . . . . . . . . . . . . 5-88
• Driving in the rain . . . . . . . . . . . . . . . . . . . . . . . . . . . . 5-88
• Driving in flooded areas . . . . . . . . . . . . . . . . . . . . . . . 5-89
• Driving off-road . . . . . . . . . . . . . . . . . . . . . . . . . . . . . . 5-89
• Highway driving . . . . . . . . . . . . . . . . . . . . . . . . . . . . . 5-89
Winter driving . . . . . . . . . . . . . . . . . . . . . . . . . . . . 5-91
• Snowy or icy conditions . . . . . . . . . . . . . . . . . . . . . . . 5-91
• Use high quality ethylene glycol coolant . . . . . . . . . . 5-94
• Check battery and cables . . . . . . . . . . . . . . . . . . . . . . 5-94
• Change to "winter weight" oil if necessary . . . . . . . 5-95
• Check spark plugs and ignition system. . . . . . . . . . . 5-95
• To keep locks from freezing . . . . . . . . . . . . . . . . . . . . 5-95
• Use approved window washer anti-freeze in system . 5-95
• Don't let your parking brake freeze . . . . . . . . . . . . . 5-95
• Don't let ice and snow accumulate underneath . . . . 5-95
• Carry emergency equipment . . . . . . . . . . . . . . . . . . . 5-96
• Don't place foreign objects or materials in
the engine compartment . . . . . . . . . . . . . . . . . . . . . . 5-96
Vehicle weight . . . . . . . . . . . . . . . . . . . . . . . . . . . . . 5-97
• Base curb weight . . . . . . . . . . . . . . . . . . . . . . . . . . . . . 5-97
• Vehicle curb weight . . . . . . . . . . . . . . . . . . . . . . . . . . . 5-97
• Cargo weight . . . . . . . . . . . . . . . . . . . . . . . . . . . . . . . . 5-97
• GAW (Gross axle weight) . . . . . . . . . . . . . . . . . . . . . . 5-97
• GAWR (Gross axle weight rating) . . . . . . . . . . . . . . . 5-97
• GVW (Gross vehicle weight) . . . . . . . . . . . . . . . . . . . 5-97
• GVWR (Gross vehicle weight rating) . . . . . . . . . . . . 5-97
• Overloading . . . . . . . . . . . . . . . . . . . . . . . . . . . . . . . . . 5-97
Trailer towing . . . . . . . . . . . . . . . . . . . . . . . . . . . . . 5-98
5
Page 264 of 479

57
Driving your vehicle
ACC(Accessory)
Press the engine start/stop button
when it is in the OFF position without
depressing the brake pedal.
The steering wheel is unlocked and
electrical accessories are opera-
tional.
If the engine start/stop button is in
the ACC position for more than 1
hour, the button is off automatically
to prevent the battery discharge.
ON
Press the engine start/stop button
while it is in the ACC position without
depressing the brake pedal.
The warning lights can be checked
before the engine is started.
Do not leave the engine start/stop
button in the ON position for a long
time. The battery may discharge,
because the engine is not running.
START
To start the engine, depress the
brake pedal and press the engine
start/stop button with the shift lever in
the P(Park) or the N(Neutral) posi-
tion. For your safety, start the engine
with the shift lever in the P (Park)
position.
✽NOTICE
• If you press the engine start/stop
button without depressing the
brake pedal, the engine will not
start and the engine start/stop but-
ton changes as follow :
OFF
→ACC →ON →OFF
Page 267 of 479
Driving your vehicle
10 5
✽NOTICE
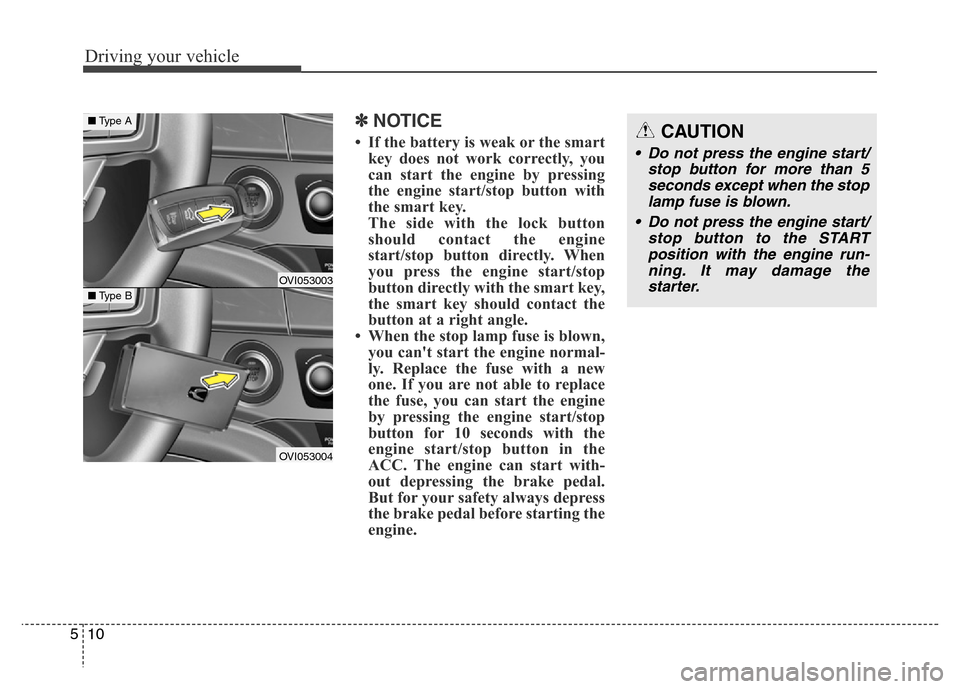
• If the battery is weak or the smart
key does not work correctly, you
can start the engine by pressing
the engine start/stop button with
the smart key.
The side with the lock button
should contact the engine
start/stop button directly. When
you press the engine start/stop
button directly with the smart key,
the smart key should contact the
button at a right angle.
• When the stop lamp fuse is blown,
you can't start the engine normal-
ly. Replace the fuse with a new
one. If you are not able to replace
the fuse, you can start the engine
by pressing the engine start/stop
button for 10 seconds with the
engine start/stop button in the
ACC. The engine can start with-
out depressing the brake pedal.
But for your safety always depress
the brake pedal before starting the
engine.CAUTION
• Do not press the engine start/
stop button for more than 5
seconds except when the stop
lamp fuse is blown.
• Do not press the engine start/
stop button to the START
position with the engine run-
ning. It may damage the
starter.
OVI053003
OVI053004
■Type B
■Type A