Page 134 of 488

133
uuOperating the Switches Around the Steering WheeluDriving Position Memory System*
Controls
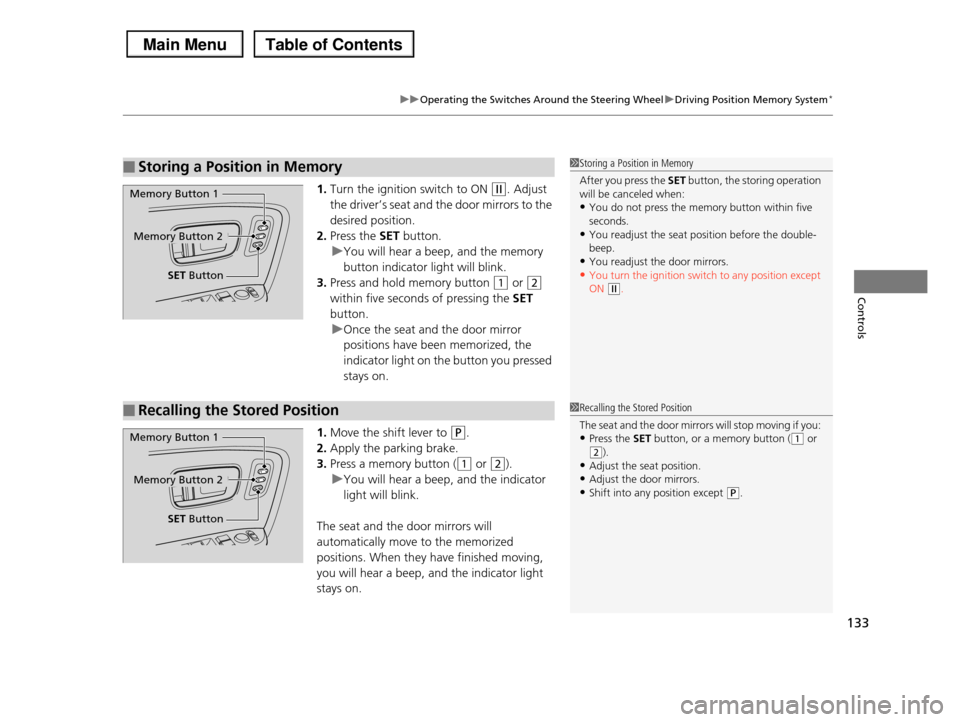
1.Turn the ignition switch to ON (w. Adjust
the driver’s seat and the door mirrors to the
desired position.
2.Press the SET button.
uYou will hear a beep, and the memory
button indicator light will blink.
3.Press and hold memory button (1 or (2
within five seconds of pressing the SET
button.
uOnce the seat and the door mirror
positions have been memorized, the
indicator light on the button you pressed
stays on.
1.Move the shift lever to (P.
2.Apply the parking brake.
3.Press a memory button ((1 or (2).
uYou will hear a beep, and the indicator
light will blink.
The seat and the door mirrors will
automatically move to the memorized
positions. When they have finished moving,
you will hear a beep, and the indicator light
stays on.
■Storing a Position in Memory1Storing a Position in Memory
After you press the SET button, the storing operation will be canceled when:
•You do not press the memory button within five
seconds.•You readjust the seat position before the double-
beep.
•You readjust the door mirrors.•You turn the ignition switch to any position except
ON (w.
Memory Button 1
Memory Button 2
SET Button
■Recalling the Stored Position1Recalling the Stored Position
The seat and the door mirrors will stop moving if you:
•Press the SET button, or a memory button ((1 or (2).
•Adjust the seat position.
•Adjust the door mirrors.•Shift into any position except (P.
Memory Button 1
Memory Button 2
SET Button
Page 147 of 488

146
uuAdjusting the SeatsuRear Seats
Controls
Rear Seats
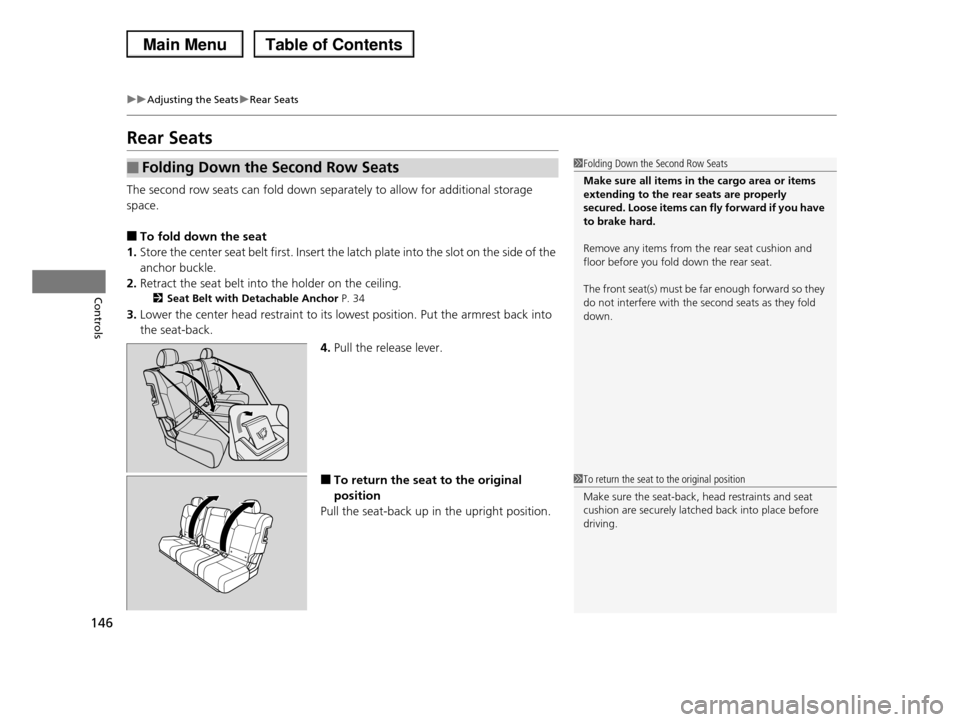
The second row seats can fold down separately to allow for additional storage
space.
■To fold down the seat
1.Store the center seat belt first. Insert the latch plate into the slot on the side of the
anchor buckle.
2.Retract the seat belt into the holder on the ceiling.
2Seat Belt with Detachable Anchor P. 34
3.Lower the center head restraint to its lowest position. Put the armrest back into
the seat-back.
4.Pull the release lever.
■To return the seat to the original
position
Pull the seat-back up in the upright position.
■Folding Down the Second Row Seats1Folding Down the Second Row Seats
Make sure all items in the cargo area or items extending to the rear seats are properly
secured. Loose items can fly forward if you have
to brake hard.
Remove any items from the rear seat cushion and
floor before you fold down the rear seat.
The front seat(s) must be far enough forward so they
do not interfere with the second seats as they fold down.
1To return the seat to the original position
Make sure the seat-back, head restraints and seat cushion are securely latched back into place before
driving.
Page 148 of 488

Continued147
uuAdjusting the SeatsuRear Seats
Controls
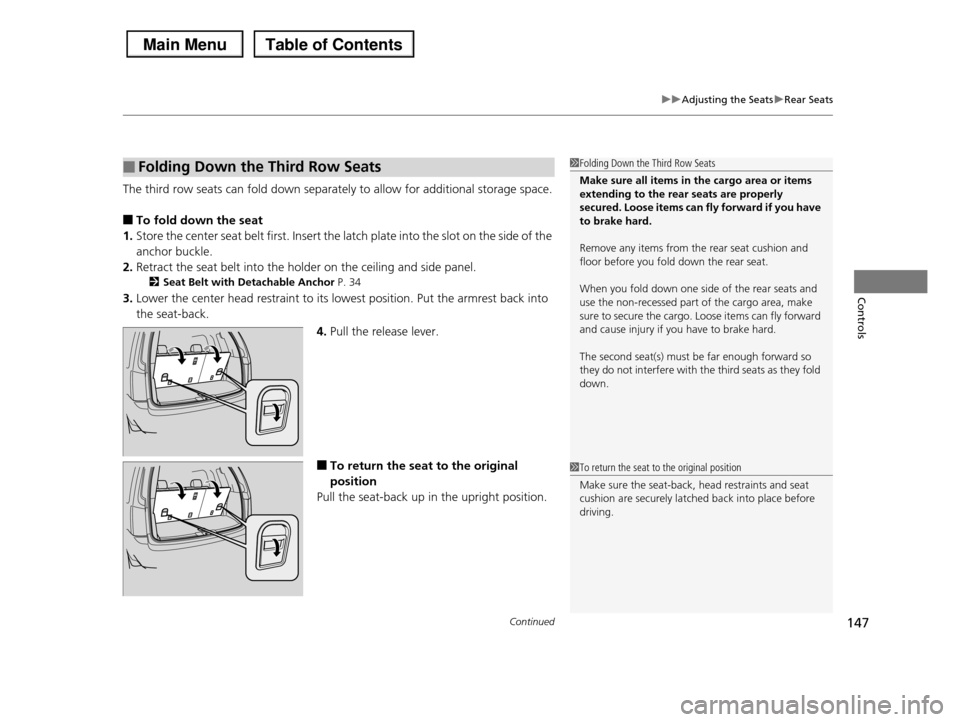
The third row seats can fold down separately to allow for additional storage space.
■To fold down the seat
1.Store the center seat belt first. Insert the latch plate into the slot on the side of the
anchor buckle.
2.Retract the seat belt into the holder on the ceiling and side panel.
2Seat Belt with Detachable Anchor P. 34
3.Lower the center head restraint to its lowest position. Put the armrest back into
the seat-back.
4.Pull the release lever.
■To return the seat to the original
position
Pull the seat-back up in the upright position.
■Folding Down the Third Row Seats1Folding Down the Third Row Seats
Make sure all items in the cargo area or items extending to the rear seats are properly
secured. Loose items can fly forward if you have
to brake hard.
Remove any items from the rear seat cushion and
floor before you fold down the rear seat.
When you fold down one side of the rear seats and
use the non-recessed part of the cargo area, make sure to secure the cargo. Loose items can fly forward
and cause injury if you have to brake hard.
The second seat(s) must be far enough forward so
they do not interfere with the third seats as they fold
down.
1To return the seat to the original position
Make sure the seat-back, head restraints and seat
cushion are securely latched back into place before driving.
Page 324 of 488

323
Driving
This chapter discusses driving, refueling, and information on items such as accessories.
Before DrivingDriving Preparation .......................... 324 Maximum Load Limit........................ 327Towing a TrailerTowing Preparation .......................... 329Driving Safely with a Trailer .............. 338Towing Your Vehicle ........................ 339Off-Highway Driving GuidelinesGeneral Information ......................... 340Important Safety Precautions............ 340Avoiding Trouble ............................. 341When DrivingStarting the Engine .......................... 342Precautions While Driving................. 344
Automatic Transmission ................... 345Shifting ............................................ 346Cruise Control ................................. 348VSA® (Vehicle Stability Assist), aka ESC (Electronic Stability Control), System ...... 352VTM (Variable Torque Management)-4r System*............................................. 354TPMS (Tire Pressure Monitoring System) ... 355Tire Pressure Monitoring System (TPMS) - Required Federal Explanation ......... 357BrakingBrake System ................................... 360ABS (Anti-lock Brake System) ........... 362
Brake Assist System ......................... 363Parking Your VehicleWhen Stopped ................................ 364Parking Sensor System*................... 365Rearview Camera*............................ 369Multi-View Rear Camera*................ 370Refueling
Fuel Information .............................. 371
How to Refuel ................................. 372
Fuel Economy.................................... 374
Accessories and Modifications
Accessories ...................................... 375
Modifications................................... 375
* Not available on all models
Page 326 of 488

Continued325
uuBefore DrivinguDriving Preparation
Driving
•Store or secure all items on board properly.
uCarrying too much cargo, or improperly storing it, can affect your vehicle's
handling, stability, stopping distance, and tires, and make it unsafe.
2Maximum Load Limit P. 327
•Do not pile items higher than the seat height.
uThey can block your view and may be thrown forward in the event of sudden
braking.
•Do not place anything in the front seat footwells. Make sure to secure the floor
mat.
uAn object or unsecured floor mat can interfere with your brake and accelerator
pedal operation while driving.
•If you have any animals on board, do not let them move around in the vehicle.
uThey may interfere with driving and a crash could occur.
•Securely close and lock all doors and the tailgate.
2Locking/Unlocking the Doors from the Inside P. 103
•Adjust your seating position properly.
uAdjust the head restraint, too.
2Adjusting the Seats P. 137
2Adjusting the Head Restraints P. 141
•Adjust the mirrors and steering wheel properly for your driving.
uAdjust them while sitting in the proper driving position.
2Adjusting the Steering Wheel P. 134
2Adjusting the Mirrors P. 135
■Interior Checks1Interior Checks
The headlight aim is set by the factory, and does not need to be adjusted. However, if you regularly carry
heavy items in the cargo area or tow a trailer, have
the aiming readjusted at a dealer or by a qualified technician.
Page 334 of 488

Continued333
uuTowing a TraileruTowing Preparation
Driving
Your vehicle has a class 3 trailer hitch as standard equipment.
The jumper harness and trailer brake fuse are stored in the glove box.
2Trailer brakes P. 334
2Trailer light P. 335
Turn the knob one-quarter left to open the
cover.
uThe 7-Pin trailer connector and trailer
hitch are located.
■Towing Equipment and Accessories1Towing Equipment and Accessories
Make sure that all equipment is properly installed and
maintained, and that it meets federal, state, province/
territory, and local regulations.
Consult your trailer sales or rental agency if any other
items are recommended or required for your towing situation.
The lighting and wiring of trailers can vary by type and brand. If a connector is required, it should only
be installed by a qualified technician.
Trailer packages and products:
•Ball mount, hitch plug, hitch pin etc.
•Wiring harness kit•Trailer hitch kit (jumper harness included)
2Trailer brakes P. 334
•Automatic transmission cooler kit2Automatic transmission cooler P. 337
Are available at a dealer.
2WD models
Knob
7-Pin Trailer Connector
Trailer Hitch
Page 335 of 488

uuTowing a TraileruTowing Preparation
334
Driving
■Trailer brakes
Recommended for any trailer with a total weight of 1,000 lbs (450 kg) or more:
There are two common types of trailer brakes: surge and electric. Surge brakes are
common for boat trailers, since the brakes will get wet.
If you choose electric brakes, be sure they are electronically actuated. Do not
attempt to attach trailer brakes to your vehicle's hydraulic system, as it will lower
braking effectiveness and create a potential hazard.
The 4-pin gray connector installed in your vehicle has all of the circuits required to
install most electric trailer brake controllers.
Have a qualified mechanic install your trailer
brake controller following the trailer brake
controller manufacturer’s instructions. Failure
to properly install the trailer brake controller
may increase the distance it takes for you to
stop your vehicle when towing a trailer.
The trailer jumper harness is used to install the
controller for the electric trailer brakes.
Insert the trailer brake fuse into the engine
compartment sub fuse box.
2Engine Compartment Sub Fuse Box P. 455
1Trailer brakes
The 4-pin gray connector is located under the instrument panel near the top of the parking brake
pedal.
Electric Brake (Brown/White)
Ground (Black)
Brake (20A) (Purple)
Stop (Sky Blue)
Trailer brake controller connector’s terminals:
Electric Brake (Brown/White)
Ground (Black)
Brake (20A) (Blue)
Brake Lights (Sky Blue)
Touring models
Page 336 of 488
Continued335
uuTowing a TraileruTowing Preparation
Driving
■Trailer light
Trailer lights and equipment must comply with federal, state, province/territory, and
local regulations. Check with your local trailer sales or rental agency for the
requirements in the area where you plan to tow.
We recommend that you have a dealer install a Honda wiring harness and converter.
They are designed for your vehicle.
1Trailer light
The trailer lighting connector is located behind the left side panel in the cargo area.
Even if you are planning to use the non-Honda trailer
lighting harness and converter, ask a dealer for the correct connector and pins.Left Turn Signal and Brake Lights (Red)
Back-up Lights (Yellow)
Electric Brake (Brown/White)
Right Turn Signal and Brake Lights (White)
Ground (Black)
Ground (Black)
Taillights (Green)
+B Charge (Blue)
Pins’ wiring color codes and their purposes: