Page 330 of 433

329
uuMaintenance Minder™uTo Use Maintenance Minder
TM
Continued
Maintenance
■
Maintenance Service Items
1Maintenance Service Items•Independent of the Maintenance Minder
information, replace the brake fluid every 3 years.•Inspect idle speed every 160,000 miles (256,000
km).•Adjust the valves during services A, B, 1, 2, or 3 if
they are noisy.
Maintenance Minder Message Maintenance
Minder Indicator
Sub Items Main Item
*1: If a message SERVICE does not appear more than 12 months after the display is reset, change the
engine oil every year.
# : See information on maintenance and emissions warranty.CODE
Maintenance Main Items
A
●Replace engine oil
*1
B
●Replace engine oil
*1 and oil filter
●Inspect front and rear brakes/service as necessary●Check parking brake adjustment●Inspect tie rod ends, steering gearbox, and boots●Inspect suspension components●Inspect driveshaft boots●Inspect brake hoses and lines (Including ABS/VSA)●Inspect all fluid levels and condition of fluids●Inspect exhaust system
#
●Inspect fuel lines and connections
#
*2: If you drive in dusty conditions, replace the air cleaner element every 15,000 miles (24,000 km).
*3: If you drive primarily in urban areas that have high concentrations of soot in the air from industry and
from diesel-powered vehicles, replace the dust and pollen filter every 15,000 miles (24,000 km).
*4: If you drive regularly in very high temperatures (over 110ºF, 43ºC), in very low temperatures (under
20ºF, 29ºC), replace every 60,000 miles/100,000 km.CODE
Maintenance Sub Items
1
●Rotate tires
2
●Replace air cleaner element
*2
●Replace dust and pollen filter
*3
●Inspect drive belt
3●Replace transmission fluid
4
●Replace spark plugs●Replace timing belt and inspect water pump
*4
●Inspect valve clearance
5●Replace engine coolant
Page 334 of 433

333
uuMaintenance Minder™uTo Use Maintenance Minder
TM
Continued
Maintenance
■
Maintenance Service Items
1Maintenance Service Items•Independent of the Maintenance Minder
information, replace the brake fluid every 3 years.•Inspect idle speed every 160,000 miles (256,000
km).•Adjust the valves during services A, B, 1, 2, or 3
only if they are noisy.
Maintenance Minder Message System Message
Indicator
Sub Items Main Item
*1: If a message SERVICE does not appear more than 12 months after the display is reset, change the
engine oil every year.
# : See information on maintenance and emissions warranty.CODE
Maintenance Main Items
A
●Replace engine oil
*1
B
●Replace engine oil
*1 and oil filter
●Inspect front and rear brakes/service as necessary●Check parking brake adjustment●Inspect tie rod ends, steering gearbox, and boots●Inspect suspension components●Inspect driveshaft boots●Inspect brake hoses and lines (Including ABS/VSA)●Inspect all fluid levels and condition of fluids●Inspect exhaust system
#
●Inspect fuel lines and connections
#
*2: If you drive in dusty conditions, replace the air cleaner element every 15,000 miles (24,000 km).
*3: If you drive primarily in urban areas that have high concentrations of soot in the air from industry and
from diesel-powered vehicles, replace the dust and pollen filter every 15,000 miles (24,000 km).
*4: If you drive regularly in very high temperatures (over 110ºF, 43ºC), in very low temperatures (under
20ºF, 29ºC), replace every 60,000 miles/100,000 km.CODE
Maintenance Sub Items
1
●Rotate tires
2
●Replace air cleaner element
*2
●Replace dust and pollen filter
*3
●Inspect drive belt
3●Replace transmission fluid
4
●Replace spark plugs●Replace timing belt and inspect water pump
*4
●Inspect valve clearance
5●Replace engine coolant
Page 336 of 433
335Maintenance
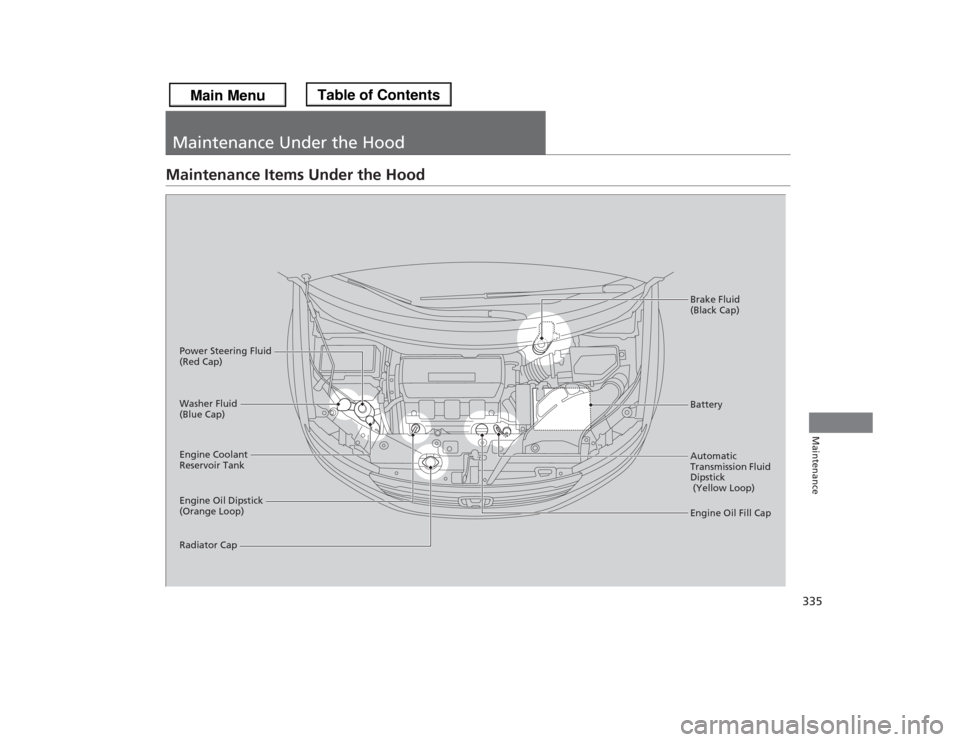
Maintenance Under the HoodMaintenance Items Under the Hood
Engine Oil Dipstick
(Orange Loop) Washer Fluid
(Blue Cap)
Engine Coolant
Reservoir Tank
Radiator CapBrake Fluid
(Black Cap)
Engine Oil Fill Cap Automatic
Transmission Fluid
Dipstick
(Yellow Loop) BatteryPower Steering Fluid
(Red Cap)
Page 337 of 433
336
uuMaintenance Under the HooduOpening the Hood
Maintenance
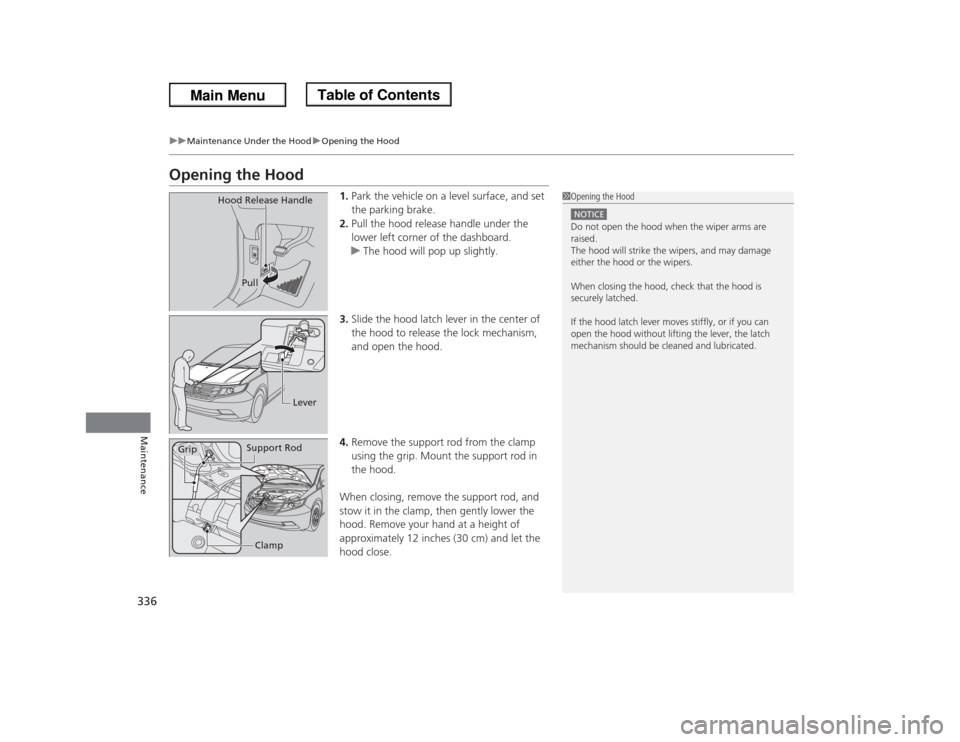
Opening the Hood
1.Park the vehicle on a level surface, and set
the parking brake.
2.Pull the hood release handle under the
lower left corner of the dashboard.
uThe hood will pop up slightly.
3.Slide the hood latch lever in the center of
the hood to release the lock mechanism,
and open the hood.
4.Remove the support rod from the clamp
using the grip. Mount the support rod in
the hood.
When closing, remove the support rod, and
stow it in the clamp, then gently lower the
hood. Remove your hand at a height of
approximately 12 inches (30 cm) and let the
hood close.
1Opening the HoodNOTICEDo not open the hood when the wiper arms are
raised.
The hood will strike the wipers, and may damage
either the hood or the wipers.
When closing the hood, check that the hood is
securely latched.
If the hood latch lever moves stiffly, or if you can
open the hood without lifting the lever, the latch
mechanism should be cleaned and lubricated.
Hood Release Handle
Pull
Lever
Support Rod
Grip
Clamp
Page 346 of 433
345
uuMaintenance Under the HooduBrake Fluid
Maintenance
Brake FluidUse the same fluid for the brakes.
The fluid level should be between the MIN
and MAX marks on the side of the reservoir.Specified fluid: Honda Heavy Duty Brake Fluid DOT 3■
Checking the Brake Fluid
1Brake FluidNOTICEBrake fluid marked DOT 5 is not compatible with your
vehicle's braking system and can cause extensive
damage.
If the specified brake fluid is not available, you should
use only DOT 3 or DOT 4 fluid from a sealed
container as a temporary replacement.
Using any non-Honda brake fluid can cause corrosion
and decrease the longevity of the system. Have the
brake system flushed and refilled with Honda Heavy
Duty Brake Fluid DOT 3 as soon as possible.
If the brake fluid level is at or below the MIN mark,
have a dealer inspect for leaks or worn brake pads as
soon as possible.
Brake Reservoir
MINMAX
Page 348 of 433

347
Continued
Maintenance
Replacing Light BulbsHeadlight BulbsWhen replacing, use the following bulbs.
1.Remove the clips using a flat-tip
screwdriver, then remove the upper part of
the air intake duct.High beam headlight:
60 W (HB3)
Low beam headlight:
55 W (H11 for halogen bulb type)
Low beam headlight:
35 W (D2S for high voltage discharge type)
■
High Beam Headlight
1Headlight BulbsNOTICEHalogen bulbs get very hot when lit.
Oil, perspiration, or a scratch on the glass can cause
the bulb to overheat and shatter.
The headlight aim is set by the factory, and does not
need to be adjusted. However, if you regularly carry
heavy items in the cargo area or tow a trailer, have
the aiming readjusted at a dealer or by a qualified
technician.
The HB3 and H11 types are halogen bulbs.
When replacing a bulb, handle it by its base, and
protect the glass from contact with your skin or hard
objects. If you touch the glass, clean it with
denatured alcohol and a clean cloth.
The exterior lights' inside lenses (headlights, brake
lights, etc.) may fog temporarily after a car wash or
while driving in the rain. This does not impact the
exterior light function.
However, if you see a large amount of water or ice
accumulated inside the lenses, have your vehicle
inspected by a dealer.
Clip
Driver’s side
Page 354 of 433
353
uuReplacing Light BulbsuBrake/Rear Side Marker/Taillight and Rear Turn Signal Light Bulbs
Continued
Maintenance
Brake/Rear Side Marker/Taillight and Rear Turn Signal Light BulbsWhen replacing, use the following bulbs.
1.Remove the mounting bolts.Brake/Rear Side Marker/Taillight: 21/5 W
Rear Turn Signal Light: 21 W (Amber)Mounting
Bolts
Page 355 of 433
uuReplacing Light BulbsuBrake/Rear Side Marker/Taillight and Rear Turn Signal Light Bulbs
354Maintenance
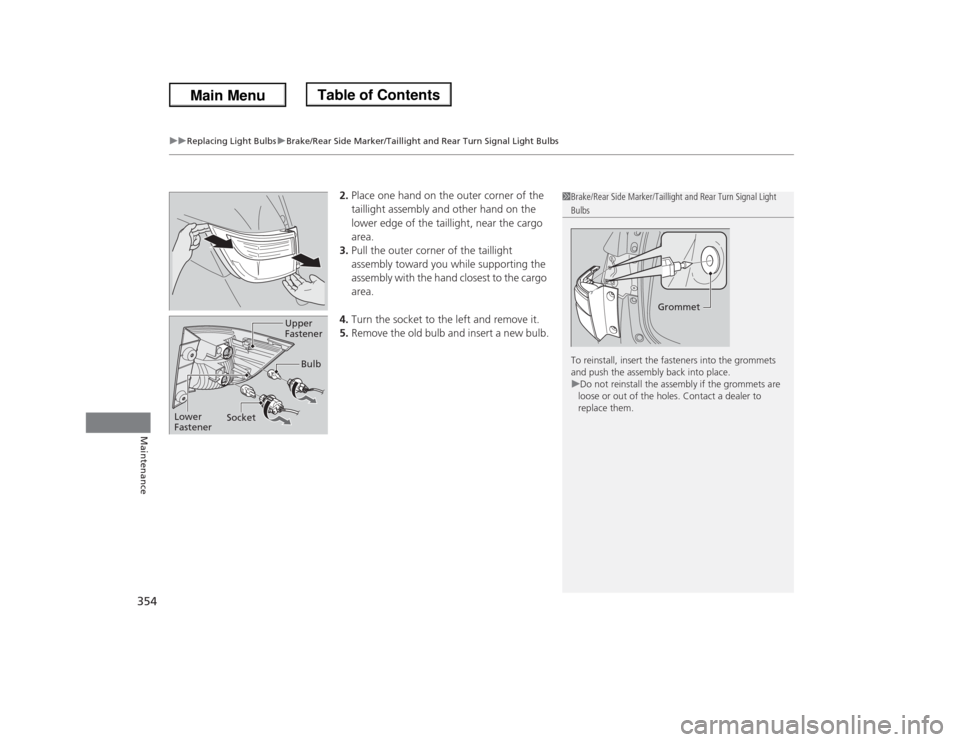
2.Place one hand on the outer corner of the
taillight assembly and other hand on the
lower edge of the taillight, near the cargo
area.
3.Pull the outer corner of the taillight
assembly toward you while supporting the
assembly with the hand closest to the cargo
area.
4.Turn the socket to the left and remove it.
5.Remove the old bulb and insert a new bulb.
1Brake/Rear Side Marker/Taillight and Rear Turn Signal Light Bulbs
To reinstall, insert the fasteners into the grommets
and push the assembly back into place.
uDo not reinstall the assembly if the grommets are
loose or out of the holes. Contact a dealer to
replace them.
Grommet
Bulb
SocketUpper
Fastener
Lower
Fastener