Page 245 of 433
244
uuRear Entertainment System
*uOperating the System
Features
■SETUP button on the remote
Press the SETUP button while the DVD is
playing to see the available options.
Use the 3, 4, , and buttons to highlight
the option and then press the ENTER button.
Disp Adjust:
You can adjust the overhead screen’s brightness, contrast, black level, color, and
tint. To return to the default display setting, select Reset.
After you make all the adjustments, the screen goes back to the top SETUP screen,
or press the CANCEL button to return.
Aspect Ratio:
You can select the screen mode with a different aspect ratio from Normal, Wide,
Zoom and Full. After you select the mode, it takes about one second to return to the
play mode with the selected ratio.
Personal Surround:
You can select the sound effect mode that fits the DVD’s audio source from Music,
Cinema, and Voice. Select Off to turn this feature off.
Page 247 of 433
246
uuRear Entertainment System
*uOperating the System
Features
■
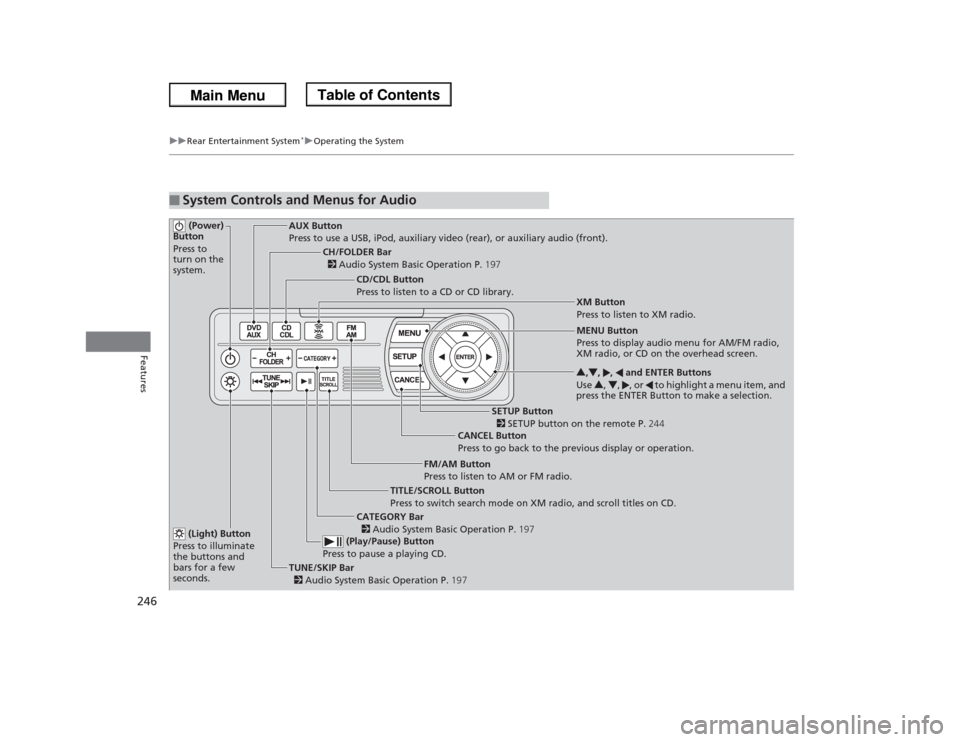
System Controls and Menus for Audio (Power)
Button
Press to
turn on the
system.
AUX Button
Press to use a USB, iPod, auxiliary video (rear), or auxiliary audio (front).
(Light) Button
Press to illuminate
the buttons and
bars for a few
seconds.TUNE/SKIP Bar
2 Audio System Basic Operation P.197 (Play/Pause) Button
Press to pause a playing CD.
TITLE/SCROLL Button
Press to switch search mode on XM radio, and scroll titles on CD.CANCEL Button
Press to go back to the previous display or operation.3,4, , and ENTER Buttons
Use 3, 4, , or to highlight a menu item, and
press the ENTER Button to make a selection.
CATEGORY Bar
2 Audio System Basic Operation P.197
CH/FOLDER Bar
2 Audio System Basic Operation P.197
CD/CDL Button
Press to listen to a CD or CD library.
FM/AM Button
Press to listen to AM or FM radio.
SETUP Button
2 SETUP button on the remote P.244 XM Button
Press to listen to XM radio.
MENU Button
Press to display audio menu for AM/FM radio,
XM radio, or CD on the overhead screen.
Page 287 of 433
uuTowing a TraileruTowing Preparation
286Driving
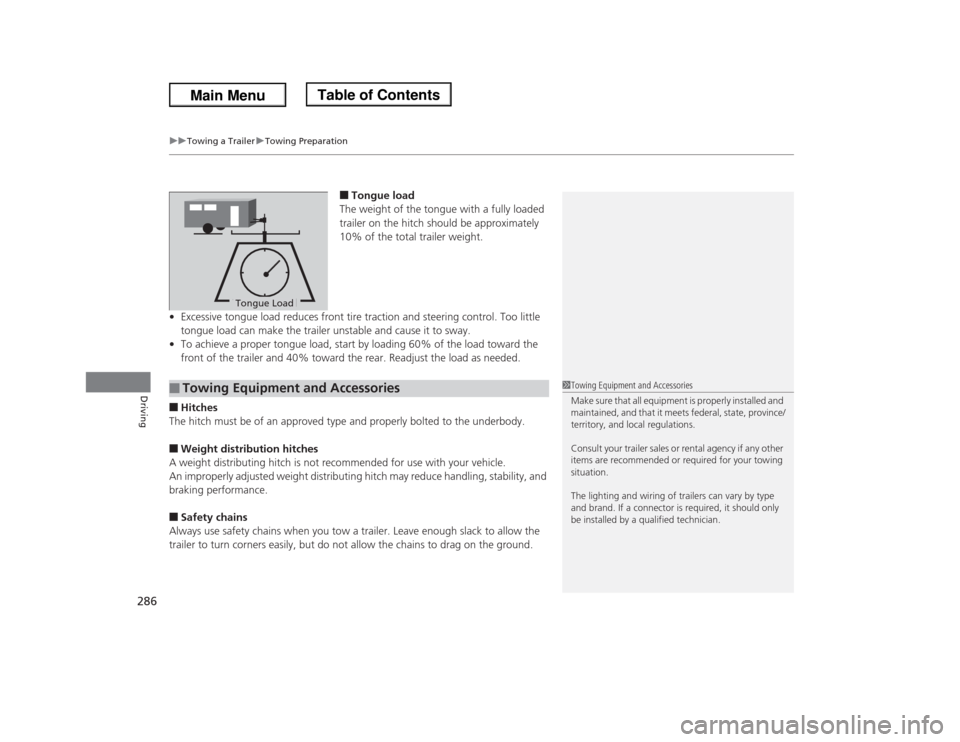
■Tongue load
The weight of the tongue with a fully loaded
trailer on the hitch should be approximately
10% of the total trailer weight.
•Excessive tongue load reduces front tire traction and steering control. Too little
tongue load can make the trailer unstable and cause it to sway.
•To achieve a proper tongue load, start by loading 60% of the load toward the
front of the trailer and 40% toward the rear. Readjust the load as needed.
■Hitches
The hitch must be of an approved type and properly bolted to the underbody.■Weight distribution hitches
A weight distributing hitch is not recommended for use with your vehicle.
An improperly adjusted weight distributing hitch may reduce handling, stability, and
braking performance.■Safety chains
Always use safety chains when you tow a trailer. Leave enough slack to allow the
trailer to turn corners easily, but do not allow the chains to drag on the ground.
Tongue LoadTongue Load
■
Towing Equipment and Accessories
1Towing Equipment and Accessories
Make sure that all equipment is properly installed and
maintained, and that it meets federal, state, province/
territory, and local regulations.
Consult your trailer sales or rental agency if any other
items are recommended or required for your towing
situation.
The lighting and wiring of trailers can vary by type
and brand. If a connector is required, it should only
be installed by a qualified technician.
Page 288 of 433
287
uuTowing a TraileruTowing Preparation
Continued
Driving
■Trailer brakes
Recommended for any trailer with a total weight of 1,000 lbs (450 kg) or more:
There are two common types of trailer brakes: surge and electric. Surge brakes are
common for boat trailers, since the brakes will get wet. If you choose electric brakes,
be sure they are electronically actuated. Do not attempt to attach trailer brakes to
your vehicle's hydraulic system, as it will lower braking effectiveness and create a
potential hazard.■Trailer light
Trailer lights and equipment must comply with federal, state, province/territory, and
local regulations. Check with your local trailer sales or rental agency for the
requirements in the area where you plan to tow.
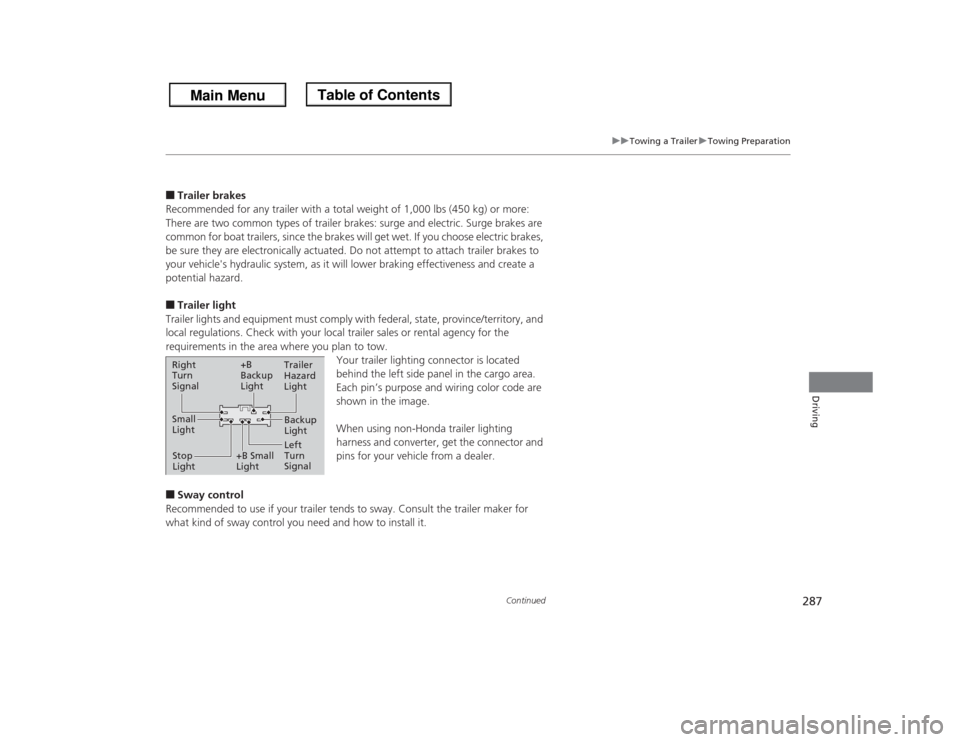
Your trailer lighting connector is located
behind the left side panel in the cargo area.
Each pin’s purpose and wiring color code are
shown in the image.
When using non-Honda trailer lighting
harness and converter, get the connector and
pins for your vehicle from a dealer.■Sway control
Recommended to use if your trailer tends to sway. Consult the trailer maker for
what kind of sway control you need and how to install it.Right
Turn
Signal
Small
Light
Stop
Light+B
Backup
Light
+B Small
LightTrailer
Hazard
Light
Left
Turn
SignalBackup
Light
Page 290 of 433
289
uuTowing a TraileruDriving Safely with a Trailer
Continued
Driving
Driving Safely with a Trailer•Have the trailer properly serviced and keep it in good condition.
•Make sure that all the weights and load in the vehicle and trailer are within limits.
2Towing Load Limits P. 285
•Securely attach the hitch, safety chains, and other necessary parts to the trailer.
•Securely store all the items in and on the trailer so that they do not shift while
driving.
•Check if the lights and brakes on the trailer are working properly.
•Check the pressure of the trailer tires, including the spare.
•Drive slower than normal.
•Obey posted speed limits for vehicles with trailer.
•Use the
(D
when towing a trailer on level roads.
•Turn more slowly and with a wider turning arc than normal.
•Allow more time and distance for braking.
•Do not brake or turn suddenly.
■
Things You Need To Know Before Towing a Trailer
■
Towing Speeds and Gears
■
Turning and Braking
1Driving Safely with a Trailer
Parking
In addition to the normal precautions, place wheel
chocks at each of the trailer’s tires.
When towing a trailer, we recommend that you carry
a full-size spare wheel and tire for your vehicle and
trailer. If you use the compact spare tire that came
with your vehicle, it could adversely affect vehicle
handling.
2Specifications P. 413
2Changing a Flat Tire P. 383
Remember to unhitch the trailer before changing a
flat tire. Ask the trailer sales or rental agency where
and how to store the trailer’s spare tire.
Page 292 of 433

291
Continued
Driving
When DrivingStarting the Engine
1.Make sure the parking brake is applied.
2.Check that the shift lever is in
(P
, then
depress the brake pedal.
uAlthough it is possible to start the vehicle
in
(N
, it is safer to start it in
(P
.
1Starting the Engine
Keep your foot firmly on the brake pedal when
starting the engine.
The engine is harder to start in cold weather and in
thinner air found at altitudes above 8,000 feet (2,400
meters).
When starting the engine in cold weather, turn off all
electrical accessories such as the lights, heating and
cooling system
*/climate control system
*, and rear
defogger in order to reduce battery drain.
If you live in a region where winter is extremely cold,
an engine block heater will improve starting and
warming of the engine. If temperatures consistently
below -22
°F (-30
°C) are expected, the coolant
mixture should be charged to a higher concentration
to prevent freezing. Consult a dealer for details.
If the exhaust system sounds abnormal or you can
smell exhaust gas inside the vehicle, have your vehicle
checked by a dealer. There may be a problem with
the engine or exhaust system.
Brake Pedal
* Not available on all models
Page 296 of 433
295
uuWhen DrivinguShifting
Continued
Driving
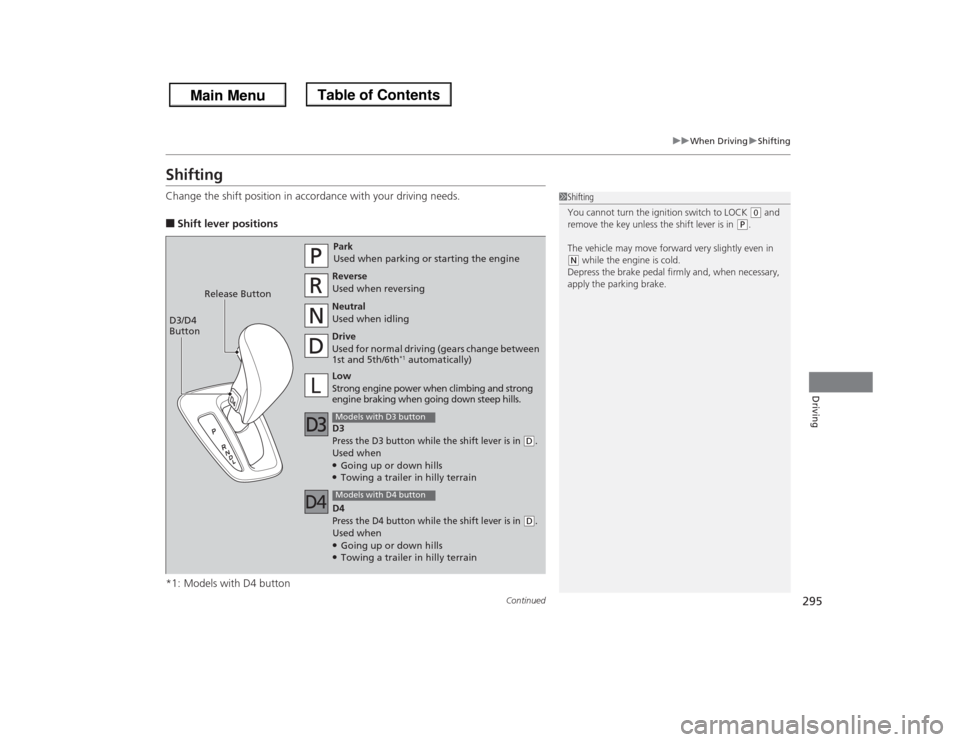
ShiftingChange the shift position in accordance with your driving needs.■Shift lever positions
*1: Models with D4 button
1Shifting
You cannot turn the ignition switch to LOCK
(0 and
remove the key unless the shift lever is in
(P.
The vehicle may move forward very slightly even in
(N while the engine is cold.
Depress the brake pedal firmly and, when necessary,
apply the parking brake.
Park
Used when parking or starting the engine
Reverse
Used when reversing
Neutral
Used when idling
Drive
Used for normal driving (gears change between
1st and 5th/6th
*1 automatically)
Models with D3 buttonLow
Strong engine power when climbing and strong
engine braking when going down steep hills. Release Button
D3/D4
Button
Models with D4 buttonD3Press the D3 button while the shift lever is in
(D.
Used when●Going up or down hills●Towing a trailer in hilly terrain
D4Press the D4 button while the shift lever is in
(D.
Used when●Going up or down hills●Towing a trailer in hilly terrain
Page 318 of 433
317Driving
Rearview CameraAbout Your Rearview CameraFor models with the navigation system, see the Navigation System Manual.
The audio/information screen can display your vehicle’s rear view.
The display automatically changes to a rear view when the shift lever is moved to (R
.
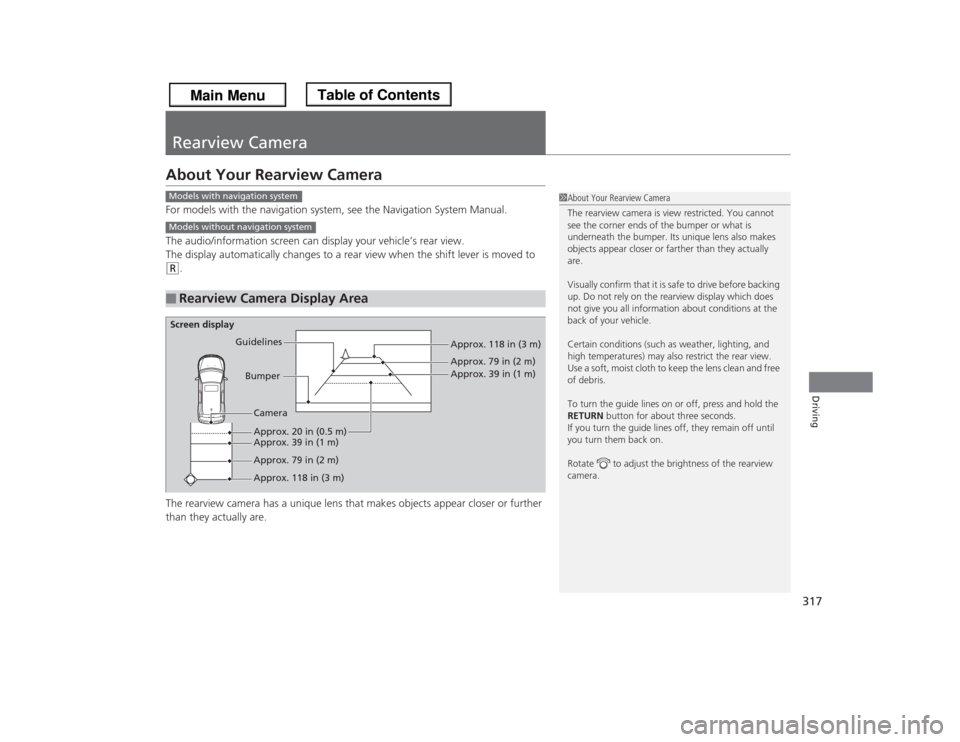
The rearview camera has a unique lens that makes objects appear closer or further
than they actually are.
■
Rearview Camera Display Area
1About Your Rearview Camera
The rearview camera is view restricted. You cannot
see the corner ends of the bumper or what is
underneath the bumper. Its unique lens also makes
objects appear closer or farther than they actually
are.
Visually confirm that it is safe to drive before backing
up. Do not rely on the rearview display which does
not give you all information about conditions at the
back of your vehicle.
Certain conditions (such as weather, lighting, and
high temperatures) may also restrict the rear view.
Use a soft, moist cloth to keep the lens clean and free
of debris.
To turn the guide lines on or off, press and hold the
RETURN button for about three seconds.
If you turn the guide lines off, they remain off until
you turn them back on.
Rotate to adjust the brightness of the rearview
camera.
Models with navigation systemModels without navigation systemScreen display
Bumper Guidelines
Approx. 118 in (3 m)
Approx. 79 in (2 m)
Approx. 39 in (1 m)
Approx. 20 in (0.5 m)
Approx. 118 in (3 m) Approx. 79 in (2 m) Approx. 39 in (1 m)Camera