Page 57 of 267
55
Routing & Guidance
Edit Waypoint Search Area
System Setup
Edit Waypoint Search AreaHINFO button
Setup
Other
Routing & Guidance
Edit Waypoint
Search Area
Select the distance from your highlighted ro ute line (on either side of your route)
that the system will search for a waypoint.
2 Adding Waypoints
P. 118
You can specify a different search distance for freeways and surface streets. 1.Rotate i to select an item. Press
u .
2. Rotate i to select a search
distance. Press u.
The following items are available:
• On Freeways : 1, 2, 5, or 10 miles can be set. Factory default is 2 miles.
• On Surface Street : 1/2, 1, 2, or 5 miles can be set. Factory default is 1/2 mile.
1Edit Waypoint Search Area
The search distance does not affect the search
range used for the Find Nearest voice commands
(e.g., say
d
“Find nearest gas station” ).
Page 60 of 267

58System Setup
Clock AdjustmentHINFO button
Clock/Wallpaper
Clock Adjustment
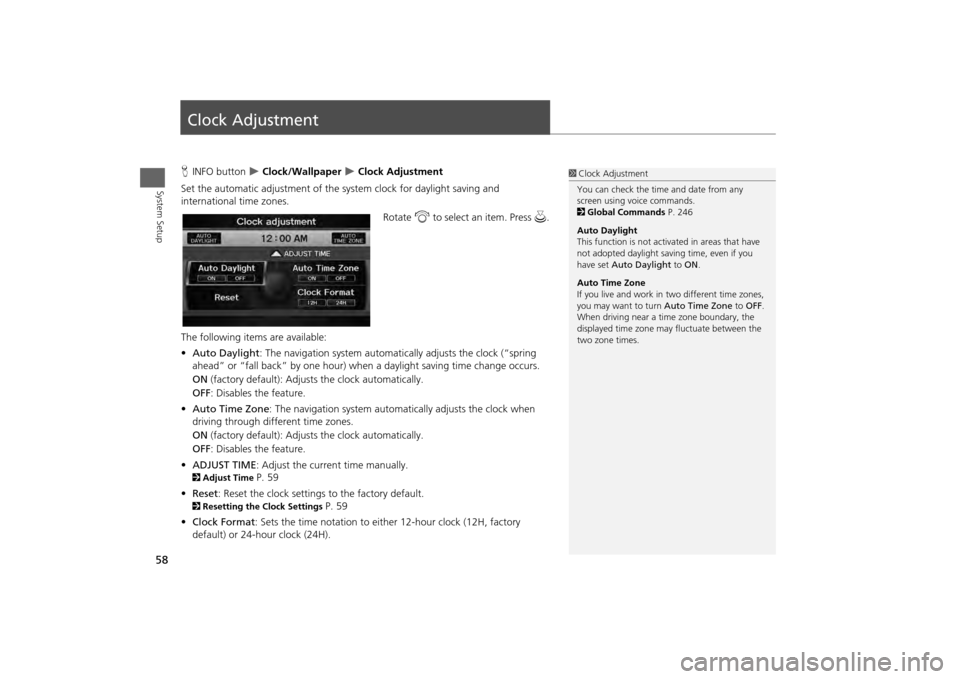
Set the automatic adjustment of the system clock for daylight saving and
international time zones.
Rotate i to select an item. Press u .
The following item s are available:
• Auto Daylight : The navigation system automati cally adjusts the clock (“spring
ahead” or “fall back” by one hour) when a daylight saving time change occurs.
ON (factory default): Adjust s the clock automatically.
OFF : Disables the feature.
• Auto Time Zone : The navigation system automati cally adjusts the clock when
driving through different time zones.
ON (factory default): Adjust s the clock automatically.
OFF : Disables the feature.
• ADJUST TIME : Adjust the current time manually.
2Adjust Time
P. 59
• Reset : Reset the clock settings to the factory default.
2Resetting the Clock Settings
P. 59
• Clock Format : Sets the time notation to either 12-hour clock (12H, factory
default) or 24-hour clock (24H).
1 Clock Adjustment
You can check the time and date from any
screen using voice commands.
2 Global Commands P. 246
Auto Daylight
This function is not activated in areas that have
not adopted daylight saving time, even if you
have set Auto Daylight to ON .
Auto Time Zone
If you live and work in two different time zones,
you may want to turn Auto Time Zone to OFF.
When driving near a time zone boundary, the
displayed time zone ma y fluctuate between the
two zone times.
Page 61 of 267
59
Clock Adjustment
Adjust Time
System Setup
Adjust TimeHINFO button
Clock/Wallpaper
Clock Adjustment
Adjust Time
Adjust the current time (hours and minutes).
1.Move w or y to select HOUR or
MINUTE .
2. Rotate i to adjust the value.
3. Move r to select OK.
Resetting the Clock SettingsHINFO button
Clock/Wallpaper
Clock Adjustment
Reset
Reset the Auto Daylight and Auto Time Zone settings to the factory defaults.
Page 66 of 267
64System Setup
Data ResetReset Factory Default SettingsHINFO button
Setup
Other
Reset Factory Default
Reset all the settings on the Setup screens and multi-view rear camera brightness
settings to their factory default.
Rotate i to select Yes. Press u to
reset the settings.
1 Reset Factory Default Settings
When you transfer the vehicle to a third party,
reset all settings to default and delete all
personal data.
The following settings are reset:•Brightness, Contrast, Black Level, Volume,
Interface Dial Feedback, Brightness (multi-view
rear camera)•Basic Settings: Units, Voice Recognition Tutor•Routing & Guidance: Rer outing, Unverified
Area Routing, Edit Wayp oint Search Area,
Guidance Mode, Street Name Guidance,
Guidance Screen Interruption•Clock Adjustment: Auto Daylight, Auto Time
Zone, Time, Clock Format•Vehicle: Off-road Tracking•Color: Map Color, Menu Color•Wallpaper Settings: Wallpaper Type, Clock
Type
Page 84 of 267
82
Entering a Destination
Place Category
Navigation
4.Rotate i to select a place name
from the list. Press u.
5. Set the route to your destination. 2 Calculating the Route
P. 90
H DEST/ROUTE button
Place Category
Fav. Subcategory
Store up to 30 favorite subcategories.
1 Place Category
The straight line distance (as the crow flies, not
driving distance) and dire ction to the destination
are shown for the highlighted place.
Restaurants with a z icon have a ZAGAT®
review. To display only restaurants with a
ZAGAT® review, select Restaurant > All Types
(Zagat Only) or say d “Zagat” .
2 Key to ZAGAT Ratings P. 216
■Favorite Subcategories
Page 96 of 267

94
Driving to Your Destination
Viewing the Route
Navigation
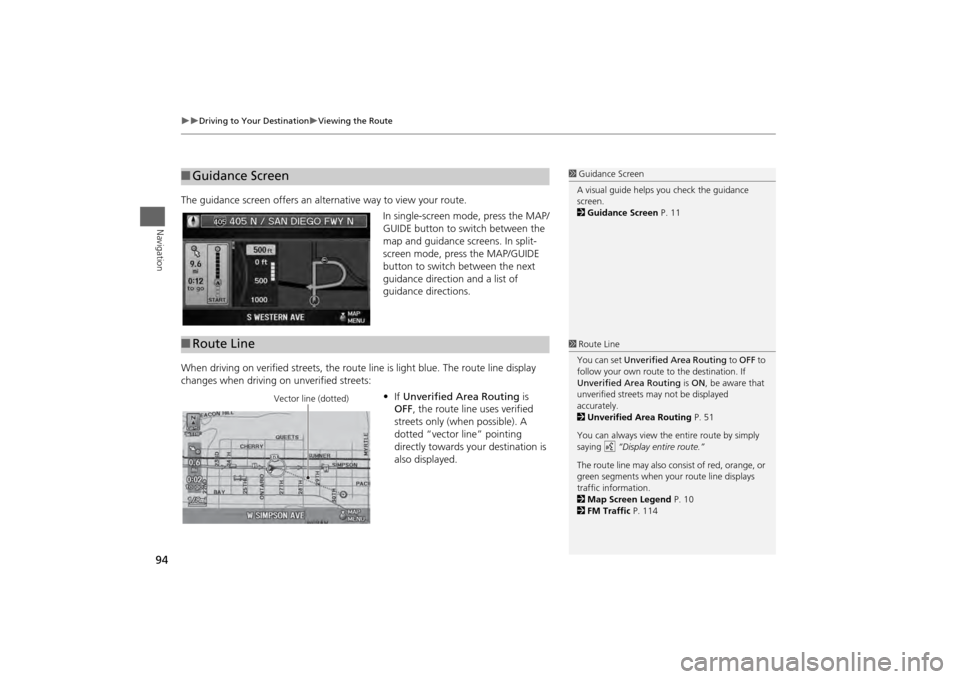
The guidance screen offers an alternative way to view your route.
In single-screen mode, press the MAP/
GUIDE button to switch between the
map and guidance screens. In split-
screen mode, press the MAP/GUIDE
button to switch between the next
guidance direction and a list of
guidance directions.
When driving on verified streets, the rout e line is light blue. The route line display
changes when driving on unverified streets:
•If Unverified Area Routing is
OFF , the route line uses verified
streets only (when possible). A
dotted “vector line” pointing
directly towards your destination is
also displayed.■ Guidance Screen
1 Guidance Screen
A visual guide helps you check the guidance
screen.
2 Guidance Screen P. 11
■Route Line
1 Route Line
You can set Unverified Area Routing to OFF to
follow your own route to the destination. If
Unverified Area Routing is ON , be aware that
unverified streets ma y not be displayed
accurately.
2 Unverified Area Routing P. 51
You can always view the entire route by simply
saying d “Display entire route.”
The route line may also c onsist of red, orange, or
green segments when your route line displays
traffic information.
2 Map Screen Legend P. 10
2 FM Traffic P. 114
Vector line (dotted)
Page 147 of 267

145Audio
Playing Hard Disc Drive (HDD) AudioThe Hard Disc Drive (HDD) Audio function plays tracks from music CDs that have
been recorded onto the built-in HDD. You ca n arrange the tracks in playlists or play
the tracks using various search methods.Selecting HDD Mode1. Press the HDD button to play tracks stored on the HDD.
2. Select a track by genre, artist, album, record ing (ripping) date, playlist, or track list.
The track number and elapsed time are displayed on the display. Title
information is displayed if found in the Gracenote® Album Info (Gracenote®
Media Database) stored on the HDD.
The HDD has two types of playlists: original playlists and user playlists. An
original playlist is automatically creat ed for each album when a music CD is
recorded. You can customize up to six us er playlists provided on the HDD by
adding tracks from your original playlists.
1 Playing Hard Disc Drive (HDD) Audio
d “Display audio screen”
You can control the HDD audio using voice
control commands.
2 HDD Commands P. 250
A visual guide helps you operate the audio
system.
2 System Controls P. 4
2 Basic Operation P. 6
In some cases, the name of the artist, album, or
track may not appear correctly.
Music tracks recorded on HDD cannot be
recorded onto CDs or other devices.
Tracks are recorded at four times the playback
speed using ultra-eff icient compression
technology; therefore, sound quality may vary
slightly from the original.
If the HDD is ever replaced, all music data is lost
and cannot be recovered.
If there is a problem, you may see an error
message on the display.
2 Error Messages P. 227
Page 210 of 267
208
Wireless Headphones
Replacing the Batteries
Rear Entertainment System
Replacing the Batteries
1.Insert a coin in the slot and twist it
slightly to pry the cover away from
the earpiece.
2. Pull the cover outward, and pivot it
out of the way.
3. Remove the battery.
4. Install the new battery in the
earpiece as shown in the diagram
next to the battery slot.
Battery Type: AAA battery
5. Slide the cover back into place on
the earpiece, then press down on
the back edge to lock it in place.
1Replacing th e Batteries
The battery is under the cover on the left
earpiece.
An improperly disposed of battery can hurt the
environment. Always c onfirm local regulations
for battery disposal.
Coin
Cover
Battery