Page 406 of 573
405
Features
Compass*
When you turn the ignition switch to ON (w
, the compass self-calibrates, and the
compass display appears.
Compass Calibration
If the compass indicates the wrong direction, or the CAL indicator blinks, you need
to manually calibrate the system.
1.Turn the ignition switch to ON
(w .
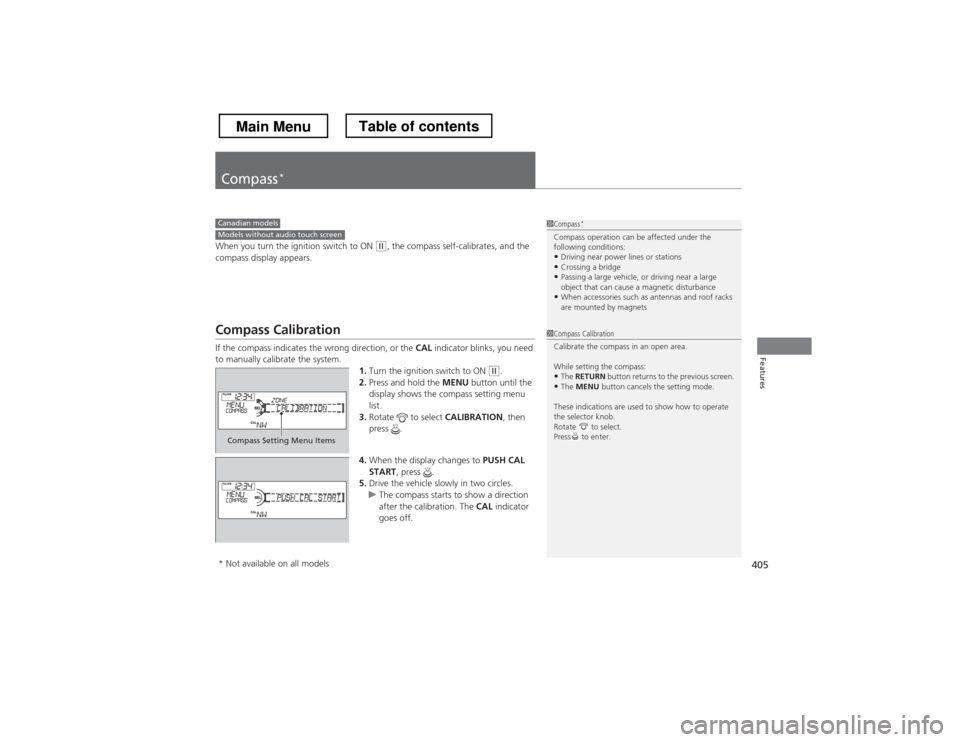
2. Press and hold the MENU button until the
display shows the compass setting menu
list.
3. Rotate to select CALIBRATION, then
press .
4. When the display changes to PUSH CAL
START , press .
5. Drive the vehicle slowly in two circles.
uThe compass starts to show a direction
after the calibration. The CAL indicator
goes off.
1Compass *
Compass operation can be affected under the
following conditions: • Driving near power lines or stations
• Crossing a bridge
• Passing a large vehicle, or driving near a large
object that can cause a magnetic disturbance
• When accessories such as antennas and roof racks
are mounted by magnetsCanadian modelsModels without audio touch screen
1Compass Calibration
Calibrate the compass in an open area.
While setting the compass:
• The RETURN button returns to the previous screen.
• The MENU button cancels the setting mode.
These indications are used to show how to operate
the selector knob.
Rotate to select.
Press to enter.
Compass Setting Menu Items
* Not available on all models
Main MenuTable of contents
Page 407 of 573
406
uuCompass*uCompass Zone Selection
Features
Compass Zone Selection
1.Turn the ignition switch to ON
(w .
2. Press and hold the MENU button until the
display shows the compass setting menu
list.
3. Rotate to select ZONE, then press .
The display shows the current zone number.
4. Rotate to select the zone number of
your area (See Zone Map), then press .1Compass Zone Selection
The zone selection is done to compensate the
variation between magnetic north and true north.
If the calibration starts while the audio system is in
use, the display returns to normal after the calibration is completed.
Zone Number
1
23
4
5 6
78910 11121314
15
Zone Map
Guam Island: Zone 8
Puerto Rico: Zone 11
Main MenuTable of contents
Page 408 of 573
407
Features
Compass*
When you turn the ignition switch to ON (w
*1
, the compass self-calibrates, and the
compass display appears.
Compass Calibration
If the compass indicates the wrong direction, or the CAL indicator blinks, you need
to manually calibrate the system.
1.Turn the ignition switch to ON
(w *1
.
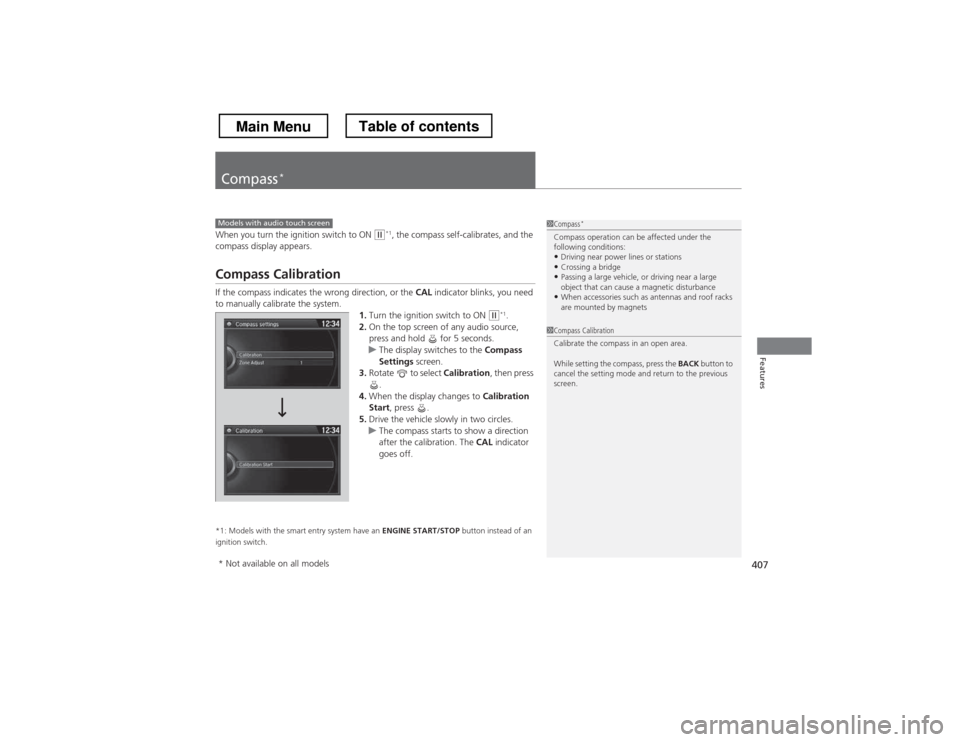
2. On the top screen of any audio source,
press and hold for 5 seconds.
uThe display switches to the Compass
Settings screen.
3. Rotate to select Calibration, then press
.
4. When the display changes to Calibration
Start , press .
5. Drive the vehicle slowly in two circles.
uThe compass starts to show a direction
after the calibration. The CAL indicator
goes off.
*1: Models with the smart entry system have an ENGINE START/STOP button instead of an
ignition switch.
Models with audio touch screen1Compass *
Compass operation can be affected under the
following conditions: • Driving near power lines or stations
• Crossing a bridge
• Passing a large vehicle, or driving near a large
object that can cause a magnetic disturbance
• When accessories such as antennas and roof racks
are mounted by magnets
1Compass Calibration
Calibrate the compass in an open area.
While setting the compass, press the BACK button to
cancel the setting mode and return to the previous
screen.
* Not available on all models
Main MenuTable of contents
Page 409 of 573
408
uuCompass*uCompass Zone Selection
Features
Compass Zone Selection
1.Turn the ignition switch to ON
(w *1
.
2. On the top screen of any audio source,
press and hold for 5 seconds.
uThe display switches to the Compass
Settings screen.
3. Rotate to select Zone Adjust, then
press .
uThe display shows the current zone
number.
4. Rotate to select the zone number of
your area (See Zone Map), then press .
*1: Models with the smart entry system have an ENGINE START/STOP button instead of an
ignition switch.
1
23
4
5 6
78910 11121314
15
Zone Map
Guam Island: Zone 8
Puerto Rico: Zone 11
1Compass Zone Selection
The zone selection is done to compensate the
variation between magnetic north and true north.
If the calibration starts while the audio system is in
use, the display returns to normal after the calibration is completed.
Main MenuTable of contents
Page 445 of 573
444
uuWhen DrivinguLaneWatchTM
*
Driving
LaneWatch TM
*
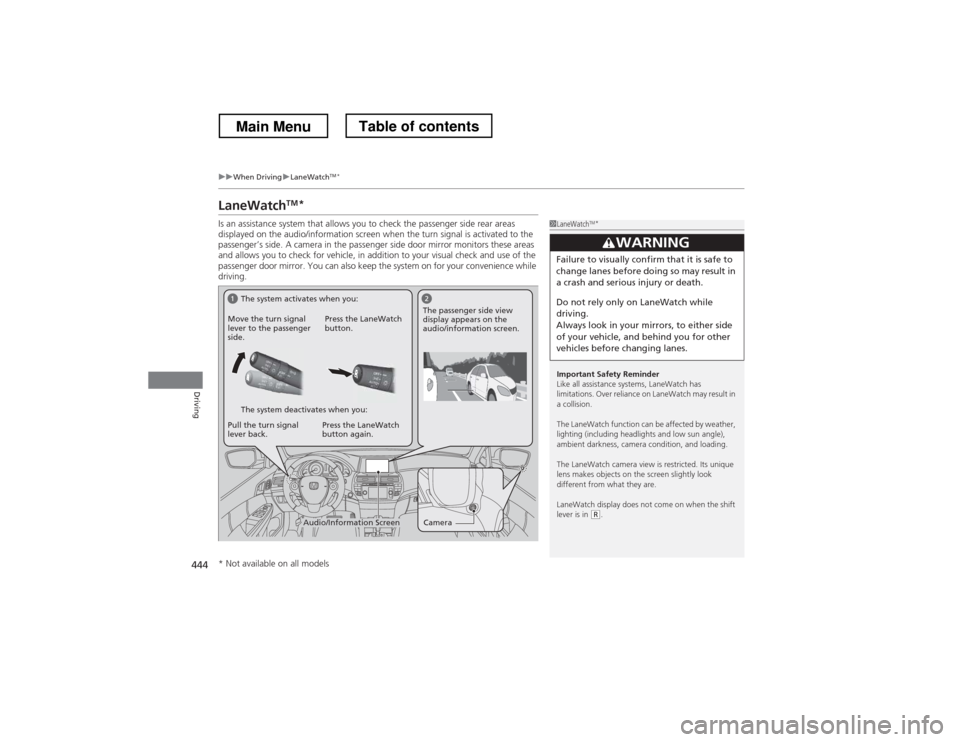
Is an assistance system that allows you to check the passenger side rear areas
displayed on the audio/information screen when the turn signal is activated to the
passenger’s side. A camera in the passenger side door mirror monitors these areas
and allows you to check for vehicle, in addition to your visual check and use of the
passenger door mirror. You can also keep the system on for your convenience while
driving.
1LaneWatch TM
*
Important Safety Reminder
Like all assistance systems, LaneWatch has
limitations. Over reliance on LaneWatch may result in a collision.
The LaneWatch function can be affected by weather,
lighting (including headlights and low sun angle),
ambient darkness, camera condition, and loading.
The LaneWatch camera view is restricted. Its unique
lens makes objects on the screen slightly look
different from what they are.
LaneWatch display does not come on when the shift lever is in
(R .
3WARNING
Failure to visually confirm that it is safe to
change lanes before doing so may result in
a crash and serious injury or death.
Do not rely only on LaneWatch while
driving.
Always look in your mirrors, to either side
of your vehicle, and behind you for other
vehicles before changing lanes.
CameraAudio/Information Screen
Move the turn signal
lever to the passenger
side.
Press the LaneWatch
button.
Pull the turn signal
lever back. Press the LaneWatch button again. The passenger side view
display appears on the
audio/information screen.
The system activates when you:
The system deactivates when you:
* Not available on all models
Main MenuTable of contents
Page 446 of 573
445
uuWhen DrivinguLaneWatchTM
*
Driving
■ Customizing the LaneWatch settings
You can customize the following items using the audio/information screen. • Show with Turn Signal : Selects whether LaneWatch monitor comes on when
you operate the turn signal light lever.
• Reference Lines : Selects whether the reference lines appear on the LaneWatch
monitor.
• Next Maneuver Pop up *
: Selects whether a turn direction screen of the
navigation system interrupts the LaneWatch display.
• Display : Adjusts display settings.
2 Customized Features *
P. 281
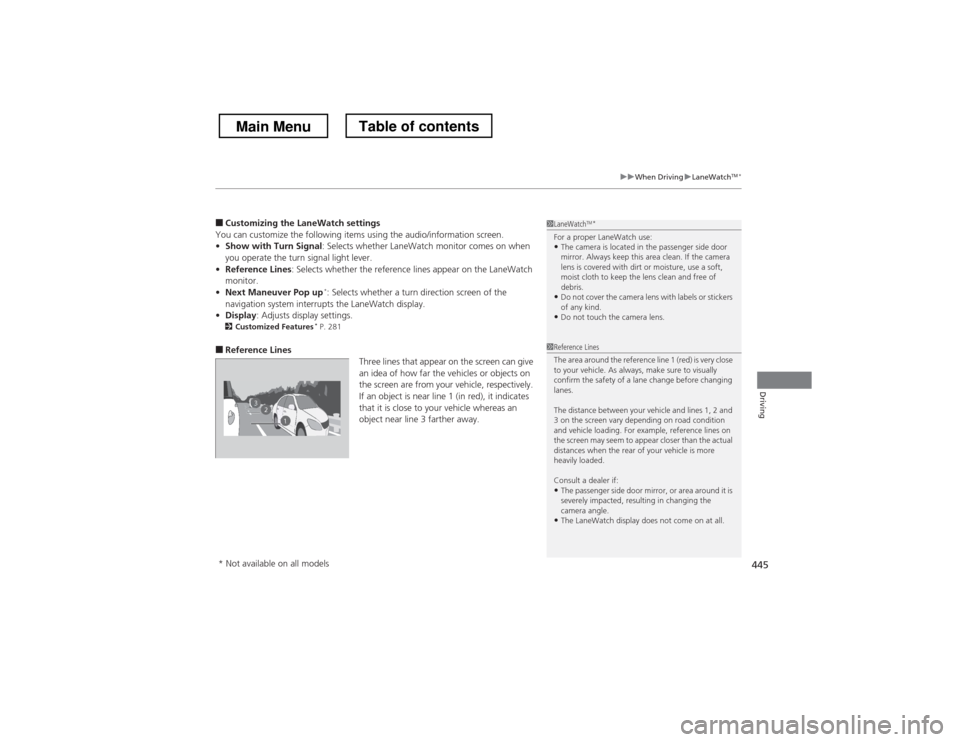
■ Reference Lines
Three lines that appear on the screen can give
an idea of how far the vehicles or objects on
the screen are from your vehicle, respectively.
If an object is near line 1 (in red), it indicates
that it is close to your vehicle whereas an
object near line 3 farther away.1LaneWatchTM
*
For a proper LaneWatch use: • The camera is located in the passenger side door
mirror. Always keep this area clean. If the camera
lens is covered with dirt or moisture, use a soft,
moist cloth to keep the lens clean and free of
debris.
• Do not cover the camera lens with labels or stickers of any kind.
• Do not touch the camera lens.
23
1
1Reference Lines
The area around the reference line 1 (red) is very close
to your vehicle. As always, make sure to visually
confirm the safety of a lane change before changing
lanes.
The distance between your vehicle and lines 1, 2 and
3 on the screen vary depending on road condition
and vehicle loading. For example, reference lines on
the screen may seem to appear closer than the actual
distances when the rear of your vehicle is more heavily loaded. Consult a dealer if:
• The passenger side door mirror, or area around it is
severely impacted, resulting in changing the
camera angle.
• The LaneWatch display does not come on at all.
* Not available on all models
Main MenuTable of contents
Page 456 of 573
455
Driving
Multi-View Rear Camera
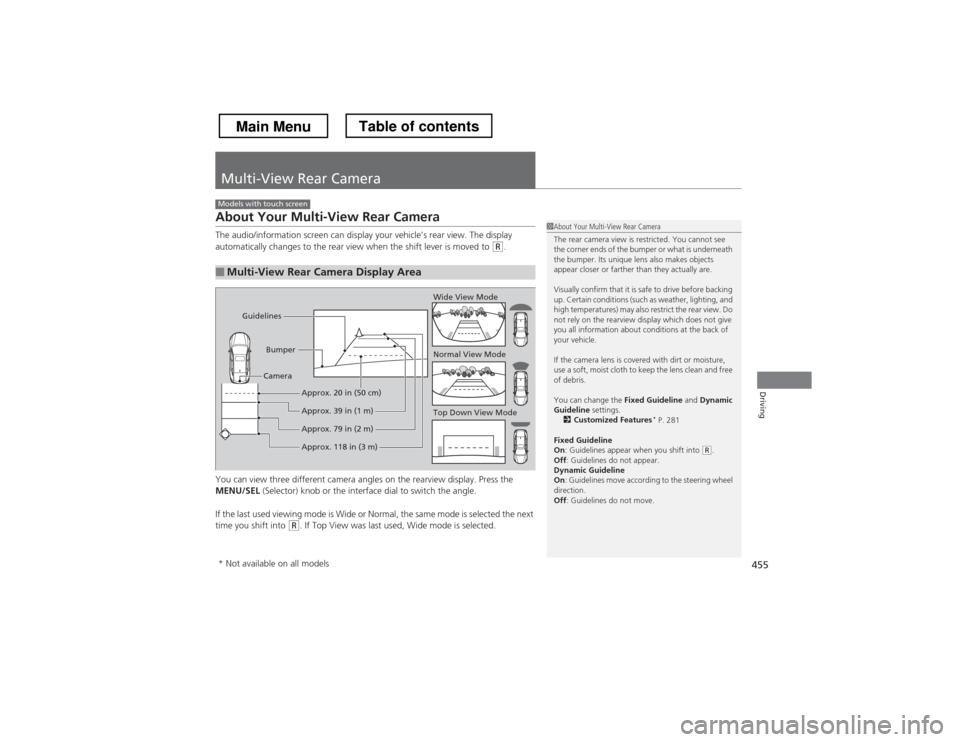
About Your Multi-View Rear Camera
The audio/information screen can display your vehicle’s rear view. The display
automatically changes to the rear view when the shift lever is moved to
(R.
You can view three different camera angles on the rearview display. Press the
MENU/SEL (Selector) knob or the interface dial to switch the angle.
If the last used viewing mode is Wide or Normal, the same mode is selected the next
time you shift into
(R . If Top View was last used, Wide mode is selected.
■Multi-View Rear Camera Display Area
Models with touch screen
1About Your Multi-View Rear Camera
The rear camera view is restricted. You cannot see
the corner ends of the bumper or what is underneath
the bumper. Its unique lens also makes objects
appear closer or farther than they actually are.
Visually confirm that it is safe to drive before backing
up. Certain conditions (such as weather, lighting, and
high temperatures) may also restrict the rear view. Do
not rely on the rearview display which does not give
you all information about conditions at the back of your vehicle.
If the camera lens is covered with dirt or moisture,
use a soft, moist cloth to keep the lens clean and free
of debris.
You can change the Fixed Guideline and Dynamic
Guideline settings.
2 Customized Features *
P. 281
Fixed Guideline On : Guidelines appear when you shift into
(R.
Off : Guidelines do not appear.
Dynamic Guideline On : Guidelines move according to the steering wheel
direction. Off : Guidelines do not move.
Top Down View Mode
Normal View Mode
Wide View Mode
Guidelines
Bumper
Camera
Approx. 118 in (3 m)
Approx. 79 in (2 m)
Approx. 39 in (1 m)
Approx. 20 in (50 cm)
* Not available on all models
Main MenuTable of contents
Page 507 of 573
506
Maintenance
Battery
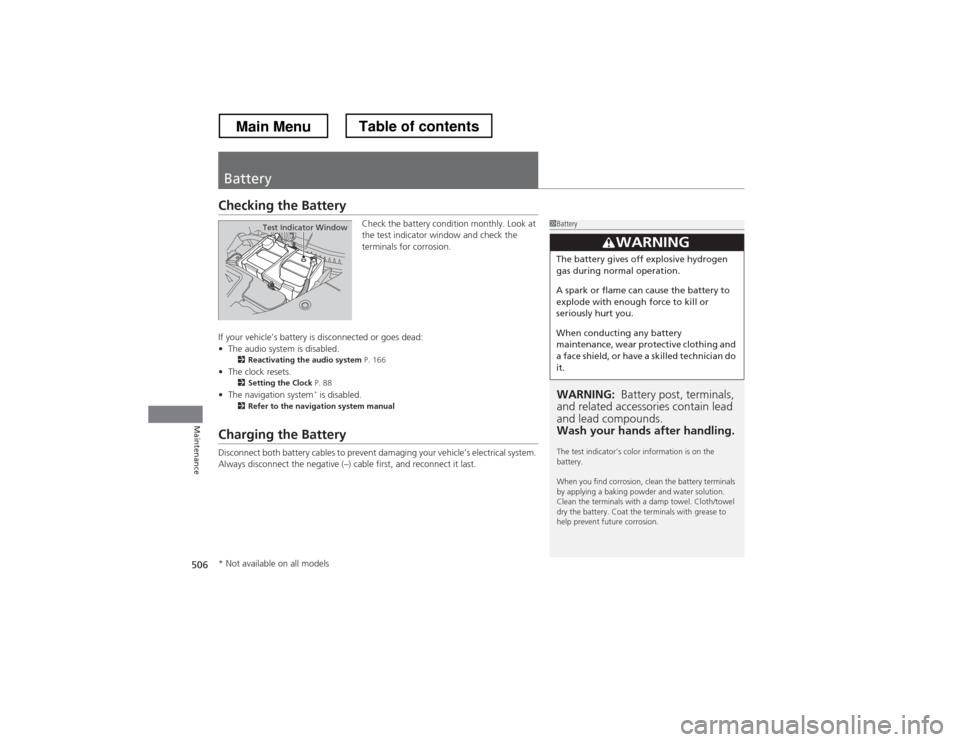
Checking the BatteryCheck the battery condition monthly. Look at
the test indicator window and check the
terminals for corrosion.
If your vehicle’s battery is disconnected or goes dead: • The audio system is disabled.
2 Reactivating the audio system P. 166
• The clock resets.
2 Setting the Clock P. 88
• The navigation system *
is disabled.
2 Refer to the navigation system manual
Charging the Battery
Disconnect both battery cables to prevent damaging your vehicle’s electrical system.
Always disconnect the negative (–) cab le first, and reconnect it last.
1Battery
WARNING: Battery post, terminals,
and related accessories contain lead and lead compounds.
Wash your hands after handling.
The test indicator’s color information is on the battery.
When you find corrosion, clean the battery terminals
by applying a baking powder and water solution.
Clean the terminals with a damp towel. Cloth/towel
dry the battery. Coat the terminals with grease to
help prevent future corrosion.
3WARNING
The battery gives off explosive hydrogen
gas during normal operation.
A spark or flame can cause the battery to
explode with enough force to kill or
seriously hurt you.
When conducting any battery
maintenance, wear protective clothing and
a face shield, or have a skilled technician do it.
Test Indicator Window
* Not available on all models
Main MenuTable of contents