Page 127 of 325

126
Controls
Interior Lights/Interior Convenience Items
Interior Lights■ON
The interior lights come on regardless of
whether the doors are open or closed. ■ Door activated
The interior lights come on in the following
situations: • When either of the doors are opened.
• You unlock the driver's door.
• You remove the key from the ignition switch.
■ OFF
The interior lights remain off regardless of
whether the doors are open or closed.
Each front interior light can be used as a map
light. Each light can be turned on and off by
pressing the lenses.
■Interior Light Switch1Interior Light Switch
In the door activated position, the interior lights fade
out and go off about 30 seconds after the doors are closed.
The lights go off after 30 seconds in the following
situations: • When you unlock the driver's door but do not open
it.
• When you remove the key from the ignition switch
but do not open a door.
You can change the interior light dimming time. 2 Customized Features P. 90
The interior lights go off immediately in the following
situations: • When you lock the driver's door.
• When you close the driver's door with the key in
the ignition switch.
• When you turn the ignition switch to ON
(w .
If you leave either door open without the key in the
ignition switch, the interior lights go off after about 15 minutes.
When the interior light switch is in the door activated
position and either door is open, the front interior
light will not go off when you press the lens.
Door Activated
Position
On
Off
Rear
Front
Main MenuTable of Contents
Page 131 of 325

uuInterior Lights/Interior Convenience ItemsuInterior Convenience Items
130
Controls
Rear trays to store small items are located on
the rear cargo console.
To access the rear cargo console, open the
door, slide the seat by pulling up on the bar, then pull up on the seat-back adjustment lever. ■ Separator
Folding down the separator will create more cargo area. 1. Remove any items from the rear trays.
2. Pull up the release handle on the top of the
separator.
■Rear Cargo Console1Rear Cargo Console
Make sure all items on the rear trays are secured.
They could be thrown around and cause injury during a crash.
To return the sepa rator upright, push it backwards
until it locks.
Make sure that the fol ded separator does not press
against the passenger seat, as this could cause the
weight sensors to work improperly.
2 Side Airbag Off Indicator P. 48
Make sure all items in the cargo area are
secured. Loose items can fly forward if you have
to brake hard.
3WARNING
This vehicle is not equipped with rear seats
or seatbelts.
Sitting in this area may result in injury or
death, and may violate state laws.
Only the driver and one front seat
passenger may be safely seated in this vehicle.
Trays
Bar
Seat-back Adjustment
Lever
Release Handle
Separator
Main MenuTable of Contents
Page 175 of 325
174
uuBefore DrivinguDriving Preparation
Driving
•Be sure items placed on the floor behind the driver’s and passenger’s seats cannot
roll under the seats.
uThey can interfere with the driver's ability to operate the pedals, the operation
of the seats, or the operation of the sensors under the seats.
• Everyone in the vehicle must fasten their seat belt.
2 Fastening a Seat Belt P. 35
• Make sure that the indicators in the instrument panel come on when you start the
vehicle, and go off soon after.
uAlways have a dealer check the vehicle if a problem is indicated.
2 Indicators P. 66
Main MenuTable of Contents
Page 176 of 325

175
uuBefore DrivinguMaximum Load Limit
Continued
Driving
Maximum Load Limit
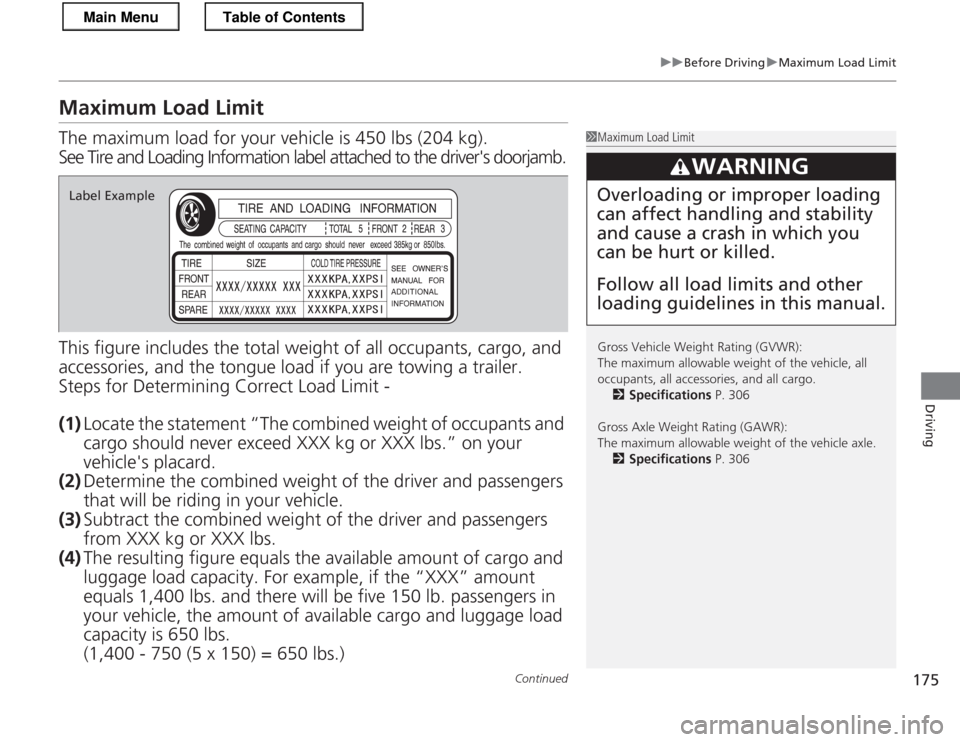
The maximum load for your vehicle is 450 lbs (204 kg).
See Tire and Loading Information label attached to the driver's doorjamb.
This figure includes the total weight of all occupants, cargo, and
accessories, and the tongue load if you are towing a trailer.
Steps for Determining Correct Load Limit -
(1) Locate the statement “The combined weight of occupants and
cargo should never exceed XXX kg or XXX lbs.” on your vehicle's placard.
(2) Determine the combined weight of the driver and passengers
that will be riding in your vehicle.
(3) Subtract the combined weight of the driver and passengers
from XXX kg or XXX lbs.
(4) The resulting figu re equals the availabl e amount of cargo and
luggage load capacity. For example, if the “XXX” amount equals 1,400 lbs. an d there will be five 15 0 lb. passengers in
your vehicle, the amount of available carg o and luggage load
capacity is 650 lbs.(1,400 - 750 (5 x 150) = 650 lbs.)
1Maximum Load Limit
Gross Vehicle Weight Rating (GVWR):
The maximum allowable weight of the vehicle, all
occupants, all accessories, and all cargo. 2 Specifications P. 306
Gross Axle Weight Rating (GAWR):
The maximum allowable weight of the vehicle axle. 2 Specifications P. 306
3WARNING
Overloading or improper loading can affect handling and stability and cause a crash in which you can be hurt or killed. Follow all load limits and other loading guidelines in this manual.Label Example
Main MenuTable of Contents
Page 177 of 325

176
uuBefore DrivinguMaximum Load Limit
Driving
(5)Determine the combined weight of luggage and cargo being
loaded on the vehicle. That weight may not safely exceed the available cargo and luggage load capacity calculated in step 4.
(6) If your vehicle will be towing a trailer, load from your trailer will
be transferred to your vehicle. Co nsult this manual to
determine how this reduces the available cargo and luggage load capacity of your vehicle.
In addition, the total weight of the vehicle, all occupants, accessories, cargo, and trailer tongue load must not exceed the
Gross Vehicle Weight Rating (GVWR) or the Gross Axle Weight
Rating (GAWR). Both are on a lab el on the driver’s doorjamb.
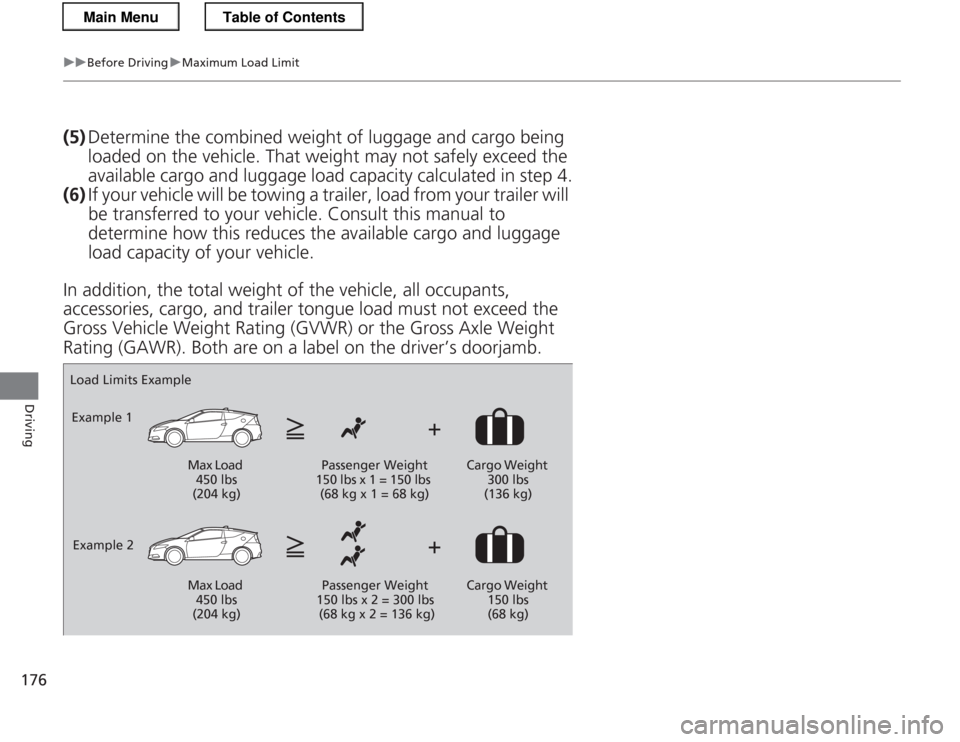
Load Limits Example
Example 1
Max Load 450 lbs
(204 kg) Passenger Weight
150 lbs x 1 = 150 lbs
(68 kg x 1 = 68 kg) Cargo Weight
300 lbs
(136 kg)
Example 2 Max Load 450 lbs
(204 kg) Passenger Weight
150 lbs x 2 = 300 lbs
(68 kg x 2 = 136 kg) Cargo Weight
150 lbs (68 kg)
Main MenuTable of Contents
Page 192 of 325
191
uuWhen DrivinguAuto Idle Stop
Continued
Driving
Auto Idle Stop
To help maximize fuel economy, Auto Idle Stop shuts off the engine when the
vehicle comes to a stop, depending on environmental and vehicle operating
conditions. The AUTO STOP indicator blinks at this time.
The engine then restarts once the vehicle is
about to move again, and the indicator goes off.
If the driver’s door is opened while the
indicator is blinking, a buzzer sounds to notify
you that the Auto Idle Stop function is in operation.
Automatic transmiss ion (CVT) models
1Auto Idle Stop
The duration of the Auto Idle Stop operation:
• Increases in the ECON mode, compared to normal
or sport mode, with climate control in use.
• Decreases if you operate the wipers and climate
control simultaneously.
AUTO STOP
Indicator
Main MenuTable of Contents
Page 195 of 325

194
uuWhen DrivinguAuto Idle Stop
Driving
Auto Idle Stop
To help maximize fuel economy, the engine automatically stops when the vehicle
comes to a stop, depending on environmental and vehicle operating conditions. The
AUTO STOP indicator blinks at this time. The engine then restarts once the vehicle
is about to move again when you depress the clutch pedal fully, and the indicator
goes off.
If the driver’s door is opened while the
indicator is blinking, a buzzer sounds to notify
you that the Auto Idle Stop function is in operation.
Manual transmission models
1Auto Idle Stop
If the Auto Idle Stop operating time lasts long enough
to lower the 12 volt battery charge or the IMA battery charge, the engine may not restart automatically.
Manually turn off the engine when you leave your
vehicle.
The duration of Auto Idle Stop operation:• Increases in the ECON mode, compared to normal
or sport mode, with climate control in use.
• Decreases if you operate the wipers and climate
control simultaneously.
AUTO STOP
Indicator
Main MenuTable of Contents
Page 205 of 325

uuWhen DrivinguVSA® (Vehicle Stability Assist), aka ESC (Electronic Stability Control), System
204
Driving
This button is on the driver side control panel.
To turn the VSA ® system on and off, press and
hold it until you hear a beep. VSA ® will stop and the indicator will come on.
To turn it on again, press the (VSA ® OFF)
button until you hear a beep.VSA ® is turned on every time you start the
engine, even if you turned it off the last time
you drove the vehicle.
■VSA ® On and Off1VSA ® (Vehicle Stability Assist), aka ESC (Electronic Stability
Control), System Without VSA ®, your vehicle will have normal braking
and cornering ability, but it will not have VSA ®
traction and stability enhancement.
In certain unusual conditions when your vehicle gets
stuck in shallow mud or fresh snow, it may be easier
to free it with the VSA ® temporarily switched off.
When the VSA ® system is off, the traction control
system is also off. You should only attempt to free
your vehicle with the VSA ® off if you are not able to
free it when the VSA ® is on.
Immediately after freeing your vehicle, be sure to
switch VSA ® on again. We do not recommend driving
your vehicle with the VSA ® and traction control
systems switched off.
If the low tire pressure/TPMS indicator comes on or
blinks, the VSA ® system comes on automatically. In
this case, you cannot turn the system off by pressing
the button.
You may hear a motor sound coming from the
engine compartment while system checks are being
performed immediatel y after starting the engine or
while driving. This is normal.
VSA ® OFF
Indicator
Main MenuTable of Contents