Page 243 of 346
242
uuBrakinguAnti-lock Brake System (ABS)
Driving
Anti-lock Brake System (ABS)Helps prevent the wheels from locking up, and helps you retain steering control by
pumping the brakes rapidly, much faster than you.
The electronic brake distribution (EBD) system, which is part of the ABS, also
balances the front-to-rear braking distribution according to vehicle loading.
You should never pump the brake pedal. Let the ABS work for you by always
keeping firm, steady pressure on the brake pedal. This is sometimes referred to as
“stomp and steer.”■ABS operation
The brake pedal may pulsate slightly when the ABS is working. Keep holding the
pedal firmly down. On dry pavement, you will need to press on the brake pedal very
hard before the ABS activates. However, you may feel the ABS activate immediately
if you are trying to stop on snow or ice.
When the vehicle speed goes under 6 mph (10 km/h), the ABS stops.■ABS
1Anti-lock Brake System (ABS)NOTICEThe ABS may not function correctly if you use an
incorrect tire type and size.
When the ABS indicator comes on while driving,
there may be a problem with the system.
While normal braking is not affected, there is a
possibility of the ABS not operating. Have the vehicle
checked by a dealer immediately.
The ABS does not reduce the time or distance it takes
to stop the vehicle. It only helps with steering control
during hard braking.
In the following cases, your vehicle may need more
stopping distance than a vehicle without the ABS:•When driving on rough road surfaces, including
when driving on uneven surfaces, such as gravel or
snow.•When tire chains are installed.
You may hear a motor sound coming from the
engine compartment while system checks are being
performed immediately after starting the engine or
while driving. This is normal.
Page 244 of 346
243
uuBrakinguBrake Assist System
Driving
Brake Assist SystemDesigned to assist the driver by generating greater braking force when you depress
the brake pedal hard during emergency braking.■Brake assist system operation
Press the brake pedal firmly for more powerful braking.
When brake assist operates, the pedal may wiggle slightly and an operating noise
may be heard. This is normal. Keep holding the brake pedal firmly down.■Brake Assist System
Page 252 of 346
251
Maintenance
This chapter discusses basic maintenance.
Before Performing Maintenance
Inspection and Maintenance ............ 252Safety When Performing Maintenance .... 253Parts and Fluids Used in Maintenance
Service ........................................... 254
Maintenance Minder
TM..................... 255
Maintenance Under the Hood
Maintenance Items Under the Hood ..... 259Opening the Hood ........................... 260
Recommended Engine Oil ................ 261
Oil Check ......................................... 262
Adding Engine Oil ............................ 263Changing the Engine Oil and Oil Filter .. 264
Engine Coolant ................................ 266
Transmission Fluid ............................ 268
Brake Fluid ....................................... 269
Refilling Window Washer Fluid......... 270
Replacing Light Bulbs....................... 271Checking and Maintaining Wiper
Blades.......................................... 277Checking and Maintaining Tires
Checking Tires ................................. 279
Tire and Loading Information Label .. 280
Tire Labeling .................................... 280DOT Tire Quality Grading (U.S. Vehicles) .. 282Wear Indicators................................ 284Tire Service Life ................................ 284
Tire and Wheel Replacement ........... 285
Tire Rotation .................................... 286
Winter Tires ..................................... 287
12 Volt Battery.................................. 288
Remote Transmitter Care
Replacing the Button Battery ........... 289
Climate Control System Maintenance...... 290Cleaning
Interior Care .................................... 291
Exterior Care.................................... 293
Page 253 of 346
252Maintenance
Before Performing MaintenanceInspection and MaintenanceFor your safety, perform all listed inspections and maintenance to keep your vehicle
in good condition. If you become aware of any abnormality (noise, smell, insufficient
brake fluid, oil residue on the ground, etc.), have your vehicle inspected by a dealer.
(Note, however, that service at a dealer is not mandatory to keep your warranties in
effect.) Refer to the separate maintenance booklet for detailed maintenance and
inspection information.■Daily inspections
Perform inspections before long distance trips, when washing the vehicle, or when
refueling.■Periodic inspections
•Check the continuously variable transmission fluid level monthly.2Continuously Variable Transmission (CVT) Fluid P. 268
•Check the brake fluid level monthly.
2Checking the Brake Fluid P. 269
•Check the tire pressure monthly. Examine the tread for wear and foreign objects.
2Checking and Maintaining Tires P. 279
•Check the operation of the exterior lights monthly.
2Replacing Light Bulbs P. 271
•Check the condition of the wiper blades at least every six months.
2Checking and Maintaining Wiper Blades P. 277
■Types of Inspection and Maintenance
1Inspection and Maintenance
Maintenance, replacement, or repair of
emissions control devices and systems may be
done by any automotive repair establishment or
individuals using parts that are “certified” to
EPA standards.
According to state and federal regulations, failure to
perform maintenance on the maintenance main
items marked with # will not void your emissions
warranties. However, all maintenance services should
be performed in accordance with the intervals
indicated by the intelligent multi-information display.
2Maintenance Service Items P. 257
If you want to perform complex maintenance tasks
that require more skills and tools, you can purchase a
subscription to the Service Express website at
www.techinfo.honda.com.
2Authorized Manuals P. 335
If you want to perform maintenance yourself, make
sure that you have the necessary tools and skills first.
After performing maintenance, update the records in
the separate maintenance booklet.U.S. models
Page 261 of 346
260
uuMaintenance Under the HooduOpening the Hood
Maintenance
Opening the Hood
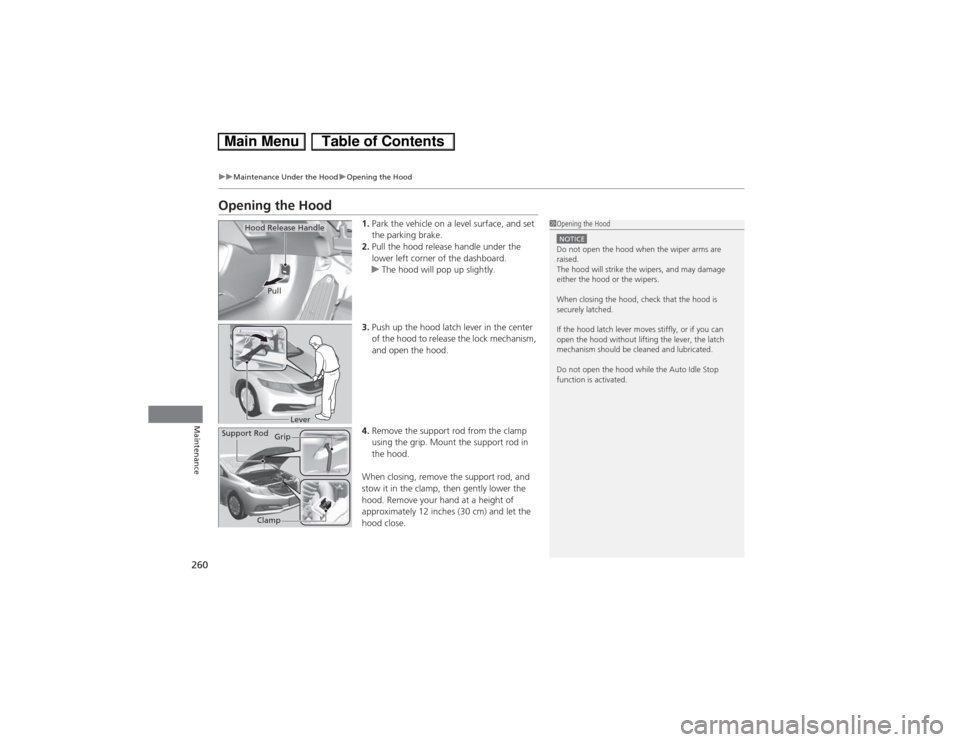
1.Park the vehicle on a level surface, and set
the parking brake.
2.Pull the hood release handle under the
lower left corner of the dashboard.
uThe hood will pop up slightly.
3.Push up the hood latch lever in the center
of the hood to release the lock mechanism,
and open the hood.
4.Remove the support rod from the clamp
using the grip. Mount the support rod in
the hood.
When closing, remove the support rod, and
stow it in the clamp, then gently lower the
hood. Remove your hand at a height of
approximately 12 inches (30 cm) and let the
hood close.
1Opening the HoodNOTICEDo not open the hood when the wiper arms are
raised.
The hood will strike the wipers, and may damage
either the hood or the wipers.
When closing the hood, check that the hood is
securely latched.
If the hood latch lever moves stiffly, or if you can
open the hood without lifting the lever, the latch
mechanism should be cleaned and lubricated.
Do not open the hood while the Auto Idle Stop
function is activated.
Hood Release Handle
Pull
Lever
Support Rod
Grip
Clamp
Page 272 of 346
271
Continued
Maintenance
Replacing Light BulbsHeadlight BulbsWhen replacing, use the following bulbs.
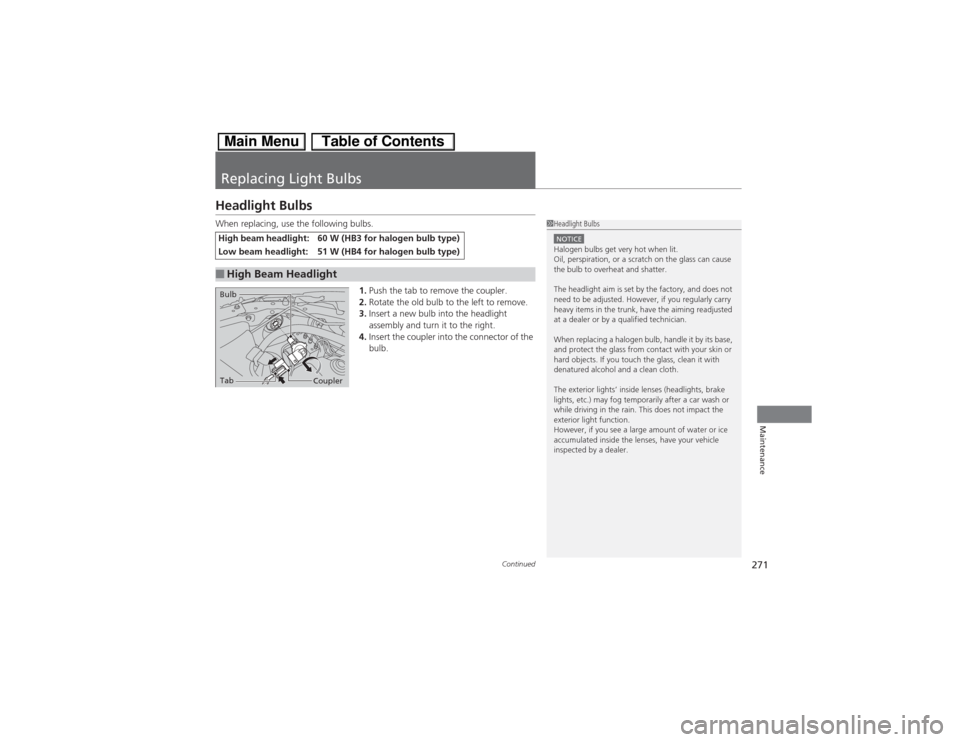
1.Push the tab to remove the coupler.
2.Rotate the old bulb to the left to remove.
3.Insert a new bulb into the headlight
assembly and turn it to the right.
4.Insert the coupler into the connector of the
bulb.High beam headlight:
60 W (HB3 for halogen bulb type)
Low beam headlight:
51 W (HB4 for halogen bulb type)
■High Beam Headlight
1Headlight BulbsNOTICEHalogen bulbs get very hot when lit.
Oil, perspiration, or a scratch on the glass can cause
the bulb to overheat and shatter.
The headlight aim is set by the factory, and does not
need to be adjusted. However, if you regularly carry
heavy items in the trunk, have the aiming readjusted
at a dealer or by a qualified technician.
When replacing a halogen bulb, handle it by its base,
and protect the glass from contact with your skin or
hard objects. If you touch the glass, clean it with
denatured alcohol and a clean cloth.
The exterior lights’ inside lenses (headlights, brake
lights, etc.) may fog temporarily after a car wash or
while driving in the rain. This does not impact the
exterior light function.
However, if you see a large amount of water or ice
accumulated inside the lenses, have your vehicle
inspected by a dealer.
Tab
Coupler Bulb
Page 275 of 346
274
uuReplacing Light BulbsuRear Turn Signal Light Bulbs
Maintenance
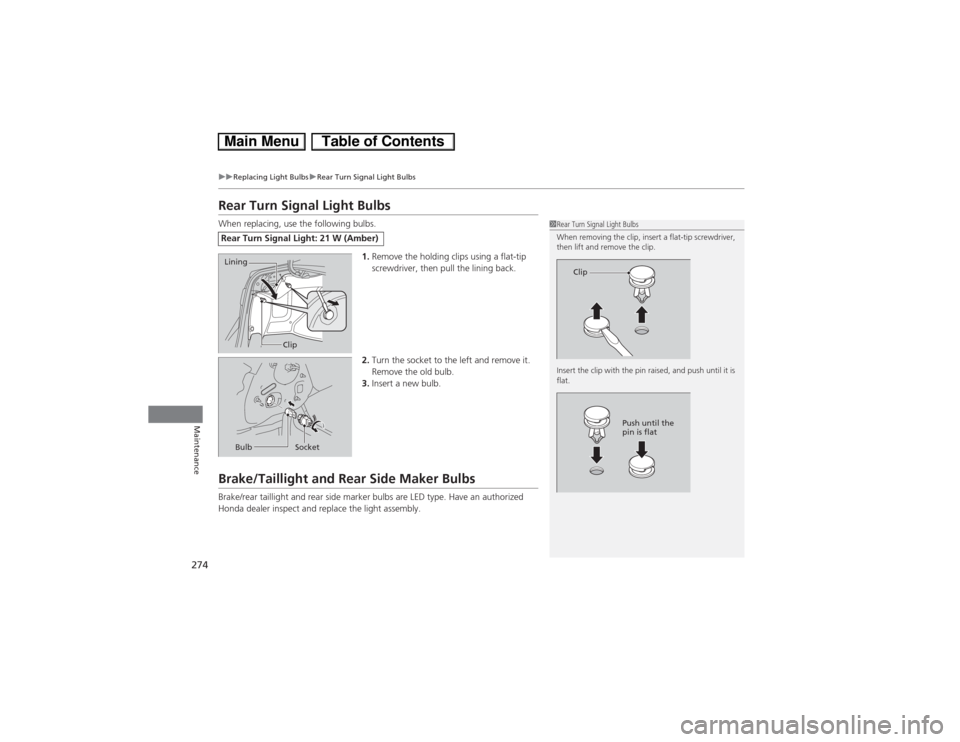
Rear Turn Signal Light BulbsWhen replacing, use the following bulbs.
1.Remove the holding clips using a flat-tip
screwdriver, then pull the lining back.
2.Turn the socket to the left and remove it.
Remove the old bulb.
3.Insert a new bulb.Brake/Taillight and Rear Side Maker BulbsBrake/rear taillight and rear side marker bulbs are LED type. Have an authorized
Honda dealer inspect and replace the light assembly.Rear Turn Signal Light: 21 W (Amber)
1Rear Turn Signal Light Bulbs
When removing the clip, insert a flat-tip screwdriver,
then lift and remove the clip.
Insert the clip with the pin raised, and push until it is
flat.
Clip
Push until the
pin is flat
Lining
ClipBulb Socket
Page 277 of 346
276
uuReplacing Light BulbsuRear License Plate Light Bulbs
Maintenance
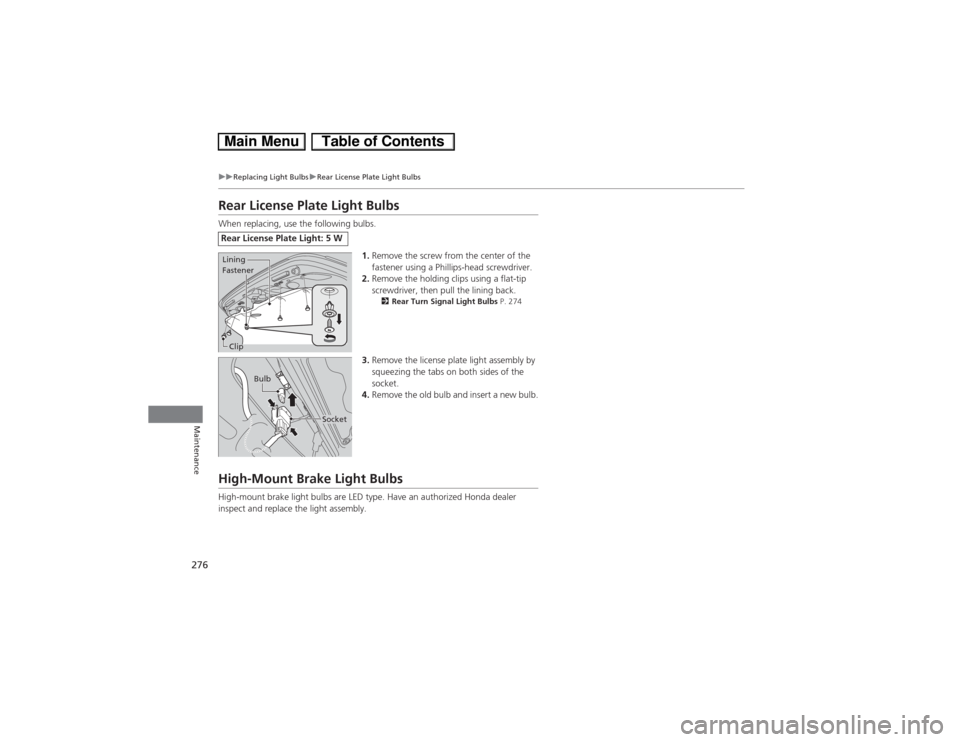
Rear License Plate Light BulbsWhen replacing, use the following bulbs.
1.Remove the screw from the center of the
fastener using a Phillips-head screwdriver.
2.Remove the holding clips using a flat-tip
screwdriver, then pull the lining back.
2Rear Turn Signal Light Bulbs P. 274
3.Remove the license plate light assembly by
squeezing the tabs on both sides of the
socket.
4.Remove the old bulb and insert a new bulb.
High-Mount Brake Light BulbsHigh-mount brake light bulbs are LED type. Have an authorized Honda dealer
inspect and replace the light assembly.Rear License Plate Light: 5 W Lining
Fastener
Clip
Bulb
Socket