Page 121 of 346
120
uuOperating the Switches Around the Steering WheeluTurn Signals
Controls
Turn Signals
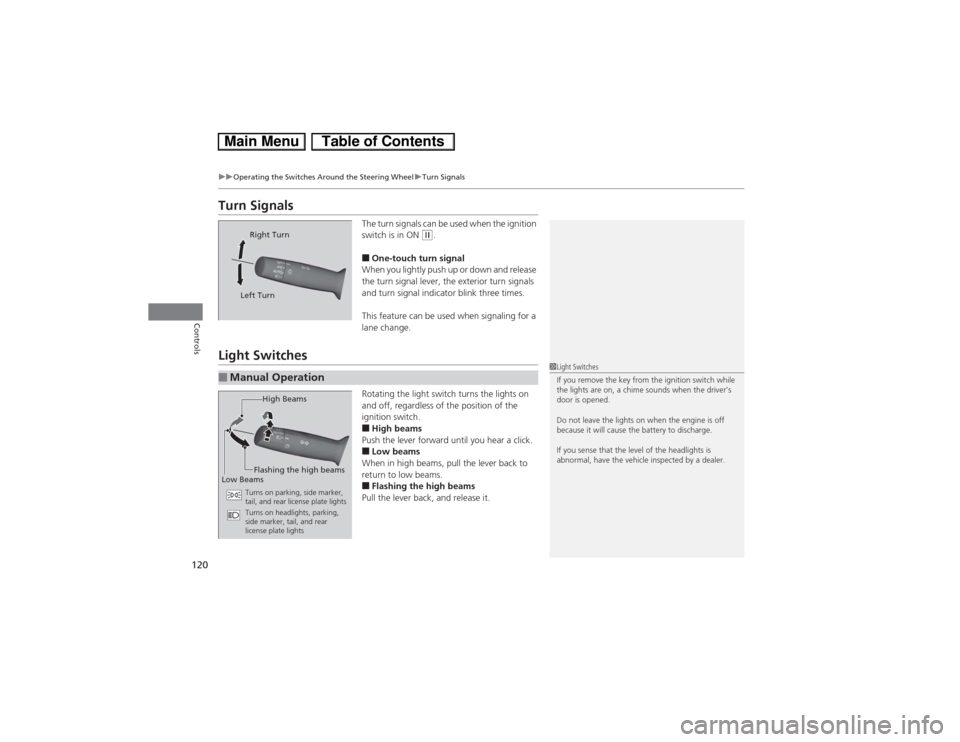
The turn signals can be used when the ignition
switch is in ON
(w.
■One-touch turn signal
When you lightly push up or down and release
the turn signal lever, the exterior turn signals
and turn signal indicator blink three times.
This feature can be used when signaling for a
lane change.
Light Switches
Rotating the light switch turns the lights on
and off, regardless of the position of the
ignition switch.■High beams
Push the lever forward until you hear a click.■Low beams
When in high beams, pull the lever back to
return to low beams.■Flashing the high beams
Pull the lever back, and release it.
Right Turn
Left Turn
■Manual Operation
1Light Switches
If you remove the key from the ignition switch while
the lights are on, a chime sounds when the driver’s
door is opened.
Do not leave the lights on when the engine is off
because it will cause the battery to discharge.
If you sense that the level of the headlights is
abnormal, have the vehicle inspected by a dealer.
High Beams
Flashing the high beams
Low Beams
Turns on parking, side marker,
tail, and rear license plate lights
Turns on headlights, parking,
side marker, tail, and rear
license plate lights
Page 151 of 346
150
uuAudio System Basic OperationuPlaying the AM/FM Radio
Features
Playing the AM/FM Radio
XM Button
Press to select a band. / Buttons
Press to display and select an
RDS category.SCAN Button
Press to sample each of the
strongest stations on the selected
band for 10 seconds. To turn off
scan, press the button again. (Power) Button
Press to turn the audio
system on and off.
Preset Buttons (1-6)
To store a station:
1. Tune to the selected station.
2. Pick a preset button and hold it
until you hear a beep.
To listen to a stored station, select a
band, then press the preset button.
/ (Seek/Skip) Buttons
Press to search up and down the
selected band for a station with a
strong signal.SETUP Button
Press to display menu items. Selector Knob
Turn to adjust the volume.
Press and turn to tune the radio
frequency.
FM/AM Button
*
Press to select a band.AM Button
*
Press to select a band.
FM Button
*
* Not available on all models
Page 152 of 346
Continued
151
uuAudio System Basic OperationuPlaying the AM/FM Radio
Features
Use the auto select feature to scan both bands and store the strongest station in
each preset.
1.Press the SETUP button.
2.Rotate to select Auto Select, then press
.
To turn off auto select, press SETUP button
and rotate to select Auto Select, then
press .■Auto Select
1Playing the AM/FM Radio
The ST indicator appears on the display indicating
stereo FM broadcasts.
Stereo reproduction in AM is not available.
Switching the Audio Mode
Press the SOURCE button on the steering wheel.
2Audio Remote Controls P. 148
You can store six AM stations and twelve FM stations
into the preset button memory. FM1 and FM2 let you
store six stations each.
Auto Select function scans and stores up to six AM
stations and twelve FM stations with a strong signal
into the preset button memory.
If you do not like the stations auto select has stored,
you can manually store your preferred frequencies.
Sound Settings
Page 172 of 346
171Features
General Information on the Audio SystemXM® Radio Service
*
1.You need your radio ID ready before registering for subscription. To see the ID in
the display: Turn the selector knob until 0 appears.
2.Have your radio ID and credit card number ready, and either call or visit the XM®
website to subscribe.
Press the XM (XM®) button and stay in this mode for about 30 minutes until the
service is activated. Make sure your vehicle is in an open area with good reception.
Loading...:
XM® is loading the audio or program information.
Channel Off Air:
The channel is not currently broadcasting.
Channel Not Authorized:
XM® radio is receiving information update from the network.
No Signal:
The signal is too weak in the current location.
--------:
No such channel exists, the channel is not part of your subscription, or the artist or
title information is unavailable.
Check Antenna:
There is a problem with the XM® antenna. Contact a dealer.■Subscribing to XM® Radio■Receiving XM® Radio■XM® Radio Display Messages
1Subscribing to XM® Radio
Contact Information for XM® Radio:
US: XM® Radio at www.siriusxm.com or (800) 852-
9696
Canada: XM® Canada at www.xmradio.ca, or (877)
209-00791Receiving XM® Radio
The XM® satellites are in orbit over the equator;
therefore, objects south of the vehicle may cause
satellite reception interruptions. Satellite signals are
more likely to be blocked by tall buildings and
mountains the farther north you travel from the
equator.
You may experience reception problems under the
following circumstances:•In a location with an obstruction to the south of
your vehicle.•In tunnels•On the lower level of a multi-tiered road•Large items carried on the roof rack
* Not available on all models
Page 233 of 346
232
uuWhen DrivinguLane Departure Warning (LDW)
*
Driving
Lane Departure Warning (LDW)
*
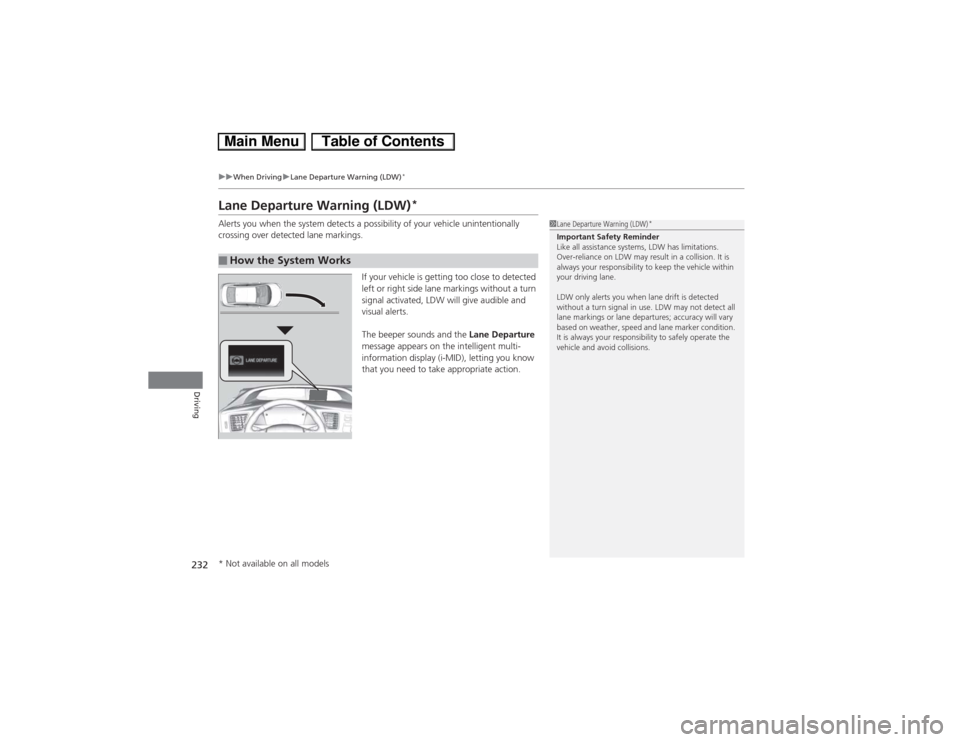
Alerts you when the system detects a possibility of your vehicle unintentionally
crossing over detected lane markings.
If your vehicle is getting too close to detected
left or right side lane markings without a turn
signal activated, LDW will give audible and
visual alerts.
The beeper sounds and the Lane Departure
message appears on the intelligent multi-
information display (i-MID), letting you know
that you need to take appropriate action.■How the System Works
1Lane Departure Warning (LDW)
*
Important Safety Reminder
Like all assistance systems, LDW has limitations.
Over-reliance on LDW may result in a collision. It is
always your responsibility to keep the vehicle within
your driving lane.
LDW only alerts you when lane drift is detected
without a turn signal in use. LDW may not detect all
lane markings or lane departures; accuracy will vary
based on weather, speed and lane marker condition.
It is always your responsibility to safely operate the
vehicle and avoid collisions.
* Not available on all models
Page 234 of 346
Continued
233
uuWhen DrivinguLane Departure Warning (LDW)
*
Driving
The system begins to search for lane markings when all the following conditions are met:
•The vehicle is traveling between at 40-90 mph (64-145 km/h).
•The vehicle is on a straight or slightly curved road.
•The turn signals are off.
•The brake pedal is not depressed.
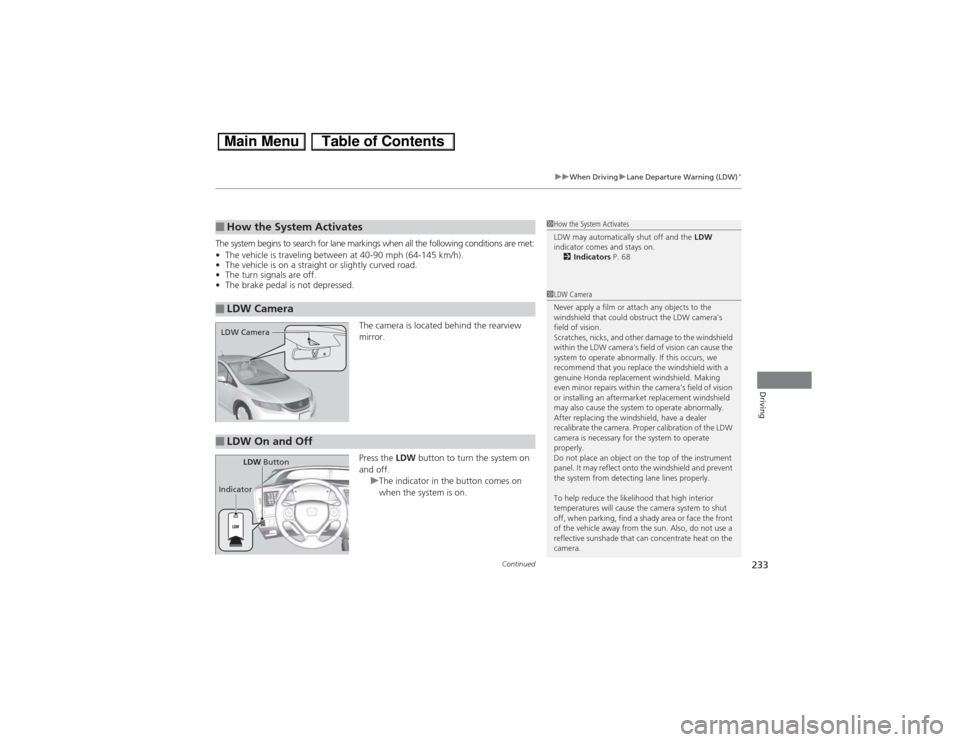
The camera is located behind the rearview
mirror.
Press the LDW button to turn the system on
and off.
uThe indicator in the button comes on
when the system is on.■How the System Activates■LDW Camera
1How the System Activates
LDW may automatically shut off and the LDW
indicator comes and stays on.
2Indicators P. 681LDW Camera
Never apply a film or attach any objects to the
windshield that could obstruct the LDW camera’s
field of vision.
Scratches, nicks, and other damage to the windshield
within the LDW camera’s field of vision can cause the
system to operate abnormally. If this occurs, we
recommend that you replace the windshield with a
genuine Honda replacement windshield. Making
even minor repairs within the camera’s field of vision
or installing an aftermarket replacement windshield
may also cause the system to operate abnormally.
After replacing the windshield, have a dealer
recalibrate the camera. Proper calibration of the LDW
camera is necessary for the system to operate
properly.
Do not place an object on the top of the instrument
panel. It may reflect onto the windshield and prevent
the system from detecting lane lines properly.
To help reduce the likelihood that high interior
temperatures will cause the camera system to shut
off, when parking, find a shady area or face the front
of the vehicle away from the sun. Also, do not use a
reflective sunshade that can concentrate heat on the
camera.
LDW Camera■LDW On and Off
LDW Button
Indicator
Page 274 of 346
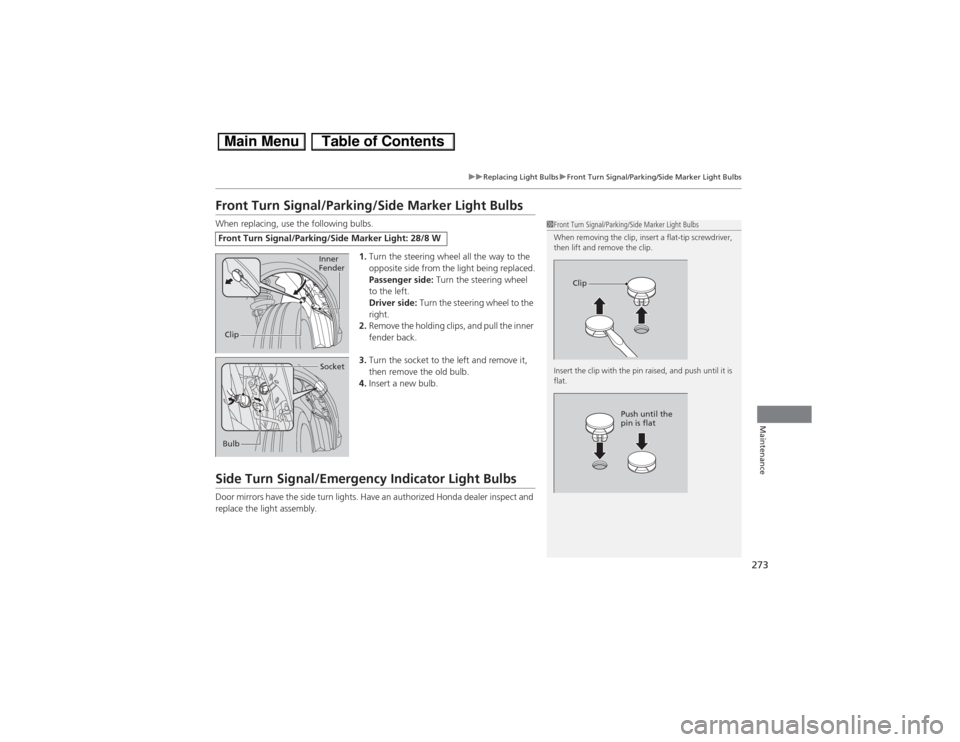
273
uuReplacing Light BulbsuFront Turn Signal/Parking/Side Marker Light Bulbs
Maintenance
Front Turn Signal/Parking/Side Marker Light BulbsWhen replacing, use the following bulbs.
1.Turn the steering wheel all the way to the
opposite side from the light being replaced.
Passenger side: Turn the steering wheel
to the left.
Driver side: Turn the steering wheel to the
right.
2.Remove the holding clips, and pull the inner
fender back.
3.Turn the socket to the left and remove it,
then remove the old bulb.
4.Insert a new bulb.Side Turn Signal/Emergency Indicator Light BulbsDoor mirrors have the side turn lights. Have an authorized Honda dealer inspect and
replace the light assembly.Front Turn Signal/Parking/Side Marker Light: 28/8 W
1Front Turn Signal/Parking/Side Marker Light Bulbs
When removing the clip, insert a flat-tip screwdriver,
then lift and remove the clip.
Insert the clip with the pin raised, and push until it is
flat.
Clip
Push until the
pin is flat
ClipInner
FenderBulbSocket
Page 275 of 346
274
uuReplacing Light BulbsuRear Turn Signal Light Bulbs
Maintenance
Rear Turn Signal Light BulbsWhen replacing, use the following bulbs.
1.Remove the holding clips using a flat-tip
screwdriver, then pull the lining back.
2.Turn the socket to the left and remove it.
Remove the old bulb.
3.Insert a new bulb.Brake/Taillight and Rear Side Maker BulbsBrake/rear taillight and rear side marker bulbs are LED type. Have an authorized
Honda dealer inspect and replace the light assembly.Rear Turn Signal Light: 21 W (Amber)
1Rear Turn Signal Light Bulbs
When removing the clip, insert a flat-tip screwdriver,
then lift and remove the clip.
Insert the clip with the pin raised, and push until it is
flat.
Clip
Push until the
pin is flat
Lining
ClipBulb Socket