2013 FORD TAURUS open hood
[x] Cancel search: open hoodPage 7 of 541

Maintenance 280
General information...................................280
Opening and closing the hood............................281
Under hood overview..................................282
Engine oil dipstick....................................286
Engine oil check......................................286
Engine coolant check..................................287
Automatic transmission fluid check........................292
Brake fluid check.....................................297
Power steering fluid check..............................297
Fuel filter...........................................297
Washer fluid check....................................298
Battery.............................................298
Checking the wiper blades...............................300
Air filter(s)..........................................300
Adjusting the headlamps................................302
Changing a bulb......................................304
Bulb specification chart.................................308
Vehicle Care 309
Cleaning products.....................................309
Cleaning the exterior...................................309
Waxing.............................................311
Repairing minor paint damage............................311
Cleaning the engine...................................311
Cleaning the windows and wiper blades.....................312
Cleaning the interior...................................312
Cleaning the instrument panel and instrument cluster lens.......313
Cleaning leather seats..................................314
Cleaning the alloy wheels...............................314
Vehicle storage.......................................315
Table of Contents7
2013 Taurus
Owners Guide gf, 1st Printing
USA(fus)
Page 52 of 541

WARNING:All occupants of the vehicle including the driver
should always wear their safety belts even when an airbag SRS
and curtain airbag is provided.
WARNING:To reduce risk of injury, do not obstruct or place
objects in the deployment path of the curtain airbag.
WARNING:If the curtain airbags have deployed,the curtain
airbags will not function again. The curtain airbags
(including the A, B and C pillar trim and headliner) must be
inspected and serviced by an authorized dealer.If the curtain
airbag is not replaced, the unrepaired area will increase the risk of
injury in a collision.
The Safety Canopy will deploy during significant side collisions or when a
certain likelihood of a rollover event is detected by the rollover sensor.
The Safety Canopy is mounted to the roof side-rail sheet metal, behind
the headliner, above each row of seats. In certain lateral collisions or
rollover events, the Safety Canopy will be activated, regardless of which
seats are occupied. The Safety Canopy is designed to inflate between the
side window area and occupants to further enhance protection provided
in side impact collisions and rollover events.
The system consists of the
following:
•Safety canopy curtain airbags
fitted above the trim panels over
the front and rear side windows
identified by a label or wording
on the headliner or roof-pillar
trim.
•A flexible headliner which opens above the side doors to allow air
curtain deployment.
•Crash sensors and monitoring system with readiness
indicator. Refer toCrash sensors and Airbag Indicatorlater
in this chapter.
52Supplementary Restraints System
2013 Taurus
Owners Guide gf, 1st Printing
USA(fus)
Page 70 of 541

Note:If any door or the luggage compartment is not closed, or if the
hood is not closed on vehicles equipped with an anti-theft alarm or
remote start, the horn will chirp twice and the lamps will not flash.
Opening the Trunk
Press the button twice within three seconds to open the trunk.
Make sure the trunk is closed and latched before driving your vehicle. An
unlatched trunk may cause objects to fall out or block the driver’s rear
view.
Activating Intelligent Access (If Equipped)
The intelligent access key must be within 3 feet (1 meter) of the vehicle.
At the Front Doors
Pull a front exterior door handle. The door will unlock and can be
opened.
Press and hold the door handle lock
sensor to lock the vehicle.
At the Trunk
Press the exterior trunk release button hidden near the license plate.
Smart Unlocks for Integrated Keyhead Transmitter
This feature helps to prevent you from locking yourself out of the vehicle
if your key is still in the ignition.
When you open one of the front doors and lock the vehicle with the
power door lock control, all the doors will lock then unlock if your key is
still in the ignition.
The vehicle can still be locked with the key in the ignition by using the
keyless entry keypad with the driver door closed, or by pressing the lock
button on the transmitter even if the doors are not closed.
If both front doors are closed, the vehicle can be locked by any method,
regardless of whether the key is in the ignition or not.
70Locks
2013 Taurus
Owners Guide gf, 1st Printing
USA(fus)
Page 80 of 541

ANTI-THEFT ALARM (IF EQUIPPED)
The system will warn you of unauthorized entry to your vehicle.
The turn signal lamps will flash and sound the horn up to a total of 10
times when:
•any door, the hood or the liftgate/trunk is opened without using the
keypad, the remote control or the intelligent access transmitter (if
equipped)
•the ignition is turned on with an invalid key.
Take all keys and remote controls to your authorized dealer if there is
any potential alarm problem with your vehicle.
Arming the Alarm
The system is ready to arm whenever the ignition is off. Lock the vehicle
to arm the alarm.
The turn signal lamps will flash once after locking the vehicle to indicate
the alarm is in the pre-armed mode and will become fully armed in
20 seconds.
Once fully armed, any intelligent access keys (if equipped) found inside
the vehicle are disabled and will not start the engine. Press the unlock
button to re-enable them.
Disarming the Alarm
To disarm the alarm, do any of the following:
•Press the power door unlock button within the 20-second pre-armed
mode.
•Press the unlock button on the remote control.
•Unlock the doors with the keyless entry pad.
•Enter the vehicle using intelligent access (if equipped).
•Turn the ignition on with a valid key (if equipped with IKT only).
•Press the panic button on the remote control. The alarm system will
still be armed, but this shuts off the horn and turn lamps when the
alarm is sounding.
Note:If the driver’s door is unlocked with a key, a chime will sound
when you open the door and a message will appear in the information
display. You will have 12 seconds to disarm the alarm using any of the
actions above, otherwise the alarm will trigger.
80Security
2013 Taurus
Owners Guide gf, 1st Printing
USA(fus)
Page 281 of 541

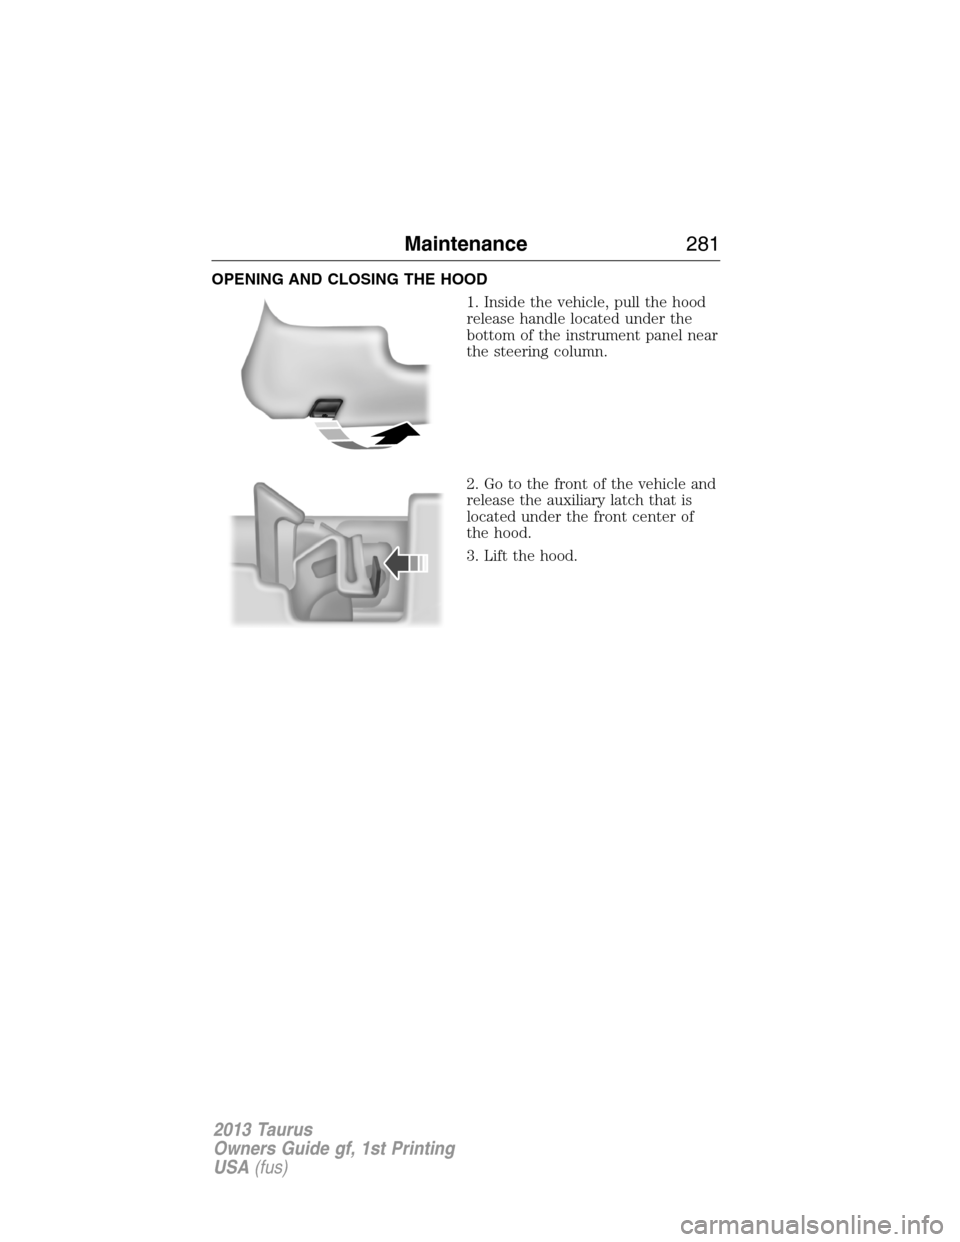
OPENING AND CLOSING THE HOOD
1. Inside the vehicle, pull the hood
release handle located under the
bottom of the instrument panel near
the steering column.
2. Go to the front of the vehicle and
release the auxiliary latch that is
located under the front center of
the hood.
3. Lift the hood.
Maintenance281
2013 Taurus
Owners Guide gf, 1st Printing
USA(fus)
Page 303 of 541

•(1) 8 feet (2.4 meters)
•(2) Center height of lamp to
ground
•(3) 25 feet (7.6 meters)
•(4) Horizontal reference line
2. Measure the height of the
headlamp bulb center from the
ground and mark an 8 foot
(2.4 meter) horizontal reference line
on the vertical wall or screen at this
height (a piece of masking tape works well). The center of the lamp is
markedbya3mmcircleontheheadlamp lens.
3. Turn on the low beam headlamps to illuminate the wall or screen and
open the hood.
To see a clearer light pattern for adjusting, you may want to block the
light from one headlamp while adjusting the other.
On the wall or screen you will
observe a flat zone of high intensity
light located at the top of the right
hand portion of the beam pattern. If
the top edge of the high intensity
light zone is not at the horizontal
reference line, the headlamp will
need to be adjusted.
4. Locate the vertical adjuster on
each headlamp. Using a Phillips #2
screwdriver, turn the adjuster either
clockwise (to adjust down) or
counterclockwise (to adjust up).
5. Close the hood and turn off the
lamps.
HORIZONTAL AIM IS NOT
REQUIRED FOR THIS VEHICLE
AND IS NON-ADJUSTABLE.
Maintenance303
2013 Taurus
Owners Guide gf, 1st Printing
USA(fus)
Page 305 of 541

Note:If the bulb is accidentally touched, it should be cleaned with
rubbing alcohol before being used.
Headlamp:
A. Front parking lamp/turn signal
bulb
B. Low/High beam headlamp bulb
C. Sidemarker bulb
Low/High beam bulbs:
1. Make sure the headlamp switch is
in the off position, then open the
hood.
2. Reach in behind the headlamp
assembly to access the bulbs and
connectors.
3. Remove service cap.
4. Remove bulb from the headlamp
assembly by turning it
counterclockwise, then pull it
straight out.
Front parking lamp/turn
signal/sidemarker bulbs:
1. Make sure headlamp switch is in
the off position, then open the hood.
2. Reach in behind the headlamp
assembly to access the bulb sockets
and connectors.
3. Rotate the bulb socket
counterclockwise and remove from
the lamp assembly.
4. Carefully pull the bulb out of the socket and push in the new bulb.
Install the new bulbs in reverse order from the steps above.
ABC
Maintenance305
2013 Taurus
Owners Guide gf, 1st Printing
USA(fus)