2013 FORD SUPER DUTY manual transmission
[x] Cancel search: manual transmissionPage 150 of 563
GENERAL OPERATING TIPS
Manual Heating and Air Conditioning System
•To reduce fog build-up on the windshield during humid weather, select
Defrost. Temperature and fan speed can also be increased to improve
clearing.
•To reduce humidity build-up inside the vehicle, do not drive with the
system off or with recirculated air engaged.
•Do not put objects under the front seats that will interfere with the
airflow to the back seats.
•Remove any snow, ice or leaves from the air intake area at the base of
the windshield.
•To improve the A/C cool down, drive with the windows slightly open
for 2-3 minutes after start-up or until the vehicle has been aired out.
•A small amount of air may be felt from the floor vent regardless of the
air distribution setting that is selected.
During extreme high ambient temperatures when idling stationary for
extended periods of time in gear, it is recommended to run the A/C in
the MAX A/C mode, adjust the blower fan speed to the lowest setting
and put the vehicle’s transmission into positionPto continue to receive
cool air from your A/C system.
For maximum cooling performance in AUTO or panel mode, press MAX
A/C.
For maximum cooling performance in panel/floor mode:
1. Move temperature control to the coolest setting.
2. Select A/C and recirculated air to provide colder airflow.
3. Set the fan to the highest speed initially, then adjust to maintain
comfort.
To aid in side window defogging and demisting in cold or humid weather:
1. Select Floor/Panel.
2. Select A/C.
3. Adjust the temperature control to maintain comfort.
4. Set the fan speed to the highest setting.
5. Direct the outer instrument panel vents toward the side windows.
6. To increase airflow to the outer instrument panel vents, close the
vents located in the middle of the instrument panel.
Climate Control149
2013 F-250/350/450/550(f23)
Owners Guide gf, 1st Printing
USA(fus)
Page 202 of 563
Tow/haul may be automatically activated (without pressing the tow/haul
button). This provides engine braking to assist the vehicles braking
system when going downhill and repetitive braking is sensed. Once the
tow/haul mode has been automatically activated it will not automatically
deactivate.
To deactivate the tow/haul feature and return to normal driving mode,
press the button on the end of the gearshift lever. The tow/haul light will
no longer be illuminated.
Tow/haul will also deactivate when the vehicle is powered down for a few
minutes.
M (Manual) without Overdrive
With the gearshift lever in M (Manual), the driver can change gears up
or down as desired. This is called SelectShift Automatic™ transmission
(SST) mode. By moving the gearshift lever from drive position D
(Overdrive) to M (Manual) you now have control of selecting the gear
you desire using buttons on the shift lever.
To return to normal D (Overdrive) position, move the shift lever back
fromMtoD.
•The transmission will operate in gears one through six.
2 (Second)
Use 2 (Second) to start-up on slippery roads or to provide additional
engine braking on downgrades.
1 (First)
•Provides maximum engine braking.
•Allows upshifts by moving gearshift lever.
•The transmission will not downshift into 1 (First) at high speeds; it
will downshift to a lower gear and then shift into 1 (First) when the
vehicle reaches slower speeds.
Forced downshifts
•Allowed in D (Overdrive).
•Press the accelerator to the floor.
•Allows transmission to select an appropriate gear.
Transmission201
2013 F-250/350/450/550(f23)
Owners Guide gf, 1st Printing
USA(fus)
Page 203 of 563
Understanding your SelectShift Automatic® transmission
This vehicle is equipped with a SelectShift Automatic™ transmission
gearshift lever. SelectShift Automatic™ transmission gives you the ability
to change gears up or down (without a clutch) as desired.
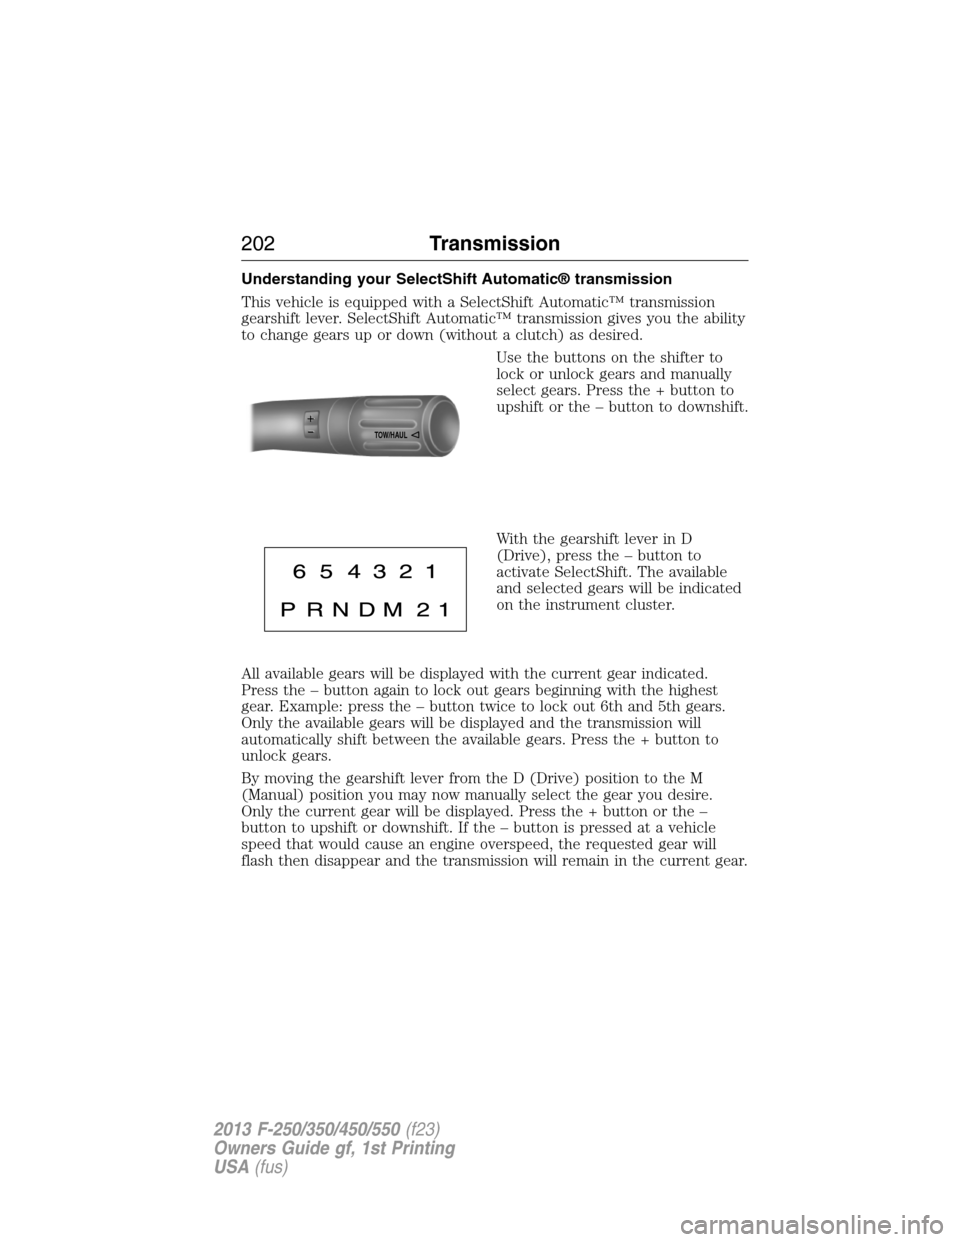
Use the buttons on the shifter to
lock or unlock gears and manually
select gears. Press the + button to
upshift or the – button to downshift.
With the gearshift lever in D
(Drive), press the – button to
activate SelectShift. The available
and selected gears will be indicated
on the instrument cluster.
All available gears will be displayed with the current gear indicated.
Press the – button again to lock out gears beginning with the highest
gear. Example: press the – button twice to lock out 6th and 5th gears.
Only the available gears will be displayed and the transmission will
automatically shift between the available gears. Press the + button to
unlock gears.
By moving the gearshift lever from the D (Drive) position to the M
(Manual) position you may now manually select the gear you desire.
Only the current gear will be displayed. Press the + button or the –
button to upshift or downshift. If the – button is pressed at a vehicle
speed that would cause an engine overspeed, the requested gear will
flash then disappear and the transmission will remain in the current gear.
TOW/H
AUL
202Transmission
2013 F-250/350/450/550(f23)
Owners Guide gf, 1st Printing
USA(fus)
Page 204 of 563
Recommended shift speeds
Upshift according to the following chart:
Upshifts when accelerating (recommended for best fuel economy)
Shift from: Gasoline engines Diesel engines
1 – 2 15 mph (24 km/h) 12 mph (19 km/h)
2 – 3 25 mph (40 km/h) 19 mph (31 km/h)
3 – 4 40 mph (64 km/h) 26 mph (42 km/h)
4 – 5 45 mph (72 km/h) 34 mph (55 km/h)
5 – 6 50 mph (80 km/h) 46 mph (74 km/h)
In order to prevent the engine from running at too low an RPM, which
may cause it to stall, SelectShift will still automatically make some
downshifts if it has determined that you have not downshifted in time.
Although SelectShift will make some downshifts for you, it will still allow
you to downshift at any time as long as the SelectShift determines that
the engine will not be damaged from over-revving.
SelectShift will not automatically upshift, even if the engine is
approaching the RPM limit. It must be shifted manually by pressing the +
button.
Engine damage may occur if excessive engine revving is held
without shifting.
Automatic Transmission Adaptive Learning
This feature is designed to increase durability and provide consistent
shift feel over the life of the vehicle. A new vehicle or transmission may
have firm shifts, soft shifts or both. This operation is considered normal
and will not affect function or durability of the transmission. Over time,
the adaptive learning process will fully update transmission operation.
Additionally, whenever the battery is disconnected or a new battery
installed, the strategy must be relearned.
Transmission203
2013 F-250/350/450/550(f23)
Owners Guide gf, 1st Printing
USA(fus)
Page 220 of 563
Make sure you allow sufficient distance between you and other vehicles for
stopping. Drive slower than usual and consider using one of the lower
gears. In emergency stopping situations, apply the brake steadily. Do not
pump the brakes. Refer to theBrakessection of this chapter for additional
information on the operation of the Anti-lock Brake System (ABS).
Parking
WARNING:If the parking brake is fully released, but the brake
warning lamp remains illuminated, the brakes may not be
working properly. See your authorized dealer.
WARNING:Always set the parking brake fully and make sure
the gearshift is latched in P (Park). Turn the ignition to the off
position and remove the key whenever you leave your vehicle.
On some 4WD vehicles, when the transfer case is in the N (Neutral)
position, the engine and transmission are disconnected from the rest of
the driveline. Therefore, the vehicle is free to roll even if the automatic
transmission is in P (Park) or the manual transmission is in gear. Do not
leave the vehicle unattended with the transfer case in the N (Neutral)
position. Always set the parking brake fully and turn off the ignition
when leaving the vehicle.
Maintenance and modifications
The suspension and steering systems on your vehicle have been designed
and tested to provide predictable performance whether loaded or empty
and durable load carrying capability. For this reason, Ford Motor
Company strongly recommends that you do not make modifications such
as adding or removing parts (such as lift kits or stabilizer bars) or by
using replacement parts not equivalent to the original factory equipment.
Any modifications to a vehicle that raise the center of gravity can make
it more likely the vehicle will roll over as a result of a loss of control.
Ford Motor Company recommends that caution be used with any vehicle
equipped with a high load or device (such as ladder racks or pickup box
cover).
Failure to maintain your vehicle properly may void the warranty, increase
your repair cost, reduce vehicle performance and operational capabilities
and adversely affect driver and passenger safety. Frequent inspection of
vehicle chassis components is recommended if the vehicle is subjected to
heavy off-road usage.
Four-Wheel Drive (If Equipped)219
2013 F-250/350/450/550(f23)
Owners Guide gf, 1st Printing
USA(fus)
Page 263 of 563
Ford Motor Company produces a towing manual for all authorized tow
truck operators. Have your tow truck operator refer to this manual for
proper hook-up and towing procedures for your vehicle.
Two-wheel drive (2WD) vehicles can be towed with the front wheels on
the ground and the rear wheels off the ground.
It is recommended that four-wheel drive (4WD) vehicles are to be towed
with a wheel lift and dollies or flatbed equipment with all the wheels off
the ground. However, a wheel lift may be used to lift the rear of the
vehicle so long as, depending on vehicle configurations, the following
preparations are met:
•On manual-shift transfer case vehicles, the front wheel hub locks are
in the FREE position prior to towing.
•On Electronic Shift-On-the-Fly (ESOF) vehicles, the 4WD control is
turned to the 2WD position prior to towing.
Note:Towing an ESOF 4WD vehicle with the front wheels on the ground
without disengaging the front hubs may cause damage to the automatic
transmission.
Note:Towing a 2WD or an ESOF 4WD vehicle with the rear wheels on
the ground for more than 50 miles (80 km) and/or in excess of 35 mph
(56 km/h) may cause damage to the automatic transmission.
Note:On dual rear wheel (DRW) vehicles, an outer rear wheel must be
removed prior to using a wheel lift wrecker.
TOWING THE VEHICLE ON FOUR WHEELS
Emergency Towing
In the event your vehicle becomes disabled (without access to wheel
dollies, car-hauling trailer, or flatbed transport vehicle), it can be
flat-towed (all wheels on the ground, regardless of the
powertrain/transmission configuration) under the following conditions:
•The vehicle is facing forward so that it is towed in a forward
direction.
•The transmission is placed in positionN.SeeAutomatic
transmissionin theTransmissionchapter if you cannot move the
transmission intoN.
•Maximum speed is 35 mph (56 km/h).
•Maximum distance is 50 miles (80 kilometers).
262Towing
2013 F-250/350/450/550(f23)
Owners Guide gf, 1st Printing
USA(fus)
Page 264 of 563
Recreational Towing
Note:Put your climate control system in recirculated air mode to
prevent exhaust fumes from entering the vehicle. See theClimate
Controlchapter.
Follow these guidelines if you have a need for recreational (RV) towing.
An example of recreational towing would be towing your vehicle behind
a motorhome. These guidelines are designed to ensure that your
transmission is not damaged.
Drivetrain
configurationRequirements for neutral towing
4WD with manual-shift
transfer caseTransmission in N (Neutral); transfer case in N
(Neutral); hublocks set to FREE.
*
2WD or 4WD with
electronic-shift
transfer case (ESOF)Do not tow your vehicle with any wheels on
the ground, as vehicle or transmission damage
may occur. It is recommended to tow your
vehicle with all four (4) wheels off the ground,
such as when using a car-hauling trailer.
Otherwise, no recreational towing is permitted.
*Always make sure that both hub locks are set to the same position.
Towing263
2013 F-250/350/450/550(f23)
Owners Guide gf, 1st Printing
USA(fus)
Page 269 of 563
•The Total Accessory Reserve Capacity (TARC) is shown on the lower
right side of the vehicle’s Safety Compliance Certification Label. This
applies to Ford-completed vehicles of 10,000 pounds (4,536 kilograms)
GVWR or less. This is the weight of permanently-attached auxiliary
equipment, such as snowplow frame-mounting hardware, that can be
added to the vehicle and satisfy Ford compliance certification to
FMVSS. Exceeding this weight may require the auxiliary equipment
installer additional safety certification responsibility. The Front
Accessory Reserve Capacity (FARC) is added for customer
convenience.
•Rear ballast weight behind the rear axle may be required to prevent
exceeding the FGAWR, and provide front-to-rear weight balance for
proper braking and steering.
•Front wheel toe may require re-adjustment to prevent premature
uneven tire wear. Specifications are found in the FordWorkshop
Manual.
•Headlight aim may require re-adjustment.
•The tire air pressures recommended for general driving are found on
the vehicle’s Safety Certification Label. The maximum cold inflation
pressure for the tire and associated load rating is imprinted on the tire
sidewall. Tire air pressure may require re-adjustment within these
pressure limits to accommodate the additional weight of the snowplow
installation.
•Federal and some local regulations require additional exterior lamps
for snowplow-equipped vehicles. Consult your authorized dealer for
additional information.
Operating the Vehicle with the Snowplow Attached
Note:Do not use your vehicle for snow removal until it has been driven
at least 500 miles (800 kilometers).
Ford recommends vehicle speed does not exceed 45 mph (72 km/h)
when snowplowing.
The attached snowplow blade restricts airflow to the radiator, and may
cause the engine to run at a higher temperature: Attention to engine
temperature is especially important when outside temperatures are
above freezing. Angle the blade to maximize airflow to the radiator and
monitor engine temperature to determine whether a left or right angle
provides the best performance.
Follow the severe duty schedule in yourscheduled maintenance
informationfor engine oil and transmission fluid change intervals.
268Driving Hints
2013 F-250/350/450/550(f23)
Owners Guide gf, 1st Printing
USA(fus)