2013 FORD SUPER DUTY warning light
[x] Cancel search: warning lightPage 271 of 563

Transmission operation while plowing
WARNING:Do not spin the wheels at over 35 mph (55 km/h).
The tires may fail and injure a passenger or bystander.
•Shift transfer case to4L(4WD Low) when plowing in small areas at
speeds below 5 mph (8 km/h).
•Shift transfer case to4H(4WD High) when plowing larger areas or
light snow at higher speeds. Do not exceed 15 mph (24 km/h).
•Do not shift the transmission from a forward gear toR(Reverse) until
the engine is at idle and the wheels are stopped.
•If the vehicle is stuck, shift the transmission in a steady motion
between forward and reverse gears. Do not rock the vehicle for more
than a minute. The transmission and tires may be damaged or the
engine can overheat.
Outside Air Temperature While Plowing
The outside air temperature reading can be inaccurate while plowing
with your vehicle due to the sensor air flow being blocked by the plow
blade.
A Ford Wiring Kit (XXXX-XXXXX-XX) is available to relocated the OAT
sensor to the plow blade frame below the headlamp to provide accurate
outside air temperature readings.
VEHICLE USED AS A STATIONARY POWER SOURCE
Auxiliary equipment called power take-off, or PTO, is often added to the
engine or transmission to operate utility equipment. Examples include a
wheel-lift for tow trucks, cranes, tools for construction or tire service,
and pumping fluids. PTO applications draw auxiliary horsepower from
the powertrain, often while the vehicle is stationary. In this condition,
there is limited cooling air flow through the radiator and around the
vehicle that normally occurs when a vehicle is moving. The aftermarket
PTO system installer, having the most knowledge of the final application,
is responsible for determining whether additional chassis heat protection
or powertrain cooling is required, and alerting the user to the safe and
proper operation.
Ford Super Duty Vehicles are approved for use as a stationary (including
split shaft capability) or mobile power source, within limits and operating
guidelines detailed in theFord Truck Body Builders Layout Book,
found at www.fleet.ford.com/truckbbas, and through the Ford Truck
Body Builders Advisory Service.
270Driving Hints
2013 F-250/350/450/550(f23)
Owners Guide gf, 1st Printing
USA(fus)
Page 303 of 563
Adding Engine Coolant
WARNING:Do not add engine coolant when the engine is hot.
Steam and scalding liquids released from a hot cooling system
can burn you badly. Also, you can be burned if you spill coolant on hot
engine parts.
WARNING:Do not put engine coolant in the windshield washer
fluid container. If sprayed on the windshield, engine coolant
could make it difficult to see through the windshield.
WARNING:To reduce the risk of personal injury, make sure the
engine is cool before unscrewing the coolant pressure relief cap.
The cooling system is under pressure; steam and hot liquid can come
out forcefully when the cap is loosened slightly.
WARNING:Do not add coolant further than the MAX mark.
Note:Do not use stop leak pellets or cooling system sealants/additives
as they can cause damage to the engine cooling and/or heating systems.
This damage would not be covered under your vehicle’s warranty.
Note:During normal vehicle operation, the engine coolant may change
color from orange to pink or light red. As long as the engine coolant is
clear and uncontaminated, this color change does not indicate the engine
coolant has degraded nor does it require the engine coolant to be
drained, the system to be flushed, or the engine coolant to be replaced.
•
DO NOT MIX different colors or types of coolant in your vehicle. Make
sure the correct coolant is used. Mixing of engine coolants may harm
your engine’s cooling system. The use of an improper coolant may harm
engine and cooling system components and may void the warranty.
•In case of emergency, a large amount of water without engine coolant
may be added in order to reach a vehicle service location. In this
instance, the cooling system must be drained, chemically cleaned with
Motorcraft® Premium Cooling System Flush, and refilled with prediluted
engine coolant as soon as possible. Water alone (without engine coolant)
can cause engine damage from corrosion, overheating or freezing.
302Maintenance
2013 F-250/350/450/550(f23)
Owners Guide gf, 1st Printing
USA(fus)
Page 307 of 563
If you notice any of the following:
•the engine coolant temperature gauge moves fully into the red (hot)
area
•the coolant temperature warning light illuminates
•the service engine soon indicator illuminates
1. Pull off the road as soon as safely possible and place the vehicle in P
(Park).
2. Leave the engine running until the coolant temperature gauge needle
moves away from the H range. After several minutes, if this does not
happen, follow the remaining steps.
3. Turn the engine off and wait for it to cool before checking the coolant
level.
WARNING:Never remove the coolant reservoir cap while the
engine is running or hot.
4. If the coolant level is normal, you may restart your engine and
continue on.
5. If the coolant is low, add coolant, restart the engine and take your
vehicle to an authorized dealer. SeeAdding engine coolantin this
chapter for more information.
Refer to fail-safe cooling for additional information.
TRANSMISSION FLUID CHECK
Checking Automatic Transmission Fluid (If Equipped)
Refer to yourScheduled Maintenance Informationfor scheduled
intervals for fluid checks and changes. Your transmission does not
consume fluid. However, the fluid level should be checked if the
transmission is not working properly, i.e., if the transmission slips or
shifts slowly or if you notice some sign of fluid leakage.
Automatic transmission fluid expands when warmed. To obtain an
accurate fluid check, drive the vehicle until it is at normal operating
temperature (approximately 20 miles [30 km]). Verify that the
transmission fluid temperature gauge, located on the instrument cluster,
is within normal range.
1. Drive the vehicle 20 miles (30 km) or until it reaches normal operating
temperature.
2. Park the vehicle on a level surface and engage the parking brake.
306Maintenance
2013 F-250/350/450/550(f23)
Owners Guide gf, 1st Printing
USA(fus)
Page 313 of 563
WASHER FLUID CHECK
WARNING:If you operate your vehicle in temperatures below
40°F (5°C), use washer fluid with antifreeze protection. Failure
to use washer fluid with antifreeze protection in cold weather could
result in impaired windshield vision and increase the risk of injury or
accident.
Add fluid to fill the reservoir if the level is low. Only use a washer fluid
that meets Ford specifications. See the technical specifications chart in
theCapacities and Specificationschapter.
State or local regulations on volatile organic compounds may restrict the
use of methanol, a common windshield washer antifreeze additive.
Washer fluids containing non-methanol antifreeze agents should be used
only if they provide cold weather protection without damaging the
vehicle’s paint finish, wiper blades or washer system.
CHANGING THE VEHICLE BATTERY
WARNING:This vehicle may be equipped with more than one
battery, removal of cable from only one battery does not
disconnect the vehicle electrical system. Be sure to disconnect cables
from all batteries when disconnecting power. Failure to do so may
cause serious personal injury or property damage.
WARNING:Batteries normally produce explosive gases which
can cause personal injury. Therefore, do not allow flames, sparks
or lighted substances to come near the battery. When working near the
battery, always shield your face and protect your eyes. Always provide
proper ventilation.
WARNING:When lifting a plastic-cased battery, excessive
pressure on the end walls could cause acid to flow through the
vent caps, resulting in personal injury and/or damage to the vehicle or
battery. Lift the battery with a battery carrier or with your hands on
opposite corners.
312Maintenance
2013 F-250/350/450/550(f23)
Owners Guide gf, 1st Printing
USA(fus)
Page 332 of 563
For fabric, carpets, cloth seats, safety belts and seats equipped with side
airbags:
•Remove dust and loose dirt with a vacuum cleaner.
•Remove light stains and soil with Motorcraft® Professional Strength
Carpet & Upholstery Cleaner.
•If grease or tar is present on the material, spot-clean the area first
with Motorcraft® Spot and Stain Remover. In Canada, use
Motorcraft® Multi-Purpose Cleaner.
•If a ring forms on the fabric after spot cleaning, clean the entire area
immediately (but do not oversaturate) or the ring will set.
•Do not use household cleaning products or glass cleaners, which can
stain and discolor the fabric and affect the flame retardant abilities of
the seat materials.
CLEANING THE INSTRUMENT PANEL AND INSTRUMENT
CLUSTER LENS
WARNING:Do not use chemical solvents or strong detergents
when cleaning the steering wheel or instrument panel to avoid
contamination of the airbag system.
Clean the instrument panel and cluster lens with a clean, damp, white,
cotton cloth, then use a clean and dry, white, cotton cloth to dry these
areas.
•Avoid cleaners or polishes that increase the gloss of the upper portion
of the instrument panel. The dull finish in this area helps protect the
driver from undesirable windshield reflection.
•Be certain to wash or wipe your hands clean if you have been in
contact with certain products, such as insect repellent and suntan
lotion, in order to avoid possible damage to the interior painted
surfaces.
•Do not use household or glass cleaners as these may damage the
finish of the instrument panel, interior trim and cluster lens.
•Do not allow air fresheners and hand sanitizers to spill on interior
surfaces. If a spill occurs, wipe off immediately. Damage may not be
covered by your warranty.
Vehicle Care331
2013 F-250/350/450/550(f23)
Owners Guide gf, 1st Printing
USA(fus)
Page 348 of 563
M.Maximum Inflation Pressure:Indicates the tire manufacturers’
maximum permissible pressure and/or the pressure at which the
maximum load can be carried by the tire. This pressure is normally
higher than the manufacturer’s recommended cold inflation pressure
which can be found on the Safety Compliance Certification Label (affixed
to either the door hinge pillar, door-latch post, or the door edge that
meets the door-latch post, next to the driver’s seating position), or Tire
Label which is located on the B-Pillar or the edge of the driver’s door.
The cold inflation pressure should never be set lower than the
recommended pressure on the vehicle label.
The tire suppliers may have additional markings, notes or warnings, such
as standard load, radial tubeless, etc.
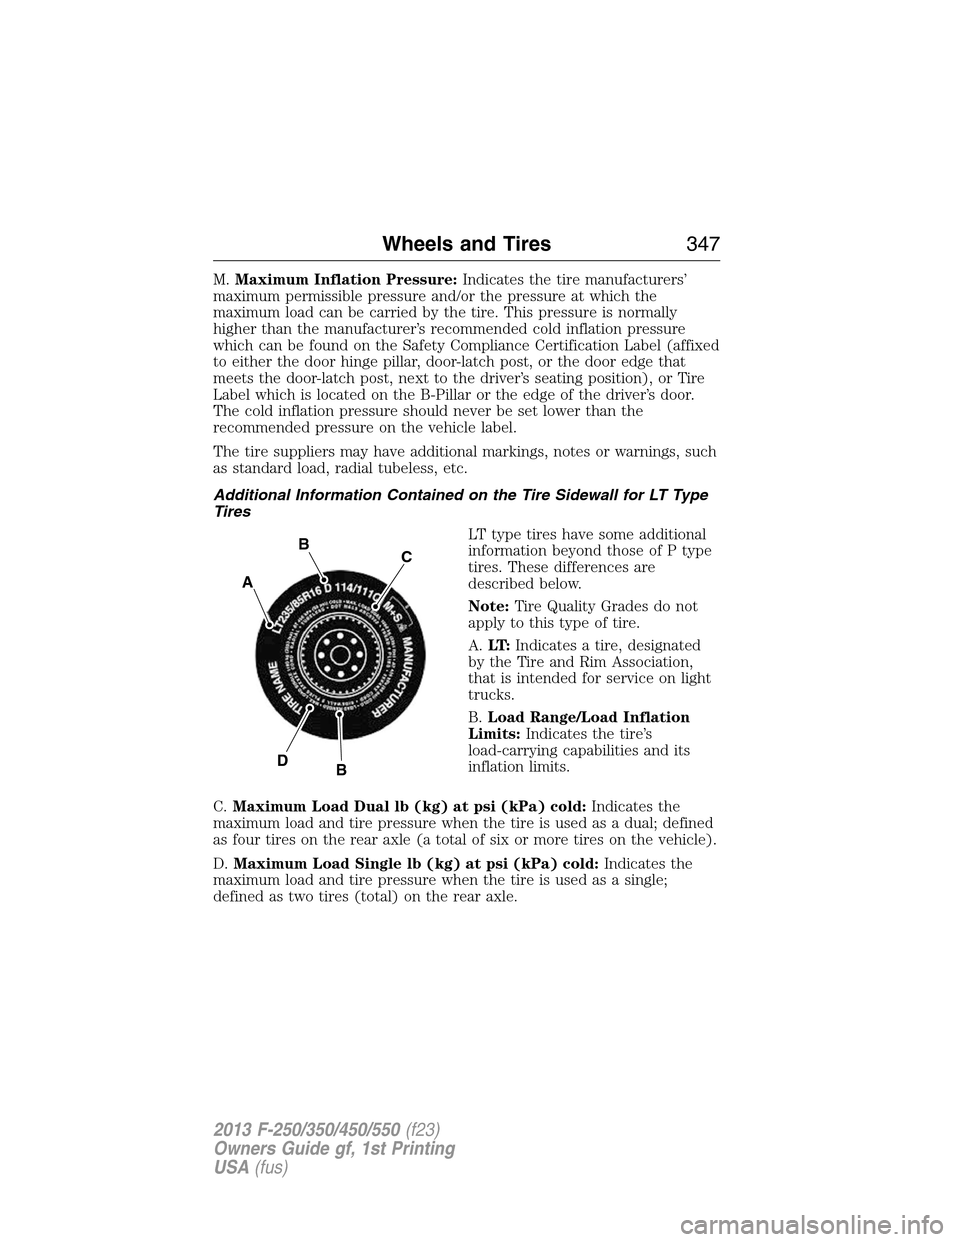
Additional Information Contained on the Tire Sidewall for LT Type
Tires
LT type tires have some additional
information beyond those of P type
tires. These differences are
described below.
Note:Tire Quality Grades do not
apply to this type of tire.
A.LT:Indicates a tire, designated
by the Tire and Rim Association,
that is intended for service on light
trucks.
B.Load Range/Load Inflation
Limits:Indicates the tire’s
load-carrying capabilities and its
inflation limits.
C.Maximum Load Dual lb (kg) at psi (kPa) cold:Indicates the
maximum load and tire pressure when the tire is used as a dual; defined
as four tires on the rear axle (a total of six or more tires on the vehicle).
D.Maximum Load Single lb (kg) at psi (kPa) cold:Indicates the
maximum load and tire pressure when the tire is used as a single;
defined as two tires (total) on the rear axle.
A
BC
BD
Wheels and Tires347
2013 F-250/350/450/550(f23)
Owners Guide gf, 1st Printing
USA(fus)
Page 352 of 563

2. Remove the cap from the valve on one tire, then firmly press the tire
gauge onto the valve and measure the pressure.
3. Add enough air to reach the recommended air pressure.
Note:If you overfill the tire, release air by pushing on the metal stem in
the center of the valve. Then recheck the pressure with your tire gauge.
4. Replace the valve cap.
5. Repeat this procedure for each tire, including the spare.
Note:Some spare tires operate at a higher inflation pressure than the
other tires. For T-type or mini-spare tires, see theDissimilar spare tire
and wheel assembly informationsection. Store and maintain at 60 psi
(4.15 bar). For full-size and dissimilar spare tires, see theDissimilar
spare tire and wheel assembly informationsection. Store and maintain
at the higher of the front and rear inflation pressure as shown on the
Tire Label.
6. Visually inspect the tires to make sure there are no nails or other
objects embedded that could poke a hole in the tire and cause an air
leak.
7. Check the sidewalls to make sure there are no gouges, cuts or bulges.
Tire Inflation Information
WARNING:An inflated tire and rim can be very dangerous if
improperly used, serviced or maintained. To reduce the risk of
serious injury, never attempt to re-inflate a tire which has been run flat
or seriously under-inflated without first removing the tire from the
wheel assembly for inspection. Do not attempt to add air to tires or
replace tires or wheels without first taking precautions to protect
persons and property.
All tires with Steel Carcass Plies (if equipped):
This type of tire utilizes steel cords in the sidewalls. As such, they
cannot be treated like normal light truck tires. Tire service, including
adjusting tire pressure, must be performed by personnel trained,
supervised and equipped according to Federal Occupational Safety and
Health Administration regulations. For example, during any procedure
involving tire inflation, the technician or individual must utilize a remote
inflation device, and make sure that all persons are clear of the
trajectory area.
Wheels and Tires351
2013 F-250/350/450/550(f23)
Owners Guide gf, 1st Printing
USA(fus)
Page 362 of 563

vehicle to ensure that the replacement or alternate tires and wheels
allow the system to continue to function properly.
The tire pressure monitoring system complies with part 15 of the FCC
rules and with RSS-210 of Industry Canada. Operation is subject to the
following two conditions: (1) This device may not cause harmful
interference, and (2) This device must accept any interference received,
including interference that may cause undesired operation.
Changing Tires with a Tire Pressure Monitoring System
Note:Each road tire is equipped
with a tire pressure sensor located
inside the tire and wheel assembly
cavity. The pressure sensor is
attached to the valve stem. The
pressure sensor is covered by the
tire and is not visible unless the tire
is removed. Take care when
changing the tire to avoid damaging
the sensor.
You should always have your tires serviced by an authorized dealer.
Check the tire pressure periodically (at least monthly) using an accurate
tire gauge. SeeInflating Your Tiresin this chapter.
Understanding Your Tire Pressure Monitoring System
The tire pressure monitoring system measures pressure in your four road
tires and sends the tire pressure readings to your vehicle. The low tire
pressure warning light will turn on if the tire pressure is significantly low.
Once the light is illuminated, your tires are under-inflated and need to be
inflated to the manufacturer’s recommended tire pressure. Even if the
light turns on and a short time later turns off, your tire pressure still
needs to be checked.
When your temporary spare tire is installed
When one of your road tires needs to be replaced with the temporary
spare, the tire pressure monitoring system will continue to identify an
issue to remind you that the damaged road wheel or tire needs to be
repaired and put back on your vehicle.
To restore the full function of the tire pressure monitoring system, have
the damaged road wheel or tire repaired and remounted on your vehicle.
For additional information, seeChanging Tires with a Tire Pressure
Monitoring Systemin this section.
Wheels and Tires361
2013 F-250/350/450/550(f23)
Owners Guide gf, 1st Printing
USA(fus)