2013 FORD SUPER DUTY air condition
[x] Cancel search: air conditionPage 306 of 563
You have limited engine power when in the fail-safe mode, so drive the
vehicle with caution. The vehicle will not be able to maintain high-speed
operation and the engine will run rough. Remember that the engine is
capable of completely shutting down automatically to prevent engine
damage; therefore:
1. Pull off the road as soon as safely possible and turn off the engine.
2. Arrange for the vehicle to be taken to an authorized dealer.
3. If this is not possible, wait a short period for the engine to cool.
4. Check the coolant level and replenish if low.
5. Restart the engine and take your vehicle to an authorized dealer.
Engine Fluid Temperature Management (If Equipped)
WARNING:To reduce the risk of collision and injury, be
prepared that the vehicle speed may reduce and the vehicle may
not be able to accelerate with full power until the fluid temperatures
reduce.
Your vehicle has been designed to pull a trailer, but because of the added
load, the vehicle’s engine may temporarily reach higher temperatures
during severe operating conditions such as ascending a long or steep
grade while pulling a trailer in hot ambient temperatures.
At this time, you may notice your engine coolant temperature gauge
needle move toward the H and the POWER REDUCED TO LOWER
TEMP message may appear in the information display.
You may notice a reduction in the vehicle’s speed caused by reduced
engine power. Your vehicle has been designed to enter this mode if
certain high temperature/high load conditions take place in order to
manage the engine’s fluid temperatures. The amount of speed reduction
will depend on the vehicle loading, towing, grade, ambient temperature,
and other factors. If this occurs, there is no need to pull off the road.
The vehicle can continue to be driven while this message is active.
The air conditioning may also cycle on and off during severe operating
conditions to protect overheating of the engine. When the engine coolant
temperature decreases to a more normal operating temperature, the air
conditioning will turn on once again.
Maintenance305
2013 F-250/350/450/550(f23)
Owners Guide gf, 1st Printing
USA(fus)
Page 321 of 563
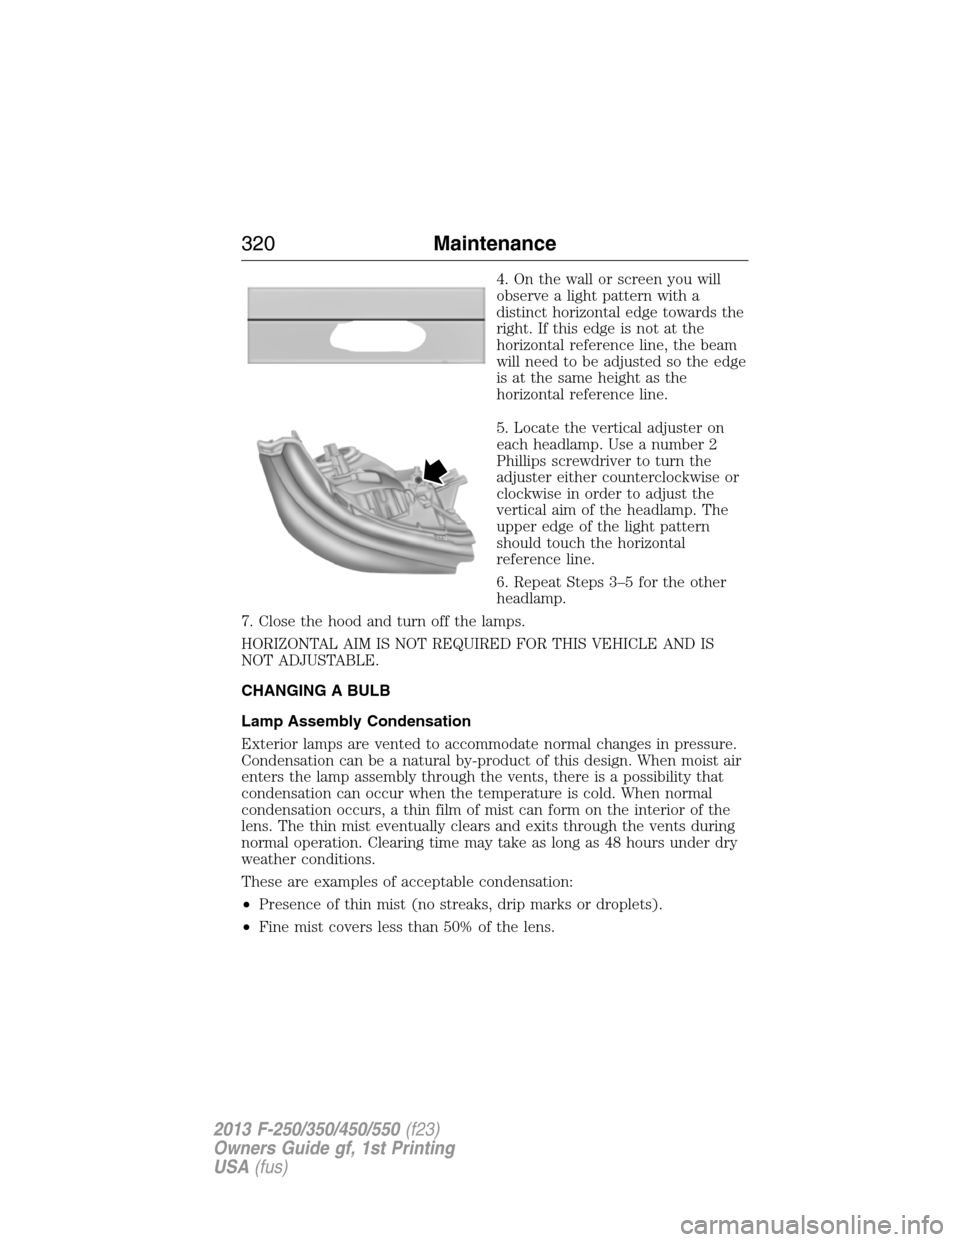
4. On the wall or screen you will
observe a light pattern with a
distinct horizontal edge towards the
right. If this edge is not at the
horizontal reference line, the beam
will need to be adjusted so the edge
is at the same height as the
horizontal reference line.
5. Locate the vertical adjuster on
each headlamp. Use a number 2
Phillips screwdriver to turn the
adjuster either counterclockwise or
clockwise in order to adjust the
vertical aim of the headlamp. The
upper edge of the light pattern
should touch the horizontal
reference line.
6. Repeat Steps 3–5 for the other
headlamp.
7. Close the hood and turn off the lamps.
HORIZONTAL AIM IS NOT REQUIRED FOR THIS VEHICLE AND IS
NOT ADJUSTABLE.
CHANGING A BULB
Lamp Assembly Condensation
Exterior lamps are vented to accommodate normal changes in pressure.
Condensation can be a natural by-product of this design. When moist air
enters the lamp assembly through the vents, there is a possibility that
condensation can occur when the temperature is cold. When normal
condensation occurs, a thin film of mist can form on the interior of the
lens. The thin mist eventually clears and exits through the vents during
normal operation. Clearing time may take as long as 48 hours under dry
weather conditions.
These are examples of acceptable condensation:
•Presence of thin mist (no streaks, drip marks or droplets).
•Fine mist covers less than 50% of the lens.
320Maintenance
2013 F-250/350/450/550(f23)
Owners Guide gf, 1st Printing
USA(fus)
Page 351 of 563
Note:Do not reduce tire pressure to change the ride characteristics of
the vehicle. If you do not maintain the inflation pressure at the levels
specified by Ford, your vehicle may experience a condition known as
shimmy. Shimmy is a severe vibration and oscillation in the steering
wheel after the vehicle travels over a bump or dip in the road that does
not dampen out by itself. Shimmy may result from significant
under-inflation of the tires, improper tires (load range, size, or type), or
vehicle modifications such as lift-kits. In the event that your vehicle
experiences shimmy, you should slowly reduce speed by either lifting off
the accelerator pedal or lightly applying the brakes. The shimmy will
cease as the vehicle speed decreases.
Maximum Inflation Pressureis the tire manufacturer’s maximum
permissible pressure or the pressure at which the maximum load can be
carried by the tire. This pressure is normally higher than the
manufacturer’s recommended cold inflation pressure which can be found
on the Safety Compliance Certification Label (affixed to either the door
hinge pillar, door-latch post, or the door edge that meets the door-latch
post, next to the driver’s seating position), or Tire Label which is located
on the B-Pillar or the edge of the driver’s door. The cold inflation
pressure should never be set lower than the recommended pressure on
the Safety Compliance Certification Label or Tire Label.
When weather temperature changes occur, tire inflation pressures also
change. A 10°F (6°C) temperature drop can cause a corresponding drop
of 1 psi (7 kPa) in inflation pressure. Check your tire pressures
frequently and adjust them to the proper pressure which can be found
on the Safety Compliance Certification Label or Tire Label.
To check the pressure in your tire(s):
1. Make sure the tires are cool, meaning they are not hot from driving
even a mile.
If you are checking tire pressure when the tire is hot (for example,
driven more than 1 mile [1.6 kilometers]), never bleed or reduce air
pressure. The tires are hot from driving and it is normal for pressures to
increase above recommended cold pressures. A hot tire at or below
recommended cold inflation pressure could be significantly
under-inflated.
Note:If you have to drive a distance to get air for your tire(s), check
and record the tire pressure first and add the appropriate air pressure
when you get to the pump. It is normal for tires to heat up and the air
pressure inside to go up as you drive.
350Wheels and Tires
2013 F-250/350/450/550(f23)
Owners Guide gf, 1st Printing
USA(fus)
Page 354 of 563
Inspecting Your Tires and Wheel Valve Stems
Periodically inspect the tire treads for uneven or excessive wear and
remove objects such as stones, nails or glass that may be wedged in the
tread grooves. Check the tire and valve stems for holes, cracks, or cuts
that may permit air leakage and repair or replace the tire and replace
the valve stem. Inspect the tire sidewalls for cracking, cuts, bruises and
other signs of damage or excessive wear. If internal damage to the tire is
suspected, have the tire demounted and inspected in case it needs to be
repaired or replaced. For your safety, tires that are damaged or show
signs of excessive wear should not be used because they are more likely
to blow out or fail.
Improper or inadequate vehicle maintenance can cause tires to wear
abnormally. Inspect all your tires, including the spare, frequently, and
replace them if one or more of the following conditions exist:
Tire Wear
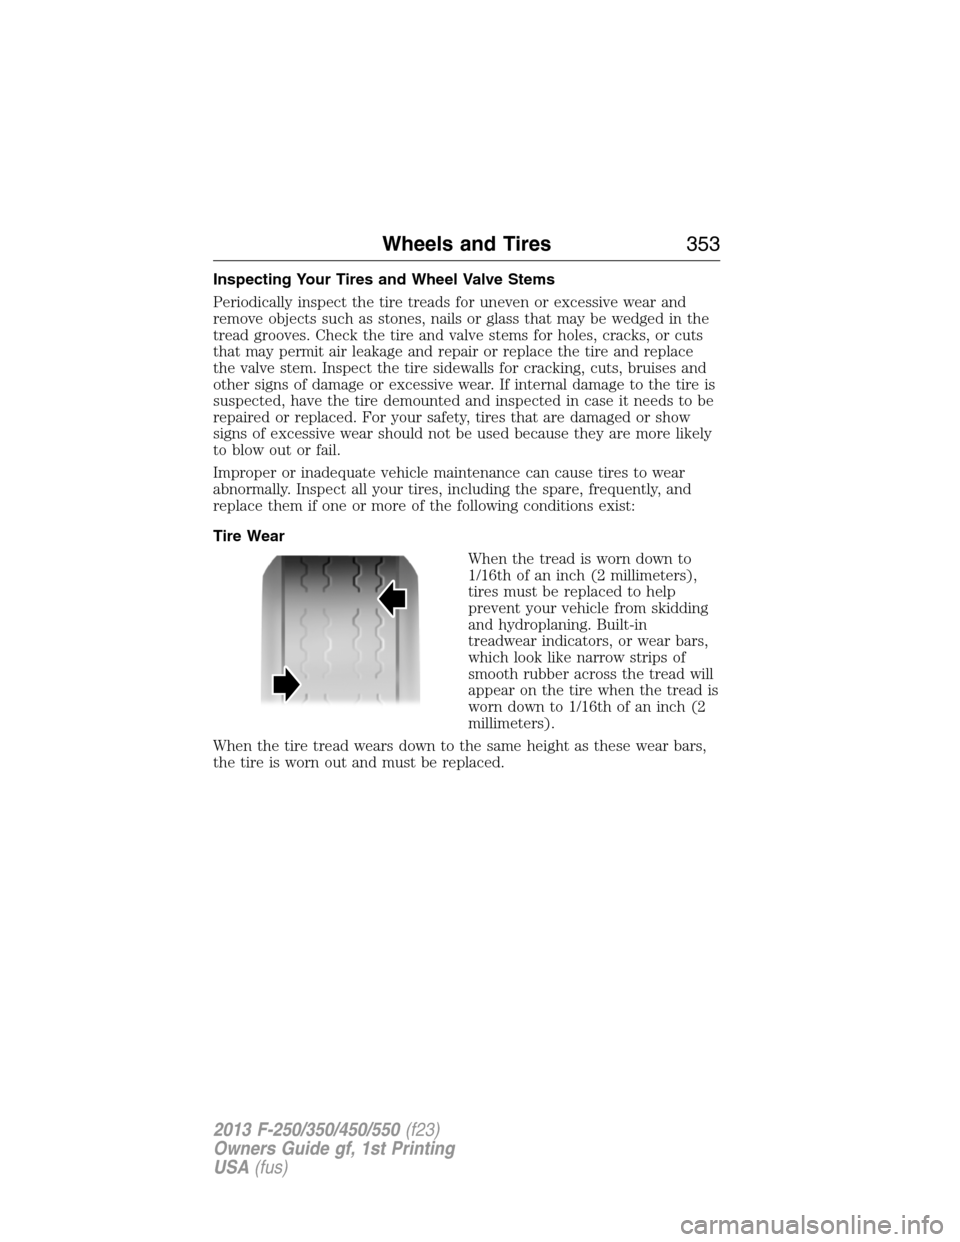
When the tread is worn down to
1/16th of an inch (2 millimeters),
tires must be replaced to help
prevent your vehicle from skidding
and hydroplaning. Built-in
treadwear indicators, or wear bars,
which look like narrow strips of
smooth rubber across the tread will
appear on the tire when the tread is
worn down to 1/16th of an inch (2
millimeters).
When the tire tread wears down to the same height as these wear bars,
the tire is worn out and must be replaced.
Wheels and Tires353
2013 F-250/350/450/550(f23)
Owners Guide gf, 1st Printing
USA(fus)
Page 362 of 563

vehicle to ensure that the replacement or alternate tires and wheels
allow the system to continue to function properly.
The tire pressure monitoring system complies with part 15 of the FCC
rules and with RSS-210 of Industry Canada. Operation is subject to the
following two conditions: (1) This device may not cause harmful
interference, and (2) This device must accept any interference received,
including interference that may cause undesired operation.
Changing Tires with a Tire Pressure Monitoring System
Note:Each road tire is equipped
with a tire pressure sensor located
inside the tire and wheel assembly
cavity. The pressure sensor is
attached to the valve stem. The
pressure sensor is covered by the
tire and is not visible unless the tire
is removed. Take care when
changing the tire to avoid damaging
the sensor.
You should always have your tires serviced by an authorized dealer.
Check the tire pressure periodically (at least monthly) using an accurate
tire gauge. SeeInflating Your Tiresin this chapter.
Understanding Your Tire Pressure Monitoring System
The tire pressure monitoring system measures pressure in your four road
tires and sends the tire pressure readings to your vehicle. The low tire
pressure warning light will turn on if the tire pressure is significantly low.
Once the light is illuminated, your tires are under-inflated and need to be
inflated to the manufacturer’s recommended tire pressure. Even if the
light turns on and a short time later turns off, your tire pressure still
needs to be checked.
When your temporary spare tire is installed
When one of your road tires needs to be replaced with the temporary
spare, the tire pressure monitoring system will continue to identify an
issue to remind you that the damaged road wheel or tire needs to be
repaired and put back on your vehicle.
To restore the full function of the tire pressure monitoring system, have
the damaged road wheel or tire repaired and remounted on your vehicle.
For additional information, seeChanging Tires with a Tire Pressure
Monitoring Systemin this section.
Wheels and Tires361
2013 F-250/350/450/550(f23)
Owners Guide gf, 1st Printing
USA(fus)
Page 400 of 563
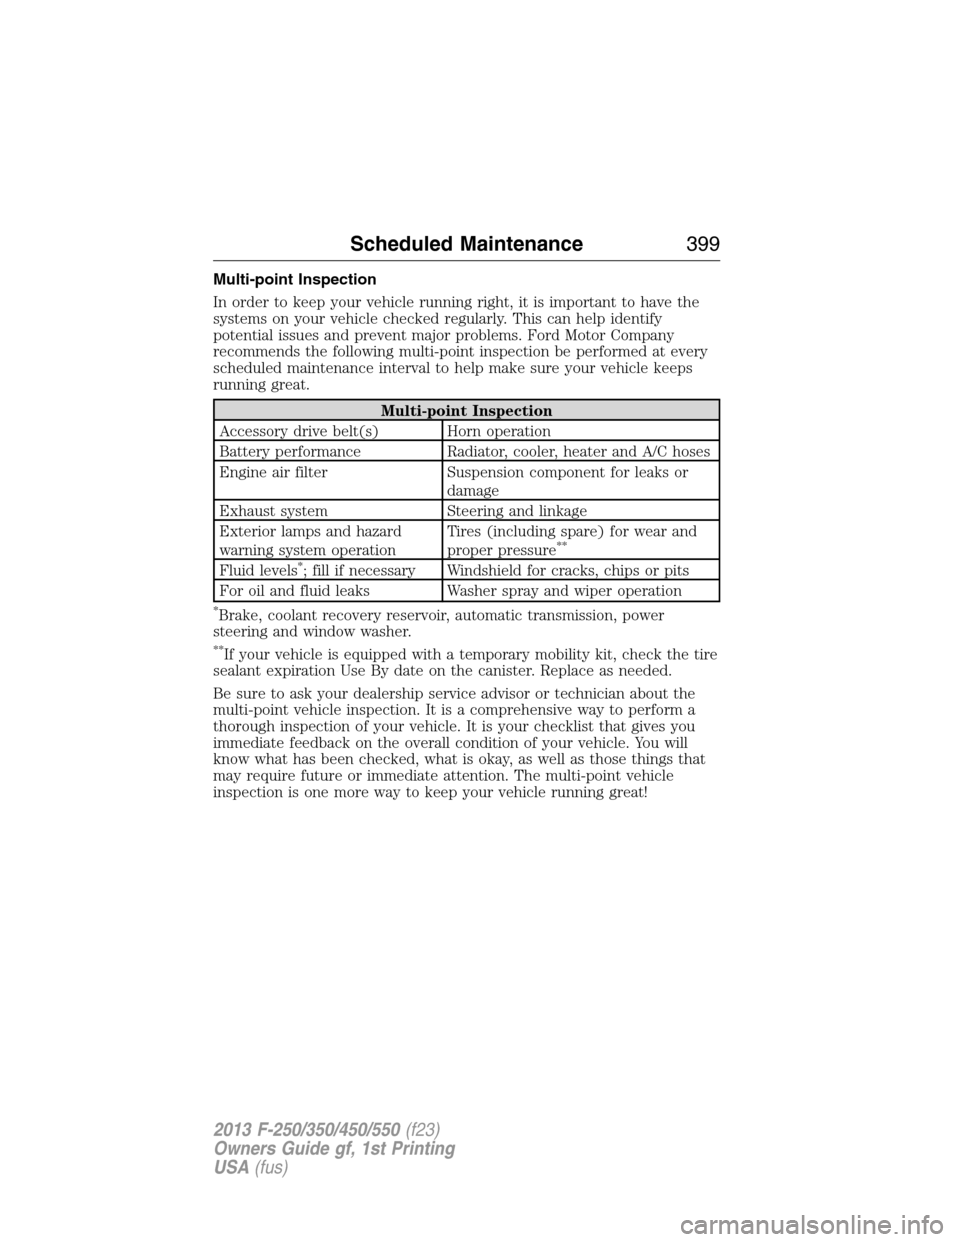
Multi-point Inspection
In order to keep your vehicle running right, it is important to have the
systems on your vehicle checked regularly. This can help identify
potential issues and prevent major problems. Ford Motor Company
recommends the following multi-point inspection be performed at every
scheduled maintenance interval to help make sure your vehicle keeps
running great.
Multi-point Inspection
Accessory drive belt(s) Horn operation
Battery performance Radiator, cooler, heater and A/C hoses
Engine air filter Suspension component for leaks or
damage
Exhaust system Steering and linkage
Exterior lamps and hazard
warning system operationTires (including spare) for wear and
proper pressure
**
Fluid levels*; fill if necessary Windshield for cracks, chips or pits
For oil and fluid leaks Washer spray and wiper operation
*Brake, coolant recovery reservoir, automatic transmission, power
steering and window washer.
**If your vehicle is equipped with a temporary mobility kit, check the tire
sealant expiration Use By date on the canister. Replace as needed.
Be sure to ask your dealership service advisor or technician about the
multi-point vehicle inspection. It is a comprehensive way to perform a
thorough inspection of your vehicle. It is your checklist that gives you
immediate feedback on the overall condition of your vehicle. You will
know what has been checked, what is okay, as well as those things that
may require future or immediate attention. The multi-point vehicle
inspection is one more way to keep your vehicle running great!
Scheduled Maintenance399
2013 F-250/350/450/550(f23)
Owners Guide gf, 1st Printing
USA(fus)
Page 407 of 563
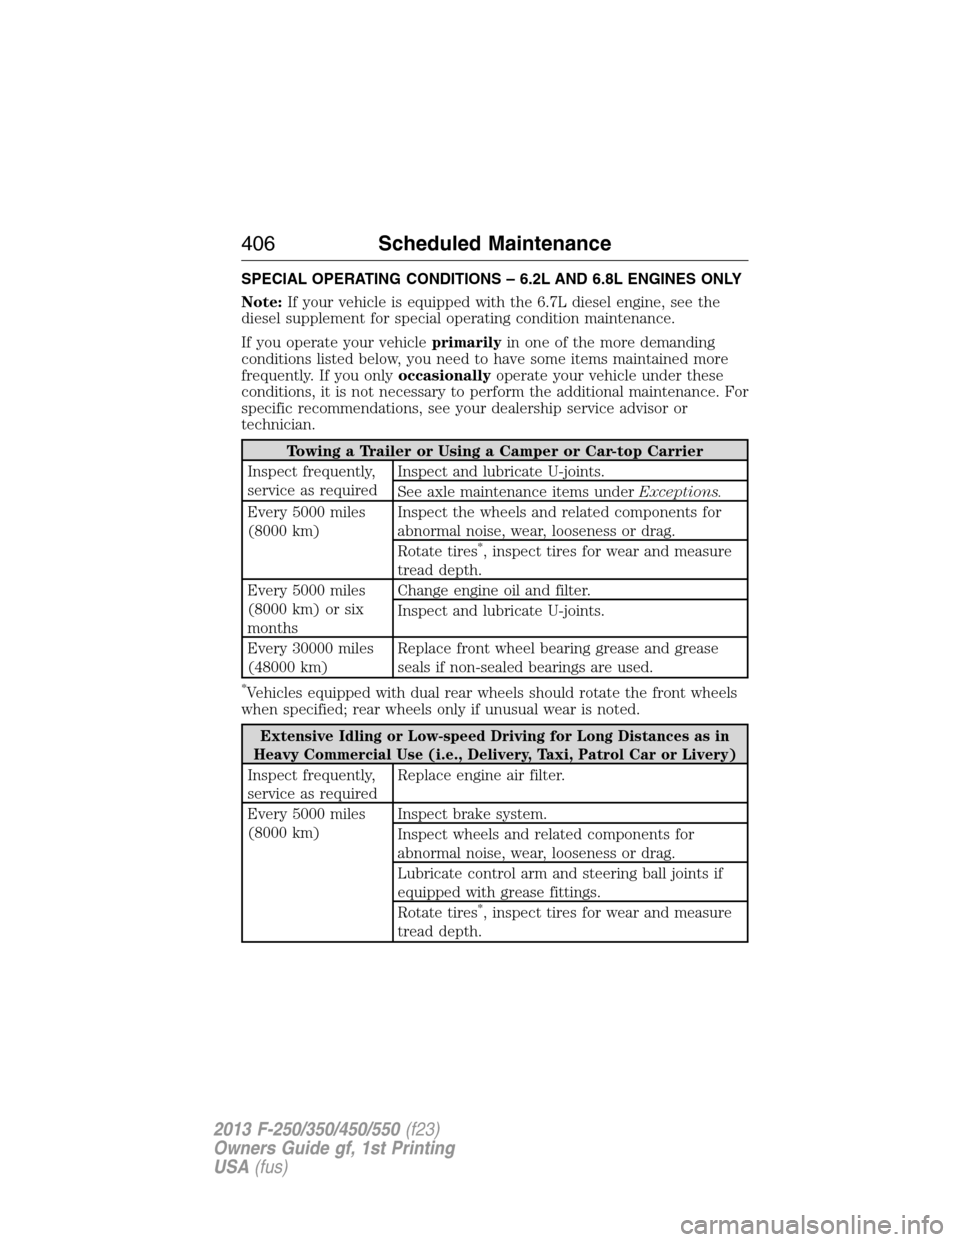
SPECIAL OPERATING CONDITIONS – 6.2L AND 6.8L ENGINES ONLY
Note:If your vehicle is equipped with the 6.7L diesel engine, see the
diesel supplement for special operating condition maintenance.
If you operate your vehicleprimarilyin one of the more demanding
conditions listed below, you need to have some items maintained more
frequently. If you onlyoccasionallyoperate your vehicle under these
conditions, it is not necessary to perform the additional maintenance. For
specific recommendations, see your dealership service advisor or
technician.
Towing a Trailer or Using a Camper or Car-top Carrier
Inspect frequently,
service as requiredInspect and lubricate U-joints.
See axle maintenance items underExceptions.
Every 5000 miles
(8000 km)Inspect the wheels and related components for
abnormal noise, wear, looseness or drag.
Rotate tires
*, inspect tires for wear and measure
tread depth.
Every 5000 miles
(8000 km) or six
monthsChange engine oil and filter.
Inspect and lubricate U-joints.
Every 30000 miles
(48000 km)Replace front wheel bearing grease and grease
seals if non-sealed bearings are used.
*Vehicles equipped with dual rear wheels should rotate the front wheels
when specified; rear wheels only if unusual wear is noted.
Extensive Idling or Low-speed Driving for Long Distances as in
Heavy Commercial Use (i.e., Delivery, Taxi, Patrol Car or Livery)
Inspect frequently,
service as requiredReplace engine air filter.
Every 5000 miles
(8000 km)Inspect brake system.
Inspect wheels and related components for
abnormal noise, wear, looseness or drag.
Lubricate control arm and steering ball joints if
equipped with grease fittings.
Rotate tires
*, inspect tires for wear and measure
tread depth.
406Scheduled Maintenance
2013 F-250/350/450/550(f23)
Owners Guide gf, 1st Printing
USA(fus)
Page 408 of 563

Extensive Idling or Low-speed Driving for Long Distances as in
Heavy Commercial Use (i.e., Delivery, Taxi, Patrol Car or Livery)
Every 5000 miles
(8000 km) or six
monthsChange engine oil and filter.
Inspect and lubricate U-joints.
Every 30000 miles
(48000 km)Replace front wheel bearing grease and grease
seals if non-sealed bearings are used.
Every 60000 miles
(96000 km)Change transfer case fluid (4WD vehicles).
Replace spark plugs.
*Vehicles equipped with dual rear wheels should rotate the front wheels
when specified; rear wheels only if unusual wear is noted.
Operating in Dusty or Sandy Conditions Such as Unpaved or
Dusty Roads
Inspect frequently,
service as requiredReplace engine air filter.
Every 5000 miles
(8000 km)Inspect the wheels and related components for
abnormal noise, wear, looseness or drag.
Rotate tires
*, inspect tires for wear and measure
tread depth.
Every 5000 miles
(8000 km) or six
monthsChange engine oil and filter.
Inspect and lubricate U-joints.
Every 30000 miles
(48000 km)Replace front wheel bearing grease and grease
seals if non-sealed bearings are used.
Every 50000 miles
(80000 km)Change rear axle fluid (F-450/550 only).
Every 60000 miles
(96000 km)Change transfer case fluid (4WD vehicles).
*Vehicles equipped with dual rear wheels should rotate the front wheels
when specified; rear wheels only if unusual wear is noted.
Scheduled Maintenance407
2013 F-250/350/450/550(f23)
Owners Guide gf, 1st Printing
USA(fus)