2013 FORD SUPER DUTY change wheel
[x] Cancel search: change wheelPage 257 of 563

B.Manual control lever:Slide the control lever to the left to activate
power to the trailer’s electric brakes independent of the tow vehicle’s
brakes (see the followingProcedure for adjusting GAINsection for
instructions on proper use of this feature). If the manual control is
activated while the brake is also applied, the greater of the two inputs
determines the power sent to the trailer brakes.
•Stop lamps:Activating the manual control lever illuminates both the
trailer brake lamps and the tow vehicle brake lamps except the
center high-mount stop lamp (if the proper electrical connection has
been made to the trailer). Pressing the vehicle brake pedal also
illuminates both trailer and vehicle brake lamps.
Procedure for Adjusting GAIN
Note:This should only be performed in a traffic-free environment at
speeds of approximately 20–25 mph (30–40 km/h).
The GAIN setting is used to set the TBC for the specific towing
condition and should be changed as towing conditions change. Changes
to towing conditions include trailer load, vehicle load, road conditions
and weather.
The GAIN should be set to provide the maximum trailer braking
assistance while making sure the trailer wheels do not lock when
braking. Locked trailer wheels may lead to trailer instability.
1. Make sure the trailer brakes are in good working condition,
functioning normally and properly adjusted. See your trailer dealer if
necessary.
2. Hook up the trailer and make the electrical connections according to
the trailer manufacturer’s instructions.
3. When a trailer with electric or EOH brakes is plugged in, TRAILER
CONNECTED appears in the information display.
4. Use the GAIN adjustment (+/-) buttons to increase or decrease the
GAIN setting to the desired starting point. A GAIN setting of 6.0 is a
good starting point for heavier loads.
5. In a traffic-free environment, tow the trailer on a dry, level surface at
a speed of 20–25 mph (30–40 km/h) and squeeze the manual control
lever completely.
6. If the trailer wheels lock up (indicated by squealing tires), reduce the
GAIN setting. If the trailer wheels turn freely, increase the GAIN
setting. Repeat Steps 5 and 6 until the GAIN setting is at a point just
below trailer wheel lock-up. If towing a heavier trailer, trailer wheel
lock-up may not be attainable even with the maximum GAIN setting
of 10.
256Towing
2013 F-250/350/450/550(f23)
Owners Guide gf, 1st Printing
USA(fus)
Page 258 of 563
Explanation of Information Display Warning Messages
Note:Your TBC can be diagnosed by your authorized dealer to determine
exactly which trailer fault has occurred. However, if the fault is with the
trailer this diagnosis isnotcovered under your Ford warranty.
TRAILER BRAKE MODULE FAULT:Displays in response to faults
sensed by the TBC (accompanied by a single chime). If this message is
displayed, please contact your authorized dealer as soon as possible for
diagnosis and repair. The TBC may still function, but performance may
be degraded.
WIRING FAULT ON TRAILER:Displays when a short circuit on the
electric brake output wire has occurred. If theWIRING FAULT ON
TRAILERmessage is displayed and accompanied by a single chime,
with no trailer connected, the problem is with the vehicle wiring between
the TBC to the 7–pin connector at the bumper. If the message is only
displayed with a trailer connected, the problem is related to the trailer
wiring. Consult your trailer dealer for assistance. This can be a short to
ground (i.e., chaffed wire), short to voltage (i.e., pulled pin on trailer
emergency break-away battery) or the trailer brakes may be drawing too
much current.
Points to Remember
Note:Do not attempt removal of the TBC without consulting the
Workshop Manual.Damage to the unit may result.
•Adjust GAIN setting before using the TBC for the first time.
•Adjust GAIN setting (according to procedure above) whenever road,
weather and trailer or vehicle loading conditions change from when
the GAIN was initially set.
•The manual control lever should only be used for proper adjustment
of the GAIN during trailer setup. Misuse, such as application during
trailer sway, could cause instability of trailer or tow vehicle.
•Avoid towing in adverse weather conditions. The TBC does not
provide anti-lock control of the trailer wheels. Trailer wheels can lock
up on slippery surfaces, resulting in reduced stability of trailer and
tow vehicle.
•The TBC is equipped with a feature which reduces output at vehicle
speeds below 11 mph (18 km/h) so trailer and vehicle braking is not
jerky or harsh. This feature is only available when applying the brakes
using the vehicle’s brake pedal, not the TBC.
•The controller interacts with the brake control system and powertrain
control system of the vehicle to provide the best performance on
different road conditions.
Towing257
2013 F-250/350/450/550(f23)
Owners Guide gf, 1st Printing
USA(fus)
Page 269 of 563
•The Total Accessory Reserve Capacity (TARC) is shown on the lower
right side of the vehicle’s Safety Compliance Certification Label. This
applies to Ford-completed vehicles of 10,000 pounds (4,536 kilograms)
GVWR or less. This is the weight of permanently-attached auxiliary
equipment, such as snowplow frame-mounting hardware, that can be
added to the vehicle and satisfy Ford compliance certification to
FMVSS. Exceeding this weight may require the auxiliary equipment
installer additional safety certification responsibility. The Front
Accessory Reserve Capacity (FARC) is added for customer
convenience.
•Rear ballast weight behind the rear axle may be required to prevent
exceeding the FGAWR, and provide front-to-rear weight balance for
proper braking and steering.
•Front wheel toe may require re-adjustment to prevent premature
uneven tire wear. Specifications are found in the FordWorkshop
Manual.
•Headlight aim may require re-adjustment.
•The tire air pressures recommended for general driving are found on
the vehicle’s Safety Certification Label. The maximum cold inflation
pressure for the tire and associated load rating is imprinted on the tire
sidewall. Tire air pressure may require re-adjustment within these
pressure limits to accommodate the additional weight of the snowplow
installation.
•Federal and some local regulations require additional exterior lamps
for snowplow-equipped vehicles. Consult your authorized dealer for
additional information.
Operating the Vehicle with the Snowplow Attached
Note:Do not use your vehicle for snow removal until it has been driven
at least 500 miles (800 kilometers).
Ford recommends vehicle speed does not exceed 45 mph (72 km/h)
when snowplowing.
The attached snowplow blade restricts airflow to the radiator, and may
cause the engine to run at a higher temperature: Attention to engine
temperature is especially important when outside temperatures are
above freezing. Angle the blade to maximize airflow to the radiator and
monitor engine temperature to determine whether a left or right angle
provides the best performance.
Follow the severe duty schedule in yourscheduled maintenance
informationfor engine oil and transmission fluid change intervals.
268Driving Hints
2013 F-250/350/450/550(f23)
Owners Guide gf, 1st Printing
USA(fus)
Page 346 of 563
E.15:Indicates the wheel or rim diameter in inches. If you change your
wheel size, you will have to purchase new tires to match the new wheel
diameter.
F.95:Indicates the tire’s load index. It is an index that relates to how
much weight a tire can carry. You may find this information in your
owner’s manual. If not, contact a local tire dealer.
Note:You may not find this information on all tires because it is not
required by federal law.
G.H:Indicates the tire’s speed rating. The speed rating denotes the
speed at which a tire is designed to be driven for extended periods of
time under a standard condition of load and inflation pressure. The tires
on your vehicle may operate at different conditions for load and inflation
pressure. These speed ratings may need to be adjusted for the difference
in conditions. The ratings range from 81 mph (130 km/h) to 186 mph
(299 km/h). These ratings are listed in the following chart.
Note:You may not find this information on all tires because it is not
required by federal law.
Letter rating Speed rating - mph (km/h)
M 81 mph (130 km/h)
N 87 mph (140 km/h)
Q 99 mph (159 km/h)
R 106 mph (171 km/h)
S 112 mph (180 km/h)
T 118 mph (190 km/h)
U 124 mph (200 km/h)
H 130 mph (210 km/h)
V 149 mph (240 km/h)
W 168 mph (270 km/h)
Y 186 mph (299 km/h)
Note:For tires with a maximum speed capability over 149 mph
(240 km/h), tire manufacturers sometimes use the letters ZR. For
those with a maximum speed capability over 186 mph (299 km/h), tire
manufacturers always use the letters ZR.
Wheels and Tires345
2013 F-250/350/450/550(f23)
Owners Guide gf, 1st Printing
USA(fus)
Page 349 of 563

Information on T Type Tires
T type tires have some additional
information beyond those of P type
tires. These differences are
described below.
T145/80D16 is an example of a tire
size.
Note:The temporary tire size for
your vehicle may be different from
this example. Tire Quality Grades
do not apply to this type of tire.
A.T:Indicates a type of tire,
designated by the Tire and Rim
Association, that is intended for
temporary service on cars,
sport-utility vehicles, minivans and
light trucks.
B.145:Indicates the nominal width of the tire in millimeters from
sidewall edge to sidewall edge. In general, the larger the number, the
wider the tire.
C.80:Indicates the aspect ratio which gives the tire’s ratio of height to
width. Numbers of 70 or lower indicate a short sidewall.
D.D:Indicates a diagonal type tire.
R:Indicates a radial type tire.
E.16:Indicates the wheel or rim diameter in inches. If you change your
wheel size, you will have to purchase new tires to match the new wheel
diameter.
Location of the Tire Label
You will find a Tire Label containing tire inflation pressure by tire size
and other important information located on the B-Pillar or the edge of
the driver’s door. See the payload description and graphic in theLoad
Carryingchapter .
A
BCDE
348Wheels and Tires
2013 F-250/350/450/550(f23)
Owners Guide gf, 1st Printing
USA(fus)
Page 351 of 563
Note:Do not reduce tire pressure to change the ride characteristics of
the vehicle. If you do not maintain the inflation pressure at the levels
specified by Ford, your vehicle may experience a condition known as
shimmy. Shimmy is a severe vibration and oscillation in the steering
wheel after the vehicle travels over a bump or dip in the road that does
not dampen out by itself. Shimmy may result from significant
under-inflation of the tires, improper tires (load range, size, or type), or
vehicle modifications such as lift-kits. In the event that your vehicle
experiences shimmy, you should slowly reduce speed by either lifting off
the accelerator pedal or lightly applying the brakes. The shimmy will
cease as the vehicle speed decreases.
Maximum Inflation Pressureis the tire manufacturer’s maximum
permissible pressure or the pressure at which the maximum load can be
carried by the tire. This pressure is normally higher than the
manufacturer’s recommended cold inflation pressure which can be found
on the Safety Compliance Certification Label (affixed to either the door
hinge pillar, door-latch post, or the door edge that meets the door-latch
post, next to the driver’s seating position), or Tire Label which is located
on the B-Pillar or the edge of the driver’s door. The cold inflation
pressure should never be set lower than the recommended pressure on
the Safety Compliance Certification Label or Tire Label.
When weather temperature changes occur, tire inflation pressures also
change. A 10°F (6°C) temperature drop can cause a corresponding drop
of 1 psi (7 kPa) in inflation pressure. Check your tire pressures
frequently and adjust them to the proper pressure which can be found
on the Safety Compliance Certification Label or Tire Label.
To check the pressure in your tire(s):
1. Make sure the tires are cool, meaning they are not hot from driving
even a mile.
If you are checking tire pressure when the tire is hot (for example,
driven more than 1 mile [1.6 kilometers]), never bleed or reduce air
pressure. The tires are hot from driving and it is normal for pressures to
increase above recommended cold pressures. A hot tire at or below
recommended cold inflation pressure could be significantly
under-inflated.
Note:If you have to drive a distance to get air for your tire(s), check
and record the tire pressure first and add the appropriate air pressure
when you get to the pump. It is normal for tires to heat up and the air
pressure inside to go up as you drive.
350Wheels and Tires
2013 F-250/350/450/550(f23)
Owners Guide gf, 1st Printing
USA(fus)
Page 372 of 563

Tire Change Procedure
WARNING:When one of the front wheels is off the ground, the
transmission alone will not prevent the vehicle from moving or
slipping off the jack, even if the transmission selector lever is in
positionP.
WARNING:To help prevent the vehicle from moving when you
change a tire, be sure to place the transmission selector lever in
positionP, set the parking brake and block (in both directions) the
wheel that is diagonally opposite (other side and end of the vehicle) to
the tire being changed.
WARNING:Never get underneath a vehicle that is supported
only by a jack. If the vehicle slips off the jack, you or someone
else could be seriously injured.
WARNING:Do not attempt to change a tire on the side of the
vehicle close to moving traffic. Pull far enough off the road to
avoid the danger of being hit when operating the jack or changing the
wheel.
WARNING:Always use the jack provided as original equipment
with your vehicle. If using a jack other than the one provided as
original equipment with your vehicle, make sure the jack capacity is
adequate for the vehicle weight, including any vehicle cargo or
modifications.
Note:Passengers should not remain in the vehicle when the vehicle is
being jacked.
Wheels and Tires371
2013 F-250/350/450/550(f23)
Owners Guide gf, 1st Printing
USA(fus)
Page 402 of 563
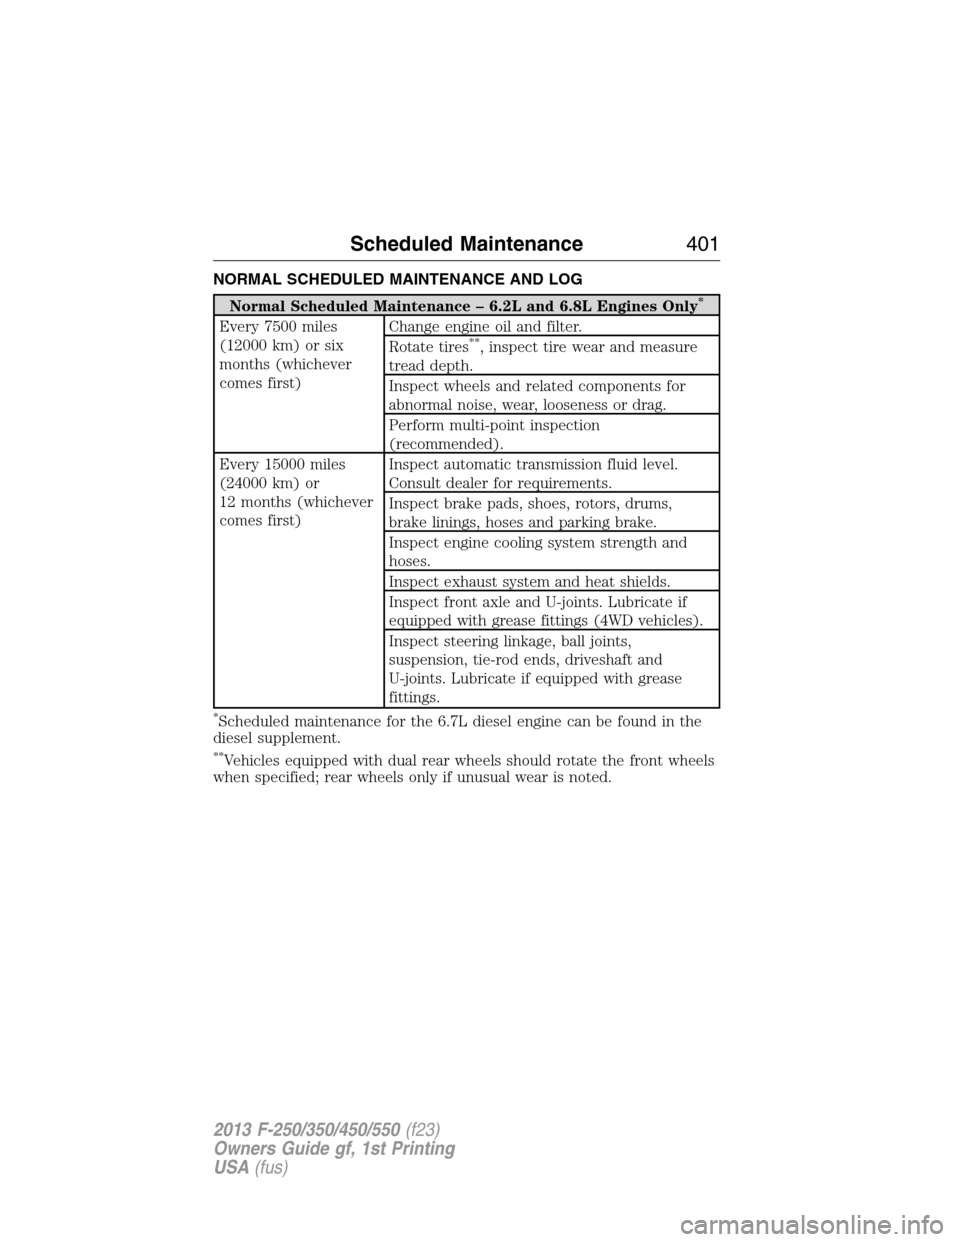
NORMAL SCHEDULED MAINTENANCE AND LOG
Normal Scheduled Maintenance – 6.2L and 6.8L Engines Only*
Every 7500 miles
(12000 km) or six
months (whichever
comes first)Change engine oil and filter.
Rotate tires**, inspect tire wear and measure
tread depth.
Inspect wheels and related components for
abnormal noise, wear, looseness or drag.
Perform multi-point inspection
(recommended).
Every 15000 miles
(24000 km) or
12 months (whichever
comes first)Inspect automatic transmission fluid level.
Consult dealer for requirements.
Inspect brake pads, shoes, rotors, drums,
brake linings, hoses and parking brake.
Inspect engine cooling system strength and
hoses.
Inspect exhaust system and heat shields.
Inspect front axle and U-joints. Lubricate if
equipped with grease fittings (4WD vehicles).
Inspect steering linkage, ball joints,
suspension, tie-rod ends, driveshaft and
U-joints. Lubricate if equipped with grease
fittings.
*Scheduled maintenance for the 6.7L diesel engine can be found in the
diesel supplement.
**Vehicles equipped with dual rear wheels should rotate the front wheels
when specified; rear wheels only if unusual wear is noted.
Scheduled Maintenance401
2013 F-250/350/450/550(f23)
Owners Guide gf, 1st Printing
USA(fus)