2013 FORD SUPER DUTY light
[x] Cancel search: lightPage 351 of 563

Note:Do not reduce tire pressure to change the ride characteristics of
the vehicle. If you do not maintain the inflation pressure at the levels
specified by Ford, your vehicle may experience a condition known as
shimmy. Shimmy is a severe vibration and oscillation in the steering
wheel after the vehicle travels over a bump or dip in the road that does
not dampen out by itself. Shimmy may result from significant
under-inflation of the tires, improper tires (load range, size, or type), or
vehicle modifications such as lift-kits. In the event that your vehicle
experiences shimmy, you should slowly reduce speed by either lifting off
the accelerator pedal or lightly applying the brakes. The shimmy will
cease as the vehicle speed decreases.
Maximum Inflation Pressureis the tire manufacturer’s maximum
permissible pressure or the pressure at which the maximum load can be
carried by the tire. This pressure is normally higher than the
manufacturer’s recommended cold inflation pressure which can be found
on the Safety Compliance Certification Label (affixed to either the door
hinge pillar, door-latch post, or the door edge that meets the door-latch
post, next to the driver’s seating position), or Tire Label which is located
on the B-Pillar or the edge of the driver’s door. The cold inflation
pressure should never be set lower than the recommended pressure on
the Safety Compliance Certification Label or Tire Label.
When weather temperature changes occur, tire inflation pressures also
change. A 10°F (6°C) temperature drop can cause a corresponding drop
of 1 psi (7 kPa) in inflation pressure. Check your tire pressures
frequently and adjust them to the proper pressure which can be found
on the Safety Compliance Certification Label or Tire Label.
To check the pressure in your tire(s):
1. Make sure the tires are cool, meaning they are not hot from driving
even a mile.
If you are checking tire pressure when the tire is hot (for example,
driven more than 1 mile [1.6 kilometers]), never bleed or reduce air
pressure. The tires are hot from driving and it is normal for pressures to
increase above recommended cold pressures. A hot tire at or below
recommended cold inflation pressure could be significantly
under-inflated.
Note:If you have to drive a distance to get air for your tire(s), check
and record the tire pressure first and add the appropriate air pressure
when you get to the pump. It is normal for tires to heat up and the air
pressure inside to go up as you drive.
350Wheels and Tires
2013 F-250/350/450/550(f23)
Owners Guide gf, 1st Printing
USA(fus)
Page 352 of 563

2. Remove the cap from the valve on one tire, then firmly press the tire
gauge onto the valve and measure the pressure.
3. Add enough air to reach the recommended air pressure.
Note:If you overfill the tire, release air by pushing on the metal stem in
the center of the valve. Then recheck the pressure with your tire gauge.
4. Replace the valve cap.
5. Repeat this procedure for each tire, including the spare.
Note:Some spare tires operate at a higher inflation pressure than the
other tires. For T-type or mini-spare tires, see theDissimilar spare tire
and wheel assembly informationsection. Store and maintain at 60 psi
(4.15 bar). For full-size and dissimilar spare tires, see theDissimilar
spare tire and wheel assembly informationsection. Store and maintain
at the higher of the front and rear inflation pressure as shown on the
Tire Label.
6. Visually inspect the tires to make sure there are no nails or other
objects embedded that could poke a hole in the tire and cause an air
leak.
7. Check the sidewalls to make sure there are no gouges, cuts or bulges.
Tire Inflation Information
WARNING:An inflated tire and rim can be very dangerous if
improperly used, serviced or maintained. To reduce the risk of
serious injury, never attempt to re-inflate a tire which has been run flat
or seriously under-inflated without first removing the tire from the
wheel assembly for inspection. Do not attempt to add air to tires or
replace tires or wheels without first taking precautions to protect
persons and property.
All tires with Steel Carcass Plies (if equipped):
This type of tire utilizes steel cords in the sidewalls. As such, they
cannot be treated like normal light truck tires. Tire service, including
adjusting tire pressure, must be performed by personnel trained,
supervised and equipped according to Federal Occupational Safety and
Health Administration regulations. For example, during any procedure
involving tire inflation, the technician or individual must utilize a remote
inflation device, and make sure that all persons are clear of the
trajectory area.
Wheels and Tires351
2013 F-250/350/450/550(f23)
Owners Guide gf, 1st Printing
USA(fus)
Page 362 of 563

vehicle to ensure that the replacement or alternate tires and wheels
allow the system to continue to function properly.
The tire pressure monitoring system complies with part 15 of the FCC
rules and with RSS-210 of Industry Canada. Operation is subject to the
following two conditions: (1) This device may not cause harmful
interference, and (2) This device must accept any interference received,
including interference that may cause undesired operation.
Changing Tires with a Tire Pressure Monitoring System
Note:Each road tire is equipped
with a tire pressure sensor located
inside the tire and wheel assembly
cavity. The pressure sensor is
attached to the valve stem. The
pressure sensor is covered by the
tire and is not visible unless the tire
is removed. Take care when
changing the tire to avoid damaging
the sensor.
You should always have your tires serviced by an authorized dealer.
Check the tire pressure periodically (at least monthly) using an accurate
tire gauge. SeeInflating Your Tiresin this chapter.
Understanding Your Tire Pressure Monitoring System
The tire pressure monitoring system measures pressure in your four road
tires and sends the tire pressure readings to your vehicle. The low tire
pressure warning light will turn on if the tire pressure is significantly low.
Once the light is illuminated, your tires are under-inflated and need to be
inflated to the manufacturer’s recommended tire pressure. Even if the
light turns on and a short time later turns off, your tire pressure still
needs to be checked.
When your temporary spare tire is installed
When one of your road tires needs to be replaced with the temporary
spare, the tire pressure monitoring system will continue to identify an
issue to remind you that the damaged road wheel or tire needs to be
repaired and put back on your vehicle.
To restore the full function of the tire pressure monitoring system, have
the damaged road wheel or tire repaired and remounted on your vehicle.
For additional information, seeChanging Tires with a Tire Pressure
Monitoring Systemin this section.
Wheels and Tires361
2013 F-250/350/450/550(f23)
Owners Guide gf, 1st Printing
USA(fus)
Page 363 of 563

When you believe your system is not operating properly
The main function of the tire pressure monitoring system is to warn you
when your tires need air. It can also warn you in the event the system is
no longer capable of functioning as intended. See the following chart for
information concerning your tire pressure monitoring system:
Low tire
pressure
warning lightPossible cause Customer action required
Solid warning
lightTire(s)
under-inflated1. Make sure tires are at the proper
pressure. SeeInflating your tiresin
this chapter.
2. After inflating your tires to the
manufacturer’s recommended
pressure as shown on the Tire Label
(located on the edge of driver’s door
or the B-Pillar), the vehicle must be
driven for at least two minutes over
20 mph (32 km/h) before the light
turns off.
Spare tire in use Repair the damaged road wheel and
tire and reinstall it on the vehicle to
restore system function. For a
description on how the system
functions, seeWhen your
temporary spare tire is installedin
this section.
Tire pressure
monitoring
system
malfunctionIf the tires are properly inflated and
the spare tire is not in use but the
light remains on, contact your
authorized dealer as soon as possible.
Tire rotation
without sensor
trainingOn vehicles with different front and
rear tire pressures, the system must
be retrained following every tire
rotation. SeeTire rotationin this
chapter.
362Wheels and Tires
2013 F-250/350/450/550(f23)
Owners Guide gf, 1st Printing
USA(fus)
Page 364 of 563

Low tire
pressure
warning lightPossible cause Customer action required
Flashing warning
lightSpare tire in use Repair the damaged road wheel and
tire and reinstall it on the vehicle to
restore system function. For a
description on how the system
functions, seeWhen your
temporary spare tire is installedin
this section.
Tire pressure
monitoring
system
malfunctionIf the tires are properly inflated and
the spare tire is not in use but the
light remains on, contact your
authorized dealer as soon as possible.
When inflating your tires
When putting air into your tires (such as at a gas station or in your
garage), the tire pressure monitoring system may not respond
immediately to the air added to your tires.
It may take up to two minutes of driving over 20 mph (32 km/h) for the
light to turn off after you have filled your tires to the recommended
inflation pressure.
How temperature affects your tire pressure
The tire pressure monitoring system monitors tire pressure in each
pneumatic tire. While driving in a normal manner, a typical passenger
tire inflation pressure may increase approximately 2 to 4 psi (14 to
28 kPa) from a cold start situation. If the vehicle is stationary overnight
with the outside temperature significantly lower than the daytime
temperature, the tire pressure may decrease approximately 3 psi
(21 kPa) for a drop of 30°F (17°C) in ambient temperature. This lower
pressure value may be detected by the system as being significantly
lower than the recommended inflation pressure and activate the system
warning light for low tire pressure. If the low tire pressure warning light
is on, visually check each tire to verify that no tire is flat. If one or more
tires are flat, repair as necessary. Check air pressure in the road tires. If
any tire is under-inflated, carefully drive the vehicle to the nearest
location where air can be added to the tires. Inflate all the tires to the
recommended inflation pressure.
Wheels and Tires363
2013 F-250/350/450/550(f23)
Owners Guide gf, 1st Printing
USA(fus)
Page 365 of 563

Tire Pressure Monitoring System Reset Procedure
WARNING:To determine the required pressure(s) for your
vehicle, see the Safety Compliance Certification Label (affixed to
either the door hinge pillar, door-latch post, or the door edge that
meets the door-latch post, next to the driver’s seating position), or Tire
Label located on the B-Pillar or the edge of the driver’s door. SeeLoad
Carryingfor more information.
Note:The tire pressure monitoring system reset procedure needs to be
performed after each tire rotation on vehicles that require different
recommended tire pressures in the front tires as compared to the rear
tires.
Overview
To provide the vehicle’s load carrying capability, some vehicles require
different recommended tire pressures in the front tires as compared to
the rear tires. The tire pressure monitoring system equipped on these
vehicles is designed to illuminate the low tire pressure warning light at
two different pressures; one for the front tires and one for the rear tires.
Since tires need to be rotated to provide consistent performance and
maximum tire life, the tire pressure monitoring system needs to know
when the tires are rotated to determine which set of tires are on the
front and which are on the rear. With this information, the system can
detect and properly warn of low tire pressures.
System reset tips:
•To reduce the chances of interference from another vehicle, the
system reset procedure should be performed at least three feet (one
meter) away from another Ford Motor Company vehicle undergoing
the system reset procedure at the same time.
•Do not wait more than two minutes between resetting each tire sensor
or the system will time-out and the entire procedure will have to be
repeated on all four wheels.
•A double horn chirp indicates the need to repeat the procedure.
364Wheels and Tires
2013 F-250/350/450/550(f23)
Owners Guide gf, 1st Printing
USA(fus)
Page 367 of 563

10. Turn the ignition off. If two short horn beeps are heard, the reset
procedure was unsuccessful and must be repeated.
If after repeating the procedure and two short beeps are heard when the
ignition is turned to off, seek assistance from your authorized dealer.
11. Set all four tires to the recommended air pressure as indicated on
the Safety Compliance Certification Label (affixed to either the door
hinge pillar, door-latch post, or the door edge that meets the door-latch
post, next to the driver’s seating position) or Tire Label located on the
B-Pillar or the edge of the driver’s door. SeeLoad Carryingfor more
information.
CHANGING A ROAD WHEEL
WARNING:The use of tire sealants may damage your tire
pressure monitoring system and should not be used. However, if
you must use a sealant, the tire pressure monitoring system sensor and
valve stem on the wheel must be replaced by an authorized Ford
dealer.
WARNING:SeeTire Pressure Monitoring Systemin this
chapter for important information. If the tire pressure monitor
sensor becomes damaged, it will no longer function.
Note:If your vehicle is equipped with the tire pressure monitoring
system, the indicator light will illuminate when the spare tire is in use.
To restore the full function of the monitoring system, all road wheels
equipped with tire pressure monitoring sensors must be mounted on the
vehicle.
If you get a flat tire while driving, do not apply the brake heavily.
Instead, gradually decrease your speed. Hold the steering wheel firmly
and slowly move to a safe place on the side of the road.
If your vehicle is equipped with the tire pressure monitoring system,
have a flat serviced by an authorized dealer in order to prevent damage
to the system sensors. SeeTire Pressure Monitoring Systemin this
chapter. Replace the spare tire with a road tire as soon as possible.
During repairing or replacing of the flat tire, have the authorized dealer
inspect the system sensor for damage.
366Wheels and Tires
2013 F-250/350/450/550(f23)
Owners Guide gf, 1st Printing
USA(fus)
Page 371 of 563

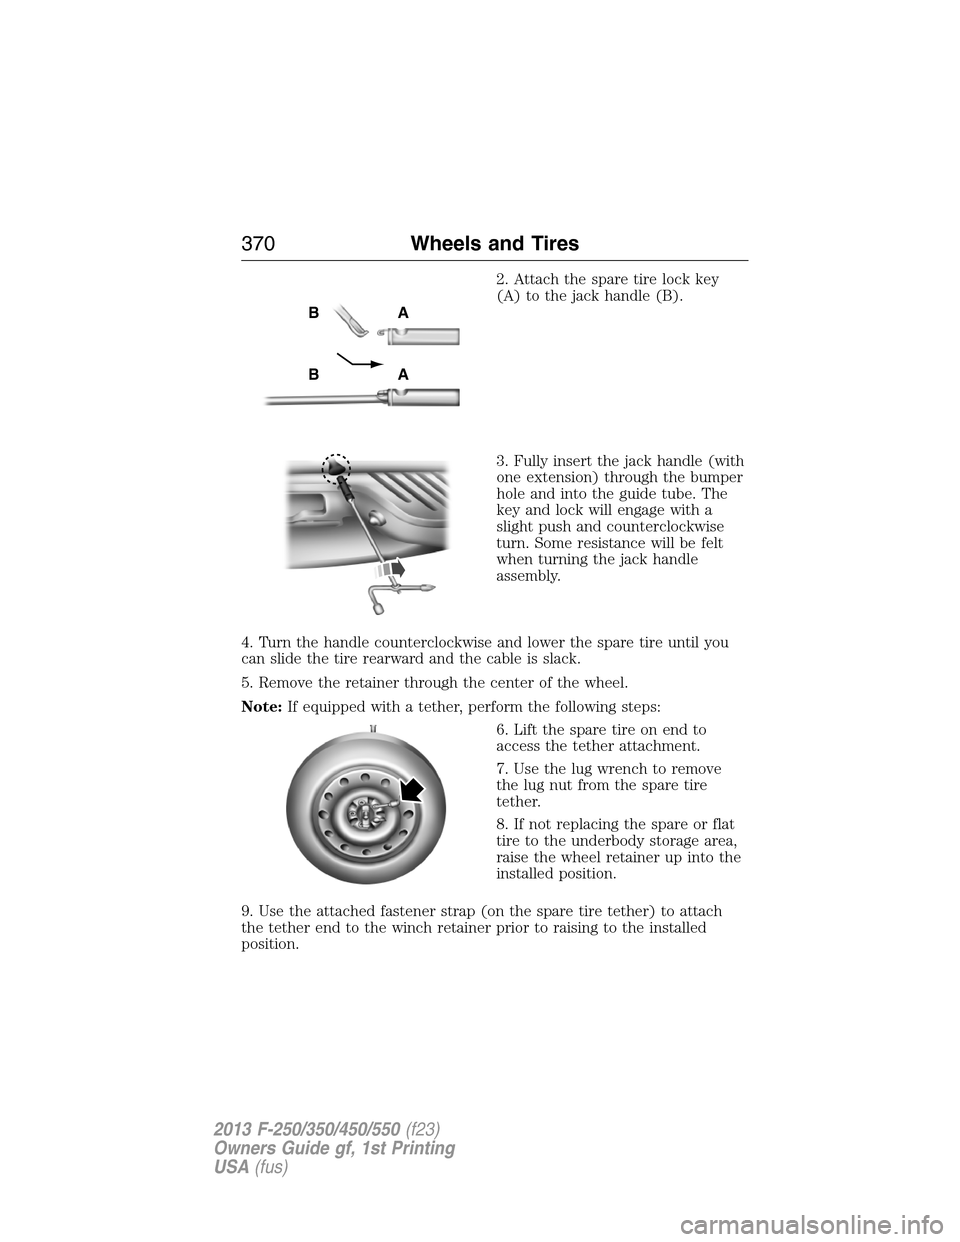
2. Attach the spare tire lock key
(A) to the jack handle (B).
3. Fully insert the jack handle (with
one extension) through the bumper
hole and into the guide tube. The
key and lock will engage with a
slight push and counterclockwise
turn. Some resistance will be felt
when turning the jack handle
assembly.
4. Turn the handle counterclockwise and lower the spare tire until you
can slide the tire rearward and the cable is slack.
5. Remove the retainer through the center of the wheel.
Note:If equipped with a tether, perform the following steps:
6. Lift the spare tire on end to
access the tether attachment.
7. Use the lug wrench to remove
the lug nut from the spare tire
tether.
8. If not replacing the spare or flat
tire to the underbody storage area,
raise the wheel retainer up into the
installed position.
9. Use the attached fastener strap (on the spare tire tether) to attach
the tether end to the winch retainer prior to raising to the installed
position.
AB
AB
370Wheels and Tires
2013 F-250/350/450/550(f23)
Owners Guide gf, 1st Printing
USA(fus)