2013 FORD F250 check engine
[x] Cancel search: check enginePage 195 of 577
Note:If you must replace the fuel filler cap, replace it with a fuel filler
cap that is designed for your vehicle. The customer warranty may be
void for any damage to the fuel tank or fuel system if the correct
genuine Ford, Motorcraft® or other certified fuel filler cap is not used.
Your fuel tank filler cap has an indexed design with a 1/4th turn on and
off feature. When fueling your vehicle:
1. Turn the engine off.
2. Carefully turn the filler cap counterclockwise until it spins off.
3. Pull to remove the cap from the fuel filler pipe.
4. To install the cap, align the tabs on the cap with the notches on the
filler pipe.
5. Turn the filler cap clockwise 1/4 of a turn clockwise until it clicks at
least once.
If the Check Fuel Cap light or a Check Fuel Cap message appears in the
instrument cluster and stays on after you start the engine, the fuel filler
cap may not be properly installed.
If the fuel cap light remains on, at the next opportunity, safely pull off of
the road, remove the fuel filler cap, align the cap properly and reinstall
it. The check fuel cap light or Check fuel cap message may not reset
immediately; it may take several driving cycles for the indicators to turn
off. A driving cycle consists of an engine start-up (after four or more
hours with the engine off) followed by normal city and highway driving.
FUEL CONSUMPTION
Filling the Tank
The advertised capacity is the indicated capacity and the empty reserve
combined. Indicated capacity is the difference in the amount of fuel in a
full tank and a tank when the fuel gauge indicates empty. Empty reserve
is the amount of fuel in the tank after the fuel gauge indicates empty.
Note:The amount of usable fuel in the empty reserve varies and should
not be relied upon to increase driving range. When refueling your vehicle
after the fuel gauge indicates empty, you might not be able to refuel the
full amount of the advertised capacity of the fuel tank due to the empty
reserve still present in the tank.
194Fuel and Refueling
2013 F-250/350/450/550(f23)
Owners Guide gf, 3rd Printing, December 2012
USA(fus)
Page 199 of 577
Readiness for Inspection/Maintenance (I/M) Testing
Some state, provincial and local governments may have
Inspection/Maintenance (I/M) programs to inspect the emission control
equipment on your vehicle. Failure to pass this inspection could prevent
you from getting a vehicle registration.
If the service engine soon indicator is on or the bulb does not
work, the vehicle may need to be serviced. SeeOn-board
Diagnostics (OBD-II)in this chapter.
Your vehicle may not pass the I/M test if the service engine soon
indicator is on or not working properly (bulb is burned out), or if the
OBD-II system has determined that some of the emission control systems
have not been properly checked. In this case, the vehicle is considered
not ready for I/M testing.
If the vehicle’s engine or transmission has just been serviced, or the
battery has recently run down or been replaced, the OBD-II system may
indicate that the vehicle is not ready for I/M testing. To determine if the
vehicle is ready for I/M testing, turn the ignition key to the on position
for 15 seconds without cranking the engine. If the service engine soon
indicator blinks eight times, it means that the vehicle is not ready for I/M
testing; if the service engine soon indicator stays on solid, it means that
the vehicle is ready for I/M testing.
The OBD-II system is designed to check the emission control system
during normal driving. A complete check may take several days. If the
vehicle is not ready for I/M testing, the following driving cycle consisting
of mixed city and highway driving may be performed:
15 minutes of steady driving on an expressway or highway followed by
20 minutes of stop-and-go driving with at least four 30-second idle
periods.
Allow the vehicle to sit for at least eight hours without starting the
engine. Then, start the engine and complete the above driving cycle.
The engine must warm up to its normal operating temperature. Once the
engine is started, do not turn off the engine until the above driving cycle
is complete. If the vehicle is still not ready for I/M testing, the above
driving cycle will have to be repeated.
198Fuel and Refueling
2013 F-250/350/450/550(f23)
Owners Guide gf, 3rd Printing, December 2012
USA(fus)
Page 241 of 577
Steering
To help prevent damage to the power steering system:
•Never hold the steering wheel at its furthest turning points (until it
stops) for more than three to five seconds when the engine is running.
•Do not operate the vehicle with a low power steering pump fluid level
(below the MIN mark on the reservoir).
•Some noise is normal during operation. If excessive, check for low
power steering pump fluid level before seeking service by your dealer.
•Heavy or uneven efforts may be caused by low power steering fluid.
Check for low power steering pump fluid level before seeking service
by your dealer.
•Do not fill the power steering pump reservoir above the MAX mark on
the reservoir, as this may result in leaks from the reservoir.
If the power steering system breaks down (or if the engine is turned
off), you can steer the vehicle manually, but it takes more effort.
If the steering wanders or pulls, check for:
•an improperly inflated tire
•uneven tire wear
•loose or worn suspension components
•loose or worn steering components
•improper steering alignment
If any steering components are serviced or replaced, install new
fasteners (many are coated with thread adhesive or have prevailing
torque features which may not be re-used). Never re-use a bolt or nut.
Torque fasteners to specifications inWorkshop Manual.
A high crown in the road or high crosswinds may also make the steering
seem to wander/pull.
240Driving Aids
2013 F-250/350/450/550(f23)
Owners Guide gf, 3rd Printing, December 2012
USA(fus)
Page 255 of 577
TRAILER SWAY CONTROL (IF EQUIPPED)
WARNING:Turning off trailer sway control increases the risk of
loss of vehicle control, serious injury or death. Ford does not
recommend disabling this feature except in situations where speed
reduction may be detrimental (such as hill climbing), the driver has
significant trailer towing experience, and can control trailer sway and
maintain safe operation.
Note:This feature does not prevent trailer sway, but reduces it once it
begins.
Note:This feature cannot stop all trailers from swaying.
Note:In some cases, if vehicle speed is too high, the system may turn
on multiple times, gradually reducing vehicle speed.
This feature applies your vehicle brakes at individual wheels and, if
necessary, reduces engine power. If the trailer begins to sway, the
stability control light flashes. The first thing to do is slow your vehicle
down, then pull safely to the side of the road and check for proper
tongue load and trailer load distribution. See theLoad Carryingchapter
for specific loading information.
RECOMMENDED TOWING WEIGHTS
Note:Do not exceed a trailer weight of 5000 pounds (2268 kilograms)
when towing with, or by, bumper only.
Note:The total area in square feet (meters) exposed to air resistance of
a moving vehicle and its trailer is the trailer frontal area. Do not exceed
60 feet
2(5.57 meters2) trailer frontal area.
Note:Exceeding this limitation may significantly reduce the
performance of your towing vehicle. Selecting a trailer with a low
aerodynamic drag and rounded front design helps optimize performance
and fuel economy.
Note:For high altitude operation, reduce the gross combined weight by
2% per 1000 feet (300 meters) starting at the 1000 foot (300 meter)
elevation point.
254Towing
2013 F-250/350/450/550(f23)
Owners Guide gf, 3rd Printing, December 2012
USA(fus)
Page 256 of 577
Note:Certain states require electric trailer brakes for trailers over a
specified weight. Be sure to check state regulations for this specified
weight. The maximum trailer weights listed may be limited to this
specified weight, as your vehicle’s electrical system may not include
the wiring connector needed to use electric trailer brakes.
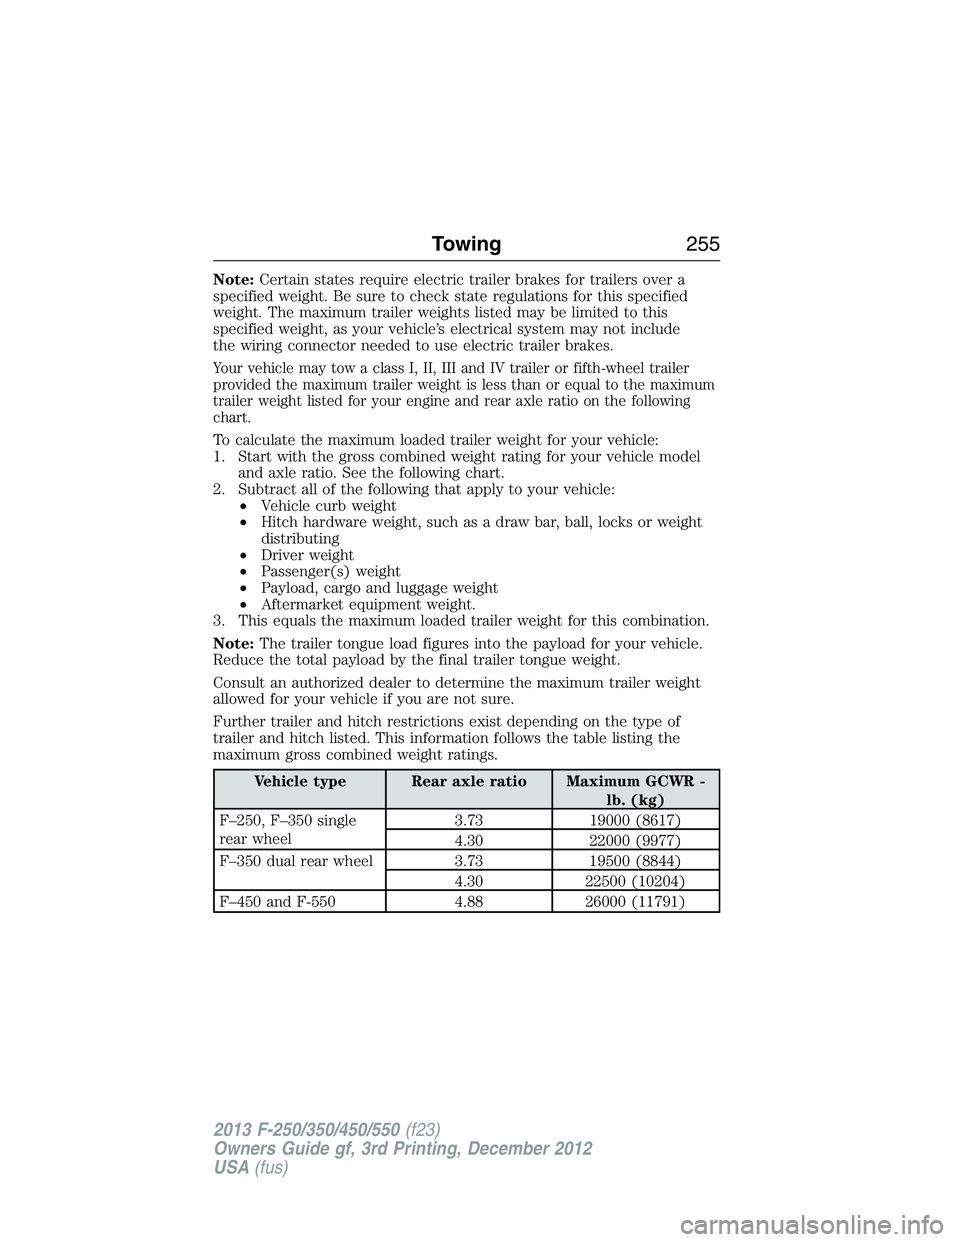
Your vehicle may tow a class I, II, III and IV trailer or fifth-wheel trailer
provided the maximum trailer weight is less than or equal to the maximum
trailer weight listed for your engine and rear axle ratio on the following
chart.
To calculate the maximum loaded trailer weight for your vehicle:
1. Start with the gross combined weight rating for your vehicle model
and axle ratio. See the following chart.
2. Subtract all of the following that apply to your vehicle:
•Vehicle curb weight
•Hitch hardware weight, such as a draw bar, ball, locks or weight
distributing
•Driver weight
•Passenger(s) weight
•Payload, cargo and luggage weight
•Aftermarket equipment weight.
3. This equals the maximum loaded trailer weight for this combination.
Note:The trailer tongue load figures into the payload for your vehicle.
Reduce the total payload by the final trailer tongue weight.
Consult an authorized dealer to determine the maximum trailer weight
allowed for your vehicle if you are not sure.
Further trailer and hitch restrictions exist depending on the type of
trailer and hitch listed. This information follows the table listing the
maximum gross combined weight ratings.
Vehicle type Rear axle ratio Maximum GCWR -
lb. (kg)
F–250, F–350 single
rear wheel3.73 19000 (8617)
4.30 22000 (9977)
F–350 dual rear wheel 3.73 19500 (8844)
4.30 22500 (10204)
F–450 and F-550 4.88 26000 (11791)
Towing255
2013 F-250/350/450/550(f23)
Owners Guide gf, 3rd Printing, December 2012
USA(fus)
Page 264 of 577
Trailer Lamps
WARNING:Never connect any trailer lamp wiring to the
vehicle’s tail lamp wiring; this may damage the electrical system
resulting in a fire. Contact an authorized dealer as soon as possible for
assistance in proper trailer tow wiring installation. Additional electrical
equipment may be required.
Trailer lamps are required on most towed vehicles. Make sure all running
lights, brake lights, turn signals and hazard lights are working.
Using a Step Bumper (If Equipped)
The rear bumper is equipped with an integral hitch and only requires a
ball with a one-inch (25.4 millimeter) shank diameter. The bumper has a
5000-pound (2268 kilogram) trailer weight and a 500-pound (227 kilogram)
tongue weight capacity.
If it is necessary to relocate the hitch ball position, you must install a
frame-mounted trailer hitch.
Before Towing a Trailer
Practice turning, stopping and backing up to get the feel of your
vehicle-trailer combination before starting on a trip. When turning,
make wider turns so the trailer wheels clear curbs and other obstacles.
When Towing a Trailer
•Do not drive faster than 70 mph (113 km/h) during the first 500 miles
(800 kilometers).
•Do not make full-throttle starts.
•Check your hitch, electrical connections and trailer wheel lug nuts
thoroughly after you have traveled 50 miles (80 kilometers).
•When stopped in congested or heavy traffic during hot weather, place
the gearshift in positionPto aid engine and transmission cooling and
to help A/C performance.
•Turn off the speed control with heavy loads or in hilly terrain.
The speed control may turn off automatically when you are towing
on long, steep grades.
•Shift to a lower gear when driving down a long or steep hill. Do not
apply the brakes continuously, as they may overheat and become less
effective.
Towing263
2013 F-250/350/450/550(f23)
Owners Guide gf, 3rd Printing, December 2012
USA(fus)
Page 271 of 577
![FORD F250 2013 Owners Manual •Carry unnecessary weight (approximately 1 mpg [0.4 km/L] is lost for
every 400 pounds [180 kilograms] of weight carried).
•Add particular accessories to your vehicle (e.g.; bug deflectors,
rollba FORD F250 2013 Owners Manual •Carry unnecessary weight (approximately 1 mpg [0.4 km/L] is lost for
every 400 pounds [180 kilograms] of weight carried).
•Add particular accessories to your vehicle (e.g.; bug deflectors,
rollba](/manual-img/11/58774/w960_58774-270.png)
•Carry unnecessary weight (approximately 1 mpg [0.4 km/L] is lost for
every 400 pounds [180 kilograms] of weight carried).
•Add particular accessories to your vehicle (e.g.; bug deflectors,
rollbars or light bars, running boards, ski racks).
•Drive with the wheels out of alignment.
Conditions
•Heavily loading a vehicle or towing a trailer may reduce fuel economy
at any speed.
•Carrying unnecessary weight may reduce fuel economy (approximately
1 mpg [0.4 km/L] is lost for every 400 lb [180 kg] of weight carried).
•Adding certain accessories to your vehicle (for example bug
deflectors, rollbars/light bars, running boards, ski/luggage racks) may
reduce fuel economy.
•To maximize the fuel economy, drive with the tonneau cover installed
(if equipped).
•Using fuel blended with alcohol may lower fuel economy.
•Fuel economy may decrease with lower temperatures during the first
8–10 miles (12–16 km) of driving.
•Driving on flat terrain offers improved fuel economy as compared to
driving on hilly terrain.
•Transmissions give their best fuel economy when operated in the top
cruise gear and with steady pressure on the gas pedal.
•Four-wheel-drive operation (if equipped) is less fuel efficient than
two-wheel-drive operation.
•Close windows for high speed driving.
DRIVING THROUGH WATER
Note:If you drove through deep water, check the transmission and
engine fluid. If water is found, replace the fluid.
Do not drive quickly through standing water, especially if the depth is
unknown. Traction or brake capability may be limited and if the ignition
system gets wet, your engine may stall. Water may also enter your
engine’s air intake and severely damage your engine.
270Driving Hints
2013 F-250/350/450/550(f23)
Owners Guide gf, 3rd Printing, December 2012
USA(fus)
Page 280 of 577
JUMP-STARTING THE VEHICLE
WARNING:The gases around the battery can explode if exposed
to flames, sparks, or lit cigarettes. An explosion could result in
injury or vehicle damage.
WARNING:Batteries contain sulfuric acid which can burn skin,
eyes and clothing, if contacted.
Do not attempt to push-start your automatic transmission vehicle.
Automatic transmissions do not have push-start capability. Attempting
to push-start a vehicle with an automatic transmission may cause
transmission damage.
When the battery is disconnected or a new battery is installed, the
automatic transmission must relearn its shift strategy. As a result, the
transmission may exhibit a combination of firm and soft shifts. This
operation is considered normal and will not affect function or durability
of the transmission. Over time, the adaptive learning process will fully
update transmission operation.
Preparing Your Vehicle
Note:Use only a 12–volt supply to start your vehicle.
Note:Do not disconnect the battery of the disabled vehicle as this could
damage the vehicle’s electrical system.
1. Park the booster vehicle close to the hood of the disabled vehicle
making sure the two vehicles do not touch. Set the parking brake on
both vehicles and stay clear of the engine cooling fan and other moving
parts.
2. Check all battery terminals. Remove the positive terminal cover
(if equipped) and any excessive corrosion before you attach the battery
cables. Ensure that vent caps are tight and level.
3. Turn the heater fan on in both vehicles to protect from any electrical
surges. Turn all other accessories off.
Roadside Emergencies279
2013 F-250/350/450/550(f23)
Owners Guide gf, 3rd Printing, December 2012
USA(fus)