2013 FORD F250 maintenance schedule
[x] Cancel search: maintenance schedulePage 257 of 577
ESSENTIAL TOWING CHECKS
Follow these guidelines for safe towing:
•Do not tow a trailer until you drive your vehicle at least 1000 miles
(1600 kilometers).
•Consult your local motor vehicle laws for towing a trailer.
•See the instructions included with towing accessories for the proper
installation and adjustment specifications.
•Service your vehicle more frequently if you tow a trailer. See your
scheduled maintenance information.
•If you use a rental trailer, follow the instructions the rental agency
gives you.
For load specification terms found on the tire label and Safety
Compliance label and for instructions on calculating your vehicle’s load,
refer toLoad limitin theLoad Carryingchapter.
Remember to account for the trailer tongue weight as part of your
vehicle load when calculating the total vehicle weight.
Hitches
WARNING:On pick-up trucks, the trailer hitch provided on this
vehicle enhances crash protection for the fuel system. Do not
remove!
Do not use a hitch that either clamps onto the bumper or attaches to the
axle. You must distribute the load in your trailer so that 10–15% for
conventional towing or 15–25% for fifth wheel towing of the total weight
of the trailer is on the tongue.
Weight-Distributing Hitches
WARNING:Do not adjust a weight-distributing hitch to any
position where the rear bumper of the vehicle is higher than it
was before attaching the trailer. Doing so will defeat the function of the
weight-distributing hitch, which may cause unpredictable handling, and
could result in serious personal injury.
When hooking-up a trailer using a weight-distributing hitch, always use
the following procedure:
1. Park the loaded vehicle, without the trailer, on a level surface.
2. Measure the height to the top of your vehicle’s front wheel opening
on the fender. This is H1.
256Towing
2013 F-250/350/450/550(f23)
Owners Guide gf, 3rd Printing, December 2012
USA(fus)
Page 270 of 577
BREAKING-IN
You need to break in new tires for approximately 300 miles
(480 kilometers). During this time, your vehicle may exhibit some unique
driving characteristics. Avoid driving too fast during the first 1000 miles
(1600 kilometers). Vary your speed frequently and change up through
the gears early. Do not labor the engine. Do not tow during the first
1000 miles (1600 kilometers).
ECONOMICAL DRIVING
Fuel economy is affected by several things, such as how you drive, the
conditions you drive under and how you maintain your vehicle.
There are some things to keep in mind that may improve your fuel
economy:
•Accelerate and slow down in a smooth, moderate fashion.
•Drive at steady speeds without stopping.
•Anticipate stops; slowing down may eliminate the need to stop.
•Combine errands and minimize stop-and-go driving.
•Close the windows for high-speed driving.
•Drive at reasonable speeds (traveling at 55 mph [88 km/h] uses 15%
less fuel than traveling at 65 mph [105 km/h]).
•Keep the tires properly inflated and use only the recommended size.
•Use the recommended engine oil.
•Perform all regularly scheduled maintenance.
There are also some things you may not want to do because they may
reduce your fuel economy:
•Sudden or hard accelerations.
•Rev the engine before turning it off.
•Idle for periods longer than one minute.
•Warm up your vehicle on cold mornings.
•Use the air conditioner or front defroster.
•Use the speed control in hilly terrain.
•Rest your foot on the brake pedal while driving.
•Drive a heavily loaded vehicle or tow a trailer.
Driving Hints269
2013 F-250/350/450/550(f23)
Owners Guide gf, 3rd Printing, December 2012
USA(fus)
Page 274 of 577
•The Total Accessory Reserve Capacity (TARC) is shown on the lower
right side of the vehicle’s Safety Compliance Certification Label. This
applies to Ford-completed vehicles of 10,000 pounds (4,536 kilograms)
GVWR or less. This is the weight of permanently-attached auxiliary
equipment, such as snowplow frame-mounting hardware, that can be
added to the vehicle and satisfy Ford compliance certification to
FMVSS. Exceeding this weight may require the auxiliary equipment
installer additional safety certification responsibility. The Front
Accessory Reserve Capacity (FARC) is added for customer
convenience.
•Rear ballast weight behind the rear axle may be required to prevent
exceeding the FGAWR, and provide front-to-rear weight balance for
proper braking and steering.
•Front wheel toe may require re-adjustment to prevent premature
uneven tire wear. Specifications are found in the FordWorkshop
Manual.
•Headlight aim may require re-adjustment.
•The tire air pressures recommended for general driving are found on
the vehicle’s Safety Certification Label. The maximum cold inflation
pressure for the tire and associated load rating is imprinted on the
tire sidewall. Tire air pressure may require re-adjustment within these
pressure limits to accommodate the additional weight of the snowplow
installation.
•Federal and some local regulations require additional exterior lamps
for snowplow-equipped vehicles. Consult your authorized dealer for
additional information.
Operating the Vehicle with the Snowplow Attached
Note:Do not use your vehicle for snow removal until it has been driven
at least 500 miles (800 kilometers).
Ford recommends vehicle speed does not exceed 45 mph (72 km/h)
when snowplowing.
The attached snowplow blade restricts airflow to the radiator, and may
cause the engine to run at a higher temperature: Attention to engine
temperature is especially important when outside temperatures are
above freezing. Angle the blade to maximize airflow to the radiator and
monitor engine temperature to determine whether a left or right angle
provides the best performance.
Follow the severe duty schedule in yourscheduled maintenance
informationfor engine oil and transmission fluid change intervals.
Driving Hints273
2013 F-250/350/450/550(f23)
Owners Guide gf, 3rd Printing, December 2012
USA(fus)
Page 283 of 577
GETTING THE SERVICES YOU NEED
Warranty repairs to your vehicle must be performed by an authorized
dealer. While any authorized dealer handling your vehicle line will
provide warranty service, we recommend you return to your selling
authorized dealer who wants to ensure your continued satisfaction.
Please note that certain warranty repairs require special training,
equipment or both, so not all authorized dealers are authorized to
perform all warranty repairs. This means that, depending on the
warranty repair needed, you may have to take your vehicle to
another authorized dealer.
A reasonable time must be allowed to perform a repair after taking your
vehicle to the authorized dealer. Repairs will be made using Ford or
Motorcraft parts, or remanufactured or other parts that are authorized by
Ford.
Away from Home
If you are away from home when your vehicle needs service, contact the
Ford Customer Relationship Center or use the online resources listed
below to find the nearest authorized dealer.
In the United States:
Mailing Address
Ford Motor Company
Customer Relationship Center
P.O. Box 6248
Dearborn, MI 48121
Telephone
1-800-392-3673 (FORD)
(TDD for the hearing impaired: 1-800-232-5952)
Online
Additional information and resources are available online at
www.fordowner.com.
These are some of the items that can be found online:
•U.S. Dealer Locator by Dealer Name, City/State, or Zip Code
•Owner Manuals
•Maintenance Schedules
•Recalls
•Ford Extended Service Plans
282Customer Assistance
2013 F-250/350/450/550(f23)
Owners Guide gf, 3rd Printing, December 2012
USA(fus)
Page 303 of 577
GENERAL INFORMATION
WARNING:Turn off the power running boards, if equipped,
before working under the vehicle, jacking or placing any object
under the vehicle. Never place your hand between the extended
running board and the vehicle. A moving running board may cause
injury.
Have your vehicle serviced regularly to help maintain its roadworthiness
and resale value. There is a large network of Ford authorized dealers
that are there to help you with their professional servicing expertise.
We believe that their specially trained technicians are best qualified to
service your vehicle properly and expertly. They are supported by a wide
range of highly specialized tools developed specifically for servicing your
vehicle.
To help you service your vehicle, we providescheduled maintenance
informationwhich makes tracking routine service easy.
If your vehicle requires professional service, your authorized dealer
can provide the necessary parts and service. Check your warranty
information to find out which parts and services are covered.
Use only recommended fuels, lubricants, fluids and service parts
conforming to specifications. Motorcraft® parts are designed and built to
provide the best performance in your vehicle.
Precautions
•Do not work on a hot engine.
•Make sure that nothing gets caught in moving parts.
•Do not work on a vehicle with the engine running in an enclosed
space, unless you are sure you have enough ventilation.
•Keep all open flames and other burning material (such as cigarettes)
away from the battery and all fuel related parts.
302Maintenance
2013 F-250/350/450/550(f23)
Owners Guide gf, 3rd Printing, December 2012
USA(fus)
Page 307 of 577
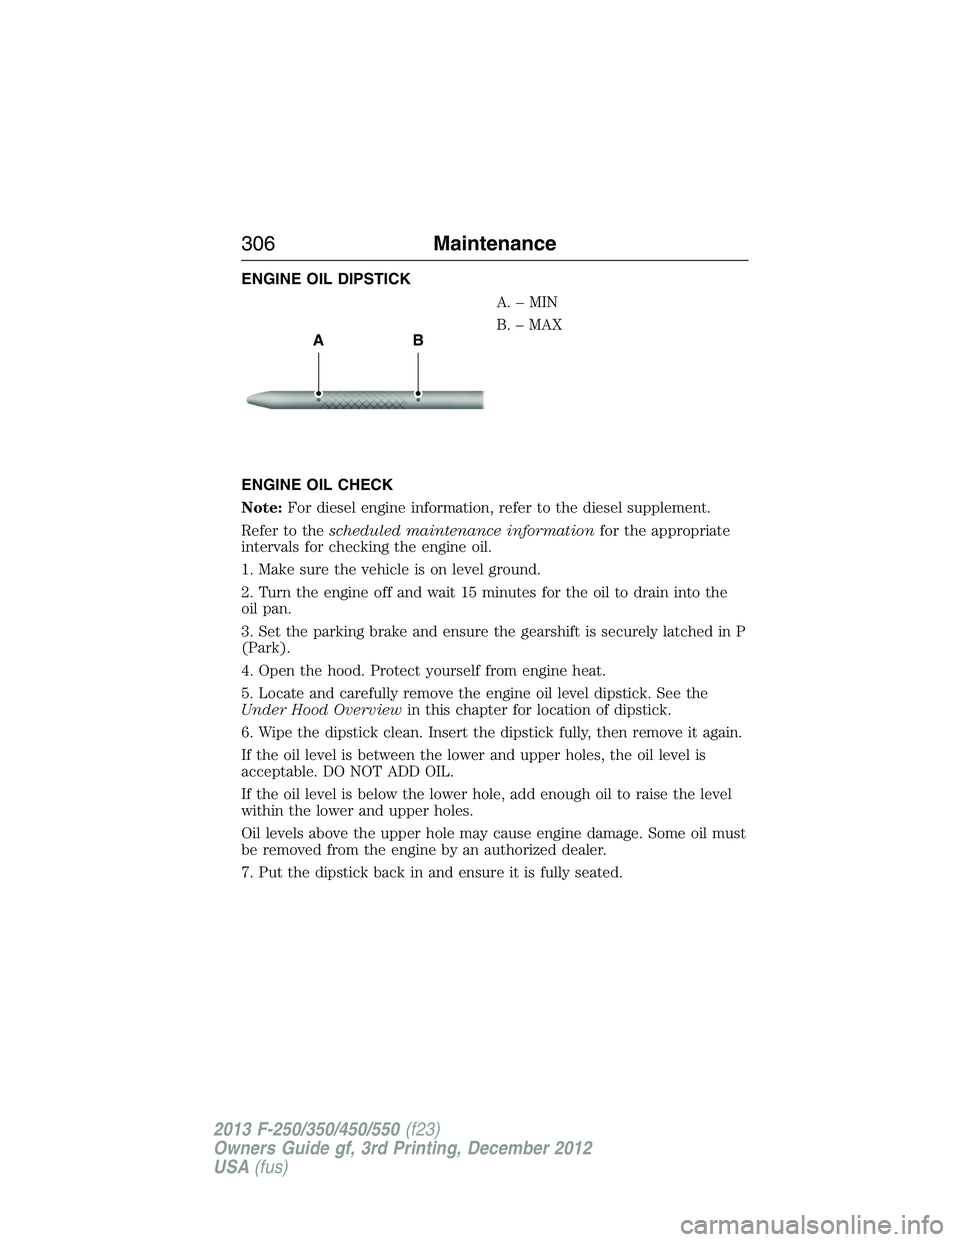
ENGINE OIL DIPSTICK
A.–MIN
B. – MAX
ENGINE OIL CHECK
Note:For diesel engine information, refer to the diesel supplement.
Refer to thescheduled maintenance informationfor the appropriate
intervals for checking the engine oil.
1. Make sure the vehicle is on level ground.
2. Turn the engine off and wait 15 minutes for the oil to drain into the
oil pan.
3. Set the parking brake and ensure the gearshift is securely latched in P
(Park).
4. Open the hood. Protect yourself from engine heat.
5. Locate and carefully remove the engine oil level dipstick. See the
Under Hood Overviewin this chapter for location of dipstick.
6. Wipe the dipstick clean. Insert the dipstick fully, then remove it again.
If the oil level is between the lower and upper holes, the oil level is
acceptable. DO NOT ADD OIL.
If the oil level is below the lower hole, add enough oil to raise the level
within the lower and upper holes.
Oil levels above the upper hole may cause engine damage. Some oil must
be removed from the engine by an authorized dealer.
7. Put the dipstick back in and ensure it is fully seated.
AB
306Maintenance
2013 F-250/350/450/550(f23)
Owners Guide gf, 3rd Printing, December 2012
USA(fus)
Page 308 of 577
Adding Engine Oil
Note:Do not remove the engine oil level dipstick or the filler cap when
the engine is running.
Note:Do not add engine oil further than the MAX mark. Oil levels above
the MAX mark may cause engine damage.
Only use oils certified for gasoline engines by the
American Petroleum Institute (API). An oil with this
trademark symbol conforms to the current engine
and emission system protection standards and fuel
economy requirements of the International Lubricants
Specification Advisory Council (ILSAC), comprised of
U.S. and Japanese automobile manufacturers.
1. Check the engine oil level.
2. If the engine oil level is not within the normal range, add engine oil
that meets Ford specifications. SeeCapacities and Specificationsfor
more information. Remove the engine oil filler cap and use a funnel to
pour the engine oil into the opening.
3. Recheck the engine oil level. Make sure the oil level is not above the
normal operating range on the engine oil level dipstick.
4. Install the dipstick and ensure it is fully seated.
5. Fully install the engine oil filler cap by turning the filler cap clockwise
until three clicks are heard or until the cap is fully seated.
ENGINE COOLANT CHECK
Checking the Engine Coolant
The concentration and level of engine coolant should be checked at the
intervals listed inscheduled maintenance information.
The coolant concentration should be maintained within 48% to 50%, which
equates to a freeze point between -30°F (-34°C) and -34°F (-37°C).
Note:For best results, coolant concentration should be tested with a
refractometer such as Rotunda tool 300-ROB75240 available from your
dealer. Ford does not recommend the use of hydrometers or coolant test
strips for measuring coolant concentrations.
Note:Make sure that the level is between the MIN and MAX marks on
the coolant reservoir.
Maintenance307
2013 F-250/350/450/550(f23)
Owners Guide gf, 3rd Printing, December 2012
USA(fus)
Page 314 of 577
TRANSMISSION FLUID CHECK
Checking Automatic Transmission Fluid (If Equipped)
Refer to yourScheduled Maintenance Informationfor scheduled
intervals for fluid checks and changes. Your transmission does not
consume fluid. However, the fluid level should be checked if the
transmission is not working properly, i.e., if the transmission slips
or shifts slowly or if you notice some sign of fluid leakage.
Automatic transmission fluid expands when warmed. To obtain an
accurate fluid check, drive the vehicle until it is at normal operating
temperature (approximately 20 miles [30 km]). Verify that the
transmission fluid temperature gauge, located on the instrument
cluster, is within normal range.
1. Drive the vehicle 20 miles (30 km) or until it reaches normal operating
temperature.
2. Park the vehicle on a level surface and engage the parking brake.
3. With the engine running, parking brake engaged and your foot on the
brake pedal, move the gearshift lever through all of the gear ranges.
Allow sufficient time for each gear to engage.
4. Latch the gearshift lever in P (Park) and leave the engine running.
5. Remove the dipstick, wiping it clean with a clean, dry lint free rag.
If necessary, refer toUnder Hood Overviewin this chapter for the
location of the dipstick.
6. Install the dipstick making sure it is fully seated in the filler tube.
7. Remove the dipstick and inspect the fluid level. The fluid should be
in the designated area for normal operating temperature or ambient
temperature.
Your vehicle is equipped with one of the following dipsticks.
Maintenance313
2013 F-250/350/450/550(f23)
Owners Guide gf, 3rd Printing, December 2012
USA(fus)