2013 FORD F250 buttons
[x] Cancel search: buttonsPage 139 of 577
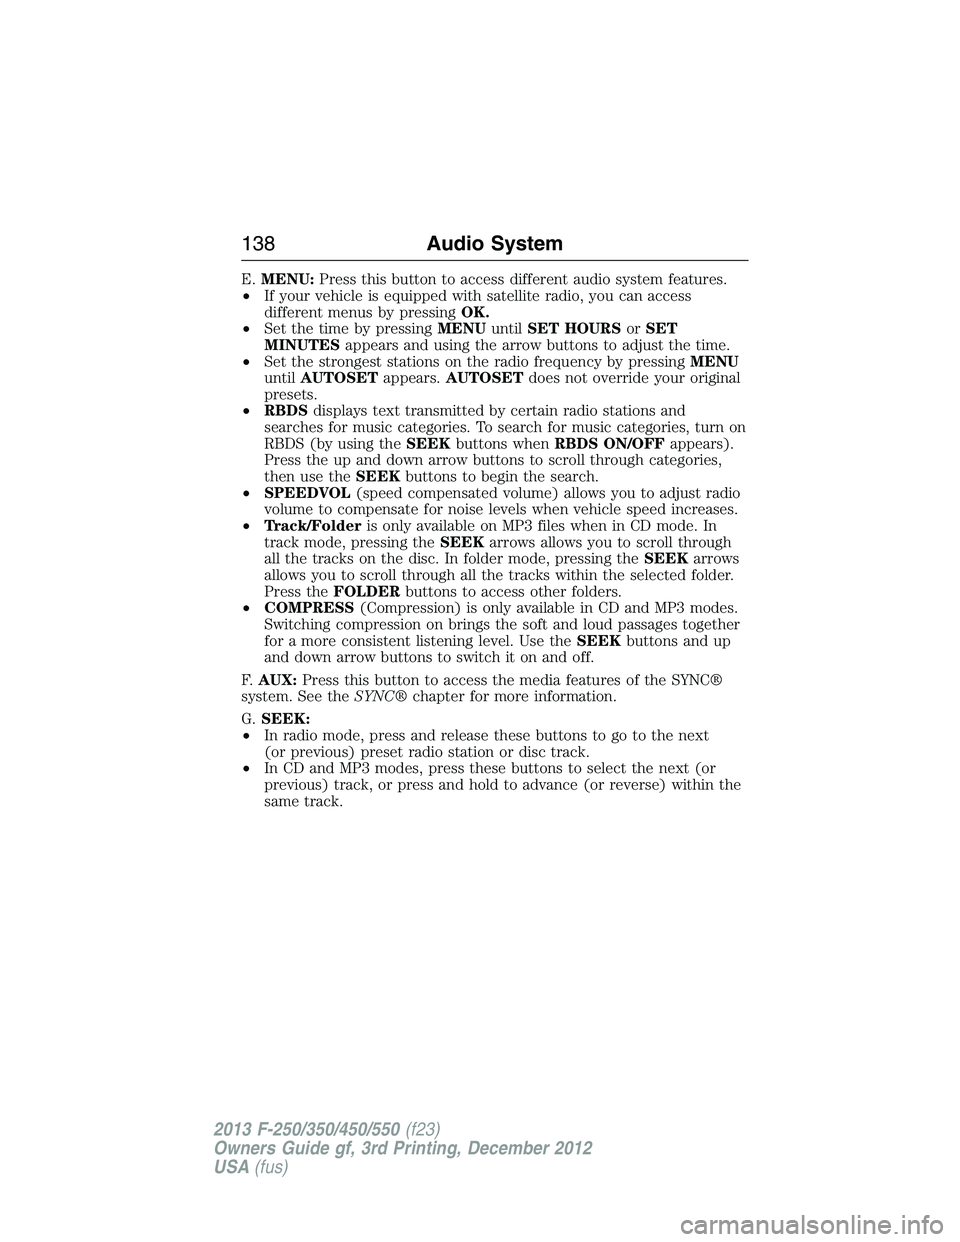
E.MENU:Press this button to access different audio system features.
•If your vehicle is equipped with satellite radio, you can access
different menus by pressingOK.
•Set the time by pressingMENUuntilSET HOURSorSET
MINUTESappears and using the arrow buttons to adjust the time.
•Set the strongest stations on the radio frequency by pressingMENU
untilAUTOSETappears.AUTOSETdoes not override your original
presets.
•RBDSdisplays text transmitted by certain radio stations and
searches for music categories. To search for music categories, turn on
RBDS (by using theSEEKbuttons whenRBDS ON/OFFappears).
Press the up and down arrow buttons to scroll through categories,
then use theSEEKbuttons to begin the search.
•SPEEDVOL(speed compensated volume) allows you to adjust radio
volume to compensate for noise levels when vehicle speed increases.
•Track/Folderis only available on MP3 files when in CD mode. In
track mode, pressing theSEEKarrows allows you to scroll through
all the tracks on the disc. In folder mode, pressing theSEEKarrows
allows you to scroll through all the tracks within the selected folder.
Press theFOLDERbuttons to access other folders.
•COMPRESS(Compression) is only available in CD and MP3 modes.
Switching compression on brings the soft and loud passages together
for a more consistent listening level. Use theSEEKbuttons and up
and down arrow buttons to switch it on and off.
F.AUX:Press this button to access the media features of the SYNC®
system. See theSYNC®chapter for more information.
G.SEEK:
•In radio mode, press and release these buttons to go to the next
(or previous) preset radio station or disc track.
•In CD and MP3 modes, press these buttons to select the next (or
previous) track, or press and hold to advance (or reverse) within the
same track.
138Audio System
2013 F-250/350/450/550(f23)
Owners Guide gf, 3rd Printing, December 2012
USA(fus)
Page 140 of 577
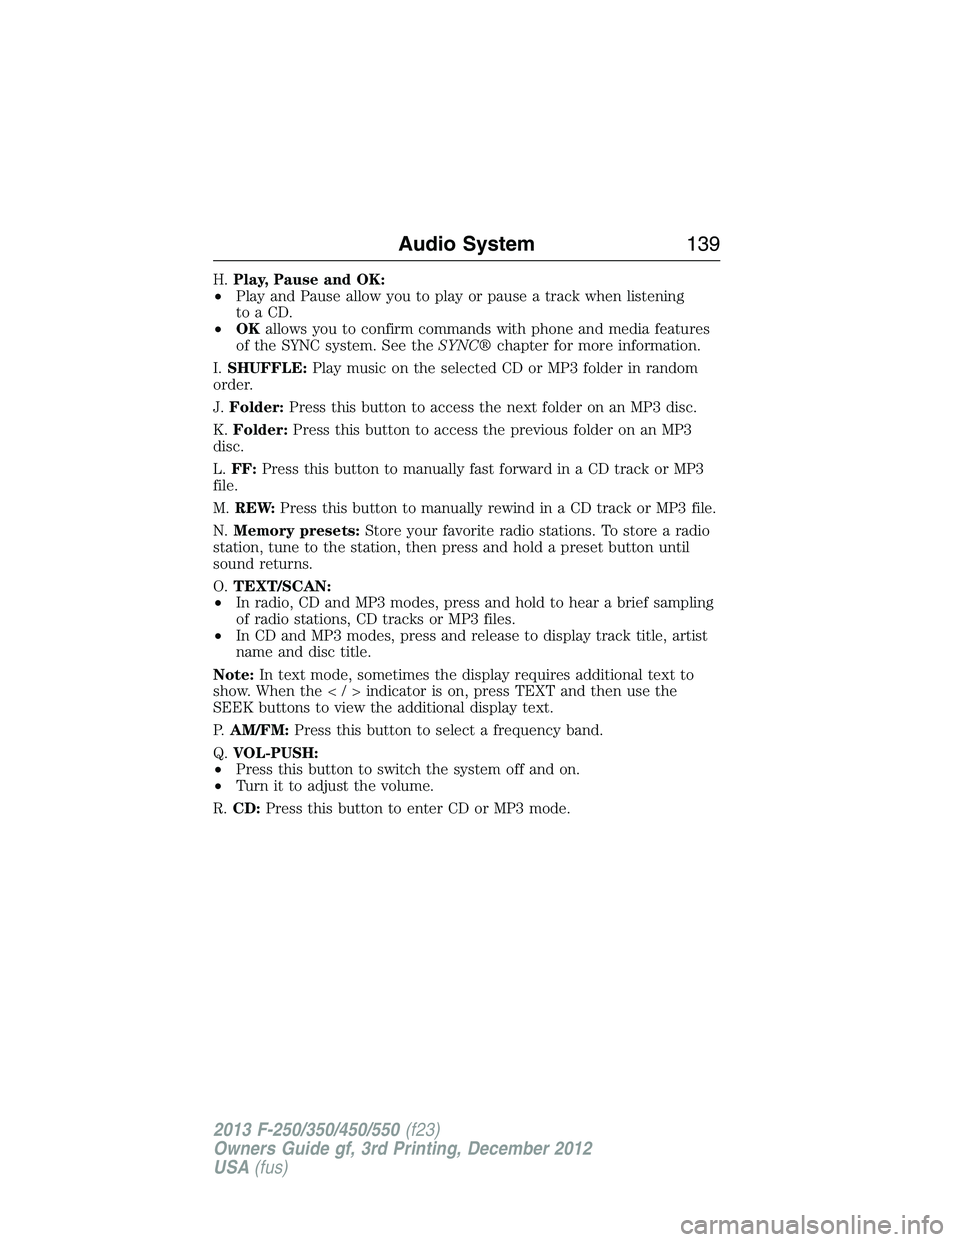
H.Play, Pause and OK:
•Play and Pause allow you to play or pause a track when listening
to a CD.
•OKallows you to confirm commands with phone and media features
of the SYNC system. See theSYNC®chapter for more information.
I.SHUFFLE:Play music on the selected CD or MP3 folder in random
order.
J.Folder:Press this button to access the next folder on an MP3 disc.
K.Folder:Press this button to access the previous folder on an MP3
disc.
L.FF:Press this button to manually fast forward in a CD track or MP3
file.
M.REW:Press this button to manually rewind in a CD track or MP3 file.
N.Memory presets:Store your favorite radio stations. To store a radio
station, tune to the station, then press and hold a preset button until
sound returns.
O.TEXT/SCAN:
•In radio, CD and MP3 modes, press and hold to hear a brief sampling
of radio stations, CD tracks or MP3 files.
•In CD and MP3 modes, press and release to display track title, artist
name and disc title.
Note:In text mode, sometimes the display requires additional text to
show. When theindicatorison,pressTEXT and then use the
SEEK buttons to view the additional display text.
P.AM/FM:Press this button to select a frequency band.
Q.VOL-PUSH:
•Press this button to switch the system off and on.
•Turn it to adjust the volume.
R.CD:Press this button to enter CD or MP3 mode.
Audio System139
2013 F-250/350/450/550(f23)
Owners Guide gf, 3rd Printing, December 2012
USA(fus)
Page 142 of 577
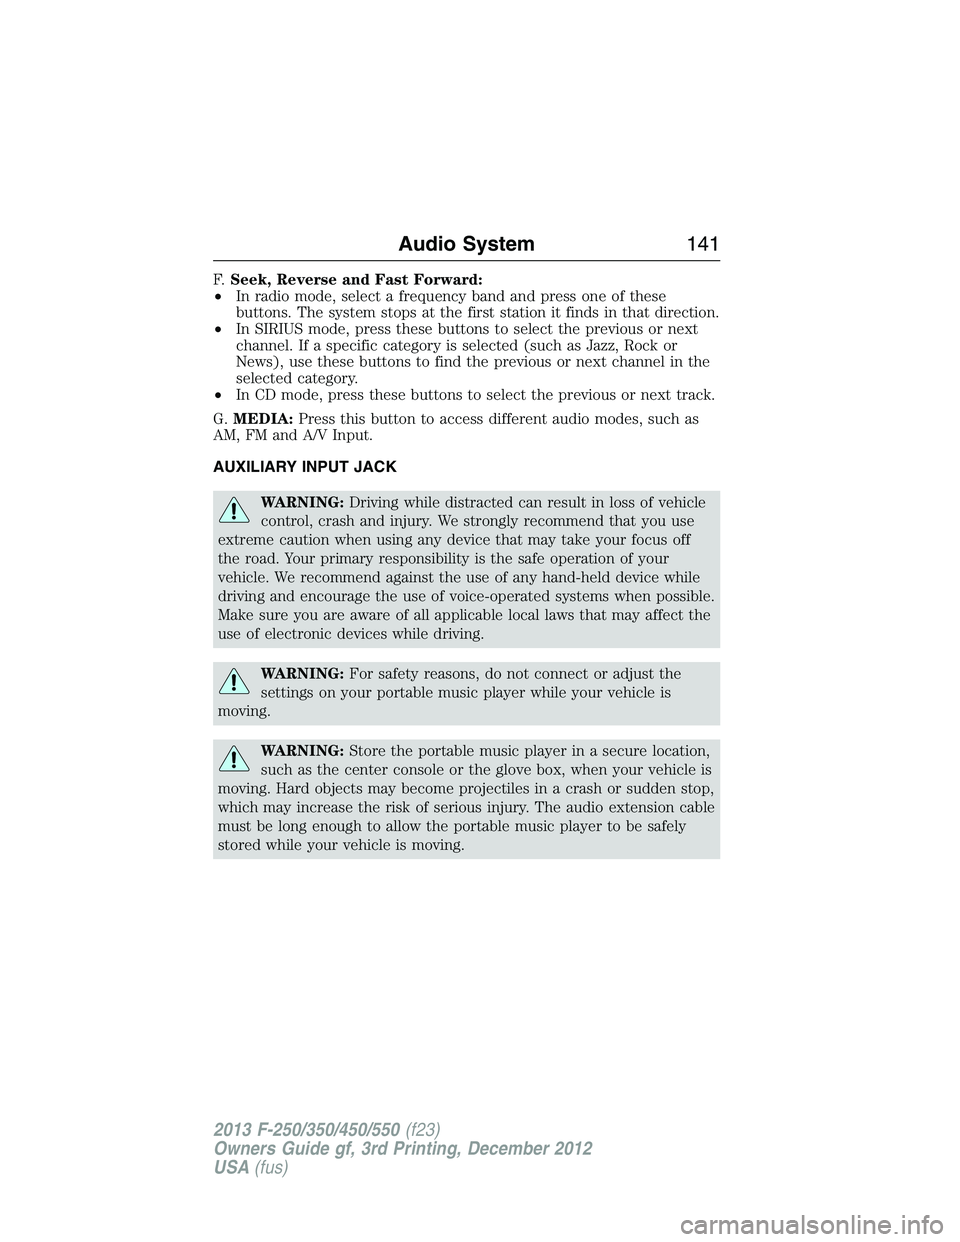
F.Seek, Reverse and Fast Forward:
•In radio mode, select a frequency band and press one of these
buttons. The system stops at the first station it finds in that direction.
•In SIRIUS mode, press these buttons to select the previous or next
channel. If a specific category is selected (such as Jazz, Rock or
News), use these buttons to find the previous or next channel in the
selected category.
•In CD mode, press these buttons to select the previous or next track.
G.MEDIA:Press this button to access different audio modes, such as
AM, FM and A/V Input.
AUXILIARY INPUT JACK
WARNING:Driving while distracted can result in loss of vehicle
control, crash and injury. We strongly recommend that you use
extreme caution when using any device that may take your focus off
the road. Your primary responsibility is the safe operation of your
vehicle. We recommend against the use of any hand-held device while
driving and encourage the use of voice-operated systems when possible.
Make sure you are aware of all applicable local laws that may affect the
use of electronic devices while driving.
WARNING:For safety reasons, do not connect or adjust the
settings on your portable music player while your vehicle is
moving.
WARNING:Store the portable music player in a secure location,
such as the center console or the glove box, when your vehicle is
moving. Hard objects may become projectiles in a crash or sudden stop,
which may increase the risk of serious injury. The audio extension cable
must be long enough to allow the portable music player to be safely
stored while your vehicle is moving.
Audio System141
2013 F-250/350/450/550(f23)
Owners Guide gf, 3rd Printing, December 2012
USA(fus)
Page 152 of 577

To aid in side window defogging and demisting in cold or humid weather:
1. Select Floor/Panel.
2. Select A/C.
3. Adjust the temperature control to maintain comfort.
4. Set the fan speed to the highest setting.
5. Direct the outer instrument panel vents toward the side windows.
6. To increase airflow to the outer instrument panel vents, close the
vents located in the middle of the instrument panel.
Dual Zone Automatic Temperature Control
•To reduce fog build-up on the windshield during humid weather, select
Defrost. Temperature and fan speed can also be increased to improve
clearing.
•To reduce humidity build-up inside the vehicle, do not drive with the
system off or with recirculated air engaged.
•Do not put objects under the front seats that will interfere with the
airflow to the back seats.
•Remove any snow, ice or leaves from the air intake area at the base of
the windshield.
•To improve the A/C cool down, drive with the windows slightly open
for 2-3 minutes after start-up or until the vehicle has been aired out.
•A small amount of air may be felt from the floor vent regardless of the
air distribution setting that is selected.
During extreme high ambient temperatures when idling stationary for
extended periods of time in gear, it is recommended to run the A/C in
the MAX A/C mode, adjust the blower fan speed to the lowest setting
and put the vehicle’s transmission into positionPto continue to receive
cool air from your A/C system.
For maximum cooling performance in AUTO or panel mode, press
MAX A/C.
For maximum cooling performance in panel/floor mode:
1. Choose the A/C and recirc buttons.
2. Set the temperature to LO.
3. Set the fan to the highest blower setting.
To aid in side window defogging and demisting in cold or humid weather:
1. Select Floor/Panel.
2. Select A/C.
3. Adjust the temperature control to maintain comfort.
4. Set the fan speed to the highest setting.
Climate Control151
2013 F-250/350/450/550(f23)
Owners Guide gf, 3rd Printing, December 2012
USA(fus)
Page 157 of 577
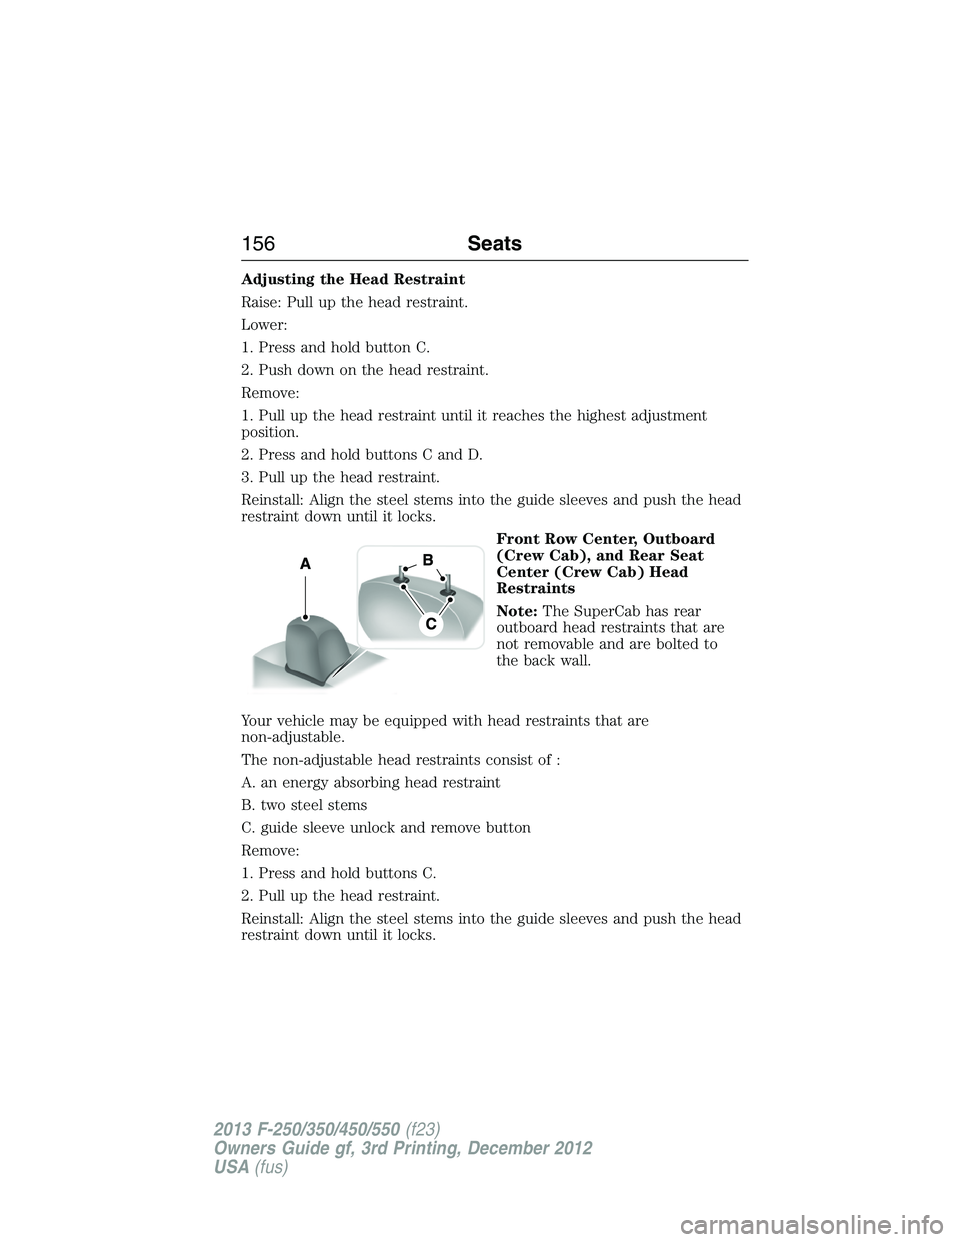
Adjusting the Head Restraint
Raise: Pull up the head restraint.
Lower:
1. Press and hold button C.
2. Push down on the head restraint.
Remove:
1. Pull up the head restraint until it reaches the highest adjustment
position.
2. Press and hold buttons C and D.
3. Pull up the head restraint.
Reinstall: Align the steel stems into the guide sleeves and push the head
restraint down until it locks.
Front Row Center, Outboard
(Crew Cab), and Rear Seat
Center (Crew Cab) Head
Restraints
Note:The SuperCab has rear
outboard head restraints that are
not removable and are bolted to
the back wall.
Your vehicle may be equipped with head restraints that are
non-adjustable.
The non-adjustable head restraints consist of :
A. an energy absorbing head restraint
B. two steel stems
C. guide sleeve unlock and remove button
Remove:
1. Press and hold buttons C.
2. Pull up the head restraint.
Reinstall: Align the steel stems into the guide sleeves and push the head
restraint down until it locks.
156Seats
2013 F-250/350/450/550(f23)
Owners Guide gf, 3rd Printing, December 2012
USA(fus)
Page 170 of 577
Note:Before you begin the programming process, park your vehicle in
front of the garage door opener motor or other device you want to
program.
Note:Make sure you keep the original remote control transmitter for
use in other vehicles as well as for future system programming.
Note:We recommend that upon the sale or lease termination of your
vehicle, you erase the programmed function buttons for security reasons.
SeeErasing the Function Button Codeslater in this section.
Note:You can program a maximum of three devices. To change or
replace any of the three devices after it has been initially programmed,
you must first erase the current settings. SeeErasing the Function
Button Codeslater in this section.
Note:Programming the system to a community gate will require a
unique set of instructions depending on the gate system model. Contact
the help line at 1-866-572-2728 for further information.
Note:If you accidently enter the program mode by pressing and
releasing the outer two buttons or all three buttons simultaneously, do
not press any button until the module times out after a few seconds and
resets to normal mode. When the module has timed out, all three LED
lamps will flash rapidly for a few seconds then turn off. Any settings
should remain as previously set.
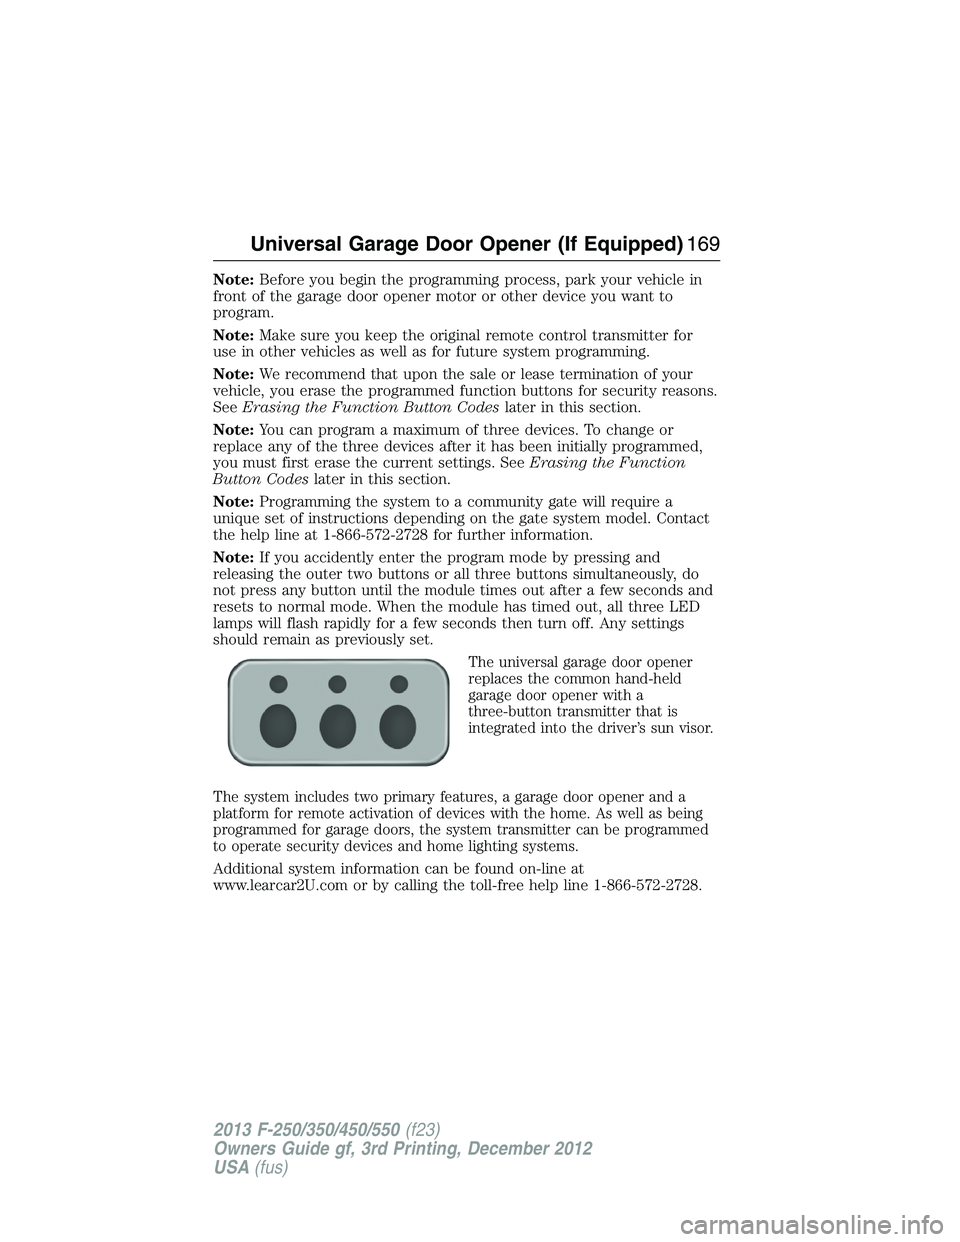
The universal garage door opener
replaces the common hand-held
garage door opener with a
three-button transmitter that is
integrated into the driver’s sun visor.
The system includes two primary features, a garage door opener and a
platform for remote activation of devices with the home. As well as being
programmed for garage doors, the system transmitter can be programmed
to operate security devices and home lighting systems.
Additional system information can be found on-line at
www.learcar2U.com or by calling the toll-free help line 1-866-572-2728.
Universal Garage Door Opener (If Equipped)169
2013 F-250/350/450/550(f23)
Owners Guide gf, 3rd Printing, December 2012
USA(fus)
Page 171 of 577
Rolling Code Programming
Note:If you do not follow the time-sensitive instructions, the device will
time out and you will have to repeat the complete procedure.
Note:It may be helpful to have another person assist you in
programming the transmitter.
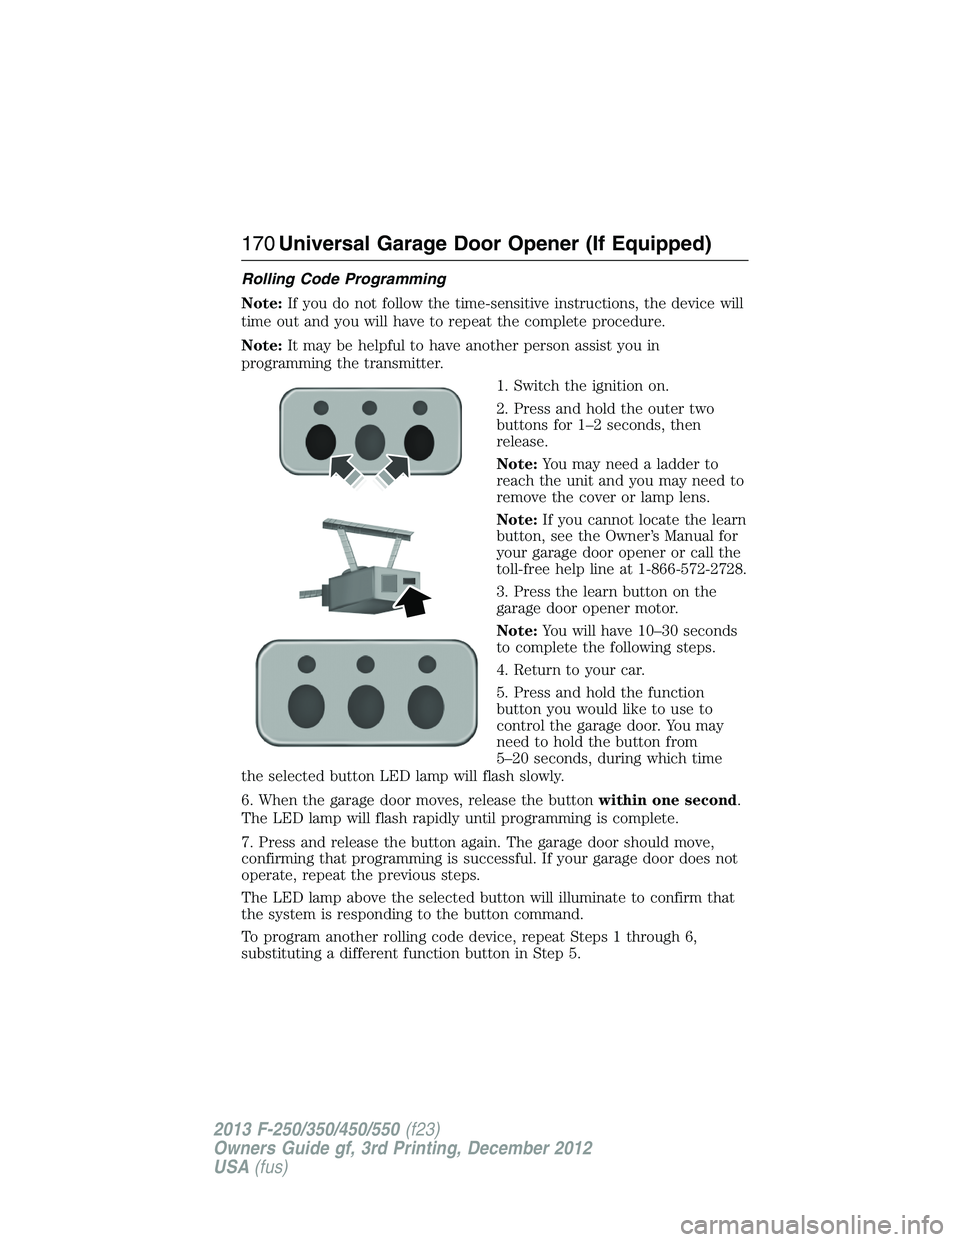
1. Switch the ignition on.
2. Press and hold the outer two
buttons for 1–2 seconds, then
release.
Note:You may need a ladder to
reach the unit and you may need to
remove the cover or lamp lens.
Note:If you cannot locate the learn
button, see the Owner’s Manual for
your garage door opener or call the
toll-free help line at 1-866-572-2728.
3. Press the learn button on the
garage door opener motor.
Note:You will have 10–30 seconds
to complete the following steps.
4. Return to your car.
5. Press and hold the function
button you would like to use to
control the garage door. You may
need to hold the button from
5–20 seconds, during which time
the selected button LED lamp will flash slowly.
6. When the garage door moves, release the buttonwithin one second.
The LED lamp will flash rapidly until programming is complete.
7. Press and release the button again. The garage door should move,
confirming that programming is successful. If your garage door does not
operate, repeat the previous steps.
The LED lamp above the selected button will illuminate to confirm that
the system is responding to the button command.
To program another rolling code device, repeat Steps 1 through 6,
substituting a different function button in Step 5.
170Universal Garage Door Opener (If Equipped)
2013 F-250/350/450/550(f23)
Owners Guide gf, 3rd Printing, December 2012
USA(fus)
Page 172 of 577
Fixed Code Programming
Note:It may be helpful to have another person assist you in
programming the transmitter.
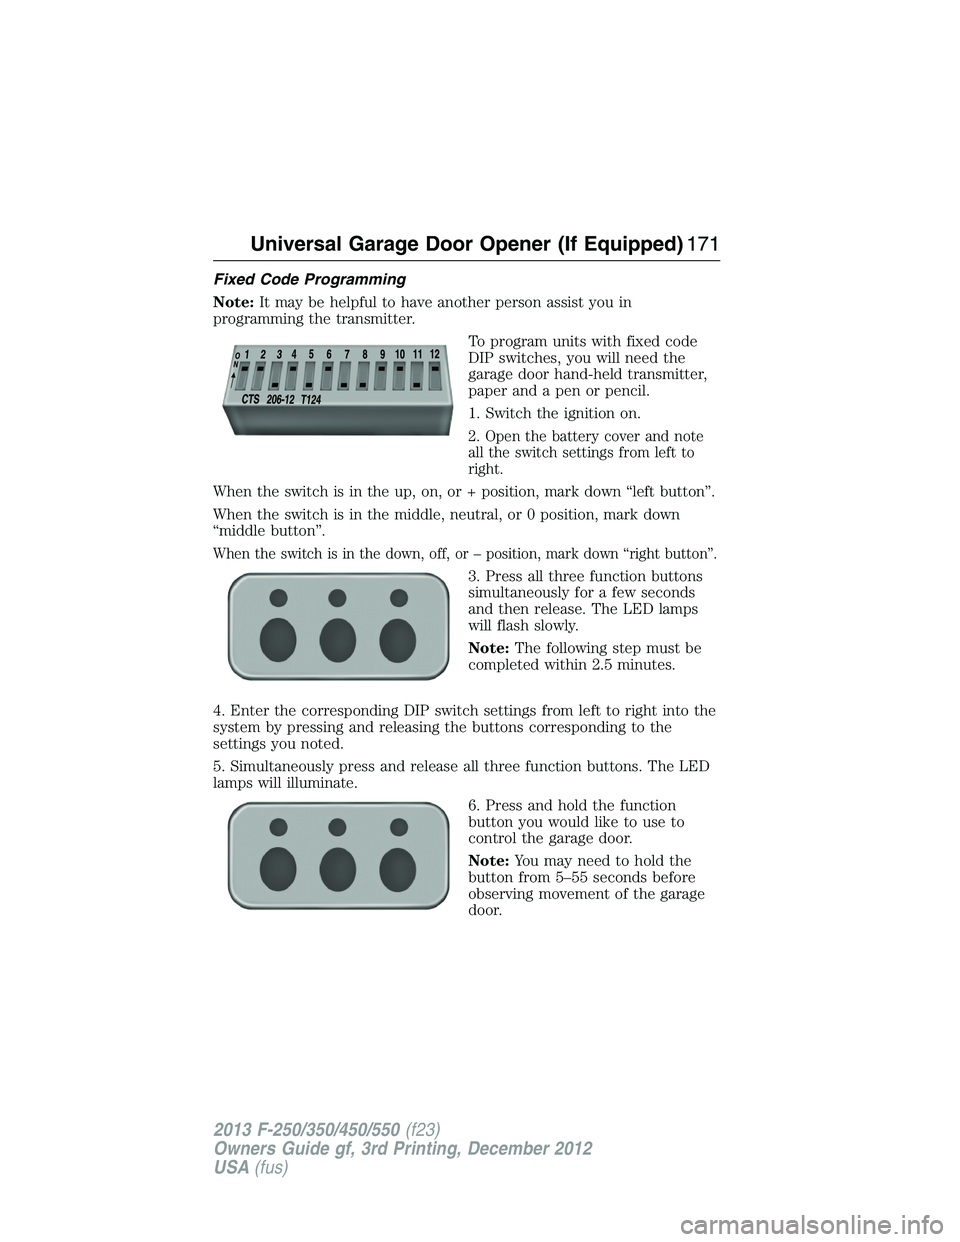
To program units with fixed code
DIP switches, you will need the
garage door hand-held transmitter,
paper and a pen or pencil.
1. Switch the ignition on.
2. Open the battery cover and note
all the switch settings from left to
right.
When the switch is in the up, on, or + position, mark down “left button”.
When the switch is in the middle, neutral, or 0 position, mark down
“middle button”.
When the switch is in the down, off, or – position, mark down “right button”.
3. Press all three function buttons
simultaneously for a few seconds
and then release. The LED lamps
will flash slowly.
Note:The following step must be
completed within 2.5 minutes.
4. Enter the corresponding DIP switch settings from left to right into the
system by pressing and releasing the buttons corresponding to the
settings you noted.
5. Simultaneously press and release all three function buttons. The LED
lamps will illuminate.
6. Press and hold the function
button you would like to use to
control the garage door.
Note:You may need to hold the
button from 5–55 seconds before
observing movement of the garage
door.
Universal Garage Door Opener (If Equipped)171
2013 F-250/350/450/550(f23)
Owners Guide gf, 3rd Printing, December 2012
USA(fus)