2013 FORD F SERIES MOTORHOME AND COMMERCIAL CHASSIS key
[x] Cancel search: keyPage 22 of 157
AUDIBLE WARNINGS AND INDICATORS
Headlamps On Warning Chime
Sounds when the headlamps or parking lamps are on, the ignition is off
(the key is not in the ignition) and the driver’s door is opened.
Fail-Safe Cooling Warning Chime
Sounds when the coolant gauge pointer has moved to hot. There are
three stages of chimes:
•Stage 1 is a single chime when the engine temperature begins to
overheat.
•Stage 2 is multiple chimes and engine power becomes limited in order
to help cool the engine.
•Stage 3 is multiple chimes and the engine will shut down.
Key In Ignition Warning Chime
Sounds when the key is left in the ignition in the off or accessory
position and the driver’s door is opened.
Information Display Chime
Sounds when some warning messages appear in the display for the first
time.
Parking Brake On Warning Chime
Sounds when you have left the parking brake on and you drive your
vehicle. If the warning chime remains on after you have released the
parking brake, have the system checked by your authorized dealer
immediately.
Instrument Cluster21
2013 Motorhome(mot)
Owners Guide gf, 1st Printing
USA(fus)
Page 29 of 157
IGNITION SWITCH
Note:When you switch the ignition off and leave your vehicle, do not
leave your key in the ignition. This could discharge your vehicle battery.
Note:To switch the engine off when your vehicle is moving, move the
transmission selector lever to positionN.Use the brakes to bring your
vehicle to a safe stop. After your vehicle has stopped, switch the engine
off and move the transmission selector lever to positionP.Turn the key
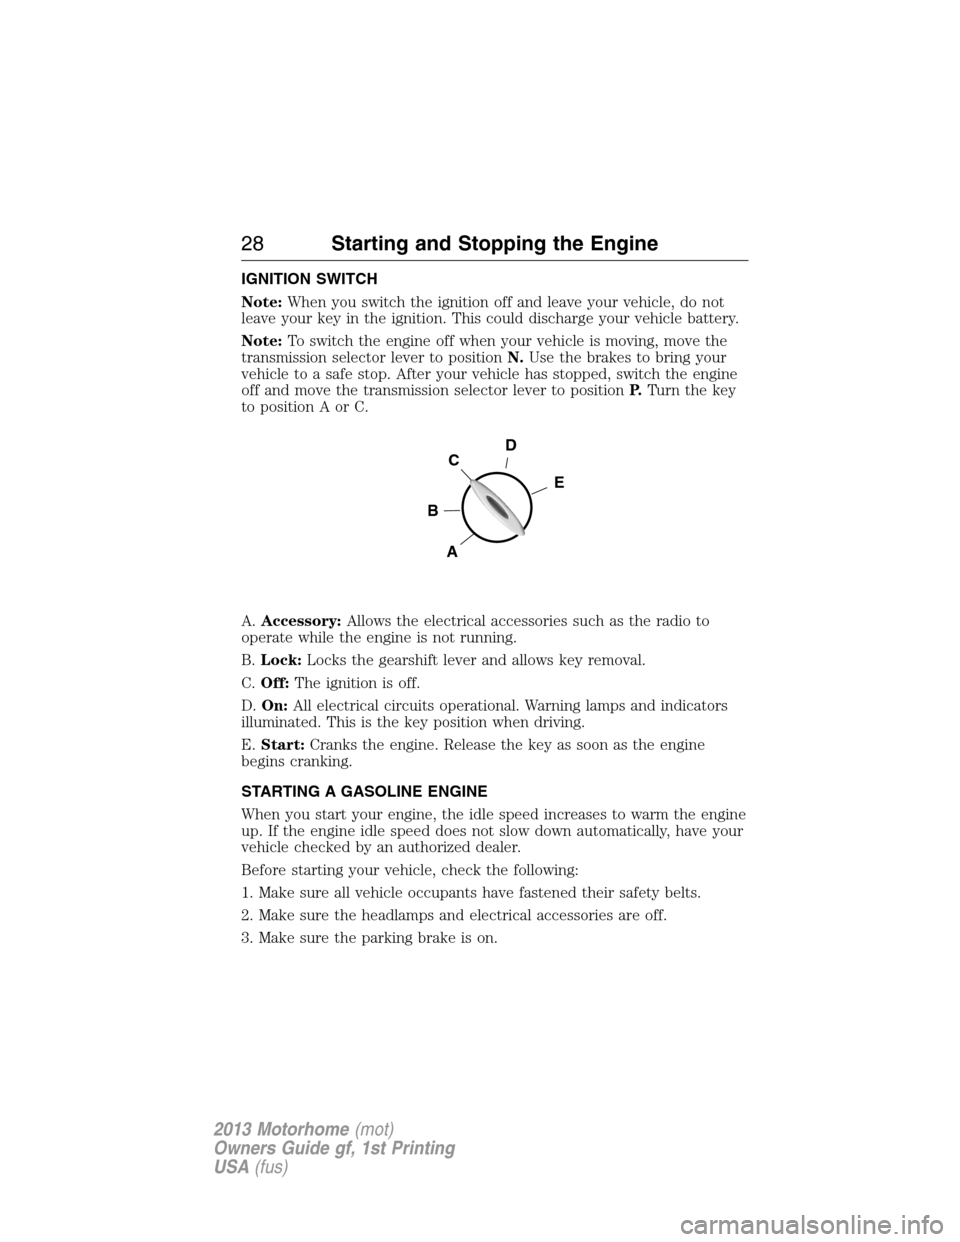
to position A or C.
A.Accessory:Allows the electrical accessories such as the radio to
operate while the engine is not running.
B.Lock:Locks the gearshift lever and allows key removal.
C.Off:The ignition is off.
D.On:All electrical circuits operational. Warning lamps and indicators
illuminated. This is the key position when driving.
E.Start:Cranks the engine. Release the key as soon as the engine
begins cranking.
STARTING A GASOLINE ENGINE
When you start your engine, the idle speed increases to warm the engine
up. If the engine idle speed does not slow down automatically, have your
vehicle checked by an authorized dealer.
Before starting your vehicle, check the following:
1. Make sure all vehicle occupants have fastened their safety belts.
2. Make sure the headlamps and electrical accessories are off.
3. Make sure the parking brake is on.
D
E
C
B
A
28Starting and Stopping the Engine
2013 Motorhome(mot)
Owners Guide gf, 1st Printing
USA(fus)
Page 30 of 157
4. Move the transmission selector lever to positionP.
5. Turn the ignition key to position D.
Note:Vehicle speed is limited to either 65 mph (105 km/h) or 75 mph
(120 km/h).
Note:Do not touch the accelerator pedal.
1. Move the transmission selector lever to positionPorN.
2. Fully press the brake pedal.
3. Start the engine, then release the key as soon as the engine begins
cranking. The engine may continue cranking for up to 10 seconds or
until it starts.
Note:If you cannot start your engine, wait for a short period of time
and try again.
If you cannot start your engine after three attempts, press the
accelerator to the floor until the engine begins to accelerate.
Guarding against Exhaust Fumes
WARNING:If you smell exhaust fumes inside your vehicle, have
your dealer inspect your vehicle immediately. Do not drive if you
smell exhaust fumes. Carbon monoxide is present in exhaust fumes.
Take precautions to avoid its dangerous effects.
Important Ventilating Information
If you stop your vehicle and leave the engine idling for long periods of
time, we recommend that you do one of the following:
•Open the windows at least one inch (2.5 centimeters)
•Set your climate control to outside air.
Starting and Stopping the Engine29
2013 Motorhome(mot)
Owners Guide gf, 1st Printing
USA(fus)
Page 39 of 157
Readiness for Inspection/Maintenance (I/M) Testing
Some state/provincial and local governments may have
Inspection/Maintenance (I/M) programs to inspect the emission control
equipment on your vehicle. Failure to pass this inspection could prevent
you from getting a vehicle registration.
If the service engine soon indicator is on or the bulb does not
work, the vehicle may need to be serviced. Refer toOn-board
diagnostics (OBD-II)in this chapter.
Your vehicle may not pass the I/M test if the service engine soon
indicator is on or not working properly (bulb is burned out), or if the
OBD-II system has determined that some of the emission control systems
have not been properly checked. In this case, the vehicle is considered
not ready for I/M testing.
If the vehicle’s engine or transmission has just been serviced, or the
battery has recently run down or been replaced, the OBD-II system may
indicate that the vehicle is not ready for I/M testing. To determine if the
vehicle is ready for I/M testing, turn the ignition key to the on position
for 15 seconds without cranking the engine. If the service engine soon
indicator blinks eight times, it means that the vehicle is not ready for I/M
testing; if the service engine soon indicator stays on solid, it means that
the vehicle is ready for I/M testing.
The OBD-II system is designed to check the emission control system
during normal driving. A complete check may take several days. If the
vehicle is not ready for I/M testing, the following driving cycle consisting
of mixed city and highway driving may be performed:
15 minutes of steady driving on an expressway/highway followed by
20 minutes of stop-and-go driving with at least four 30-second idle
periods.
Allow the vehicle to sit for at least eight hours without starting the
engine. Then, start the engine and complete the above driving cycle. The
engine must warm up to its normal operating temperature. Once started,
do not turn off the engine until the above driving cycle is complete. If
the vehicle is still not ready for I/M testing, the above driving cycle will
have to be repeated.
38Fuel and Refueling
2013 Motorhome(mot)
Owners Guide gf, 1st Printing
USA(fus)
Page 40 of 157
AUTOMATIC TRANSMISSION OPERATION
Understanding the shift positions of the 5–speed automatic
transmission
This vehicle is equipped with an adaptive transmission shift strategy.
Adaptive transmission shift strategy offers the optimal transmission
operation and shift quality. When the vehicle’s battery has been
disconnected for any type of service or repair, the transmission will need
to relearn the normal shift strategy parameters, much like having to reset
your radio stations when your vehicle battery has been disconnected.
The adaptive transmission shift strategy allows the transmission to
relearn these operating parameters. This learning process could take
several transmission upshifts and downshifts; during this learning
process, slightly firmer shifts may occur. After this learning process,
normal shift feel and shift scheduling will resume.
P (Park)
This position locks the transmission and prevents the rear wheels from
turning.
To put your vehicle in gear:
1. Start the engine
2. Press the brake pedal
3. Move the gearshift lever into the desired gear
To put your vehicle in P (Park):
1. Come to a complete stop
2. Move the gearshift lever and securely latch it in P (Park)
WARNING:Always set the parking brake fully and make sure
the gearshift is latched in P (Park). Turn the ignition to the lock
position and remove the key whenever you leave your vehicle.
Transmission39
2013 Motorhome(mot)
Owners Guide gf, 1st Printing
USA(fus)
Page 43 of 157
Brake-shift interlock
WARNING:To prevent vehicle movement when following this
procedure, park on a level surface, ensure parking brake is set,
and block the rear wheels.
WARNING:If your brake lamps are not working properly or if
you have disconnected the vehicle battery cables, the vehicle
brake lamps and hazard flashers may not properly warn traffic of a
vehicle breakdown or approaching danger, which can increase the risk
of serious injury or death. To minimize the risk of serious injury or
death, be aware of your surroundings, use other hazard signaling
devices if available, and move the vehicle to a safe location away from
traffic as soon as possible.
WARNING:Do not drive your vehicle until you verify that the
brake lamps are working.
WARNING:Always set the parking brake fully and make sure
the gearshift is latched in P (Park). Turn the ignition to the lock
position and remove the key whenever you leave your vehicle.
WARNING:If the parking brake is fully released, but the brake
warning lamp remains illuminated, the brakes may not be
working properly. See your authorized dealer.
The vehicle is equipped with a brake-shift interlock feature that prevents
the gearshift lever from being moved from P (Park) unless the brake
pedal is pressed.
If you cannot move the gearshift lever out of P (Park) position with the
ignition in the 4 (on) position and the brake pedal pressed, a
malfunction may have occurred. It is possible that a fuse has blown or
the vehicle’s brake lamps are not operating properly. Refer toFuses and
relaysin theRoadside Emergencieschapter. If the fuses and brake
lamps are working properly, and the vehicle still will not shift out of (P)
Park, see your authorized dealer for service.
42Transmission
2013 Motorhome(mot)
Owners Guide gf, 1st Printing
USA(fus)
Page 44 of 157
In an emergency, to disable the malfunctioning brake-shift interlock
feature in order to shift the vehicle from P (Park) follow these steps:
1. Apply the parking brake. Turn key to the lock position, and then
remove the key.
2. Disconnect the negative (black) battery cable from the battery.
3. Insert the key and turn to the off position. Shift to N (Neutral).
4. Reconnect the negative (black) battery cable to the battery.
5. Start the vehicle.
See your authorized dealer for service immediately.
If Your Vehicle Gets Stuck in Mud or Snow
Note:Do not rock the vehicle if the engine is not at normal operating
temperature or damage to the transmission may occur.
Note:Do not rock the vehicle for more than a minute or damage to the
transmission and tires may occur, or the engine may overheat.
If your vehicle gets stuck in mud or snow, it may be rocked out by
shifting between forward and reverse gears, stopping between shifts in a
steady pattern. Press lightly on the accelerator in each gear.
Transmission43
2013 Motorhome(mot)
Owners Guide gf, 1st Printing
USA(fus)
Page 46 of 157
Note:For Hydromax-equipped vehicles operating under normal
conditions, the noise of the fluid flowing through the booster may be
heard whenever the brake is applied. This condition is normal. Vehicle
service is not required.
If braking performance or pedal response becomes very poor, even when
the pedal is strongly pressed, it may indicate the presence of air in the
hydraulic system or leakage of fluid. Stop the vehicle safely as soon as
possible and seek service immediately.
HINTS ON DRIVING WITH ANTI-LOCK BRAKES
When the system is operating, the brake pedal will pulse and may travel
further. Maintain pressure on the brake pedal. You may also hear a noise
from the system. This is normal.
The ABS will not eliminate the dangers inherent when:
•you drive too closely to the vehicle in front of you.
•your vehicle is hydroplaning.
•you take corners too fast.
•the road surface is poor.
PARKING BRAKE
WARNING:Always set the parking brake fully and make sure
the transmission selector lever is placed in position P. Turn the
ignition to the lock position and remove the key whenever you leave
your vehicle.
Apply the parking brake whenever the vehicle is parked. Press pedal
downward to set the parking brake.
The BRAKE warning lamp in the instrument cluster illuminates when the
ignition is turned on until the parking brake is released.
The parking brake is not recommended to stop a moving vehicle.
However, if the normal brakes fail, the parking brake can be used to stop
your vehicle in an emergency. Since the parking brake applies only the
transmission mounted parking brake assembly, the vehicle’s stopping
distance will increase greatly and the handling of your vehicle will be
adversely affected.
To release the parking brake:
1. Press the foot brake pedal firmly.
2. Pull the parking brake release lever.
Brakes45
2013 Motorhome(mot)
Owners Guide gf, 1st Printing
USA(fus)